The roof rafter frame is only part of the necessary lumber that is needed to build your own home.
In addition to this, you still need to use quite a lot of material in order to make high-quality and correct sheathing for the roofing material.
This roof element is very important , therefore, when constructing it, you must adhere to established building rules and regulations, depending on the materials chosen.
In this article you will learn what the sheathing is and how to install it correctly.
Lathing: purpose and features
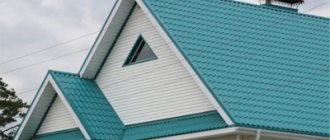
The roof, as part of the structure, plays a dual role - it protects living quarters from the vagaries of the weather, while at the same time being an important decorative element. The construction market offers a wide range of roofing materials that cope equally well with these two tasks. In order for the roof covering to lie correctly and reliably, a lot of preliminary work is done to prepare the base; One of its important parts is the sheathing.
Lathing is usually called a structure that is mounted on top of the rafters (the main, supporting roof system) and is characterized by the following properties:
- Strengthens the roof structure , distributing the load from the roofing material and thereby extending its service life.
- It can take the form of a lattice of lumber (laid in various ways into a category) or continuous flooring , the design is determined by the type of roofing material.
Arrangement methods Source legkovmeste.ru
- Continuous sheathing is required in those areas of the rafter structure that bear the maximum (or, in the winter season, additional) load. As a rule, reinforcement is required for eaves overhangs, valleys, ridges and other places where slopes join.
- Reinforced sheathing is recommended in places where snow guards, stairs, and solar panels are attached.
- It is made from boards (preferably edged and tongue-and-groove), timber, board materials or high-quality plywood . In recent years, profile-type ventilated metal lathing (special thin-walled purlins with holes) has become widespread.
- Roof lathing should be distinguished from counter lathing . The function of the latter is to form a ventilation gap for the waterproofing layer. The counter-lattice is placed on rafters protected by hydrobarrier material.
Roof with counter-lattice Source superarch.ru
We install the counter-lattice
Tools required for installation of counter battens and sheathing:
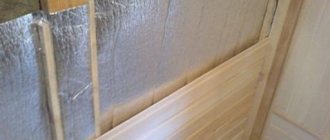
The counter-lattice creates a ventilated area under the roof.
- marker;
- long rail;
- roulette;
- hammer;
- galvanized nails (for counter-lattice);
- screwdriver;
- self-tapping screws;
- bars 30-50 x 1350-1370 mm (for counter-lattice);
- bars 50 x 50 mm;
- boards 32 x 100 mm (for lathing).
When installing a metal tile roof using a waterproofing and thermal insulation layer, it is necessary to install a counter-lattice. This will improve the quality of the roof, as additional noise and heat insulation will be created, and good ventilation will be created for the under-roof space. If miscalculations were made when installing the rafters, then using this design you can level the horizontal plane of the slope.
To install the counter-lattice, it is necessary to use smooth bars or boards that are not blue and free of knots. Depending on the roofing material and the slope of the roof, the cross-section of the bars for its installation also varies. For roofs with a slope of less than 30, bars with a large cross-section are used, since on roofs with a small slope the weight of the roofing material puts a large load on the entire area of the roof slope.
Roof structure diagram.
The bars for the counter-lattice are taken with a length of no more than 1.5 m (on average 1350-1370 mm) and with a cross-section of 30-50 mm. If the roof has a complex structure and a long rafter legs, then the bars for it are taken with a cross-section of 50-50 mm. The pitch of the counter-lattice must coincide with, because it is installed directly on them on top of the hydro- and vapor barrier layer. The bars for the counter-lattice are fastened with galvanized nails, observing a pitch of 300 mm.
To obtain a high-quality and durable connection, the upper ends of the bars from opposite slopes must be joined by sawing during installation. This will allow you to more accurately calculate the pitch of the sheathing and correctly mount the block of the top row of covering (ridge). To do this, it is necessary to saw the ridge bars at the required angle on opposite slopes so that the planes of the upper edges of the sheathing intersect at a single point.
Types of structures
The roof structure provides for one of two types of sheathing - solid or sparse; which one to prefer is decided in each specific case after choosing the finishing coating. Features of these types are characterized by the following parameters:
Continuous sheathing
Moisture-resistant sheet material (FSF or OSB) is laid with a gap not exceeding 1 cm. This indentation makes it possible to compensate for changes in the linear dimensions of the material during operation (with increasing humidity and air temperature, expansion occurs and vice versa).
For arranging a continuous sheathing, it is preferable to choose sheets rather than boards. The advantage of this choice is a perfectly flat surface, free from changes that are inevitable when using boards. A solid base also has some disadvantages:
- Cost . Plywood and board material (OSB) are more expensive than boards, so the construction of such a base will lead to an increase in the construction budget.
Solid plank sheathing Source krysha-expert.ru
- The appearance of condensation . Dense installation makes it difficult for air to circulate under the roof. If a ventilation gap is not provided, moisture will inevitably begin to linger in the roofing pie, which will negatively affect its quality and destroy the insulation (if it is provided).
- Necessity . A solid base is a technological necessity for flexible tiles. For metal tiles, it is more logical to arrange a sparse sheathing; it will be more practical and economical.
Sparse lathing
Regardless of the design features of the roof, the optimal lumber for a sparse structure (for most roofing coverings) is considered to be:
- A block with a cross section of 5x5 or 6x6 cm.
- Board for roof sheathing, 2-4 cm thick.
- Quality . A necessary condition is the choice of wood of at least grade 2. Knots and other defects on low-grade lumber can eventually cause some elements to break under the weight of snow. Another condition is that you should purchase well-dried wood. Raw lumber will certainly begin to deform, and fasteners (nails, screws) will weaken and begin to fall out.
Discharged lathing Source kabanchik.ua
The spacing of the lathing, mounted in disparity, is selected taking into account the selected finishing coating; it varies within fairly narrow limits. This base is suitable for laying ceramic tiles, corrugated slate, and metal tiles.
Antiseptic for wooden sheathing
Even if the roof is impeccable and does not allow water to pass through, the wood in the roofing pie and rafter system is subject to the adverse effects of humidity and temperature changes, which provokes the formation of fungi and mold. Mice and woodworms happily inhabit the roofing pie. Wood is a fire hazard.
To avoid this, you need high-quality impregnation. It must resist all these dangers and penetrate deeply into the structure of the wood, not contain substances harmful to humans (arsenic, copper sulfate), dissolve well in water, and not wash off for a long time.
In our climatic conditions and the conditions of a particular house, we need to choose what is more important - resistance to moisture or fire . Wood is impregnated only once. And the first composition will be the main one in action. Coatings applied in the second and third stages will work weaker.
There are two methods for applying antiseptics.
- Impregnation is the immersion of wooden elements in a bath or other reservoir with a composition. Usually applied before lumber is sold. But it can also be done at home, for which the manufacturer indicates on the can the required time, which for small and medium-sized lumber is 30–60 minutes, but can reach up to 4 hours.
- Manual processing - spraying or painting, which saves the composition, but the efficiency is reduced.
Processing lumber manually does not ensure deep penetration of impregnation, but it saves its quantity
An antiseptic is protection against fungus (fungicide), microbes (biocide), insects (insecticide) in one bottle. The composition of a good antiseptic should be completely harmless to humans. Antiseptics for external parts include a coloring alkyd resin.
I can confidently recommend the water-based antiseptic “Senezh”. It comes in different series for different designs - “Ultra”, “Bio”, “Thor”, “Sauna”. We treated the rafters, floor beams, and sheathing with the “Ultra” variety. "Senezh" is easily applied with a spray gun. With a small consumption of the product, only slightly higher than stated (250-300 g/m3), the impregnation by eye turned out to be of high quality and even decorated the wood. The manufacturer promises bioprotection for up to 35 years and a “healing” effect for already damaged wood. About ten years have passed and there is no reason to complain yet.
I did some market research. It showed that, in addition to Senezh, Pinotex Impra and Pinotex Ultra products produced in Estonia are popular, as they are highly effective and have a decorative effect. But unlike Senezh, they cannot be used on wood already affected by microorganisms. And the domestic product “Drevotex” protects from atmospheric influences and the sun, gives a beautiful appearance to the product, but has restrictions on the moisture content of the lumber: it cannot be applied if the humidity is more than 20%.
Table: comparative characteristics and prices of antiseptic impregnations
| Name | Characteristics | Quantity per package, l | Average price per liter, rub. |
| Pinotex Ultra | Protects against fungi, rot and mold, weathering, UV rays | 9 | 420 |
| Pinotex Impra | Protects deep layers of wood from ground moisture, mold, blue stains and rot | 10 | 520 |
| "Senezh Ultra" | Protects against rot, mildew, blue stain and woodworms indoors and outdoors | 10 | 60 |
| "Senezh Bio" | Protects against rot, mold, blue stains and woodworms in contact with humans and animals and in the open air in particularly difficult conditions | 10 | 78 |
| "Drevotex" | Forms a weather-resistant and UV-resistant elastic coating | 10 | 230 |
Photo gallery: several types of antiseptics
"Drevotex" is inferior to "Senezh" both in functions and in efficiency
Pinotex Ultra is considered a rather expensive, but high-quality antiseptic with a wide spectrum of action
"Senezh Ultra" is the most affordable domestic antiseptic
"Senezh Bio" can be used not only for roofing, but also when laying wooden parts in the ground
Pinotex Impra is used for impregnation of hidden structures
About materials
In country house construction, when constructing a base for a finishing coating, the following materials and their combinations are considered suitable:
Sheet (panel) materials
With their help, you can quickly prepare a large area, the resulting base is perfectly flat. When installing the roof, the following materials are used:
- Fiberboard (fibreboard). Board material obtained from wood fibrous raw materials in several ways (may contain resin additives). Products are marked by density and hardness.
- Chipboard (chipboard). The product is obtained by hot pressing a mixture of chips and resin. Plates can have one or more layers and different bending and deformation strengths.
Using sheet materials saves time Source rubankom.com
- OSB (oriented strand board). Multilayer material; In each layer, chips mixed with resin are arranged in a different orientation. This manufacturing feature ensures high practical reliability, due to which OSB sheets most often serve as the basis for finishing coatings.
- FSF . It is obtained by gluing veneer sheets (thin sheets of pine or birch wood). This type of plywood is characterized by high water resistance and wear resistance, which allows it to be successfully used in roofing installations.
Advantages of using sheet materials:
- The best option for soft roofing materials .
- Budget cost.
- The slabs raised onto the roof are easily and quickly installed .
The disadvantages include the following features:
- Plates, like any wooden material, need to be pre-treated with an antiseptic and fire retardant.
- Installation of roof sheathing is carried out in dry weather , otherwise sheets soaked in moisture are likely to become deformed.
- It is not very convenient the slabs onto the roof.
Installation of OSB board Source rodnik-group.ru
See also: Catalog of companies that specialize in roof repair and design.
Board and timber
Lumber, which serves as the main raw material for arranging sheathing. Their characteristics are subject to the following conditions:
- Optimal choice . Edged or tongue and groove board; It is advisable to choose products made from softwood with a moisture content not exceeding 20%. An economical option is a slab, which is laid flat side up.
- It is recommended to use products no wider than 15 cm - wider ones are more susceptible to warping.
- Basic rule of fastening : when organizing a continuous sheathing, leave a gap of 3-5 mm; for sparse sheathing, the fastening step is calculated in advance.
- Fastening elements . Nails are used for fastening to the rafters; their length is selected as twice the thickness of the board (beam).
- For a structure with a wide rafter pitch (more than 80 cm), it is more practical and reliable to replace the roof board with timber (with dimensions from 5x5 cm). For the counter-lattice, take a 3x5 cm beam.
Methods of fastening boards and beams Source plotnikov-pub.ru
- The lumber is not only dried, but also treated to protect it from rot and insect pests.
The advantages of using lumber are their budget cost, environmental friendliness and low weight, which makes lifting them onto the roof easy. The following are considered negative aspects of use:
- Requires professional installation skills .
- Mandatory additional treatment to protect against mold and insects.
- Possibility of deformation in wet conditions. To eliminate this possibility, laying the sheathing and roofing is carried out in dry weather.
How much does the sheathing cost?
I found it difficult to calculate the average cost of materials in our study. There are too many variables: the cross-section of boards and timber and their quantity depend on the design of the sheathing, the material and the area of the roof. There are many calculators on the Internet: when you enter all the data, you get the price. I recommend the StroyDay website calculator - in my opinion, it is the most balanced and complete.
Using the calculator from the StroyDay website, you can calculate both sparse and continuous sheathing
In the same way, I can only give average figures for the cost of work by professional craftsmen in terms of per square meter.
Table: cost of installation of sheathing
| Installation of 1 m2 of sheathing (the price is indicated for an area of 100 m2 or more) | Price, rub |
| Installation of counter-lattice | 70—90 |
| Installation of thin sheathing | 80—120 |
| Installation of continuous plank sheathing | 170—220 |
| Installation of continuous sheathing from panels on a finished base | 120—170 |
Video description
About the intricacies of roof installation in the following video:
Metal for sheathing
Sheathing made of metal profiles is recommended for buildings with a slope length exceeding 6 m, as well as for buildings with a high level of fire hazard. The metal structure can only be sparse; it is assembled from pipes of a suitable cross-section, channels and I-beams; made of steel (stainless or galvanized). The elements are fastened with self-tapping screws or welding (the latter is possible if the rafter structure also consists of metal elements). Metal roof sheathing has many advantages:
- Dimensional accuracy . The use of a metal frame minimizes mistakes that even professional builders make when installing a complex structure (for example, an attic floor).
- Expanded application possibilities . The design is suitable for arranging roofs of a large area (with long slopes), including for buildings for industrial purposes.
Using a hat profile Source prostanki.com
- Increased strength . The characteristic affects not only the service life, but also the resistance of the system to wind and snow loads.
- Resistance to deformation when changing temperature and humidity.
- Corrosion resistance . The structural parts are coated with modern polymer compounds that reliably protect the metal from moisture.
- Installation of the structure is permitted in any weather conditions .
The obvious disadvantage is the cost of metal sheathing and the complexity of installation work - its installation will require the involvement of specialists with skills in working with metal and welding.
Wood processing
Previously, to protect wood from moisture penetration, one common type of impregnation was used - drying oil.
Today, the range of compositions has expanded significantly. These are various antiseptics that prevent the formation of fungus and mold, as well as wood impregnations. There are universal types of impregnations that work as antiseptics and protective coatings. Often such compositions are not of very good quality. It is better to purchase antiseptic and impregnation separately.
Scheme of the design of a treated wooden frame for plasterboard. An old but effective way to protect wood from moisture and rotting remains the application of paint and varnish. You can use both nitro paints and any others, for example, acrylic-based.
Calculation of the cost of lathing
The calculation of the sheathing is included in the general calculation of the roof; it is carried out on the basis of initial data - roof parameters, design features of the rafter system, construction materials and roofing. There is a selection of calculators on the Internet that allow you to get average figures for the cost of the project (the more complex the roof, the more approximate the figures will be).
To calculate the sheathing, it is proposed to enter its characteristics: the width and thickness of the board, as well as the distance between the boards. But for this you need to have preliminary calculations, which take into account not only the cross-section of the board or beam, but also other parameters, including the type of sheathing.
In order for the planning of the required amount of materials to be accurate, it must be carried out by a specialist who can take into account all the variables and specifics of roofing materials. The quality of fastening of the finishing coating depends on how accurately the calculation is carried out and the pitch of the load-bearing part is selected.
An important part of the roofing pie Source qopudin.bilagyteco.ru.net
Lathing scheme
Before installing the sheathing, you need to decide on its type - solid or sparse packing.
Continuous sheathing for metal tiles is done only in the most critical places: at the ridge, valleys and junctions
When installing continuous sheathing, lumber is laid almost closely, leaving a ventilation gap of up to 2 cm. Lattice flooring is a little more complicated, but is used more often because its design reduces wood consumption and facilitates the roof structure. As for the sheathing pitch, as already written above, it should be equal to the wavelength. Many manufacturers indicate the required step in the instructions for metal tiles.
Often boards are sold already processed. But if not, then you will have to do the impregnation yourself. This will dramatically increase the service life of the wood.
- Installation of the sheathing begins with laying the waterproofing on the rafters. Make a slight sag and fix it with a counter-lattice.
- The sheathing is secured with nails 2 times the thickness of the board. They try to hammer them in as close as possible to the axis of the counter rail.
- At the junction points, along the perimeter of the attic and dormer windows, near the pipes, a continuous sheathing 15–20 cm wide and its own rafter system, to which boards (beams) are attached, are installed.
- At the junction of the slopes in the area where the valley passes, a ten-centimeter continuous sheathing flooring is laid along the entire slope with ventilation gaps of 2 cm.
Particular attention should be paid to the first row of the sheathing (eaves row), since it is along it that all sheets of metal tiles are subsequently aligned. The thickness of the board of this row, as noted above, should be at least 10 mm greater than all other slats, which will smooth out the difference in the support points of the metal tile sheets
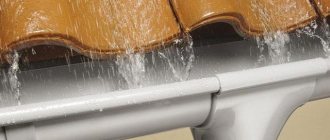
The correct arrangement of eaves units is of great importance for the even laying of sheets of metal tiles and the organization of normal drainage
In addition, the step size between the first (eaves) and second row is always 50–70 mm smaller compared to the others. Measure it from the edge of the front board to the center of the next one. This indicator depends on the angle of the roof, the projections beyond the wall and the diameter of the drainpipes and gutters. The step between the rows of the sheathing is calculated as accurately as possible, or it is made according to the recommendation of the metal tile manufacturer.
Video: installation of sheathing for metal tiles
A sheathing for metal tiles that is not installed according to the rules will lead to many roofing defects:
- water will overflow through the gutter if the protrusion is larger than expected, or, conversely, will pass between the gutter and the front plate when the protrusion is smaller;
- the joining of sheets will be disrupted to the point where it will be impossible to connect adjacent elements;
- the fastening of metal tile sheets or fragments to the sheathing will weaken;
- it will be difficult to install and secure the end and gable strips;
- air circulation in the under-roof space will be incomplete if the dimensions of the gaps are not maintained, which will cause the insulation to get wet, mold and mildew to appear.
The influence of roofing on the sheathing arrangement
The correct roof sheathing is always designed taking into account the properties of the selected finishing coating; it also specifies the type of load-bearing part and determines the installation rules.
Slate
Asbestos-cement slate (flat or corrugated sheets) has been one of the most popular roofing coverings for decades, due to its low cost, ease of processing and durability. The sheathing pitch when calculating a slate roof is selected individually; it is influenced by the thickness of the sheet and its linear dimensions; it varies from 50 to 75 cm. The cross-section of the beam ranges from 5 to 8 cm. Regardless of other parameters, the following rule is observed during installation: three beams serve as support for each sheet. This is enough to maintain the rigidity of the roof under any load (movement of a person or snow cover).
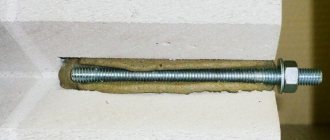
Rough nails
The “very, very” best option is to use galvanized rough nails . They have the highest tensile strength, which is why they are deservedly considered No. 1 in the professional construction world.
Often, rough nails are also called ring nails .
Rough nails have proven their reliability when used on wooden pallets, which, like sheathing, is also a lattice structure.
Those who have had to deal with dismantling a board nailed with ring nails know that it is easier to make a hole in the board than to pull out a rough nail.
After many years, fastening to rough nails will remain strong and reliable.
How to make a sheathing for Monterrey metal tiles: step-by-step instructions
Monterrey metal tiles are a popular material for roofing. The sheets have a classic profile with a low-height incoming wave. The longitudinal step of the steps is 35 cm, so the sheathing boards are installed with the same distance in relation to each other.
Installation is done from bottom to top. Before starting work, control measurements of the slopes are carried out to determine their flatness and perpendicularity to the lines of the ridge and cornice. The boards must first be antiseptic and dried. If you purchase already processed lumber, they have a greenish or pinkish tint.
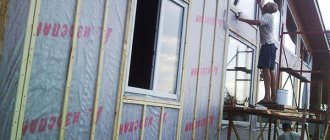
Installation of waterproofing
Waterproofing material is laid between the rafters so that the air flow can pass freely from the eaves to the ridge. A slight sag is provided to drain the draining condensate.
It is necessary to ensure that there are no obstacles in the path of air movement, and that moisture does not accumulate on wooden structures, for example, on slanting rafters on roof slopes or sheathing around the chimney. The waterproofing carpet is placed on top of the bottom board, and then onto the eaves strip, so this edge is secured after installing the sheathing.
When laid over insulation, waterproofing must be vapor permeable. This promotes the free evaporation of moisture from the material and the preservation of thermal insulation properties.
Waterproofing is not installed on the roofs of canopies, gazebos or unheated buildings. Since there is no temperature difference or the material communicates freely with the atmosphere, condensation either does not form or evaporates immediately. Accordingly, a counter-lattice is not needed.
Installation of counter beam
To install the counter-lattice, it is recommended to use dry planed timber, which retains its geometry well even with fluctuations in humidity. The waterproofing strips are fixed to the rafters with a stapler, and pressed against the top with a counter-lattice. Nails are nailed in increments of 30-35 cm.
When installing a counter-lattice under a metal tile, a gap must be left between the bars along the length. This allows you to create an open system of air channels under the metal tiles and provide additional ventilation of the under-roof space.
Markings for the sheathing are applied to the surface of the counter beam using a dye cord. If the boards are calibrated and have the same width, you can use templates instead of markings. They are made from pieces of bars according to the calculated step and, before fastening, are placed under both ends of the lathing. Galvanized nails or self-tapping screws are used to fasten the counterbeam.
Laying the sheathing
The first board is aligned with the cornice. A second one is attached nearby if long hooks are provided for the gutters.
You need to retreat 30 cm from the first board, this will be the axis for the 3rd guide. The rest are installed in increments of 35 cm, which are measured either between the centers or edges of the battens.
The length of the joint of the boards should be on the counter beam. Each end is nailed with two nails. The ends are not allowed to hang in the air. When laying, you need to control the flatness of the sheathing and, if necessary, adjust its position using pads.
An additional board is laid along the ridge line. It creates a rigid base not only for fastening metal tiles, but also profile parts.
Lathing for the valley
At the junction of the slopes, where an internal angle is formed, the loads are more intense. Snow accumulates in this area, and precipitation from a large part of the roof flows there. To arrange the recesses, double gutters are used - one is laid from below and attached to the sheathing, the second is placed on top and screwed to the metal tile. The joint is carefully sealed in the area of possible leaks.
A thickened or continuous sheathing is installed around the recess. The boards can be laid either across the slopes or along the rafters. Between them it is necessary to maintain a deformation gap of 20-30 mm. The reinforced platform must have a width of at least 300 mm on both sides of the valley axis. The lower additional profile is attached to the sheathing before installing the metal tile sheets, the upper one - after completion.
Edged boards 1st grade GOST
| Product name | Thickness, mm | Width, mm | Wood type | Variety | The price of the product |
| Edged board 25 x 100 GOST | 25 | 100 | needles (spruce, pine) | 1st grade | RUB 21,999.78 |
| Edged board 25 x 150 GOST | 25 | 150 | needles (spruce, pine) | 1st grade | RUB 22,000.00 |
| Edged board 40 x 100 GOST | 40 | 100 | needles (spruce, pine) | 1st grade | RUB 21,999.78 |
| Edged board 40 x 150 GOST | 40 | 150 | needles (spruce, pine) | 1st grade | RUB 21,999.87 |
| Edged board 50 x 100 GOST | 50 | 100 | needles (spruce, pine) | 1st grade | RUB 21,999.78 |
| Edged board 50 x 150 GOST | 50 | 150 | needles (spruce, pine) | 1st grade | RUB 22,000.00 |
| Edged board 50 x 200 GOST | 50 | 200 | needles (spruce, pine) | 1st grade | RUB 22,000.00 |
Is it worth doing it yourself?
You can do the installation of the sheathing yourself, but it is not easy, especially for a beginner in the field of construction. You need to have certain tools, plan and prepare everything correctly. It is important to have theoretical knowledge and skills in carrying out repair and construction work. It is advisable to have an assistant. Self-manufacturing and installation of such a design will save money. But, if you lack self-confidence and tools, then it is better to turn to professionals. After all, there is a risk of making gross mistakes, as a result of which the roof will soon have to be redone.
Length of nails for sheathing
The size of the nail needed to fasten the wooden sheathing depends on the thickness of the sheathing used.
- To attach a 20 mm thick sheathing, the nail length must be at least 60 mm;
- Sheathing 25-30 mm thick - attached 70 mm;
- Sheathing thickness 40-50 mm – nail 90-100 mm;
- For 60 mm thickness – nail length = 120 mm.
It is worth emphasizing as a separate point that:
For roof sheathing, since this is a long-term structure, it is advisable to use galvanized .
Consumption of nails for sheathing
- Consumption of nails in wooden beams up to 50x50 mm in size, one nail per connection (so as not to split the wood).
- For sheathing widths from 60 to 120 mm, you can use 2 nails per connection to the counter beam or rafter leg. You can alternate the number of nails along the sheathing according to the pattern 2-1-2-1-2-1-2.
- If a wider board 130-200 mm is used, 2 nails per connection are required.
- And, if the board is already quite wide (more than 200 mm), use 3 nails per connection.
If there are no rough nails, they can be replaced with screw nails .
Screw nails, unlike simple construction nails, can withstand loads and wood drying processes much better.
Professional recommendation
In practice, sometimes there are situations when, for one reason or another, the upper planes of the sheathing do not lie on the same line. For metal tiles, these are unacceptable deviations; they must be eliminated; the process can be accelerated using a simple measuring device. How to make it?
Step 1
. Cut a wedge 30–40 cm long from the board, make it in the form of an equilateral triangle with an acute angle at the apex.
Step 2
. Find a piece of roofing felt; it is recommended to place it under the sheathing during leveling. Not only does it not deteriorate its original properties throughout the entire period of operation, but it also interrupts possible routes of moisture entering the wood. Cut the roofing felt into rectangular pieces with sides approximately 2x4 cm.
Pieces of roofing felt
Step 3
. Place the wedge on a flat surface, and one piece of roofing felt on both sides. Slowly move the level slat from the base of the wedge to the top. It is necessary to determine the place where the movement will stop - pieces of roofing felt will not allow it. Mark on the wedge the distance from the top to the fixed position.
Step 4
. Add another piece of roofing felt on each side and repeat the above steps, make a second mark.
Using this method, determine the total thickness of 5-6 pieces of roofing material one by one, making marks each time. For ease of use, transfer them to the back side of the wedge. The device is ready, working with it is very simple. First you need to determine which sheathing boards require adjustment. This is done using a long level, a rule, or any level slats. Then a wedge is inserted into the gap, the marks on it indicate how many pieces of roofing felt a particular board needs to be raised.
The wedge is inserted into the gap between the rule and the sheathing
In conclusion, we remind you once again that the reliability, duration, efficiency and safety of operation of the entire roof depends on the correct arrangement of the sheathing; carefully follow existing construction technologies and rules. Don't experiment; mistakes are very costly.