Often, alteration of a walk-behind tractor is carried out in cases where the operational characteristics of the unit, functionality and ease of operation no longer satisfy the owner of the equipment. In some cases, individual craftsmen tune a walk-behind tractor to realize their visual fantasies or to impress others. Today, almost every private house and summer cottage has a walk-behind tractor or a walk-behind cultivator. However, the capabilities of this technique are limited. To expand the functionality of walk-behind tractors, you can contact a specialized workshop, but the price of such conversion can be very high. There are several ways to inexpensively and practically upgrade a walk-behind tractor with your own hands.
Do-it-yourself 4×4 walk-behind tractor
Auto mechanic, specializes in agricultural equipment
Tillage is an integral part of the life of those people who have land at their disposal. Various tools are used specifically for this, but its use involves physical costs. To significantly facilitate the task, there is auxiliary special equipment. In this case we are talking about walk-behind tractors. Such equipment is quite expensive, which is why not everyone can buy it. Despite this, there is a possibility of making such equipment yourself.
How to make a 4x4 walk-behind tractor with your own hands
Many craftsmen can make such a device on their own if they have everything necessary for this. In this case, there is nothing significantly difficult; you only need to prepare certain devices, and also subsequently connect them into a single mechanism. Let's take a closer look at what is required to manufacture the device:
In this video you will learn how to make a 4x4 walk-behind tractor:
After this, you need to install the wheels and perform a test run of the assembled device. It is worth noting that it is recommended to conduct trial tests at each stage of assembly to determine the functionality of the assembled device.
Important! At the initial stage of assembly, it is important to take care of equipping the walk-behind tractor with auxiliary equipment, as well as its connection (if necessary, plows, harrows, cutters and other components can be purchased or made independently).
Reviews
It is worth understanding that when manufacturing a device with 4 drive wheels, it is necessary to install all drive axles, as well as the corresponding gearboxes for transmitting torque. All the necessary diagrams for arranging such equipment are freely available on the Internet. However, in this case it is necessary to pay attention to a number of comments regarding the use of homemade walk-behind tractors.
Oleg, 32 years old, Nizhny Novgorod
“At first glance, it seems difficult to assemble your own walk-behind tractor, but I managed to do it with minimal investment. The finished apparatus significantly speeded up soil cultivation. I believe that the manufacture of such a device is a worthwhile endeavor, since the need for physical costs is reduced to a minimum.”
Alexander, 46 years old, Saransk
“I am extremely pleased that I took the time to study the necessary schemes. The device was assembled quite quickly. I used all the old parts from the car, but had to buy the engine separately. The result was a good device, which required a small amount of time and material investments.”
On the Internet there are not only comments about the creation of devices, but also full-fledged discussions on thematic forums. Of course, some of the information there is superfluous, but there is an opportunity to create a reliable and interesting device as described.
Important! When making such equipment yourself, it is recommended to do everything in the established sequence in order to avoid mistakes and subsequently not have to completely redo everything.
Source
Step by step instructions
A carat made from a walk-behind tractor is a rational investment of effort and finances. An all-terrain vehicle from a walk-behind tractor is created according to the scheme. Construct the base. It will be possible to take ready-made frames. For example, remove Ural or Izh from used cars. They are durable and easy to maneuver. The rear axle includes both suspensions, which are made from: strut, mowing, bushing. For all-terrain vehicle wheelbase. It is allowed to use a used spare tire from a truck. Transport on the SND is easy to drive and maneuverable. A prefabricated engine structure is mounted so that the all-terrain vehicle performs the necessary functionality. If the motor installation is completed, install:
- transmission;
- exhaust parts;
- braking structure.
Parts from old vehicles will do. The ATV has good maneuverability, maneuverability, and safety. It looks like a 4-wheeled motorcycle vehicle. Typically, an ATV is built on a walk-behind tractor from a Neva car. The step-by-step instructions are as follows:
- Wheel conversion. The wheels are positioned at an equal distance from the car body using adapters.
- The frame is being modernized and strengthened. It is correct to use a ready-made base from motor vehicles; it is reliable and will not cause problems.
- Installing car wheels. You can use a low profile. You can reduce friction between tires and rims using fabric spacers.
- Tires are mounted. Truck wheels are suitable. You can take tires with low pressure. There is no need to install shock-absorbing elements.
After simple manipulations, the created ATV from a walk-behind tractor is used off-road. In addition to transport, you can do SND.
A walk-behind tractor on pneumatic wheels creates minimal impact on the road. On the rear axle, homemade tires are used, which can be installed on:
- Swamp walker.
- Motor sleigh (air sled).
- Snowmobile.
- Motoblock towing vehicle.
You can buy store-bought items or purchase parts separately (tires, tubes, wheels). The assembly diagram is as follows:
- Standard disks and fasteners are welded with metal tubes.
- They make larger cameras with more secure mounting.
- Tires are attached to the finished expanded disk. You can buy it or use it used from a truck. An air valve is inserted into the hole in the disk.
- The wheel is filled with a pump. The created tires are mounted on an all-terrain vehicle from a walk-behind tractor.
To increase the power of a standard wheel, it is equipped with a tread. Chains and tracks made in a workshop are suitable for mounting cameras.
More popular homemade models with a motor from a walk-behind tractor were described. However, the ingenuity of the craftsmen from the people in relation to such a unit does not end there. Residents of the north have long appreciated the advantages of snowmobiles, motorized sleds, and snowmobiles. A mini tractor or towing vehicle with a walk-behind engine is actively used by farmers.
All-wheel drive adapter for walk-behind tractor
Homemade front adapter with steering for a walk-behind tractor: photo report on making a homemade product.
Dear site visitors, You are Your Own Builder! We present to your attention another homemade product from the craftsman Mikhail, who is engaged in the construction of various homemade mini tractors and other agricultural equipment. technology.
This time we will look at a rather useful homemade product that will undoubtedly be useful to owners of walk-behind tractors - a homemade front adapter with steering control for a walk-behind tractor.
This device greatly facilitates the work of cultivating a vegetable garden, because essentially by installing the adapter on a walk-behind tractor, it will already be a mini tractor with steering control, and working on a mini tractor is much easier than with a walk-behind tractor.
The process of building an adapter for a walk-behind tractor is presented in these detailed photos:
Front axle with homemade steering knuckles.
The homemade frame is welded from a profile pipe.
The base for the seat is welded to the frame.
Steering rack from a VAZ car.
Steering rods are also from a VAZ car.
As a result, the author made a mini tractor from a walk-behind tractor with his own hands.
Many farmers use walk-behind tractors to work in their fields. The adapter for the walk-behind tractor makes it possible to speed up its execution. This unit is used as a trailer that moves on wheels and is attached to a motor cultivator. You can add attachments to the device and mount a chair. Often gardeners make such a unit themselves.
Method 1: grind the cylinder head
The cylinder head (cylinder head hereinafter) is the most important part in the design of any gasoline engine, controlling the process of fuel combustion and gas exhaust. It is located on top of the cylinders themselves. The purpose of its milling is to reduce the size of the combustion chamber, which in turn will increase the compression and compression necessary for working on high-octane gasoline. The acceptable degree of milling is considered to be 3.5 mm. This means that if the cylinder head on the walk-behind tractor was 95 mm, after milling there should be 91.5 mm left.
Progress:
- remove the cylinder head after sequentially disconnecting the bolts and nuts;
- remove oil seal caps;
- remove possible carbon deposits, traces of oil and dirt with a solvent - ordinary acetone or diesel fuel will do;
- Having a clean head, start milling. To do this, you don’t have to look for a specialist milling machine. Having an emery wheel at home, you can do this yourself. Considering that the cylinder head of most walk-behind tractors is made of aluminum, and not their cast iron, to create a perfectly smooth surface of the established thickness, it will have to be additionally sanded with emery cloth attached to a flat block of wood or glass;
- Once the visible grooves have disappeared, you can begin polishing the working area of the valves.
Having cleared the coolant hoses of metal dust, you can install a cylinder head adjusted to the required dimensions.
In addition, to ensure greater reliability of the conversion:
- install new caps and valves themselves;
- change the used cylinder head gasket;
- take reliable bolt ties (for example, with a diameter of 1.1 cm), which are tightened with a torque wrench so that the load on the connection is 7.5 kg/s. For larger diameter studs, this figure increases to 9.5 kg/s;
- While tightening, make sure that the correct gaps are maintained between the outer valves - 0.3-0.35 mm. For all others - up to 0.4 mm is permissible;
- Considering that the cylinder head has shrunk in size, the original cultivator push rods will no longer fit. Instead, you need to put shorter ones.
After all the nuances are met, the motor part is assembled. Before starting the walk-behind tractor on 92nd fuel, check and, if necessary, clean the carburetor.
Is it possible to assemble an adapter for the Neva walk-behind tractor?
For the Neva walk-behind tractor, an adapter operating in a 4x4 pattern is sold in an agricultural equipment store.
It is recommended to prepare all the necessary materials and tools. A homemade adapter for the Neva walk-behind tractor helps you save money and spend it on other parts needed to upgrade the device.
It’s worth considering what the front adapter to the Neva walk-behind tractor looks like.
An adapter for a Neva motor-cultivator means a trailer with a seat made on the basis of a two-wheeled frame. The functional purpose of such equipment is to make working with a walk-behind tractor simple, convenient and comfortable. The adapter allows you to upgrade the cultivator into a small tractor, which is suitable for various types of work in the country, on a farm, or in a personal plot.
Neva walk-behind tractors with a homemade adapter come in 2 types:
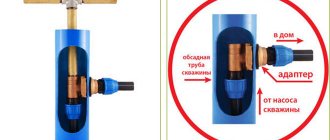
The diagram of the KTZ 03 front adapter for the Neva walk-behind tractor shows the presence of the following structural elements on the mechanism:
Harrows, plows, diggers, and mowers can be used as attachments. To secure them, it is enough to provide one hitch. The devices used can be moved to the working position using a manual drive. Device drawings are required.
Previously, the stages of manufacturing a mechanism operating on all-wheel drive and steering were described. To make such a device yourself, you will need the following materials:
You need to prepare a welding machine and a lathe, a set of tools, and tools for gardening work.
Before assembling the structure, it is necessary to make a kinematic diagram. The principle of its operation is as follows:
Converting a cultivator into a snowmobile - execution algorithm in detail
Before making a snow blower or snowmobile from a cultivator, you need to prepare an approximate drawing, which will indicate the main structural elements, the method of connecting them and the sequence of work. The entire structure will consist of two main units - the slave and the master. The driven part includes shock absorbers, steering column and skids.
Before starting work, you need to decide which parts you have ready-made and which you need to make yourself. The further algorithm of work is as follows:
- First, let's start creating the frame. To make a reliable snow blower with your own hands, you need to try to connect the components of the frame as tightly as possible. A quarrel is suitable for this. The basis of the frame will be pipes. As a rule, ordinary water pipes are used for welding, but sometimes craftsmen use parts of motorcycle frames. In order to avoid gross mistakes, the pipes are first secured by spot welding. After this, if the structure has the correct shape, the pipes are connected with a continuous single seam;
- Next, you need to weld brackets to the frame that will hold the motor, runners, seats, steering column and other structural elements;
- Next according to the plan is the manufacture of runners. For a snowmobile, one or two wide skis are suitable, which should be connected to the steering column via a hinge mechanism;
- After this, you need to install shock absorbers - they can be taken ready-made from any motorcycle;
- Next, install the engine and gearbox. They must be mounted on the leading part of the structure;
- In order for a snow blower to be able to move with your own hands from a motorized cultivator, it must be equipped with wheels or tracks. The option with wheels will help make the unit more maneuverable. However, if you want to avoid wheel slipping, you should choose tracks. This option will make the snowmobile more passable, but it will NOT be as maneuverable due to its heavy weight;
- It’s quite possible to make tracks for the unit yourself. To do this, you can use conveyor belts or motorcycle chains.
- In any case, the main thing is that the design is sufficiently reliable, durable and lightweight;
- If desired, the front part of the snowmobile can be equipped with a hitch for attaching a bucket - it will help quickly remove large piles of snow or scrape off ice;
- Having connected the tracks to the rest of the structure, it is necessary to test the machine.
Sources:
https://motoblok-pro.com.ua/navesnoe-oborudovanie/komplekty-peredelki-motobloka-v-minitraktor/ https://pmk-urres.ru/peredelka-kultivatora-v-motoblok-svoimi-rukami/ https: //tehnopanorama.ru/sadovaya/prevratit-kultivator-v-motoblok-realno-ili-net.html https://pro-motobloky.ru/motokultivatory/samodelky/snegohod.html
How to make an adapter for the Neva walk-behind tractor with your own hands
In order to make an all-wheel drive front adapter for the Neva MB walk-behind tractor with a steering wheel, you need a base. It can be a rectangular pipe, the length of which is 1.7 m. Next, a 50-centimeter pipe is welded to it as a transverse crossbar. Then you need to weld on it special stands for the wheels of the adapter for the Neva walk-behind tractor type MB-2 or another model of motor-cultivator.
The height from the wheel axis to the top of the stand should be 30 cm. For the adapter to the Neva walk-behind tractor model MB or KTZ, wheels from a garden cart are perfect. It is necessary to bore the inner bushings on the machine in order to put the outer bearings on them.
Next, the following steps are performed:
If the equipment works normally, then the cultivator can be painted. This is how you assemble the adapter for the Neva walk-behind tractor with your own hands.
Making a tractor
If you attach additional chassis to the walk-behind tractor, it will turn into a full-fledged self-propelled machine. All-wheel drive is done using a regular motorcycle chain and two sprockets welded to the axle shafts.
If you decide to upgrade the Neva walk-behind tractor, do-it-yourself modifications are carried out in the following sequence:
- Project development. It is necessary to carefully calculate the weight distribution on the front and rear axles. In this case, the load must be adequate to the capabilities of the machine.
- Making the frame. For this purpose, reinforced steel corners are used. If you plan to transport a heavy load, then it is advisable to strengthen the bottom of the trailer with a channel.
- Body assembly. The classic solution is to use sheet metal. However, multi-layer plywood or board can be a budget alternative to metal. At any time, wood can be replaced with steel.
- Making a seat for the driver. If it is factory made, then it needs to be welded to the frame. Homemade is welded from pipes or corners.
- Cleaning metal from rust and scale. After this, the frame must be immediately treated with an anti-corrosion compound and painted. You can install one of the devices on the drawbar for cultivating the soil, planting tubers or cleaning the area.
- Equipping the built trailer with brakes. This is necessary to prevent it from tipping over when there is a sudden change in the speed of the walk-behind tractor.
To create additional pressure on the drive wheels, they need to be weighted. For this purpose, special overlays on the hubs or canopies on the frame are used. Control of a tractor based on a walk-behind tractor can be improved by replacing the control rods with a full-fledged steering column. For such a modification, you can use an old part from a VAZ 2121, on which the gear shift knob is already placed on the column.
What are Neva walk-behind tractors with a homemade adapter used for?
The Neva walk-behind tractor with a homemade adapter is convenient to operate on plowed or virgin land. To increase the functionality of the cultivator, it is recommended to attach a blade capable of removing snow to the unit. It is enough to place the coupling unit in front, checking the quality of the coupling. It should be very high so that the walk-behind tractor does not break at the right moment.
A homemade mini-tractor will allow you to perform a wide range of agricultural work, use motor cultivators in the garden: plowing, cultivating the plot, hilling vegetables, collecting snow, taking out garbage.
The simplest adapter option for a walk-behind tractor is all-wheel drive.
About the device
In terms of its design, the 4x4 adapter intended for the Neva walk-behind tractor is a fairly simple device. It consists of several main components:
Simply put, the adapter is a regular cart with a seat that is attached to a walk-behind tractor. Walk-behind tractors can be such as Cayman, Patriot, Texas, Foreman, Crosser, Viking, Loplosh (loplosh video) and others. After coupling the adapter and walk-behind tractor, it can be compared in functionality to a mini tractor, but such a comparison is a little arbitrary, because the power remains the same, i.e. from the walk-behind tractor engine.
In addition, additional attachments can be attached to the adapter, which further expands the potential scope of work.
Some adapters are equipped with special compartments where you can place some kind of cargo. There are models equipped with a lifting lever, which greatly simplifies working with the device.
As a rule, the adapter contains two couplings - one allows you to attach it to a walk-behind tractor, and the second allows you to attach additional attachments. In particular, you can connect a seeder, hillers, plow, harrow and other devices to the adapter.
The wheelset axle in the adapter is of a fairly robust design, allowing the walk-behind tractor to be used on the most difficult areas of land, as well as for transporting fairly heavy loads.
It is also important to understand that driving such a unit on public roads is prohibited, which is why they are used exclusively in rural areas.
However, despite some structural similarity between all adapters, they also have some differences. In particular, rear adapters with steering, front adapters and all-wheel drive units are available for sale.
For more details about the adapter for the Neva walk-behind tractor, watch the video:
Adapter for walk-behind tractor: purpose and types of factory designs
Any attachment used during the operation of a walk-behind tractor, including the Zubr, Cascade and Neva models, has characteristic design features. The factory attachment to the Neva walk-behind tractor allows you to perform operations such as harrowing, cultivating, hilling, digging and mowing grass. Currently, several types of adapters are produced, which are represented by the following parts:
To connect to the walk-behind tractor, a conventional hitch is used.
The second hitch module allows the connection of a lifting mechanism and attachments, resulting in functionality that increases to the level of a mini-tractor. Such adapters successfully combine good quality and affordable cost.
The most popular types of such units are:
It should be remembered that the universal adapter is most often equipped with a counterweight, as well as weights, hubs, a plow and a potato digger.
Why is this necessary?
At the moment, there are several types of mini-equipment for cultivating land:
- motor cultivators;
- walk-behind tractors;
- mini tractor.
Epiphany comes immediately after the owner of the cultivator realizes that his cultivator is only capable of loosening the soil with cutters, and it is impossible to use attachments while working on this unit for the following reasons:
- weak power;
- unreliable gearbox (reduction gear)
- no wheels.
However, the money for the purchase has already been spent. Therefore, the owner of the cultivator is faced with the question of whether it is possible to convert it into a walk-behind tractor .
With steering
Such devices allow you to convert a walk-behind tractor into a mini tractor, while maintaining the power of the engine used in the unit. It is attached to the walk-behind tractor through a hitch, which is located in front of the adapter. This adapter is well suited for Forza, Sadko, Don, Huter, Profi, Plowman and Champion walk-behind tractors. The design of this adapter includes:
At the back of such an adapter there is a special lifting mechanism, to which you can attach additional mounted and trailed equipment. The adapter for the Neva walk-behind tractor with a steering wheel, the price of which is about 45 thousand rubles , has the following technical characteristics:
Front
Structurally, it is very similar to the previous type of adapter, but its coupling mechanism will be located at the rear. Accordingly, we get a full-fledged front adapter for the Neva walk-behind tractor. This design is completely disassembled, which greatly simplifies its further transportation.
An important area of application for a chainsaw is collecting firewood, cutting down trees and working with other wooden objects. Here you can learn how to choose a good chainsaw.
A lawn mower is a suitable device for mowing unwanted plants, grass, and weeds. Here's an article on how to wind your own fishing line on a lawnmower.
The MAZ-5551 truck remains one of the most popular eight-ton trucks in Russia. MAZ-5551 is maneuverability, reliability and practicality.
At the request of the client, additional wheels with lugs or wheels of larger diameter can be installed on the adapter. Naturally, the cost of these additions is determined separately.
The cost of such a unit is about 27 thousand rubles.
Application area
Of course, they will differ in the power of the engine used, but the very specifics of the work they perform will be similar. In principle, the idea of assembling a home-made unit was to carry out the list of agricultural works characteristic of a mini tractor.
Probably its main purpose is direct work “in the field”. We are talking about plowing land holdings, removing weeds so that the treated soil is suitable for subsequent planting of potatoes and other vegetable and grain crops.
In addition, a homemade mini tractor can be used for the following purposes:
- transportation of various goods;
- cleaning up construction and household waste;
- cleaning local areas from snow masses;
- for cutting grass for the purpose of subsequent harvesting of hay for livestock.
Fortunately, there are plenty of all kinds of drawings on the Internet indicating the exact dimensions and parameters, which is quite enough for any rural craftsman.
But this does not mean that homemade mini tractors will be very inferior in performance to purchased options. If this is still the case, then this lag is not critical, and at the everyday level it is not noticeable at all.
What is needed to create a 4x4 walk-behind tractor.
Making an adapter for a walk-behind tractor with your own hands
The base of the adapter to the walk-behind tractor is made of a rectangular pipe 170 cm long. Another pipe 50 cm long is welded across it, to which the adapter wheel mounting posts should be attached. The height of these racks from the top point of the rack to the axis of the adapter wheel is 30 cm. You can adapt the wheels from a regular garden cart, and bore their inner bushings on a lathe. Bearings of the required size are put on the bushings.
Then braces should be welded to the adapter wheel bushings and to the central pipe. Their length can be different and is determined by the angle that you will need to maintain. This is followed by calculation and welding of the frame for the attachments. The side tubes of this frame are attached to the wheel stands using bolts. The bolts must be of sufficient diameter to withstand various mechanical loads.
Diagram and device of the adapter to the walk-behind tractor
The adapter for the walk-behind tractor is a trailer with a seat based on a two-wheel frame. Its purpose is to make it easier to work with a walk-behind tractor, which it transforms into a device for transporting goods, similar to a mini-tractor.
The adapter provides a significant reduction in the labor intensity of agricultural work and increases the operating efficiency of the walk-behind tractor many times over. It is worth noting that there are two types of heavy adapters: long and short. They can be connected to different walk-behind tractors. A lightweight adapter for a cutter, which is attached to one wheel of a walk-behind tractor, is also known, in contrast to a heavy adapter.
Adapters, being the main link in connecting the walk-behind tractor and attachments, are equipped with a seat, an extended or short bed (drawbar) and hitches. Structurally, the adapter contains two couplings. One of them ensures the connection of the adapter with the walk-behind tractor, and the task of the second is to aggregate attachments: harrows, plows, cultivators, diggers, mowers, etc. The attachments are usually connected to the adapter using a single hitch. The attachments are brought into the working position by means of a manual drive.
Today, many different types of adapters are produced, which, based on the main features of their design, can be classified into two main types: body (universal) adapters are suitable for both agricultural work and cargo transportation; bodyless - only for processing.
Adapters with long or short drawbars are connected to walk-behind tractors of various capacities. Adapters with short drawbars are used only on light walk-behind tractors, and adapters with long drawbars are used on heavy ones. As a rule, adapter models are equipped with devices for adjusting the track width, sliding drawbars, as well as drives for lowering and raising attachments.
3rd method: by installing additional gaskets (changing the gasket)
If the previous methods of converting a walk-behind tractor to 92 gasoline seem too labor-intensive, you can limit yourself to simpler ones. The first of them is based on the fact that the cylinder head is reinforced with 3 additional gaskets at once. The middle one will remove excess heat. It is ideal if you have silumin or another made of light alloy material on hand.
All of them must be commensurate with each other. It is important to calculate the thickness of the middle gasket.
To do this, use the formula (all in mm):
Vsr = 4 mm - (Vv + Vn) + 0.7 mm (shrinkage coefficient), where:
Вв – height of the upper gasket;
The valve pushers that were on the old MTZ-05 or MTZ-12 walk-behind tractor may remain old. Only their rods need to be replaced (they are needed shorter than in the design for 80-octane gasoline).
The second is the usual replacement of the gasket between the cylinder and the cylinder head. The standard ones are replaced with more durable ones, for example, made from paranite.
As you can see, after minor modifications, the walk-behind tractor can operate stably on high-octane gasoline.
Features of the adapter for walk-behind tractor
An adapter is a special device for riding a walk-behind tractor. Using it, you can simultaneously drive a walk-behind tractor and cultivate the soil.
Working with a walk-behind tractor will be greatly simplified if you use an adapter. You will be able to change attachments, depending on what work you need to do - hilling, planting, weeding, transportation. With the help of this device, all processes will be doubled.
This unit allows you to sit comfortably on the seat with which it is equipped. Now you can do household chores, but with more comfort. Steering adapters are available on the market. However, you can make them yourself.
DIY adapter for walk-behind tractor drawing
Converting a walk-behind tractor into a mini-tractor can be done by purchasing and attaching to the unit an adapter, which is a trailed trolley equipped with a seat. A front adapter for a walk-behind tractor will make it easier to carry out agricultural work and reduce fuel costs. However, if you wish, you can make a drawing of an adapter for a walk-behind tractor to make this mechanical device with your own hands, with which it will be easy to carry out all agricultural work on the land.
Please note that the adapter must include the frame, wheelset, seat and coupling devices. If you make an adapter for a walk-behind tractor with a reliable design yourself, then you can immediately sit in its seat and begin gardening work on your plot of land, being completely confident that everything will go well.
In addition to the walk-behind tractor itself, when making an adapter for it you will need:
The process of transforming a walk-behind tractor into a mini-tractor includes the following steps:
1. Determination of the kinematic diagram of a mini-tractor. You can either make a kinematic diagram yourself, with the main attention paid to ensuring the balance of the structure so that no additional loads arise, or you can take a ready-made diagram (see drawing below), which kinematically depicts a mini-tractor made from a Neva walk-behind tractor.
The engine of the power unit (2), driving the front wheels (1), transmits torque through the chain (3) to the reverse gearbox (4), and from it, through the cardan transmission (5) to the rear axle (6), driving rotation of the rear drive wheels (7).
If necessary, you can purchase and additionally install on the adapter such agricultural implements as: plow; potato digger; hillers; harrow; snow scraper, etc.
By creating a mini-tractor with your own hands, equipped with additional attachments, you can significantly increase the productivity of gardening work and plow, hill up or clean your garden plot all year round, with virtually no special effort.
External tuning of the unit
Structurally, light, medium and heavy walk-behind tractors are practically the same. They consist of a power plant, chassis and controls. The operator resembles an ancient plowman, holding the handles of the machine with both hands. However, it is not protected from sunlight, rain, snow and heat coming from the engine. To create additional comfort, you do not need to spend additional money. Everything you need is at hand. External modernization of a walk-behind tractor involves the installation of a removable or permanent awning, an additional protective casing or hood over the power plant.
To work you will need:
- roulette;
- building level;
- Bulgarian;
- welding machine;
- electric drill;
- set of wrenches;
- steel or aluminum corner 30 x 30 mm;
- paint brush;
- acrylic paint;
- tarpaulin or cellular polycarbonate;
- flexible plastic.
External modification of the walk-behind tractor is carried out in the following sequence:
- Drawing up drawings. It is necessary to accurately calculate all dimensions of the frame and provide options for attaching it to the frame and handles.
- Carrying out markings, cutting out blanks for the awning, casing, wings and hood.
- Welding a frame from a corner. Drilling mounting holes, cleaning metal from rust, oil and dirt. Painting of the manufactured structure.
- Fitting the frame onto the frame. Marking and making holes in it. Fastening the frame with bolts and nuts, checking the reliability of all connections.
- Installation of plastic casings and awnings on frames.
There is an option to mount the instrument panel on the handle. This way the unit will look solid and representative. The operator additionally gets the opportunity to control the state of the power plant, know the speed of the machine and the distance traveled. When remodeling the walk-behind tractor from the outside, you need to pay attention to ensuring that air freely penetrates to the motor, cooling it efficiently.
Types of adapters for walk-behind tractors
The adapter for the walk-behind tractor comes in several types. The design is distinguished by the coupling method:
The devices are also divided according to the presence of drive wheels into:
Trailers are divided into:
In addition to garden work, universal ones are useful for transporting crops.
Trailers are divided according to the size of the drawbar:
Structures with a short drawbar are attached to low-power walk-behind tractors. Trailers with a long drawbar are attached to powerful cultivators.
There are 2 types of trailers: on 1 axle or on 2 axles. These couplings are created by the manufacturer. The factory calculated such a design and mounted a tow bar on it. A spring was installed under the seat, designed to allow the vehicle to move smoothly on rocky surfaces.
The APM has special footrests and a brake that is pressed with the foot to stop the cultivator. Pneumatic tires were mounted on the adapter, which ensure smooth running at high speed.
You can buy the device in a specialty store unassembled in packaging. It's easy to assemble. There are instructions for this. To assemble the device, no additional knowledge or skills are required. Afterwards you need to check how the design works.
If all components work well, you can start operating the device. When purchasing a design, you also need to choose a soft lining for the seat. Then the driver's work will become more convenient. The HorseAM IS 1 adapter for the Magnum walk-behind tractor, and adapters for the PNO-1, AM-3 K, BUM-3, KTZ-03 cultivators are very popular among farmers.
With steering
A high-quality adapter with a steering wheel for a walk-behind tractor makes it easier to control the cultivator. In terms of its functions, such a walk-behind tractor is comparable to a mini-tractor, only it is more economical in fuel consumption. The standard APM unit does not have a steering wheel.
Control is carried out using the cultivator steering wheel. But other manufacturers produce units with steering. The trolley is designed for more convenient work on the cultivator, so the presence of a steering wheel will make control easier.
With movable joint
When a trailer is movably coupled to a motor-cultivator, the angle of the vertical axis between the cart and the cultivator changes. It is easier to make such a device, but when turning it will be necessary to apply more force. This type of trailer is inferior in geometric characteristics: the turning radius becomes larger.
Method 2: setting up the ignition
Another way by which you can transfer the engine of an Agro or Cascade walk-behind tractor to AI-92 is to re-adjust the initial ignition timing.
The process looks like this:
- empty the fuel tank;
- turn on the engine, giving the opportunity to use up the remaining gasoline in the carburetor;
- remove the tip of the spark plug;
- unscrew the bolt ties that hold the fan protection;
- remove the casing itself;
- loosen the flywheel tie;
- remove the ratchet and accompanying nuts and bolts;
- unscrew the central pin that holds the flywheel and pull it out of the housing;
- we determine where the installation mark for the ignition is located, marked on the class=”aligncenter” width=”400″ height=”265″[/img]
- take a screwdriver and slowly turn the magneto fasteners;
- carefully move the latter 2 mm to the left (counterclockwise);
- We begin assembling the motor block in the reverse order of disassembly.
During the assembly process you need to take into account that:
- a key was installed on the crankshaft;
- the flywheel nut was tightened with a force of no more than 16 kg/s and was covered with a locking washer on top;
- Instead of the old spark plug, a new type A17B was installed.
After this, the engine can safely run on AI-92 fuel.