how to make a children's table
Children's tables and chairs have many benefits and are a great addition to a child's room. Every child loves his own furniture that suits him, where he can do what he loves and which he can call his own. , making a children's table with your own hands is easier than making an adult table - it is small in size and assembly is usually simple. On the other hand making tables and chairs for children is a big responsibility. We often forget how unpredictable children can be, and they certainly won't sit quietly and obediently at the table. Therefore, children's tables and chairs for children are not just furniture, but a risk zone. The 15 examples of children's tables and chairs presented in this article were made by hand, taking into account all the features of children's furniture. If you're ready to start your project, this information will be helpful.
Material
Before starting work, you should decide on the material. For a children's table, wood is considered the ideal option. Give preference to linden and coniferous species, because they are easy to process. Another benefit of using them is the environmental side.
Timber is used for legs, boards with slightly rounded side edges are suitable for larger elements. The latter parts are also used for wall cladding.
In general, the surface and edges should be smooth and carefully sanded. In order for the product to be transformed, you should select non-toxic varnishes and paints.
Note! Comfort is of great importance during the manufacture of a product. The child should be pleased and comfortable sitting at the table.
Therefore, experts advise covering the seat and back with non-marking fabric that is stretched over the foam rubber. The parts are fastened using a stapler. Thus, the back and seat will become soft, and it will be pleasant for the baby to sit on them.
The high cost of the table is due to the price of the wood. Therefore, in order to save money, only small parts are made from wood. The main parts, for example, the back, seat, frame part, are made by selecting chipboard and plywood.
Hallways 2021: TOP-200 photos of the best new products and modern design. Options for the ideal combination of color and style of furniture in the hallway- DIY stool: manufacturing methods and instructions for creating simple and stylish models (90 photo ideas)
- Do-it-yourself door finishing: 115 photos of the best options for entrance and interior doors
If you prefer chipboard, then give preference to emission class 1 or 0. Pay attention to the minimum amount of resin it contains.
It is best to choose laminated slabs, close the edges. To do this, use a strip that is glued to the desired area using an iron. If there is excess, it must be removed. It all depends on the size of the homemade children's tables.
There is also an option - ordering precise cutting according to drawings, which are carried out by qualified specialists.
Labor and cost
Cutting out the parts will take an hour. Subsequent assembly and fastening is another half hour.
Painting, together with drying of each layer, takes about four days.
- Adhesive primer 4 kg. - 300 rubles
- Paint with magnetic properties 0.5 l. — 1500 rubles
- Blackboard paint 1 l. — 1000 rubles
- Three sheets of plywood 1700 x 900 mm - 5800 rubles
The total cost of the table is 8,600 rubles.
With such a table, a child will pass through more than one class. The height of the chair and the lid can be adjusted, so this furniture will serve the owner for several years.
Tools
Having assessed the volume and types of work, I collected tools in accordance with the following list:
- a jigsaw, which I use to cut circles from fiberboard and chipboard;
- I will need an electric drill to drill holes for connecting furniture parts;
- screwdriver for fastening screws;
- an air compressor with a gun for blowing holes and treated surfaces;
- hammer;
- iron;
- wrench;
- improvised tools (pliers, screwdriver, metal ruler, tape measure, knife, pencil).
Required set of tools
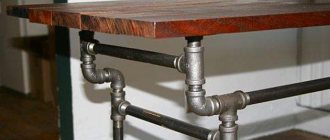
Welded construction
Whether you are an amateur or a professional welder, he will definitely need a reliable welding table.
A large welding table has one important characteristic. Its working surface must be made of thick sheets of metal that will not deform under the influence of high temperature, load or cutting. A table made by yourself must be of an appropriate height, convenient for a particular master. Since welding work is carried out during its production, safety precautions must be observed. The most common type of welding is electric, welders may face hazards such as fire, explosion, electric shock, eye damage, etc. You need to make sure that all equipment is safe and that the person is properly protected with gloves, safety glasses and a helmet.
Step 1
The first step in preparing for work should be to purchase the necessary equipment that will guarantee an efficient process and quality of work. Then you need to make 11 frame elements and purchase steel plates that are suitable for heavy-duty use. The table drawings assume that the approach will be ergonomic; the furniture is created taking into account the physical characteristics and habits of the master for whom it is intended.
Step 2
In accordance with the planned dimensions, the process of cutting all parts is carried out. The dimensions of your own welding table are completely subjective, but for reference purposes you can use the ones below as a guide:
- 4 legs cut from 2.5 cm square pipes, each of which is 70-75 cm long.
- 7 parts cut from 2.5 cm square pipes, each of which is 75-80 cm long.
- 3 steel plates 90 cm long and 30 cm wide.
To prevent the metal from rusting for a long time, it must be coated with one of the special compounds offered in hardware stores.
Step 3
The upper part of the frame is completely welded. You need to make sure that the frame is lying on a flat surface. Important to remember! Too much heat from welding can warp the metal.
Next you need to make the legs. They are welded to three cross members, which will prevent them from bending, and can provide a comfortable place to rest your feet. The crossbars can be placed 20 cm from the floor.
Step 4
You need to try to make the welds strong, this is what guarantees the stability of the structure - everything depends on the integrity of the manufactured structure. After the parts are produced, the parts are welded to each other. The structure is ready.
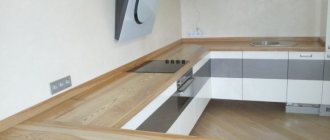
Step by step instructions
The design is very simple and includes a tabletop and legs, as in any classic table model. For the legs, as we said above, we will use 40x40 bars, and for the tabletop - a furniture panel, which must be cut so that we get a tabletop measuring 40x80.
Now let's move on to the actual production:
- Turn the furniture panel over, step back 5 cm from the edge, and then draw an even strip around the perimeter.
- Take a long block, and then cut it so that you get 2 elements of 30 cm and 2 elements of 70 cm.
- Secure the resulting elements to the furniture panel using self-tapping screws (along the previously drawn line), coat the joints with PVA to prevent cracking.
- Fix the metal corners inside the resulting frame, and screw the previously prepared 40x40 beams to them.
- The finished product must be sanded and then covered with 3-4 layers of varnish.
Another mini-instruction that will help you create a table from a long block and a painted wooden plate.
In the video, the master makes a charming table and chair from solid wood (beech).