When installing an electrical input into a house, each of us thinks about how it is better to do it - overhead or underground?
Installation of air SIP is always much faster and several times cheaper.
However, situations arise when it is more advisable to run the power cable into the house underground.
Firstly, it is more reliable. And secondly, it does not spoil the facade of the building or the appearance of the surrounding area.
Often these two methods are combined. Initially, an input is made to a special pipe stand from a support.
And from this distribution cabinet the cable is laid in the ground and brought into the house. When the support is located not far from the building, some SIP wires are mounted directly on the facade.
But we will turn specifically to the underground input. Let's look at what difficulties you will encounter when laying cables in the ground and place special emphasis on common mistakes when performing this work, which ultimately, sooner or later, lead to failure of the cable line.
Which cable to lay
Cable installation in the ground can be done in two ways:
- without any protection (using armored KL grades)
- in pipes or special corrugation
Let's look at the first method first. Here, as a rule, a cable with tape armor is used - VBBbShv or AVBbShv.
It is not at all necessary to use armor of the type AABL, AAShV, where there is a one-piece cast protective shell made of aluminum. It could just be ribbons overlapping each other.
In this case, armor protects not so much from external influences (someone started digging where they shouldn’t), but from deformation and traction forces during soil heaving.
Mistake #1
Never bury ordinary grades of home wiring cable in the ground without protection.
The same applies to the SIP wire. It cannot be laid in the ground, even in pipes.
Select the cable cross-section according to the connected load, but not less than 10mm2 for copper or 16mm2 for aluminum.
You can often find videos on YouTube where copper CLs with 6mm2 conductors or 10mm2 aluminum are used. This is explained by the supposedly small number of electrical appliances in the house or country house.
In terms of load, this may be enough for you, but in terms of compliance with the requirements for the minimum cross-section of the PEN conductor, you will have a violation. For single-phase power supply, the cable must be three-wire, for three-phase power supply, it must be five-wire.
Core design
The wires that make up the core of the cable conduct electrical current to the outlet. The reliability and safety of the wiring depends on their parameters.
- To produce a cable for a socket, single-core conductors are used.
- The PUE prohibits the use of stranded conductors for internal wiring.
When installing such products, all ends must be tinned and soldered; they get very hot, the insulation wears out faster, which causes a short circuit and fire.
Digging a trench for cables - distances and dimensions
The selected cable should be carefully laid in the trench. What size should it be, what distances should be maintained when excavating it?
Mistake #2
Firstly, this trench cannot be dug close to the foundation of the house.
It is necessary to maintain a certain distance of 60cm.
After laying in the ground, the cable should not fall on the line of action of the foundation force, directed at 45 degrees from the base.
Standardized clearances from plants and trees on your site are also required. Here are the minimum dimensions for underground cable laying from nearby utilities, structures and obstacles.
What dimensions should this trench have? Here you can focus on the standard project A5-92 “Laying cables with voltage up to 35 kV in trenches” -.
The cable depth is 0.7 m. Please note that this is the distance from the surface to the top of the cable itself.
Mistake #3
Taking into account the fact that there will be a sand cushion of 10-15 cm underneath, the total depth of the trench should be at least 900 mm.
Not 0.8m, as many recommend, but 90cm, and certainly not 0.7m.
Where did all these numbers even come from? Why can’t you just bury the cable in your yard to the depth of a spade bayonet? Why such torment?
You are not doing the installation in a public place on a city street or at a construction site where heavy vehicles will drive.
The most important reason for such a depth is to ensure optimal temperature conditions for the cable.
By laying it as close to the surface of the earth as possible, you will lose the main advantage of underground installation - the lack of influence of ambient temperature and weather conditions.
The upper layers of the soil warm up much more, and moisture after good rains simply will not reach the cable sheath if it lies at 70 cm. The same cannot be said about 30-40cm.
The second aspect of such a depth of laying is pressure. The deeper the cable lies, the more evenly the pressure from above is distributed on it.
Especially under external influences - a car driving along the KL highway, something heavy was placed on top, etc.
Mistake #4
If your entrance to the house runs from a support across the road, then here you need to bury the cable to an even greater depth - 1000 mm.
The minimum trench width is calculated by the formula = cable diameter + 100mm on each side for a sand bed.
By the way, so that such labor-intensive work on digging a trench does not go to waste, some additionally lay a grounding loop in it. Just don’t forget about the minimum margins of 300-350mm.
Well, in the case of protecting the cable with a pipe, the circuit is not a hindrance at all. After all, it is not necessary that it be in the shape of a triangle or square.
And if the geometry of the site and the location of the input allow, the same trench is adapted for simultaneous installation:
- input cable
- cable to video intercom
- street lighting
- power supply for sliding gate automation
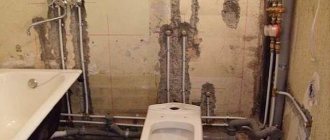
Wiring after repair
Running an Internet cable through an apartment after renovation is more difficult. Mainly because you will have to move the furniture and lay it out so that it does not get in the way and is not conspicuous. There are two options here:
- Modern skirting boards have channels for multiple cables. Open them one at a time and route the wires inside the baseboards to their destination. There will be problems with doorways; you will have to lead directly or around the door.
- Cable channels. Buy small cable channels, raise them to the ceiling or hide them behind furniture. Then run all the wires through them. More work, but it will turn out nicer than hanging wires.
If there are no options at all, then leave the router in the hallway and place a repeater in the desired room. Connect all the necessary devices to it. Connection speed and stability will suffer, but this may be the best option.
Backfilling the trench with sand
Mistake #5
The bottom layer of the trench must be filled with sand; do not skip this step.
Otherwise, sharp pebbles and other foreign elements in the ground will damage the insulation after some time.
Mistake #6
The sand must be compacted. Do not lay the cable on a loose base.
What to do if you don’t have sand in stock and don’t want to order it? In this case, sift the excavated soil.
The fraction of individual elements after sifting should be no more than 5 mm.
Is it possible to do without this sand pillow or its equivalent? Why is it even needed? No you can not.
In addition to protecting the insulation from sharp objects, it plays another important role. The layer of sand under and above the cable is practically not subject to heaving.
It can be easily compacted, as a result of which there is no subsidence of the soil in the trench. No drawdown - no voids.
Namely, they lead to local overheating of the cable. The result is a situation where, in the place where a shallow hole is formed, the cable heats up significantly more than in the same area, but a couple of meters away.
Due to the temperature difference, the cable begins to “pull”. Under significant loads, the PVC insulation bursts and subsequently begins to actively suck moisture through these microcracks.
Well, don’t forget about the drainage properties of sand. Even if water reaches a depth of 0.7 m, it will pass through the sand without stopping near the cable line itself.
The meaning of a dedicated channel
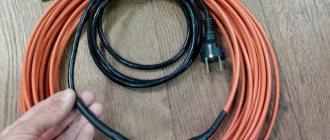
Typically, the connection occurs by laying a twisted pair cable by the provider to the apartment and a little in it. They often hang the router above the front door or place it on the closet closest to the entrance. The provider can lay wires in the apartment, but for an additional fee. Sometimes there is no such service, then all that remains is to negotiate with the installers about unofficial work or install twisted pair cables in the apartment with your own hands.
Your further actions depend on how exactly the room is connected and what you will continue to pull from. If the installers left a large piece of wire in the apartment, then all that remains is to extend the Internet cable further yourself. If it is plugged into the router, then you can pull a second wire from the router or extend the original one. In the second case, it will be possible to organize the installation of the router in the right place, and not near the entrance. There will be a weak point where the provider cable connects to your piece of wire. So don’t skimp and buy normal connections, like adhesive tape, heat shrink or any other type. Electrical tape is simple, but not very reliable in terms of durability.
Correct cable routing
The cable itself is laid in a “snake” trench.
SNiP 3.05.06-85 stipulates that cables in trenches should be laid with a margin of 1-2%. This reserve is precisely provided by the snake.
Just don't go overboard with the bends.
Mistake #7
But making a reserve in the form of rings is not allowed.
Why are these extra bends needed at all? As it turns out, not for emergency repairs at all. If the CL is laid in a perfectly flat straight line, then the temperature deformations that accompany the operation of the CL will sooner or later damage the input.
Mistake #8
Before and after installation, do not forget to test the insulation of the cable cores with a megometer.
Read how to do this correctly in a separate article.
A small layer of sand is again poured on top of the laid cable.
Flexibility category
Flexibility ensures resistance when turning and changing the angle of the power cable. The greater the number of cores, the higher its flexibility. There are six classes of flexibility of aluminum and copper wire.
To connect the socket to the electrical network with the required cross-section of the cable core of 2.5 mm2 with a calculated diameter of 1.8 mm and 1 wire in the core, the first class of flexibility is used.
Laying warning tape or bricks
To protect against a person with a shovel, as well as to mark the route, signal tape is used.
Mistake #9
Make no mistake, it should be laid at a distance of 250mm from the cable line itself, and not from the surface of the earth.
That is, when excavating, you must first hit the tape with the bayonet of a shovel, but not reach the shell. When mechanized trench digging, after detection of the warning tape, only manual excavation of the soil is allowed.
If you don’t have tape, use any available materials at home in the country.
The main thing is to lay something that will warn and “scream” - there’s a cable underneath me! Don't dig!
It is also recommended to protect the cable with bricks or asbestos-cement slabs.
Mistake #10
They must protrude at least 50mm beyond the boundary of the cable sheath in cross section.
By the way, the same applies to the tape.
Especially if several cables lie in one trench at the same time.
Mistake #11
You can’t just lay one narrow strip in the middle.
It should protrude beyond the outermost cable in the row. One is missing, use two, three, etc.
Bricks should be used as protection when it comes to the input from a substation or transformer substation to a multi-storey building, factory or other large facility.
Mistake #12
In this case, it is prohibited to use silicate or perforated bricks.
In private construction, with underground entry into a small cottage, no one will complicate their life and increase the cost of repairs by laying red bricks. Therefore, in our case, one tape will be enough.
Wiring before repair
Wiring and installing an Internet cable in an empty house is a great idea. There are no obstacles, you can plan everything from start to finish. The result will be a beautiful system that will please the eye after moving in.
Examples of wiring diagrams:
Scheme for 1k/2k apartment
Scheme for a 3k apartment
Here are a few nuances:
- You need to clearly understand where and what will be located in the room.
- Select in advance the location for the router from which all other wires will disperse.
- The cable is laid simultaneously with sockets and other cables.
You can run cables in the wall or remove them during repairs under the plaster. Popular choice, but not worth doing. Now it is recommended to run all wires in cable ducts. This is important because if the cable breaks, short circuits, or some other problem, they can be quickly found and repaired. Once the renovation begins, all the channels will be hidden; in addition, they are bought to match the color of the room or furniture so that they stand out less. If there are none, then paint them yourself.
As a result of such planning, you will get such sockets. A telephone, TV, computer and any device that requires power are immediately connected to them. You won't be tied to one place in the whole house and can move your TV or computer at any time. Or connect to the network for a minute from anywhere in the house.
Perfectly buried cable
After all the above work, you finally fill the trench with earth. To summarize the above, we can derive the formula for a perfectly buried cable. Here's what we get:
- trench depth 900mm
- sand cushion at the bottom 100-150mm
- the cable itself
- sand cushion over cable 100-150mm
- Red brick
- soil layer 200-250mm without coarse rocks
- warning tape
- residual soil layer
Each layer after laying is compacted manually or mechanically.
As a result, you get a technologically correct and “permanently” laid cable.
Insulation material and thickness
Two elements that determine safety and resistance to fire when the wire overheats.
- Rubber insulation gives the product flexibility and low hygroscopicity.
- Polyvinyl chloride is used in electrical networks from 0.66 to 6 kV. It is elastic, cheap, light, heat-resistant.
- XLPE insulation is a new innovative method to improve the safety of electrical wiring. Low-density polyethylene molecules, when irradiated with fast electrons, followed by foaming in the presence of stabilizers and reaction catalysts, form cross-linked bonds.
- The resulting material has light weight, high strength, a service life of 30 years, and when shorted, can withstand heating up to +2500 C, and heating of the conductor up to +900 C.
Operating temperature range from -50 to +500 C.
According to GOST, the insulation thickness for each wire core with a cross-section of 2.5 mm2 should be 0.6 mm. The thickness of the sheath insulation, which collects all the wires into a bundle, is at least 1.8 mm, and for one core - 1.6 mm.
Paper and fabric insulation is not used in residential wiring.
Laying cables in the ground in pipes
All of the above concerns the laying of armored cables. However, due to their high cost, the method most often used is to lay the usual marks in the ground without any armor VVG, AVVG and the like.
Here protection in the form of pipes is used:
- metal
- HDPE
- double-wall corrugated (DKC 121950 or Promsleeve)
The latter can contain both electrical cables and network and telecommunication cables.
Mistake #13
Polypropylene and sewer pipes are strictly prohibited, as well as metal hoses.
For 0.4 kV power cables, a red or black corrugated pipe is used. For low current – blue.
Such corrugation in its properties is much better than asbestos pipes, which were widely used previously.
Pipes are divided according to the degree of compression resistance. And they are able to withstand pressures of several hundred kN.
By wearing special rubber seals, sections of such corrugated tubes can be connected to each other with couplings.
Connection protection degree – IP67!
The cable fill factor in the pipe and corrugation should be 1.4. What does this mean?
Mistake #14
The diameter of the corrugation or pipe should be such that the cable in it occupies no more than 40% of the total space.
Please note that not all HDPE pipes are equally useful for underground installation of cable lines. The vast majority of them are pipes for cold water supply with an operating temperature of up to 40C.
And some cables in normal modes at maximum loads heat up to 90C! Here are the corresponding letters and documents about the ban on HDPE pipes from Rosseti and Rosstandart.
Letters on the use of HDPE pipes
True, this applies primarily to high-voltage cable lines, so for your private house, in principle, little changes, you can use it.
In what cases are pipes still used? For example, in those when it is not physically possible to meet certain requirements and standards for minimum distances:
- when laying in close proximity to or through trees
- approaching or crossing with pipelines or other electrical networks
In such cramped conditions, a reduction in distance is allowed, but with the obligatory use of pipes. They protect:
- from mechanical influences and shocks
- from stray currents
- from aggressive soils
- from rodents
If the route is long (tens of meters), it is best to tighten the cable into the pipe using a special broach with a cable stocking.
And to put this broach inside, use a vacuum cleaner and a strong rope. The rope will be more fun to tighten if you attach a piece of cork or a plastic bag to its end.
Mistake #15
When joining metal sections of pipe, do not use welding under any circumstances if the cable is already pulled inside.
In this case, it is better to use threaded connections, or tighten the input into an initially straight section, and then bend it with a pipe bender.
About twisted pair
Twisted pair has been used for over a hundred years, even if it originally looked a little different. It was first used on American telephone lines. It got its name due to the fact that the paired conductors through which the signal travels were twisted together along the entire length of the line. This protected against interference and interference, and if changes did occur, they affected both cables equally.
Twisted pair is still used to build low-current networks up to 24 V: telephones, Internet, cameras, alarms, security and industrial networks. For a home, the conductors are too thin to organize electrical wiring. Will not withstand high stress.
Has the following characteristics:
Advantages and disadvantages
Cheapness
Difficult to damage until the signal is completely lost
Can be bent at large angles
Resistant to interference
Often receives microdamage when bending too much or when pinched by heavy objects, which leads to a weakening of the signal
Susceptible to electromagnetic fields as standard
Twisted pair cable ensures stable data exchange between devices in the apartment and the Internet at a speed of 1 Gbit/s, if all devices have the appropriate connectors. A good choice for carrying out the last few tens or hundreds of meters to the final equipment. For longer distances or connection speeds, optics are used.
Horizontal directional drilling method
When the width of the road surface exceeds 10 meters, it is better to use another technology - horizontal directional drilling, or HDD for short. The maximum pipe diameter for this operation is 1200 mm, but private developers do not need such figures. It is possible to lay any highways - both metal and plastic. For horizontal directional drilling, the master will need a special drilling rig designed for this job.
It is installed in the place on the side of the road where the entrance to the pipeline route will be located under the road. To drill a hole, a monitor and locators are used: this equipment will make it possible to avoid even minimal deviations from the given trajectory. HDD is a method that is used to lay communications under any (artificial, natural) objects, at any depth.
Laying a pipeline using a drilling rig also consists of several stages.
- First, they examine the site of future work and study the communications diagram, then prepare trenches and install equipment.
- Then a pilot well is drilled. For punching, a drill head is used, which consists of a pipe and a conical tip made of hard alloy. It has holes designed to supply bentonite drilling fluid. Its tasks are to reduce friction, cool the head, and bring soil to the surface. The body of the working tool is connected to a tubular flexible rod, which is activated by hydraulic jacks.
- After the pilot well has been installed, it is expanded. Before this operation, the drill head is disconnected, and a reverse-action expander - a rimmer - is installed in its place. In order for the hole diameter to be sufficient for the pipeline, the diameter of the expander must be 1.5-2 times larger. The rimmer is rotated and pulled in the direction of the drilling rig.
The last stage is stretching the pipeline. To do this, attach a nozzle with a swivel to the pipe using a hinged earring, which will prevent rotation of the element. The other end of the swivel is connected to the rimmer, after which the pipeline is pulled into the well.
Yes, this is a possible alternative, but it will require additional investment. If anyone is wondering how much it will cost to rent equipment, they say that “hiring” the installation along with the staff will cost on average 1000-1400 rubles per hour. Prices, of course, can rise.
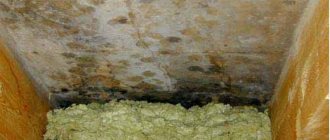
How to lay a sewer system under the foundation of a private house
If a shallow foundation, monolithic slab or USHP is chosen for the house, the sewerage system will have to be laid under them.
Shallow foundation
In modern construction of private houses, this type of foundation is used more and more often. In this case, the depth of the tape may be 40 cm, and it will not be possible to lay the pipe through the foundation. Then communications, including sewerage, are laid under the foundation strip. But not in the pillow, but under it. With a cushion height of 30 cm, the passage must be made below this mark.
All communications in this case are laid before the foundation is laid, and not after. The passage location is marked, a trench is dug, and the soil at its bottom is compacted. Next, you need to make a case from a thicker-walled pipe, for example, for a 110 mm sewer, a thicker red pipe with a diameter of 160-200 mm, laid level on the ground, will do. And inside it it will be possible to lay the main sewer pipe of 110 mm with the required slope.
Scheme of laying a case for a sewer pipe under a shallow foundation
The passage area must be filled from above and compacted layer by layer with exactly the same soil as at the bottom of the rest of the trench under the foundation. At the end of the work on laying the liner, the soil located nearby in the trench also needs to be compacted so that the density of the base under the foundation pad is the same over the entire area.
Slab foundations
When installing a monolithic foundation or USHP, the loads on the soil are uniform over its entire area. Compared to strip foundations, they are much smaller. Therefore, you can often see how the sewerage installation is done almost under the monolithic slab itself.
But it’s better to play it safe once again and lay the pipe at least 20-30 cm deep into the cushion under the foundation so that it doesn’t get crushed anywhere. Make exits in the right places, put plugs on them, fill them, pour them well and compact the sand over the pipe.
Video on the topic of sewerage installation under a slab foundation:
What to choose for telephone lines
Outside the premises, telephone lines are laid underground, protecting the wires with special structures or stretching them inside pipes. It is also possible to lay the cable over the air.
For wiring on the walls of houses, products of the following brands are used: TPVBG, TPPep, PRPPM. And for underground and overhead lines - TCPP(v)t, TCPPmPt, PRPPMt, PRPPMS, TB, TK, TPPepB, TPPepZBbShp, etc.
For home wiring, simple products without armor or screens are used. The insulating material of such cables is PVC or rubber, and their service life can reach 15 years.
Minimum order
Minimum order within Moscow and the Moscow region:
10,000 rub.
When connecting a residential building, industrial or commercial facility to the power supply network, it is often necessary to resort to excavation work to lay the cable from the distributor to the consumer. According to current legislation and existing rules, before starting to dig a trench for a cable, you must obtain special permission for this. Responsibility for documenting excavation work lies with the owner of the property. But even if permission has already been obtained, you need to entrust the construction of the trench to qualified excavators, since this work requires certain knowledge and responsibility of the performer.
How to calculate the load on electrical wiring
Knowing the total power that the equipment should consume in the entire room, you can calculate the load on the power line.
Knowing the total power, you can calculate the load on the power lines.
The minimum value will be equal to the sum of the powers of all energy consumers in the house, multiplied by a factor of 0.8, and the maximum by 1.2.
The formula looks like this:
(P1+P2+P3+…Pn) * 0.8 = P,
where Pn is the power of the electrical appliance in the house, and P is the permissible load on the wiring.
Auger drilling
This is another answer to the question of how to lay a pipe under the road. In this case, the hydraulic unit acts as the main working unit. This trenchless pipeline installation differs from the previous method.
- First, pits are dug. Their depth should be one meter greater than that of the trench. A hydraulic unit with an auger is lowered to the bottom of the inlet area.
- The well is drilled using a compression pipe. Monitor the correct operation of the laser. Part of the soil is removed, creating a hole.
- After the first section with the nozzle almost completely enters the ground, the next element with the auger is attached to it.
- At the moment when the end of the column appears in the opposite pit, it begins to be removed from the well, sequentially removing the augers.
Pipes or cases are immediately installed inside the tunnel. The maximum diameter of such holes is 1720 mm.