To provide the coolant with the opportunity to expand when heated, it is necessary to install an expansion tank in the heating system. This is a very important event. It will protect pipes and radiators from unnecessary loads and significantly increase the service life of the functional elements of the autonomous heating system.
We will talk about how the expansion tank works in open and closed circuits. We'll show you how to install it correctly in both versions of the system. In our article you will find a description of the technology for connecting this backup capacity and useful recommendations.
Where is the expansion tank installed for heating?
So, the installation of the tank depends on the type of heating system and the purpose of the tank itself. The question is not why an expansion tank is needed, but where it should compensate for the expansion of water. That is, in the heating network of a private house there may be not one such vessel, but several. Here is a list of functions assigned to various expansion tanks:
- compensation of thermal expansion of water in closed heating systems;
- in open networks, the reservoir performs 2 functions - it absorbs excess coolant volume and removes air from the system into the atmosphere;
- under certain conditions, the membrane tank serves as an addition to the standard expansion tank of the gas boiler;
- absorb excess heated water in the hot water supply network.
Being at the highest point of an open type system, the tank acts as an air vent.
In open heating networks, the water in the tank comes into contact with atmospheric air. Therefore, the installation of the expansion tank is provided at the highest point - on the riser coming from the boiler. Often these systems are made gravity, with increased diameters of pipelines and a large amount of coolant. The capacity of the tank should be appropriate and be about 10% of the total volume of water. Where else if not in the attic to put such a large tank?
Reference. In one-story houses of old construction, there are small expansion tanks for an open heating system, installed in the kitchen next to the floor-standing gas boiler. This is also correct; a container located under the ceiling is easier to control. True, it doesn't look too good in the interior. To put it mildly.
Alternative homemade open-type tanks from a plastic canister (photo on the left) and an air receiver
Closed-type heating systems are distinguished by the fact that the membrane expansion tank for water is completely sealed. The optimal installation option is in the boiler room, next to other equipment. Another place where it is sometimes necessary to install a closed expansion tank for heating is the kitchen in a small house, since the boiler is located there.
In closed systems operating on non-freezing coolant, the volume of the tank should be increased to 15% of the total amount of liquid. The reason is the increased coefficient of thermal expansion of glycol antifreeze.
Leak search
As we already understood, if there is no tightness, there will be a sharp loss of pressure. Of course, it is necessary to conduct a full inspection of the system to identify all problems. The main thing here is not to rush!
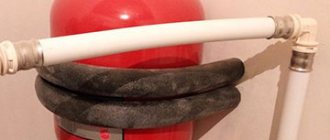
The best thing is that leaks can be seen quite quickly, since in places where there are leaks there will be accumulations of moisture or a white coating.
During the inspection, you need to inspect everything very carefully, without rushing. It is especially worth paying attention to the connection points. So, for example, pipes made of metal are more likely to leak at the seams. You have found the leak, but what to do next? We need to start fixing this problem.
How does this happen? The detected leakage area is repacked, new gaskets and seals are installed. Be sure to install new parts a little thicker than the previous ones. If it turns out that the pipeline is severely damaged, then it is worth replacing with a new one.
About additional capacities
Manufacturers equip wall-mounted heat generators with built-in tanks that absorb excess heated coolant. The dimensions of the tank do not always correspond to the house heating wiring; sometimes the capacity is not enough. To ensure that the coolant pressure during heating is within normal limits, the displacement is calculated and an additional expansion tank is installed for the wall-mounted boiler.
For example, you converted an open gravity system into a closed one without replacing the mains. The new heating unit was selected according to the heat load. The built-in boiler tank is not enough to expand such an amount of water.
Another example: heated floor heating of all rooms of a two- or three-story house plus a radiator network. Here, the volume of coolant will also be impressive; a small tank will not be able to cope with its increase, and the pressure inside the system will increase. A second expansion tank for the boiler is needed.
Note. The second tank to help the boiler is also a closed membrane container, located in the furnace room.
When the hot water supply at home is provided by an indirect heating boiler, a similar problem arises - where to put the excess sanitary water from the storage tank? A simple solution is to install a relief valve, as is done on electric water heaters. But an indirect heating boiler with a volume of 200...300 liters will lose too much hot water through the valve. The right solution is to select and install an expansion tank for the boiler.
Reference. Buffer tanks (heat accumulators) from some manufacturers also provide the ability to connect a compensating tank. Moreover, experts recommend installing it even on large-capacity electric boilers, as shown in the video:
Troubleshooting methods
The leak in the plastic tank is repaired. In terms of durability, the design is inferior to new parts, although it will allow you to delay replacement. Let's look in detail at how to seal the expansion tank.
Sealing
Holes in plastic containers are eliminated using high temperature and reinforcing elements. During soldering, the polymer softens, acquiring the desired shape. The reinforcing structure increases the bond strength after hardening.
Soldering is considered a professional repair method. The procedure requires tools:
- soldering iron;
- metal scissors;
- a piece of fine mesh.
How to install the tank correctly
When installing an open tank in the attic, a number of rules must be followed:
- The container should stand directly above the boiler and be connected to it by a vertical riser of the supply line.
- The body of the vessel must be carefully insulated so as not to waste heat heating a cold attic.
- It is imperative to organize an emergency overflow so that in an emergency situation hot water does not flood the ceiling.
- To simplify level control and make-up, it is recommended to install 2 additional pipelines into the boiler room, as shown in the tank connection diagram:
Note. It is customary to direct the emergency overflow pipe to the sewer network. But some homeowners, in order to simplify the task, take it under the roof straight to the street.
Installation of a membrane-type expansion tank is carried out vertically or horizontally in any position. Small containers are usually attached to the wall with a clamp or suspended from a special bracket, large containers are simply placed on the floor. There is one point here: the performance of a membrane tank does not depend on its orientation in space, which cannot be said about its service life.
A closed-type vessel will last longer if it is mounted vertically with the air chamber upward. Sooner or later, the membrane will exhaust its resource and cracks will appear. When the tank is positioned horizontally, air from the chamber will quickly penetrate into the coolant, which will take its place. Installing a new expansion tank for heating will have to be done urgently. If the container hangs upside down on the bracket, the effect will appear faster.
In a normal vertical position, air from the upper chamber will slowly penetrate through the cracks into the lower one, just as the coolant will reluctantly go up. As long as the size and number of cracks do not increase to a critical level, the heating will work properly. The process takes a long time, and you will not notice the problem right away.
A sure sign of critical wear and cracking of the membrane in a closed expansion tank is a drop in pressure in the home heating network. Periodically monitor the pressure gauge readings on the safety group.
But no matter how you place the vessel, you should adhere to the following recommendations:
- The product must be located in the boiler room in such a way that it is convenient to service. Do not install floor-standing units close to a wall.
- When wall-mounting the expansion tank of the heating system, do not place it too high so that during maintenance you do not have to reach the shut-off valve or air valve.
- The load from the supply pipelines and shut-off valves should not fall on the tank pipe. Attach the pipes and taps separately, this will make it easier to replace the tank in the event of a breakdown.
- It is not allowed to lay the supply pipe along the floor through a passage or hang it at head height.
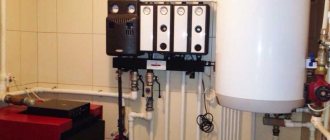
Option for placing equipment in the boiler room - a large tank is placed directly on the floor
Video description
Repairing a car's expansion tank.
Sealing
Motorists patch up minor damage. Special sealant for cars “DoneDeal” is a temporary measure to eliminate cracks. Under the influence of an aggressive coolant environment, the product quickly loses its fixing characteristics. The mass is applied to a previously cleaned and degreased surface and left for 4 hours to polymerize.
The action of epoxy adhesive is similar in characteristics to sealant. Cracks in the plastic tank are filled with a liquid composition and dried. The downside of resin is that it requires careful preparation of the working surface. The problem area is cleaned of debris, degreased with a solvent, and then the mass is applied.
Repair options Source drive2.com
Cold soldering
If you don’t have a soldering iron, use special glue to seal cracks. The fixing composition "3M DP8005" is suitable for plastic. The two-component option, due to adhesion, helps to seal polymer joints without preparation. The chemical is resistant to moisture and aggressive liquids. The high price is the only drawback of the product.
When working with plastic, motorists recommend Hosch glue. The two-component mass is intended for sealing cracks and holes in polymers. The seam retains strength and elasticity at high pressure (up to 12 atm) and low temperatures.
Having decided how to seal the expansion tank, you can begin the procedure. Before use, the surface of the plastic is cleaned of dirt, wiped with acetone, and left to dry. The liquid ingredient is applied to the damaged area. From the second bottle, the area is treated with granulate, then again with glue.
Two-component product Source tapes-store.com
The fixing solution sets within a few minutes. When the components of the composition come into contact, steam is released and the temperature rises. After drying, the tank is connected to the cooling system and liquid is poured.
When working with through cracks, the cold welding method is combined with a sealant. The outside of the damaged area is filled with glue, and an additional agent is used from the inside. The expansion tank dries for a day, then it is checked for leaks.
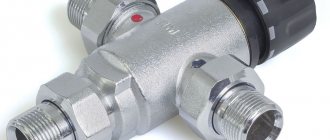
Connection methods
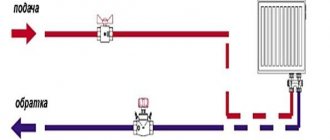
It is correct to connect the tank hydraulically at a point located on the return line in front of the boiler and circulation pump (if viewed in the direction of water flow). The tank can also be installed on the supply side, but under one condition: the pump must be located on the supply line and still stand in front of the compensating tank.
The best place to connect a membrane tank is the heating return in the boiler room, but always before the pump, and not after it
Point two: when a solid fuel boiler overheats, the tank connected to the supply will begin to fill with steam. Air and steam are compressible media, in which case the rubber “bulb” will no longer compensate for the expansion of water.
The correct connection of the expansion tank to the heating system is always carried out through a shut-off ball valve with an American connection. Then the tank can be taken out of service at any time and quickly replaced without waiting for the coolant to cool down. If you install a tee and a second tap on the supply line, as shown in the connection diagram, then the container can be emptied first:
Recommendation. When connecting an indirect heating boiler with a boiler and DHW, connect the expansion tank to the cold water supply line at the inlet to the storage tank. Here a special tank is used that can withstand the pressure of the water supply network. A heating tank or hydraulic accumulator is not suitable. How to distinguish them, watch the video:
Models of the Zilmet OEM-Pro series
This expansion tank for the heating system usually receives positive reviews. Many buyers praise it for its durable body. The device also uses a good fuse. Only one membrane is used at the tank. If you trust the experts, it wears off slowly. It is recommended to install the model behind the radiator grille.
It is also worth noting that the modification is not afraid of high temperatures. A maximum of 10 liters of coolant is allowed. The air chamber is used with a small volume. The outlet valve in the device is designed for heavy loads. The maximum pressure indicator is at least 2 Pa. It is recommended to connect the thermostat behind the counter above the mixer. The modification is great for gas boilers. The price for it fluctuates around 1,700 rubles.
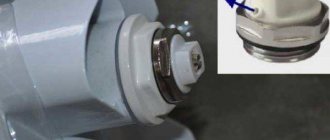
How to check and pump up the expansion tank
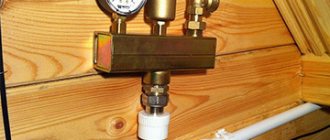
Before connecting and filling the tank with coolant, it is necessary to check the pressure in the air chamber of the tank for compliance with the pressure in the heating network. To do this, a plastic plug is unscrewed or removed from the side of the air compartment, and under it there is a regular spool, familiar to you from car cameras. You measure the pressure with a pressure gauge and adjust it to your system by pumping it up with a pump or releasing it by pressing the spool rod.
The tank is inflated through the fitting using a conventional hand pump
For example, the design pressure in the network after filling should be 1.3 Bar. Then in the air compartment of the expansion tank you need to make 1.1 Bar, that is, 0.2 Bar less. The trick is to keep the rubber “bulb” of the tank pressed against the water side. Otherwise, when cooling, the compressed coolant will begin to draw air through automatic air vents, which is unacceptable. After setting up, open the tap, fill the entire system with coolant and calmly start the boiler.
Note. Some manufacturers indicate on the packaging of their products the factory pressure in the air compartment. Using it, you can choose a suitable tank and not bother with pumping.
Principle of operation
The water-type heating scheme involves both natural and forced movement of the coolant. Floor-standing or wall-mounted boiler models act as heating devices: one or two circuits, a heat carrier in the form of steam, water or antifreeze. An open-type heating system most often uses plain water as a coolant.
Moreover, its movement occurs naturally due to the different densities of cold and hot water and the slope under which the pipeline is laid. The fact is that heated water has a much lower density than cold water. As a result, hydrostatic pressure is created, thanks to which hot water moves to the radiators.