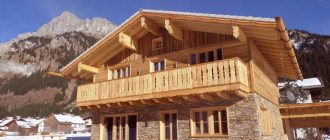
Chalet is a small rural house in the Alpine mountains. It is resistant to low temperatures and large amounts of precipitation in the form of snow.
This building from Switzerland made a real splash in country house construction all over the world, serving as a prototype for both houses and small architectural objects for recreation areas.
Chalet style idea
Chalet-style gazebos have a number of distinctive features by which you can easily determine whether a building belongs to this direction.
In this publication we will look at the variety of these buildings, list their key features, and also show many photographs of this Alpine style in the construction of gazebos.
Distinctive features
The chalet style originated in the Alps. Initially, this term denoted small shepherd's houses, intended not so much for long-term living as for protection from bad weather. Later, such structures began to be erected in romantic parks to create a pastoral atmosphere.
Chalet-style gazebos will not leave anyone indifferent to them
Gradually, this style won fans in many countries around the world. Now chalet-style gazebos can be open, no longer able to protect from rain or frost. Nevertheless, they still have a number of characteristic features:
- Large roof with two or four slopes. The angle of their inclination is usually small - the snow accumulated on the surface served for additional thermal insulation. The slopes should be large, up to 1–1.5 m, so that snowdrifts do not accumulate near the walls.
- Using only natural materials: stone, wood and clay. This emphasizes both the ancient roots of the style and its solidity. Metal, as well as modern materials like polycarbonate or plexiglass, are extremely undesirable in a chalet. An exception can be made for the roof: authentic clay tiles are very heavy and inconvenient to use. Metal tiles can be a replacement.
- The color scheme should be natural, with a predominance of brown-red and gray shades.
- Ceiling beams must be massive, made of rectangular timber. Wide cornices are also welcome.
- A fireplace or barbecue is an important part of the chalet, without it it would be difficult in the cold.
- The facade should traditionally be located on the east side.
- The floor is made of stone or wood, and its demonstrative roughness and simplicity are valued.
Simplicity and quality that attracts the eye
Styles
Before creating a project, look to the Internet for inspiration. There you will quickly find a lot of photos of beautiful gazebos. But choosing the option you like and taking it as the basis for the future structure will take time.
We recommend that you familiarize yourself with the design styles before diving headfirst into making your dreams come true. In this case, the search will go faster: it’s easier when you know what you’re looking for.
How to age wood
It is the aged wood that best fits into the chalet style. This effect can be achieved in two ways:
- Thermal. The wood is carefully treated with fire retardants, then fired over an open fire until contrasting structural lines appear. The tree should not be on fire for too long; overexposure will damage it. Finally, the bars are varnished.
- Mechanical. Suitable only for conifers, in which the trunk is divided into soft and hard layers. The soft layer is scraped off with a metal brush until the relief of the hard structure appears. After this, the wood is varnished.
Loft
The eye-catching industrial style quickly wins sympathy. Creating the atmosphere of an old factory or factory on their site allows summer residents to “play” with a combination of brick, concrete, glass and metal. In the decoration of the facade, you can actively use brick pipes and elements of the ventilation system. The main thing is that all materials should be unprocessed and the decor should be rough.
Self-construction
So, let's look at the plan for building a chalet-style gazebo. For example, let’s take an open-type wooden structure without a barbecue.
First of all, you need to choose a suitable location for the building. It is good if it is possible, according to tradition, to direct the facade to the east - so that there is a convenient approach to it. A good choice would be proximity to an artificial pond or simply a particularly beautiful area of the garden.
Then you need to prepare all the necessary tools and supplies. You will need:
- drill or shovel;
- saw;
- electric plane;
- axe;
- jigsaw;
- screwdriver;
- building level and tape measure;
- roofing felt;
- metal rods 6 mm;
- concrete;
- fastening materials: anchor bolts, self-tapping screws, corners.
Measurements and calculations
Construction begins with drawing up a drawing of the future gazebo. Recommended sequence of actions:
- Decide whether there will be a barbecue in your chalet, and if so, what size.
- Consider the shape of the gazebo. Traditionally chalets were rectangular, but now greater variety is allowed. In particular, polygons and two-room designs are popular, where one room serves as a kitchen, and the second as a recreation area.
- Determine the size of the gazebo, taking into account the available space on the site and your own financial capabilities. This style assumes space, and if you intend to gather there with friends or family, it is advisable to allocate about 4-5 square meters. m per person. The height of the gazebo must be at least 2 m.
Don't skimp on the quality of parts
- Determine whether the gazebo will be open, closed or semi-closed. If closed, will the walls be stone or wooden?
- Based on the received plan, calculate the required amount of materials.
Foundation
For a chalet-style gazebo, the foundation is often cast-in-place piles. They are installed like this:
- Using pegs and rope, mark the perimeter of the future structure. Make sure all walls are level. Pull the ropes along and across the future gazebo at a distance of 2 m from each other. Drive in pegs at their intersections - this is a guide for the piles.
- Along the perimeter of the foundation and in marked places, drill or dig holes at least 50 cm wide and 50 cm deep beyond the freezing level of the soil. If water fills more than a quarter of the holes, pump it out.
- Roll the roofing felt into pipes. They should fit tightly into the prepared holes, while rising 20–30 cm above the soil level. Roll in two layers. Secure the rolls with tape or thin wire. Wrap the lower part with thick polyethylene.
- Make a frame for each pile using 3-4 metal rods. Fasten the rods together using crossbars every 50–60 cm. The upper part of the frame should rise above the soil level so as to be 2–3 cm lower. At the same time, some experts advise taking long pins that can be driven into the ground 1–1.5 m below the bottom level.
- Drive the frame into the holes. Pour the concrete and compact it with a construction vibrator.
- Dig a ditch connecting all the supports. Lay a dense layer of sand at the bottom of the ditch and a layer of crushed stone on top of it. Then roofing material is laid on the bottom, formwork is made and reinforced rods are inserted into it, which are connected to the pile frame. The formwork is moistened and filled with concrete.
After pouring the foundation, it should be left for about a month. Although concrete visually hardens earlier, it gains full strength only after this period.
Base and trim
The next step is installation of the base. For it, it is advisable to use a beam with a cross-section of 15x15 or 20x20 cm. Work process:
- Treat the wood with rot and insect repellents, as well as fire retardants.
- Wrap the foundation with timber in two tiers. Self-tapping screws or anchor bolts are used for fastening.
- Install the lower longitudinal joist, securing it to the harness with a half-wood cut. It should go through the center. Then install transverse logs perpendicular to it. For a better fit, grooves are cut out at their ends for connection.
If the area is large, several longitudinal logs are installed so that they diverge in rays. In this case, the short ones are attached between them.
Flooring
Now you need to install the floor. To do this, it is recommended to use a dark tongue-and-groove board with a small but noticeable relief.
The floor is laid like this:
- Wood for flooring is sawn into pieces of the required length and treated with the same means as trim beams.
- Before fastening the boards with self-tapping screws, holes with a diameter of 10 mm are drilled in the places of future fastening. When laying, a checkerboard layout is encouraged - so that 7-8 boards are located perpendicular to the strapping, forming a square. Adjacent squares should be parallel to the strapping and so on in a checkerboard pattern.
- First, the over-drilled holes are masked with suitable sized pieces of dowels, fixing them with wood glue.
You can also hide the fastening points by screwing in the screws at an angle of 45°.
Read also: what is the best way to make a reliable floor in a gazebo.
Rafters
All that remains is to install the supports and rafters. The work is carried out as follows:
- Install vertical supports in the corners of the structure and along the perimeter of the bottom trim. They can be made either from timber or from deliberately rough-hewn logs. Secure the racks using self-tapping screws and temporary supports.
- Secure the posts using the top strap.
- Install the rafter system. For this, 5x10 or 5x20 cm boards made of coniferous trees are recommended. First of all, the Mauerlat is mounted - a square, which represents the lower support for the rafters.
- Attach the beams to the Mauerlat, and at their central cross - a support for the ridge girder, that is, the upper part of the structure. The purlin itself must be installed strictly horizontally on the support.
- Attach 4 boards to the ridge run, acting as diagonal rafters. They should diverge crosswise. Do not forget that the bevels should be located further than the walls, ideally at least 1 m.
- Secure the sheathing between the rafters and lay metal tiles on it. Secure it with self-tapping screws.
A light open chalet-style gazebo is ready! If desired, fabric sheets can be attached to the top harness - they provide coolness and are often used in this style. The fabric is preferably light - this will create a beautiful contrast with the heavy dark wood.
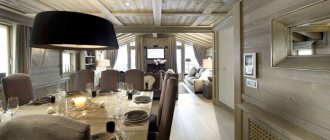
For interior decoration, you need to use solid wooden furniture that matches the style of the gazebo.
Floor installation
Designing a gazebo, as mentioned above, includes a completely sanded floor, varnished, for greater visibility of the wood structure. It is laid according to the platform rule, i.e. it is covered along the entire perimeter of the foundation. The base of the walls is erected on the prepared floor platform.
The frame pillars are distributed along the perimeter of the octagonal structure, then intermediate logs are mounted. Here, correct calculations and accuracy play a key role, because all diagonal lines of the structure must be the same.
A floorboard is mounted on top of the posts. All protruding parts are trimmed along the edge of the binding.
Lighting
This type of decoration is a must. Firstly, it’s a great opportunity to see something you’re proud of “from a different angle.” Secondly, creating colored lighting will add originality to the structure.
To realize your ideas, the following are suitable: LED strip, chandeliers, lanterns, wall sconces. You can give the structure “weightlessness” and illuminate it from below, or use the same strip with bulbs up under the ceiling.
Gazebo on the site
Such a hut is a vertical structure, which is raised 10-20 centimeters from the ground. Among the distinctive characteristics of this type of modern gazebo, professionals note the use of fresh flowers for decoration.
Advice! You can select plant varieties that are capable of independently forming a frame. The owner only needs to trim them periodically.
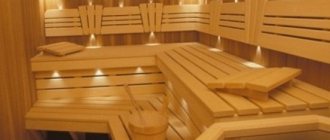
Scandinavian
Came to us from countries with harsh climates. This fact is reflected in the character of the style: a powerful foundation, the use of laminated or solid timber, laconic forms. Glazed windows and a durable roof are designed to protect from bad weather and the weight of snow.
A mandatory element of the interior of these beautiful summerhouses is a stove. It is used mainly in construction in cold winter conditions. After all, how nice it is to contemplate the snow-covered landscape, listening to the soft crackling of wood in the fireplace and enjoying a cup of hot tea.
Wooden frame for a chalet-style gazebo.
The material for installing the frame is solid wooden elements, treated with antiseptic impregnations and, as a rule, “aged” by thermal or mechanical processing methods, with the obligatory preservation of the natural texture of the wood, i.e. there is no talk of any painting, this will clearly contradict the chosen the image of a chalet gazebo, so it will be enough to treat it with wood varnish.
Natural stone is used for supporting pillars, but if funds do not allow such material, then brick in gray tones to resemble stone or blocks is used, followed by finishing with tiles (for example, clinker) imitating natural stone.
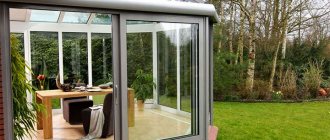
Mediterranean
Unlike the solid Scandinavian one, this building will be airy and light. The use of white and blue colors in the design, the absence of walls, and draping with organza curtains is an excellent option for southern latitudes. Marine themes are actively used in interior decor: shells, elements of a ship, chests, and you never know what you might find in your closets.
Actively use rattan furniture, it is simply necessary here. To learn how to build a beautiful gazebo in a marine style, watch video tutorials on the Internet.
Fabrics
Any textile can be used in the interior of the gazebo. The main, but not the only criterion will be the fabric’s resistance to fading. And here your imagination can not be stopped: after all, with the help of material you can advantageously emphasize the beauty of architectural elements or hide internal flaws.
Tablecloths, napkins, pillows, blankets would be appropriate - anything that can further reflect the chosen style. The main thing is not to overdo it with fabric in options with a strict or laconic design.
Furniture
The furnishings are selected based on the design style. For these purposes, soft sofas, couches or armchairs are used - something on which you can lie down and relax. Wicker furniture has long been loved by summer residents: it is not afraid of the scorching rays of the sun or excessive humidity, and it looks great.
If the decor seems boring, you can always add bright spots in the form of decorative pillows. Forged chairs and tables will be elegant, but will require a metal pavilion. A beautiful cheap gazebo made of plastic will perfectly fit furniture made of the same material - a good budget option.
Examples of designer gazebos
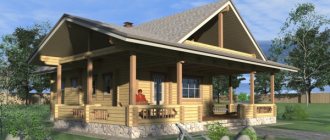
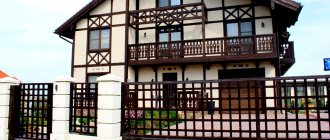
Classic designs
Dark and noble colors, natural materials, as well as a hipped roof - this is the basis of Alpine construction in Russian summer cottages. It is these features that will be found in the vast majority of Chalet gazebos discussed in this publication.
Classic gazebos are ideally suited to the harsh Russian climate, as they are guaranteed to withstand snowy winters and low temperatures.
Solid wood
Most of the Alpine buildings are distinguished by their large diameter and cross-section of wood. This approach makes it possible to make the gazebo massive and stable, which is extremely important for withstanding harsh weather conditions.
You will not find light and airy structures among the buildings of this style. The approach to relaxation here is completely different - thorough, powerful and serious.
With barbecue and fireplace
To heat chalet houses, stoves have long been used, which were located inside the home and provided heat for the residents. In the case of gazebos, the design does not involve heating the room, however, cooking meat on coals indoors is quite appropriate.
It is important to note that this style does not tolerate metal parts, therefore, the grill or barbecue must be made of brick or stone. The same applies to the fireplace - installing a potbelly stove with a glass door will not work.
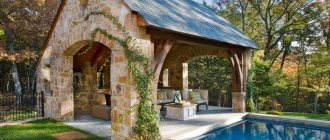
Near the pond
The pinnacle of landscape design will be a building near a pond, which will emphasize the closeness of the gazebo to nature. You don’t have to buy a cottage near a lake to organize such beauty. A small artificial pond or pool is enough.
Together with the “Alpine Hill” you will achieve an exceptionally aesthetic summer cottage and gazebo.
Alpine house project
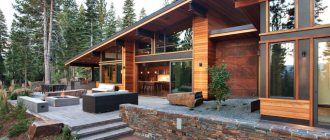
Modern
The main difference between this design is the mixing of natural materials with artificial ones. In this case, you can absolutely safely “mix” plastic with stone, polycarbonate with wood, stucco molding and forged elements - no one will say a word against you.
Unusual transitions from straight lines to smooth, bright colors in the interior - this riot of possibilities serves for maximum comfort and convenience of vacationers.