02.05.2011
The very first question that arises among buyers of finishing materials is whether porcelain tiles can be laid on walls? Many people know that this material is used for façade cladding and for forming floor surfaces. However, it is also known that this material is quite heavy. The weight of a 3 cm thick tile can reach more than 150 kg if the dimensions of the cladding fragment are 120x180 or 120x190 cm.
And yet, porcelain stoneware is not as heavy as natural stone, and its colors are so diverse that they allow you to create real masterpieces on the walls in the form of artistic cladding or panels. The scope of application has expanded not so long ago, although porcelain tiles have been represented on the building materials market for several decades.
The development of the construction of modern structures with curtain facades provides porcelain stoneware with the opportunity to successfully compete with glass, which in terms of specific gravity, depending on the type, can even exceed porcelain stoneware by 3 times, as is the case with lead oxide glass. The ability to effectively imitate natural stone, wood, leather and other materials makes porcelain tiles an interesting material for exterior and interior designers.
Laying porcelain tiles on the wall is carried out using two technologies:
- using a complex system of supporting frame made of guide profiles onto which the cladding is attached. This scheme is convenient when finishing buildings using the technology of suspended ventilated facades;
- finishing walls with porcelain tiles using construction adhesives. This method is used when decorating interior walls of various rooms and spaces.
Naturally, when choosing facing fragments, various factors that will affect the coating are taken into account. Depending on this, the type, format and thickness of the finishing material is selected. And depending on the design project, the color of the porcelain stoneware is selected, which can be monochromatic, full-color, natural materials, or even mosaic fragments for wall decoration.
What you need to know about laying porcelain tiles
When starting installation, you should take into account the features of large-format porcelain tiles. This will help you avoid common mistakes.
Thanks to manufacturing technology and composition, porcelain tiles are highly durable and waterproof. The variety of types of this material significantly expands the scope of application. It can be used as a floor covering, for cladding walls and fireplaces, after leveling the surface.
When choosing porcelain tiles, you should consider their thickness. It varies from 3 to 30 mm. Thin tiles are suitable for finishing vertical surfaces. For indoor flooring, tiles with a thickness of 12-20 mm are used, and for cladding steps and the entrance to the building it is better to use thicker material. At the same time, there are manufacturers who claim that laying thin porcelain stoneware on the floor is acceptable and prove this by the presence of a coating of thin material in their showrooms.
It is also necessary to take into account the properties of the material, depending on its type. So, when planning to use porcelain tiles as a floor covering, you should remember that this is a “cold” material and it is necessary to consider a floor heating system. But rectified porcelain tiles are not suitable for heated floors, since the technology for laying them requires a seamless method. Temperature changes may affect the integrity of the coating.
Tiles with a polished surface can be too slippery, so they are not used for tiling floors in bathrooms and on open balconies.
When choosing a material, you should focus on the following criteria:
- Tile weight. Porcelain tile is a heavy material. Its standard specific gravity is 2400 kg/m³, which is indicated in the certificate attached to the material. If this parameter does not correspond to reality, a violation of the manufacturing technology should be suspected. Such material will not meet its physical qualities;
- The inside of the tile. It should be smooth, without significant depressions. If it has deep flaws, it is better to refrain from purchasing such material, no matter how attractive the price may seem;
- Size. Tiles from the same batch must have the same size and shape.
Grouting joints
Seal the joints between the tiles with special putties. The glue used for installation is not suitable - in addition to the obvious lack of aesthetic appearance, its structure is coarse-grained.
Profile for expansion joint
Do not forget about expansion joints, if any. They are sealed either with silicone or using two components:
- elastic filler; it could be, for example, polyurethane foam or polystyrene foam; the size of the strip should be less than the depth of the seam so that there is a gap for the expansion of the filler;
- surface sealant (polyurethane or silicone based); the main characteristic of the material for sealing deformation gaps is elasticity;
Let's get back to grouting. According to the EN 13888 standard, fugue is classified according to its chemical composition:
- cement (designated CG); for regular seams (1);
- for improved seams (2);
Grouts with increased abrasive resistance (Ar) and reduced water absorption (W) have additional designations. Silicone grouts are classified as sealants.
- Grout class CG2 is suitable for domestic premises.
- For rooms with high humidity (bathrooms, showers, swimming pools) and interior work - class CG2 W.
- Commercial premises - class CG2 Ar.
- Objects with increased requirements for hygiene and resistance to chemicals (kitchen aprons, countertops, food production, hospitals, shops).
Cement putties
Due to their relative cheapness and huge tonal variety, cement grouts are much more popular than others. We recommend using material from European manufacturers. Many people mistakenly consider the choice of fugue to be a secondary matter, not realizing that a bad putty will ruin even a perfectly executed cladding in a few months.
Since porcelain tiles are most often installed in areas that do not have perfectly dry conditions, purchase a putty that contains water-repellent and antifungal components. Special impregnations that cover caulked seams help to further enhance the waterproofing of joints. Depending on the degree of penetration deep into the fugue, two classes of impregnation are distinguished:
- polymer varnish; penetrates deeply, providing good waterproofing;
- water repellent; impregnates the surface of the putty, damage to the top layer of the fugue leads to water barrier weaknesses;
Apply the impregnation with a brush, having previously taken care to protect the tiles from contact with the composition. Otherwise, stains may remain on the porcelain tiles. The technology requires double application: apply the second time a day later.
When choosing a grout mixture, remember that the tone of fresh grout is different from the shade of aged grout. Often there are differences even between the actual putty and the one shown on the packaging. If the color of the material is extremely important, experiment on a small area.
You can start caulking the seams no earlier than 24 hours after lining. An exception is the use of quick-setting glue (you need to wait at least 3-4 hours after installation). The joints must be thoroughly cleaned of the binder mixture, and the tiles must be washed. The grout is mixed according to the instructions on the package.
For jointing, use a rubber spatula or grater, which is used to apply the fugue to the seams. The mixture must fill at least two-thirds of the depth of the gap, otherwise there is a risk of destruction of the putty. Apply the composition with force, the voids are processed again. Remove any remaining residue immediately with a spatula. In one approach you can process 0.5–3 square meters. The specific area depends on the type of putty and manufacturer. It is easiest to work with glossy porcelain tiles. Matte, and even more so structured, is more difficult to grout - the fugue penetrates into the pores, from where it is difficult to wash out. In such cases, it is more convenient to wash the mixture with a damp kitchen sponge with an abrasive surface. Bring the seams to condition using a damp foam sponge. Some manufacturers produce special equipment, but their use is not essential. It is important to maintain diagonal movements in relation to the joints; “parallelism” washes the fugue out of the gaps. Before using a sponge, a round rubber spatula or an 8-10 mm cylindrical cable is often used to smooth and compact the fugue layer. As a result, the seams are obtained with a uniform depression and a smooth surface. The lining is finally washed off after 10-20 minutes, when the grout begins to dry out.
Epoxy putties
Epoxy grout feels rougher to the touch than cement grout.
They consist of two components: filler and resin. The quality of joints filled with a fugue of this type is an order of magnitude higher than those filled with cement putty. The material is very dense, waterproof and chemically inert to most chemicals.
Epoxy is much more difficult to use than conventional grout. The components should be mixed to the nearest gram. Due to the harmfulness, it is advisable to work with rubber gloves. In one approach, no more than a square of cladding is processed; the movements of the spatula do not differ from those already described. The lifespan of the finished composition is no more than half an hour. Uncured seams are generously moistened with water using a “hairy” kitchen sponge until an emulsion is formed. This is done with care so as not to wash the mixture out of the seams. Liquid residues of the mixture are removed with a hard cellulose sponge. When the sponge becomes saturated with resin, you need to replace it with a new one. Litokol has special sponges for epoxy grout; they are more expensive, but more durable. You need to wash off the epoxy grout before it starts to harden, otherwise problems will arise. The remaining plaque is washed off with water with the addition of 10% ethyl alcohol or special detergents (for example, Litonet Gel).
The new mosaic is spoiled by an epoxy coating with dirt.
A little about silicone
The use of silicone results in contact with the ceramic. Without waiting for setting, it is removed with a solvent (gasoline, toluene, ethyl acetate). The frozen material does not react to solvents; it can only be removed mechanically, with the risk of damaging the tiles.
Laying porcelain tiles with or without a seam: what to consider
There are two technological methods for laying large-format porcelain stoneware: with a seam and without a seam. Both methods are successfully used in different types of finishing work and each has its own advantages and disadvantages.
The seamless method involves laying slabs with minimal gaps between them. For such installation, rectified tiles are considered the best option. As a rule, the seams between such slabs are very small. Such seams are grouted with matching grout, which visually creates the impression of the integrity of the floor covering. But it should be remembered that this installation method is not used when tiling surfaces in unheated rooms, and it is also undesirable when using porcelain stoneware flooring. Temperature changes and high loads on floors can lead to deformation of the coating, causing the seams to separate and the visible integrity to be compromised. It is better to use the seamless method to cover vertical surfaces indoors, where a constant temperature is maintained.
Laying with a seam is preferable to use when tiling floors. In this case, it is necessary to take into account the load on the working surface and operating conditions. The higher the load on the floors, the wider the joint should be to reduce the deformation load. Generally, the size of the floor covering seam is 3-6 mm.
If the deformation is expected to be minimal, a small gap can be left.
When finishing walls, the seam size can be from 1.5 to 3 mm. In this case, you need to take into account the size of the porcelain stoneware. Large format tiles are laid with large gaps.
cutting
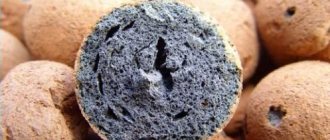
Unlike tiles, porcelain tiles are fired in a kiln twice, at a higher temperature. There is a hardened layer inside the material, which makes it difficult to cut using conventional methods.
For example, after cutting a line with a regular roller tile cutter, the corners often break off spontaneously. In addition, the size of the floor cladding reaches large values; it may simply not fit into the tile cutter. Therefore, the following cutting methods are used:
- Angle grinder - available in the arsenal of most home craftsmen;
- dry electric tile cutter - portable machine;
- “wet” network tile cutter is expensive, used only by professionals.
By analogy with walls, external corners can be found on the floor. Most often, they occur at the junctions with the balcony steps. Here, cutting the edges of two facing elements at an angle of 45° is usually used.
For the “grinder” you will need a special device. Dry, "wet" type machines usually have the ability to cut at an angle.
Learn more about cutting porcelain tiles here.
Features of working with large-format porcelain tiles
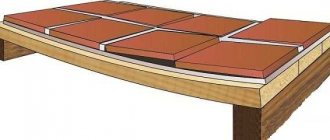
Large sizes of porcelain stoneware slabs are most preferable for surface finishing. Being large in size, it fits organically into the interior of modern apartments and is convenient for installation. But the installation of slabs of this size will have some features.
Note! It is better to lay complex slabs together, as the material may split at the point of bending or cutting. After applying the glue, the slab becomes quite heavy to work alone
First of all, you need to choose the right adhesive mixture. The label must indicate that this is an adhesive for porcelain tiles.
Also, some difficulties may arise when laying tiles on walls that have previously been coated with gypsum plaster. Due to its porous structure, plaster can make it difficult to firmly fix the slabs to the wall. Therefore, the plastered surface must first be prepared for the installation of porcelain stoneware.
What are seams used for?
Indeed, why is it not possible in any particular case to proceed with laying porcelain tiles on the floor without seams? Even the tile certificates clearly indicate the requirements - the minimum joints should be 2 or 3 mm. The reason is the instability of the parameters of mineral raw materials, due to which the tiles differ even within the same batch. And such parts will either “ruffle” or crumble at the edges against each other. But what about examples of work presented on the Internet? Where are porcelain stoneware floors shown without adhesive joints? This is a professional job that is quite expensive.
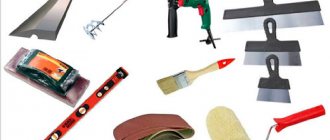
What tools are needed to work with large format tiles?
To cover surfaces with porcelain stoneware, you need a certain tool with which you can perform the work efficiently.
For these purposes you will need:
- mixer – necessary for preparing the working solution for installation;
- notched spatulas with large and small teeth - needed for applying glue to work surfaces;
- tile cutter or grinder;
- crosses for aligning seam sizes;
- floor leveling system;
- grout float, foam sponge - needed to clean the seams from excess glue and grout.
In addition, you will need a tape measure, a bubble level, a level, a rubber spatula, wire cutters, a mallet and a container for diluting the solution.
All of the above equipment is necessary for high-quality installation of porcelain tiles.
Features of fast-hardening tile adhesive
The choice of tile adhesive is of no small importance for quality installation. The reliability of the fixation of the slabs and the quality of operation of the coating depend on this. If the composition of the adhesive mixture is incorrectly selected or the expiration date has expired, the reliability and quality of the work cannot be guaranteed. In this case, the tile will not adhere well to the surface and will begin to peel off.
The choice of adhesive mixture depends on the operating conditions, the size and thickness of the porcelain stoneware, as well as the surface on which it will be laid.
Important! Porcelain tiles are less porous in structure and therefore have low absorbency. The adhesive for its installation must have high adhesive (adhesive) properties.
For floor coverings, it is better to choose cement-based adhesive. This glue has high moisture resistance, elasticity, and quick adhesion. These properties of the adhesive allow it to bear the full load within a few hours after application.
Preparation and calculations
First, establish the sequence of work and draw a diagram.
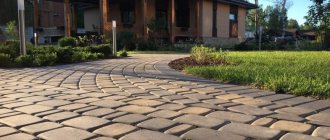
At the moment, there are several options for how to lay porcelain tiles on the floor. You can lay out a mosaic, place it in a checkerboard pattern, or create a pattern using products of different colors. It all depends on your ideas and imagination.
As soon as you draw up a diagram, you will understand what quantity of tiles and adhesive to purchase in the store. You can use online calculators for calculating finishing materials.
- Decoration Materials
How to glue tiles: a detailed guide that will leave no questions
An innovative way to lay porcelain tiles
One of the newest methods of laying tiles on both floors and walls is SVP and is suitable for porcelain tiles of any thickness. Its advantages are:
- perfectly smooth cladding surface;
- when the glue shrinks during drying, the surface of the tile does not deform;
- identical and uniform seams;
- reduction of tile laying time.
A domestically produced hovercraft consists of a wedge and a clamp. At the same time, this method has its advantages and disadvantages. Among the advantages are reliability of fixation, ease of operation and strength of the material. The disadvantage is that it is inconvenient to remove the plastic in the gaps after the glue has dried.
How does the floor leveling system work?
The use of SVP consists in the special alignment of two adjacent surfaces of slabs at the same level. After laying the tiles, two clamps are placed under its base on each side. The adjacent tile is laid so that it rests tightly against the clamp leg. After this, the clamps are fixed with a wedge, which performs a leveling function, leveling the differences between the edges of the slabs. After the glue has completely dried, the wedges and the outer part of the clamps are removed using a rubber mallet.
How to prepare an adhesive composition for facing work
In order for the glue to better fix the tiles to the surface, it is necessary to follow the technology for preparing the working solution. The dry mixture must be diluted with cool water and mixed well using a construction mixer. It is important to avoid the formation of lumps. After preparing the mixture, it must be left to stand for five minutes (let the glue harden). After this, the mixture must be mixed well again and you can begin finishing work.
Tips for use
If you want to extend the life of your flooring, you need to know a few simple rules for its use.
If any acidic composition gets in, try to remove it from the seams as quickly as possible, since in such cases they are the first to suffer. Just be sure not to over-water them or soak them.
Pexels
Alkaline compounds can be used to remove stubborn stains. They also work great on grease and wine stains. Sticky and hard substances such as wax or resin can be removed with gasoline or acetone.
When cleaning such a floor, you can use acid-based products, but not in particular. Because of them, again, the seams can change color and collapse. Don't overdo it with hard brushes either. It is better to use mops with soft bristles.
Why do you need to try on tiles before installation?
Installation of large-format porcelain tiles begins with preliminary dry installation. This allows you to evaluate the future result, see how organically the pattern fits into the overall interior of the room and what is the best way to lay the tiles to achieve maximum visual effect.
At the same time, the dimensions are adjusted and the working canvases are prepared. To determine the place where installation will begin, the first tile is placed where the eye immediately falls. With this installation method, the coating will look neat and fit organically into the overall concept.
How to lay large format porcelain tiles
Due to their size, laying large format tiles has its own characteristics. The main subtlety lies in the correct application of the solution. It is better to use deforming types of glue for these purposes. This will reduce the deformation of the tile itself under load.
The technology for laying large tiles involves applying glue twice, on the surface of the tile and on the base.
You must first make sure that the surface of the tile is clean and free of mechanical particles.
The working solution is applied with notched spatulas. To wet the base with glue, use a spatula with wide teeth. To apply the solution to the tile itself, it is better to use a fine-toothed tool. This will ensure even distribution of the glue over the surface. The optimal thickness of the solution should be at least 1 cm.
At the same time, 70% of the tile area must be covered if it is mounted on the wall. If porcelain stoneware is laid on the floor, in this case the entire surface of the tile must be 100% filled with glue.
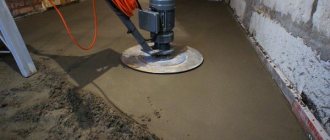
During installation, no voids should form under the tiles, as this increases the risk of breakage when heavy objects fall on it. To ensure that the tiles adhere securely to the base and remove all air, it is advisable to “tap” the surface or use a manual vibrating machine for this purpose.
For better fixation of large slabs during installation, it is advisable to use vacuum suction cups, which provide reliable fixation.
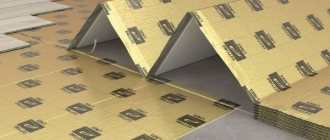
Preparing walls before installing large-format tiles
Before you begin laying porcelain stoneware on vertical surfaces, you must first prepare them. First of all, the walls are cleaned of remnants of the old coating: wallpaper, oil paint, and heavy dirt is removed. Next, the walls are leveled. In this case, you need to take into account the size of the tiles. The larger the tile, the smaller the deviations should be.
Applying primer is the final step in preparing the working surface. Moreover, if the walls for cladding are prepared in a bathroom or kitchen, where there is always high humidity, the primer must have moisture-proof properties
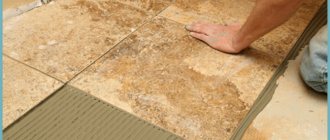
How to lay tiles on a wall
Cladding walls with porcelain stoneware is a painstaking and time-consuming process that has its own rules and must be followed.
The slabs are usually laid from bottom to top, unless another layout is provided.
Initially, the tile is laid tightly against the side edges of the adjacent tile, and then, using sliding movements, it moves to the place of its marking. This allows you to minimize the amount of glue in the grooves. After fixing, the tile is tapped with a rubber hammer to compact the fit and remove any remaining air from under the tile.
Perfect seams
The dimensions of the tile joints depend on the thickness and type of finishing tiles and the method of laying porcelain stoneware. Also, the size of the seams directly depends on the size of the sides of the cladding.
Laying rectified tiles requires minimal joints of up to 1.5 mm. For other types of finishing slabs, there is a pattern according to which the longer the side of the covering, the larger the seam. So, if the length of the side of the tile does not exceed 10 cm, then the width of the seam will be 2 mm. If the side length exceeds 60 cm, the seam will accordingly increase to 5 mm. This is due to the reduced possibility of deformation of the finishing surface.
Cutting, grinding and drilling of large format porcelain tiles
No matter how perfectly selected the finishing tiles may seem, during installation they will reveal inconsistencies with the dimensions of the working surface. In this case, you have to resort to cutting the tiles. This is a delicate job that requires care, skill and special equipment. For these purposes, a tile cutter and a grinder are usually used.
Whatever tool is used, it is important to remember that when cutting porcelain stoneware, chips always form, so the cut must be sanded. To ensure that the dimensions of the tiles are not affected, the cut must be made at a distance of 2 mm from the edge markings.
Important! When cutting porcelain tiles with a grinder, you should try to minimize vibration. Otherwise, the disk will get stuck in the tile, which can lead to its sudden splitting.
What is the difficulty when cutting with a tile cutter?
Most tile layers consider the tile cutter to be a capricious mechanism that cannot be used to cut porcelain tiles. In fact, the main difficulty lies in making a precise cut, with the help of which the crack extends along the entire length of the tile. For large-format pieces, this is quite difficult to do, and additional tools are needed, such as a special cutting staff for large pieces and a strong separator with which you can separate the pieces along the cuts.
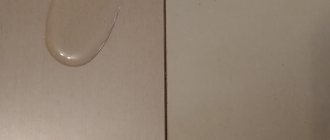
How to joint grooves between tiles
During installation, the width of the joints between the slabs is fixed using special crosses. After the installation of the tiles is completed and the glue has dried, you can begin processing the seams. To do this, the seams are cleaned of glue residues, if any, and a jointing mixture is applied using a special grater, filling the seam space. Excess mixture is removed with a damp sponge and the material is allowed to dry. It is necessary to remove excess jointing mixture as quickly as possible, otherwise its prolonged contact with the surface of porcelain stoneware can spoil the quality of the surface.
Why are stitches needed?
Traditionally, tilers make identical joints between the tiles, which are then sealed with grout. The same thickness of the seam can be achieved using plastic crosses.
What purpose do the seams serve?
- Ceramics are made from clay and tend to expand when exposed to moisture or temperature changes. So if you are laying ceramics in the bathroom or on a kitchen splashback, you cannot do without seams: the seams allow the tile to “play.”
- Joints allow you to play with contrast and create interesting visual effects. Light ceramics and dark grout look unusual and original, and the combination of red ceramics and blue joints is extravagant.
- Wide joints help hide errors in the dimensions of ceramic tiles. If the dimensions differ by several millimeters, tiles without seams will highlight these defects.
Important points in laying porcelain tiles
Thus, we can highlight the most important points that need to be taken into account when laying large-format porcelain tiles.
- The surface for laying tiles must be pre-prepared: cleaned of mechanical particles, leveled and primed.
- When choosing an adhesive base, it is important to make sure that the adhesive is intended for porcelain tiles and has not expired. When laying tiles on drywall, it is better to use dispersion adhesive that does not penetrate deeply into the structure.
- The glue must be applied correctly, using a special notched trowel. In this case, you need to take into account the size of the teeth.
- Decide in advance which installation method will be used and what width of seams will be optimal for finishing.
- Select a method for laying out the tiles of the pattern.
- If it is expected that the cladding will deform, expansion joints should be installed to help minimize the consequences of deformation.
- Select a high-quality jointing mixture and grout the seams.
- To extend the life of porcelain stoneware, you need to organize proper care of the lined surface.
Myth 1. Large-format porcelain tiles are boring colors and faceless
This opinion arose at a time when large tiles were used only for finishing shops, offices, warehouses and ventilated facades. Today, manufacturers offer dozens of different textures and colors for the most current interiors. As evidence, here are a few collections:
- Grande Marble Look. An exquisite collection from the Italian brand Marazzi with a magnificent interpretation of marble design.
- Grande Metal Look. Another series from Marazzi with a polished metal texture for fashionable urban design.
- Iron. Spanish large-format porcelain stoneware with a patinated metal surface.
- Onice Giada. Porcelain tiles from Italy in extra large format with onyx texture for elegant classic interiors.
- Ultra Onici. Another variation on the onyx theme – from another Italian brand.
However, these are not all the options that manufacturers offer. Wood, stone, terracotta, semi-precious minerals and artistic panels are just some of the design options.