There is no arguing about the need to build a toilet on a summer cottage. Installing a summer shower in the country is also an equally important and necessary part of comfort. But structures built separately take up a lot of space, and if the dacha plot is small, then they try to build them in small sizes. This option is inconvenient and uncomfortable. To solve this problem, you can build a toilet and shower combined in one building with your own hands.
- 2 Advantages and disadvantages over separate structures
- 3 Preparing a project for a shower room combined with a toilet
- 4 Choice of materials
- 5 Tools needed
- 6 Step-by-step instructions for DIY construction
- 7 Installation and nuances of use in the country
- 8 Video: stages of construction of a country toilet with a shower under one roof
Features of design and operation
The main feature of the design of a toilet with a shower is a single building and a common dividing wall. Each room is equipped with a separate door.
The design of the toilet, separated from the shower room, is equipped with a container for storing and supplying water. Plastic tubes supplying water are connected to this tank. In the shower room, the tube is connected to a watering can. The water supply is adjusted using a tap. It enters the toilet room through tubes that are connected to the washbasin and toilet cistern. In the latter case, it is supplied when the appropriate plumbing is installed.
Such a structure saves the territory of the dacha
The cesspool should be located from the well or water well, no closer than 15 m. The most acceptable distance is 25 m. This is necessary to avoid the possibility of foreign impurities getting into the water used.
When choosing a location for the construction of this structure, you need to take into account the possibility of access for sewage trucks to pump out sewage. If the septic tank is deep and wide, it will take longer to fill. You must not forget to equip it with a hatch to drain the contents.
If the pit is located closer than 15 m from a well or water supply station, its walls and bottom must be carefully sealed.
Construction of a cesspool
At the site where the outdoor toilet is installed, a cesspool is dug, giving it a square or round shape. The depth of the septic tank pit should not exceed 1.5 meters, and its diameter should not exceed 2.5 meters. But as practice shows, cesspools that have a round shape are more functional. They are characterized by increased strength and can withstand heavy loads and pressure.
Tip: When digging a hole, it is better to use a shovel with a short handle. With such a tool it will be easier to turn around in tight spaces. A crowbar or pick is useful when digging in tougher soil such as gravel, heavy clay or limestone.
Digging a hole of the required size, compact its base. Instead of tamping, the bottom can be lined with a bed of gravel. To ensure the necessary sealing of the device, the walls of the pit are lined with brickwork, or concrete rings are installed.
Construction of a cesspool
The brickwork is reinforced with reinforced mesh or reinforcement. All joints are carefully sealed with cement mortar, followed by installation of a waterproofing layer. This allows you to protect the crop from impurities and preserve groundwater from pollution.
Advantages and disadvantages over separate structures
The following criteria should be considered for the benefits:
- It is more expedient to design the construction of a toilet and a summer shower in one building. Every meter of land on a summer cottage is fertile soil on which you can grow vegetables, plant a tree or plant a flower bed. The construction of individual structures will take up much more space than a single frame.
- When constructing individual structures, a larger amount of material is needed, since each of them requires an individual foundation, roof and the construction of additional walls (in the combined version, only a partition wall is needed). This will also affect financial costs.
- The construction of a combined toilet and shower will reduce construction time, since in this case work is being done for both structures at the same time.
- If you build everything separately, then both structures need to be equipped with their own drainage pit. In addition, the walls of each of them must be reinforced with bricks, roofing felt, slate or concrete, which will additionally entail waste of money.
The disadvantages include the following:
- Unpleasant odor from the cesspool, the risk of contamination of soil and groundwater with sewage, as well as the high cost of pumping out its contents.
- If you don’t connect a pump to the summer shower tank, then to take a swim you will have to carry water in buckets and pour it with your hands into a container on the roof.
- In the absence of sunlight, the water will not heat up well in all seasons. And to keep it warm on hot days, it needs to be prepared in advance.
How is the construction of the above-ground part of the toilet carried out?
After the summer resident has decided on the choice of latrine pit, it is worth thinking about the upper appearance.
Here everything depends on a person’s imagination, and various building materials will help make a toilet in a country house not only a necessary, but also a beautiful room. First of all, you need to choose the optimal size of the building. They should not be too large, but not too small either. Otherwise, an obese person simply will not fit there. As drawings of a toilet for a summer house, you can take at least the following diagram, or order an individual calculation from specialists.
Drawing of a country toiletSource stroypay.ru
- First of all, they build the lower base, on which the next step is to install the frame. Timber is mainly used as a building material here.
- The back wall should be about 10 cm lower than the front wall. This is done to ensure the slope of the roof. The door must be secured to the front wall. If necessary, cut a hole for the window.
- Next, the frame is sheathed with the selected material. If the toilet is supposed to be without a toilet, then the seat under the high chair is also covered.
- The outer part can be made of any materials. The design can also be varied.
Design options for a country toilet Source vannayasovety.ru
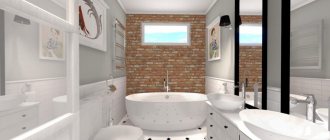
Preparing a project for a shower room combined with a bathroom
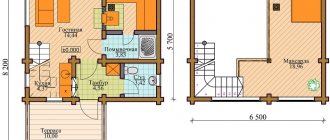
The design of a combined toilet and shower should, above all, be functional and comfortable. It can be designed in any shape, size and color. A house measuring 2750x200x2520 mm will be comfortable to use. In such rooms it is convenient to install rectangular benches and shelves. It is not difficult to build a frame of this shape. The diagram and drawing below show the optimal parameters for the construction of this structure.
Optimal parameters presented
Here is a separate toilet and shower in one building. The structure is located on a columnar foundation. Its dimensions allow it to be conveniently used for its intended purpose. The shower and toilet rooms have dimensions sufficient to accommodate additional furniture and plumbing. You can place a washbasin and shelves in the toilet, and benches and a bathing cabin in the shower room. With a width of 130 cm and a length of 200 cm, each room will not be cramped. The height of 2.5 m makes it possible for even a very tall person to use this building.
The length and width of the structure are selected individually
If the door opens as shown in the drawing, then it is better to place the washbasin on the right side. In this case, the sink will not interfere with entering and leaving the toilet room. The bench in the shower room can be installed in the same way.
What is more profitable: buying a ready-made utility block or building
If the utility block is the first building on a new site, then the shortest possible time is allocated for its construction. Often the owner of a plot of land is faced with a choice: to build or buy a ready-made building.
There are options available for sale on a metal frame, the construction of which is quite a labor-intensive and slow process and requires welding. The advantage of such a construction is a long service life and the ability to be transported to another location.
Metal utility block for shower and toiletSource velesagrovet.ru
You can purchase a ready-made utility unit with a shower and toilet in a frame, panel or other design. It is enough to install the structure on a lightweight foundation or concrete slab.
However, ready-made utility units are small in size. They consist of a room, shower and toilet, which does not suit everyone. Many private owners are inclined to a more economical and diverse option in terms of layout - construction according to the project they like.
Selection of materials
Various materials are used to build a toilet with a shower. In our case, it will be a frame structure on a columnar foundation with a gable roof. A frame building does not require a deep foundation, since it is relatively light in weight. Thanks to the pillars, the structure will rise above the ground. This will protect the lower frame of the structure from dampness and fungus. Water will not linger under the base. A gable roof will allow you to equip a cold attic for household needs. Water drains from such a roof faster than from a pitched roof.
When purchasing beams and boards, you need to take into account their humidity, the degree of which should not exceed 22%. To determine this, use a needle moisture meter.
To build a country toilet with a shower, you need to prepare the following materials:
- For the lower and upper trim: four beams 2750 mm long and the same number 2000 mm long, all with a cross-section of 100x100 mm;
- For vertical supports, beams with a cross section of 50x100 mm are needed, in the amount of 24 pieces, each of which is 200 cm long;
- Wooden edged boards with a section of 10x100 mm, for sheathing;
- Beams with a cross section of 50x100 mm, length 200 cm, 12 pcs. – for the roof frame;
- For flooring (in the toilet), boards with a cross-section of 40x150 mm are required in an amount of (minimum) 20 pieces. OSB sheets are used as the finished floor;
- If the floors in the shower room are tiled, then the amount required is 2 m²;
- Plastic pipes and sewer drain;
- Concrete mixture (M-200) in the amount of one and a half cubic meters;
- Plywood sheets for making formwork;
- Sand and gravel;
- Metal tiles.
All wooden elements must be free from knots, cracks, mold and insect damage.
- Sheets of multilayer plywood, chipboard, fiberboard or OSB boards are used as a rough ceiling.
- To make it easier to fasten the beams, metal corners and plates are used.
WE MAKE A COLUMNAR FOUNDATION
For ease of use and saving building materials, we will build a shower and toilet for the dacha in one building. Its volume: width 1.5 m, length 3 m, height 2.2 m. It turns out that the premises will be built with an area of 1.5 by 1.5 m. Looking ahead, it should be noted that during operation of this volume of rooms there were more than enough, they seemed too big, an area of 1.2 m by 1.2 m would have been enough.
We will build a country toilet with a shower from wood, so a columnar foundation 80 cm deep will suit us.
Let's cut 16 wooden pegs and mark the place for the foundation. Along a perimeter measuring 1.5 by 3 m, 0.75 m apart from each other, we will install 14 pegs; where there will be a hole, we will skip one peg. We will also place pegs in the far corners of the pit, and here we will make a hatch for cleaning. Be sure to check the diagonals of the extreme marks, the distance between the pegs should be the same, the angles should be right. Using a garden drill with an auger diameter of 13 cm, which we used to drill holes when installing the fence, we will make 16 holes. Near each pit we will make wooden formwork with a height, width and length of 20 cm, level it horizontally with a building level.
To strengthen the foundation, we insert 3 bars of reinforcement into each hole and tie it with wire. Let's put a rolled-up piece of roofing felt in all the holes to prevent the concrete from contacting the ground, as we already did when installing fence posts. We fill the recesses with the cement mortar that we used to plaster the walls. To save cement, you can add fine crushed stone based on the calculation: 1 part cement, 3 parts sand, 5 parts crushed stone. Having leveled the solution along the formwork, we insert a metal pin with a diameter of 10 mm in the center to a depth of 12 cm, and leave 8 cm at the top. We are waiting for the foundation to get stronger, and we ourselves will begin to prepare the wooden beams for the frame.
INSTALLING THE FRAME
For the frame of a country shower with a toilet, we will use pine beams with sides of 10 cm. As soon as the solution gains strength, we will disassemble the formwork and proceed to the lower frame of the foundation. We use a chainsaw to cut the timber along the length of the sides of the building and connect it together in half a tree. This means that on each side we cut off 5 cm of thickness; when we connected it together, it turned out to be just 10 cm.
We drilled holes under the studs protruding from the foundation, laid the ceiling, then secured it with a washer and nut using a spanner. A piece of roofing felt was laid under the tree for waterproofing. We have the bottom frame of the foundation, the entire beam lies on the pillars, firmly tightened with a pin and nut. We will treat the wood with a protective compound (we used used machine oil).
Above the pit, where the seat and floor will be, we will place two metal channels for reliability. We will cover the cesspool, which extends beyond the perimeter of the walls, with plank and protect it with waterproof material. If we need to pump out sewage from the pit, we will remove a couple of slits to insert the hose of the sewage machine.
Now you can install vertical posts for the frame. The height of all pillars is 2.2 m. First, let's install them in the corners. We check the verticality of the pillars using a building level. We connect the vertical posts with the strapping with metal plates and corners used for fastening. For strength, we put spacers at the bottom and secure them with long self-tapping screws. We will install two pillars where the wooden entrance doors will be, 2 m high, 80 cm wide. The distance between the pillars must be maintained exactly 0.8 meters. Above the future door, at a height of 2 m, we will fix a horizontal spacer to create an opening. We will subsequently glaze the remaining gap between the door and the ceiling, equal to 20 cm.
We will also strengthen the vertical posts on the sides with spacers, firmly screwing them with self-tapping screws. After the pillars are installed, we will tie the frame on top, connecting the beam into half a tree. To protect the wood, we will treat the entire structure with an antiseptic.
Required Tools
When building a country toilet with a shower, you will need the following tools:
- Bayonet and shovel shovels;
- Jigsaw or hacksaw;
- Concrete mixer;
- Electric welding machine;
- Large container with water;
- Buckets or wheelbarrow for carrying concrete mixture, gravel and sand;
- Pliers and wire cutters.
- Screwdriver or Phillips screwdriver.
- Axe.
- Hammer.
- Building level.
- Square.
- Yardstick.
- Cord.
- Self-tapping screws and nails.
- Plane.
- Pencil.
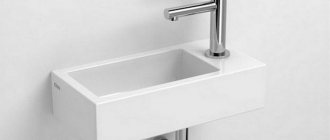
Types of shower
Options:
- shower-stomp;
- shower stand;
- shower stall.
The treadmill shower is a rubber mat with a built-in pump and two hoses.
One hose has a nozzle at the end. The other is designed to supply water from a metal or plastic tank. You stand on the mat, pressing your feet on the pump, thereby providing yourself with water. To build a shower stand, running water is required, which can be provided by a pump or water pipe. The entire structure is mounted on a wall or stand, and the water supply hose is connected to the water supply or pump. You can install this structure yourself or purchase a ready-made one.
The shower stall can be installed with your own hands or purchased ready-made. There are many options for such a construction, as well as ways to supply water to it.
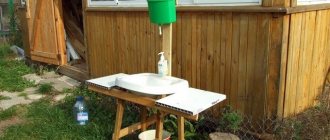
Installation and nuances of use in the country
When the structure of the country toilet and shower is erected, you can proceed to the direct installation of a water barrel and connecting a tube with a shower head to it. It is also necessary to install a seat in the toilet.
A flat roof is most suitable for installing a water barrel. Since in our case it is gable, it is necessary to build a stand for this container. It must be made from metal pipes, a channel or a corner, using electric welding. In our case, we used a metal corner with sides of 50 mm and a thickness of 3 mm. To strengthen the structure, it is necessary to weld reinforcements perpendicularly, every 100 cm. The total length of the frame is 4 m. The result should be a solid stand in the form of a tripod. Then, near the shower wall, drill three holes 1 m deep. Lower the tripod into them and fill them with concrete.
In order to save material, a frame was made of three metal corners
A plastic container 20 cm high, 100 cm long and wide was used as a water barrel. Due to its small height, the water in such a container heats up quite quickly from the sun's rays. It is necessary to make a wooden frame under it. In our case, it is made of beams with a cross section of 50x50 cm, 100 cm each. Their ends should be connected using the half-tree method and secured with self-tapping screws.
The shape of this tank holds a lot of water, which quickly heats up in the sun
The wooden frame must be attached to the stand with self-tapping screws.
Now you can move on to installing the shower pipes. For this, it is better to use plastic ones with a diameter of 25 mm. Carefully drill a similar hole in the barrel, into which, using lock nuts and rubber seals, install the fitting. Connect a pipe to it, in which, after 50–60 cm, connect a ball valve. It is necessary to shut off the water in the event of any repair or construction work. Then drill a hole in the ceiling and insert a pipe into it. Using tees and fittings, place it in the shower. Install a watering can with a tap in the pipe under the ceiling.
Now you need to install the toilet seat. To make a straight hole, you need to place a bucket in the middle of the pedestal and trace it with a pencil. Using a jigsaw, cut a hole in the marked area.
The bucket will hide the edges of the hole
Insert a bucket into it and secure it with self-tapping screws. If you use the toilet in winter, you must purchase a foam seat. It will be warm in any weather, which is important for health.
The appearance of the finished building will fit well into the territory of the summer cottage
WE MANUFACTURE A SEAT
Let's start laying the floor.
For the flooring we used 40 mm thick boards. We cut them to the required size with a jigsaw and screw them to the foundation frame with self-tapping screws. The length of the floor from the entrance to the pit is 1 meter.
On the outer board above the pit we will build a pedestal for sitting. We cut 5 bars with a side of 50 mm, a length of 40 cm, screw them to the floorboard with self-tapping screws and metal corners. Parallel to them, we will also install 5 vertical bars on the channel above the pit and connect them to each other with the same bars.
We cover the resulting structure with 20 mm thick board. We have a pedestal on which to sit.
For the seat, take an oval-shaped plastic bucket for a country toilet, which is sold in hardware stores. Using a knife heated over the fire, carefully cut off the bottom of the bucket, lean it against the pedestal, then trace the outline with a pencil.
Using a jigsaw, cut a hole in the pedestal and insert a bucket. Let’s secure it with self-tapping screws: that’s it, our seat is ready.
Video: stages of construction of a country toilet with a shower under one roof
With little effort, you will build the necessary and convenient building with your own hands. Rest and living at the dacha will become much more comfortable. To take a swim after gardening on a hot day, you don’t need to heat water or waste electricity. Thanks to various external finishing materials, a toilet and shower combined in one building will not disturb the architectural ensemble of country buildings.
- Author: Andrey Sokolov
Rate this article:
- 5
- 4
- 3
- 2
- 1
(13 votes, average: 3.2 out of 5)
Share with your friends!
Construction of a cesspool
For seasonal living or rare visits to the dacha, you can use a cesspool as a place to dispose of sewage waste. It is located under the toilet. The size of the storage tank depends on the volume of waste. Standard parameters:
- depth – 2 m;
- side size – 1×1.1 m.
The finishing of the pit is essential; the degree of safety of the structure depends on it. Among the popular options for finishing pit walls:
- brick;
- reinforced concrete rings;
- monolithic concrete structure;
- plastic container.
Each method has pros and cons that should not be overlooked.
Brick finish
A popular and economical option for arranging a drainage pit. After leveling the walls, brick laying with cement mortar begins. The bottom of the structure is filled with sand and concreted. The result is a durable and reliable design.
Reinforced concrete rings
This option is good for its durability and strength, but requires a lot of labor to install heavy rings. The bottom of the pit is filled with concrete, the walls of the rings are covered with waterproofing.
Monolithic design
A complex and time-consuming process allows you to create a sealed chamber for wastewater. It will not endanger the territory of the site.
Plastic tank
A storage tank made of polymers has many advantages: it is easy to install, sealed and durable. The only drawback of the choice is frequent pumping with a sewer truck.
Plastic container for waste
Useful tips
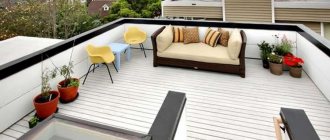
The utility block, toilet and shower for the dacha can be insulated, two levels of flooring can be made, and the top can be tiled with linoleum or tiles. Mineral wool or polystyrene foam will help insulate walls, floors and ceilings.
Parchment or polyethylene protects a wooden building from moisture.
In winter, the shower room in the country house can be used to store vegetables and canned foods.
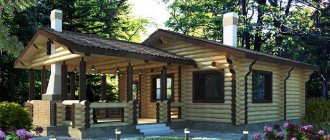
The corner design will hide the true purpose of the building from prying eyes: a wood shed, a tool shed or a bathroom.
A two-story project will allow you to rationally save space in your dacha.
This utility unit combines three functions;
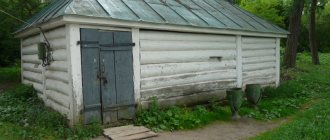
This utility unit (pictured on the left) is designed for storing garden tools, storing tools or equipment. After harvesting, the harvested supplies can be dried and packaged indoors.
The toilet room is located inside the woodshed (there is no need to install an additional building on the site), and it will significantly save your budget, since buying a separate toilet and delivering it will cost a tidy sum. Our development of a 3 in 1 utility unit will help you save a lot and free up space for beds and flower beds.
The woodshed is designed for storing and drying firewood. This woodshed can accommodate up to 8 meters of cubic firewood.
Video about building wooden sheds
The barn turned out to be beautiful, but not cheap. But it is decent in size, strong and in appearance no different from a house - it fits into the composition. Everything is shown/described in detail, there is one violation: the waterproofing under the metal tiles is laid vertically. Even with good gluing of the strips, sooner or later the water will make a path for itself. Otherwise, everything is correct.
In this case, the barn is built with your own hands on what is probably the cheapest foundation: concrete is poured into old tires. The frame stands on these “pillars”. Naturally, they need to be placed on a flat, reliable surface and they themselves must be at the same level. In terms of strength, the base will not be inferior to the best concrete blocks, and may even surpass them. Tires protruding from under the structure can be closed by making a step and subsequently placing flowers on it or using it for other needs. It will be even more practical.
Another video with a step-by-step illustration of the construction of a frame barn made of timber.