Why is there low pressure in the mixer?
Recently, in order to save water, all residents of our country have been required to install water meters.
To ensure that they do not fail due to scale, we install a coarse filter (CFP) in front of them.
So, it is precisely this kind of filter that is clogged; it is installed at the very beginning of the distribution and, accordingly, if it is clogged, there is no water pressure at all points of analysis.
“I turned off the water again, unscrewed the faucets, having first removed the handles (lambs) from them, and with a knitting needle similar to the ones that grandma knits mittens for you, I cleaned the holes inside the mixer. Having completed these steps, it would be a good idea to wash everything that you scraped off; to do this, you supply water by slightly opening the inlet taps, one at a time.
Why does water flow poorly from the faucet?
If the problem appears in the shower and after cleaning the faucet there is still no hot water, you will need to clean the sprayer. It is dismantled using an adjustable wrench, after which it is placed in a pan and filled with water, and then placed on the stove.
You need to add vinegar or citric acid to the water. No need to boil. An acidic environment has a destructive effect on plaque and other deposits that have formed on the sprayer.
After cleaning, the sprayer should be rinsed under running water and returned to its original place.
A drop in pressure of both hot and cold water can be caused by factors such as the simultaneous consumption of liquid in large quantities. As a rule, under such circumstances, water does not flow well in the evening, when the bulk of the area's residents return home.
Causes of unpleasant odor from the kitchen sink
When clogs form in the kitchen sink, an unpleasant odor may occur. There are several reasons for its appearance:
- damage to sewer pipes;
- vacuum plug;
- poor sewage ventilation;
- siphon clogging;
- water seal
To remove ointment use:
- mustard;
- bleach;
- "Alkazeltzer";
- fresheners.
Mustard, bleach or Alkazeltzer are poured into the pipe in an amount of 100-150 g and poured with boiling water. After use, the pipes are washed with hot water and cleaning agent.
Important! Air fresheners will solve the problem only for a while, and only by eliminating the unpleasant odor.
There is low water pressure in the apartment - what to do and where to go
As experts note, most often, clogged pipes and a decrease in water pressure occur due to rusted joints of plastic and metal pipes. Fortunately, the problem is easily solved.
The main thing is to have the necessary finances and time. To restore pressure, it is necessary to clean the pipes.
If this procedure turns out to be useless, then it is recommended to completely replace the metal pipes with plastic ones.
- If there is a problem with the mixer, you need to replace it. If you don’t have the money to buy a new one, you can try to wash it or repair a broken part;
- If the pressure is poor due to a clogged aerator, then you also need to clean it with a needle and blow out. If the aerator is very clogged, then it is easier to buy a new one and install it on the tap.
- If you need to change pipes, then only specialists will help. The owner is only required to purchase the necessary materials. It is worth noting once again that it is better to change the riser completely, otherwise due to the joints the pressure will weaken again soon.
- A pump that increases the pressure in the apartment or on the riser will also help solve the problem. Installing a pump on the riser is necessary only when complaints to the housing office are unsuccessful. A sump pump is expensive, so you need to work with your neighbors to purchase it.
- If the diagram is incorrect, you need to change the sequence of connecting the devices to the water supply. Only a specialist will help in this matter.
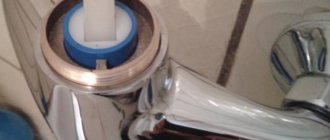
Cleaning the aerator
Cleaning soap deposits on the outside of the faucet is only half the battle. Modern faucets are equipped with aerators - this is a small metal nozzle with a mesh on the spout of the tap. This small part serves to enrich the water with oxygen and thereby performs a number of useful functions:
- Reduces the noise level of flowing water due to the fact that many small bubbles soften the flow of water.
- Reduces splashing.
- Additional filtration from small debris that occasionally occurs in tap water.
- The aerator helps by maintaining good pressure with minimal water consumption. Savings depending on the model can range from 50 to 80%.
It often happens that the aerator becomes clogged with lime flakes and ceases to efficiently cope with its functions. In this case, it needs to be removed and cleaned.
How to understand that it’s time to clean the aerator:
- The tap is fully open, but the water barely flows
- The water flows unevenly, the flow either increases or decreases
- There is water in the system, but it does not pass through the mesh holes
To work, we will need pliers, a rag and a container with detergent.
Carefully wrap the nozzle in a rag, pinch with pliers and turn clockwise. And here the owners of cheap Chinese plumbing fixtures are in for an unpleasant surprise: aerators for such faucets are most often made of extruded aluminum or plastic coated with a shiny coating; both materials are fragile and often break when you try to unscrew them. If the aerator bursts during dismantling, do not despair, buy a new one. High-quality plumbing aerators made of steel or brass last much longer.
If the nozzle is jammed, then use WD-40 or vinegar, wet a cloth, wrap it around the nozzle, wrap it with a plastic bag on top and leave until the mobility of the thread is restored, this is about 2-3 hours.
After you have unscrewed the aerator, rinse it from large contaminants under the running tap, and then place it in a glass with 9% vinegar. The exposure time depends on the degree of contamination and varies from 1 to 12 hours. After the time has expired, rinse the aerator with clean water and, if necessary, clean the holes with a darning needle.
Assemble the clean nozzle and screw it into place; there is no need to tighten it, so you can easily unscrew it with your fingers at any time and wash it. It is advisable to remove and rinse the nozzle once a week, then the aerator will work properly.
Why is there low water pressure in the taps, how to clean the pipes
Weak water pressure in taps
If you are tormented by weak water pressure in the tap, the water flows in a thin stream, which is clearly not enough for comfortable use, then there may be several reasons.
Possible reasons for low water pressure:
- The mixer is clogged or faulty; the cartridge must be replaced. Most likely, this is so if, for example, the water pressure in the kitchen is weak, but in the bathroom it is good. You can find out how to repair or replace a faucet here. how to replace the cartridge - here. How to clean the faucet, read below.
- If you use a filter to purify water, then the problem may be with the filter and it needs to be replaced.
- Old water pipes are “overgrown” with rust and lime. They need to be cleaned or replaced.
- If you have a geyser installed, the problem may be there.
- Incorrect pipe connection.
- Low pressure when supplying water to the pumping station. Chat with your neighbors, find out what water pressure they have in their taps.
We suggest you familiarize yourself with How to make detergent for washing dishes
If the reasons are points 5 and 6, then you need to contact specialists; you will not be able to solve the problem yourself.
Folk remedies for cleaning
The presence of a beautiful device with a chrome finish makes the sink or sink more presentable. However, with intensive use, the shine may disappear as mineral deposits, household dust and other debris accumulate on the surface.
In addition, such particles accumulate at the joints of moving mechanisms, creating fossils. This compromises the functionality of the valves and creates gaps between important components, increasing the risk of leaks. To avoid such problems, you need to figure out in advance how to clean the faucet in the bathroom or kitchen.
To protect chrome surfaces from tarnish or rust, it is important to regularly wipe them with a dry cloth after each use. However, some housewives ignore the importance of such a procedure and remember about it only when severe scale forms.
Among the most effective folk remedies for cleaning the bathroom faucet are the following:
- Baking soda.
- Laundry soap.
- Lemon acid.
- Table vinegar.
Each ingredient has different effectiveness and principle of action.
Table vinegar
The advantage of this folk remedy is its high speed of action - vinegar works instantly, which is why it is very popular among housewives.
To get rid of mineral deposits on taps, you can use either table vinegar with a 9% concentration or apple cider vinegar. The cooking recipe is as follows: you need to combine vinegar with clean liquid in a 1:1 ratio. Next, you need to soak a cloth in the solution and begin treating the plumbing surfaces. After a couple of minutes, the coating should be wiped with a dry cloth to get rid of any remaining solution.
If the contamination is strong enough, it is better to unscrew the tap and immerse it in a container with solution overnight. During this period, all salt deposits will be completely removed.
There is another way to clean faucets using vinegar:
- It is necessary to heat the acid, but not to boil it. It should stay warm.
- A cloth napkin is moistened in the prepared solution, and then it is applied to the tap.
- The plumbing should remain in this condition for 30-60 minutes.
- After treatment, you need to thoroughly rinse the surface and wipe the tap dry.
Since vinegar is a fairly aggressive agent, when using it you need to remember to wear personal protective equipment, such as gloves and a respirator. Such measures are needed in order to protect the skin from irritation. You also need to protect your respiratory tract, because... Vinegar fumes emit a pungent odor and cause irritation of the mucous membranes.
Lemon acid
You can clean the bathroom faucet using citric acid and water. In this case, use the product according to the following instructions:
- Turn off the tap.
- We create a solution based on water and lemon acid in the following proportion - 4 tbsp. l. substances are diluted in 1 liter. liquids.
- The plumbing fixture is immersed in the container and left there for 1-2 hours.
- Remove the tap from the solution and rinse in running water.
- Wipe the treated surface dry with a soft and clean cloth and secure the tap.
You can also use lemon in its pure form for processing using this method. You need to cut it into 2 parts and start wiping each contaminated surface. A small amount of juice can be squeezed into a suitable container and used for culinary purposes.
After cleaning is completed, plumbing fixtures should be wiped with a dry cloth to remove any remaining product.
This folk method is highly effective and allows you to remove plaque without much expense.
Salt
Using table salt you can get rid of old stains and restore the shine of surfaces. However, when using this product, you should not perform rubbing movements, but carefully apply the additive to the chrome coating. After a couple of minutes, it should be washed off with water.
Coca Cola
A proven remedy for stains on plumbing fixtures is Coca-Cola. Highly effective compresses are created based on this sweet drink. The cleaning process itself consists of the following steps:
- A rag is moistened in a cola solution and placed on the problem area with plaque.
- After 15-20 minutes, the surface is washed with clean water and wiped with a dry cloth.
The effectiveness of the product is justified by the presence of special acids in the composition of the soda.
Baby oil
An unusual faucet cleaner is baby oil. It is used according to the following instructions:
- A soft cloth is moistened in a container with baby oil.
- After this, the contaminated areas are wiped with it.
- After a couple of minutes, they are washed with water to remove any remaining oil.
- To polish the faucet, use a soft cloth, such as flannel or suede.
This solution allows you to get rid of soap stains, grease stains and limescale deposits.
Laundry soap
Laundry soap has powerful hypoallergenic and disinfectant properties, which makes it possible to use it to combat plaque on plumbing fixtures. To remove dirt, you need to take a bar of soap and rub it on a coarse grater. The resulting chips are mixed with hot water until a homogeneous mass of medium density appears. Next, baking soda is added to the composition (you can also take the calcined version).
You need to moisten a clean cloth in the prepared solution and start processing the chrome surfaces. After completing the treatment, all surfaces should be washed with warm water.
Using a soap solution, you can remove various contaminants, including heavy scale. Some housewives use this folk remedy to clean any surfaces in the bathroom and kitchen.
Baking soda
To keep your faucet shiny and looking like new, you can clean it with baking soda. To do this, a couple of tablespoons of the food additive need to be diluted in a small amount of water to obtain a slurry that will be used to clean chrome. The product is left on surfaces for 1 hour, after which it must be removed with a soft cloth. If streaks appear, they should be carefully wiped off with the back of the sponge.
To apply the paste, use a soft sponge, damp cloth or toothbrush. It is better to avoid using steel wool.
Toothpaste
You can clean the faucet from limescale using toothpaste and a brush. The simplest whitening product removes not only plaque from teeth, but also from plumbing surfaces. However, when choosing this method, you need to use a brush with soft bristles, since other devices can damage the surfaces.
The key advantages of brushing with toothpaste are its high efficiency and the ability to treat finely textured surfaces.
Toothpicks
To remove limescale on stainless steel products, toothpicks or dish nets are also used. The first device is effective in cases where areas with plaque occupy a small area and the surface of the faucet has relief.
You need to take the toothpick by both edges and press it against the tap to remove a layer of plaque. Cooking nets also have a similar effect. You can clean the most inaccessible places with small dirt with a mesh.
Window cleaner
A wide selection of specialized cleaning products for treating window surfaces is offered for sale. However, they can be used not only for their intended purpose, but also to combat plaque on plumbing fixtures.
Microfiber or bamboo cloth
Microfiber or bamboo cloths can be used to treat faucets and remove dirt. They appeared on the market recently, but are already in great demand among housewives. Such rags do not require complex care, but provide a high degree of cleaning.
Microfiber products are available in non-woven and woven types. The first option is made in the form of compressed fibers and is suitable for processing any surface. Cloth wipes resemble a piece of plain fabric and are designed to work with non-glossy finishes.
Bamboo-based wipes have rare natural fibers that give them special properties that allow them to get rid of any dirt and absorb water.
Initially insufficient pressure level
According to GOST, the pressure level of the water supply network in the city should be 4 atmospheres.
In practice, it can fluctuate in the range of 3-5 atmospheres.
In megacities, the required pressure is regulated by electrical devices and is almost always normal.
It will be interesting: The only method to properly disassemble a shower head
This problem can be corrected by contacting public utilities that are assigned to certain territories. You should first find out about the water pressure from your neighbors, especially from the upper floors.
Types of repairs depending on the location of the leak
- Leak under the sink. If it drips under the kitchen sink, it means the hose leading to the plumbing is damaged, or the cause is a worn gasket where the hose connects to the sink bowl. Repairing this leak will require replacing the hose or sealing gasket at the outlet of the sink.
- Leaks where the spout connects. The junction of the body and the spout leaks if it is worn out or the gasket is outdated. It is necessary to install new gaskets on the replaced seal.
- The gander is leaking. The gander leaks if the housing is damaged. This can happen because the outlet filter is clogged, the water pressure, which passes through with difficulty, puts pressure on the walls of the mixer and cracks appear. Single-lever models, which have a built-in body with a monolithic casting, require a complete replacement of the device except for the cartridge. If the mixer has two valves, then the gander is replaced with a new one.
- Other places of leakage. Often the faucet starts dripping, but there is no obvious reason for this. It is possible that the formation of limescale on the elements of the device leads to a malfunction.
It is necessary to clean the faucet with household solutions designed to remove rust and lime.
Requirements for the quality of hot water supply
Process water should not be ingested; it is used exclusively for domestic purposes, but despite this, the quality of the heated liquid supplied through the water main must meet all currently established sanitary standards for water consumption. Increased attention is paid to the temperature regime of hot water supply. The upper and lower temperature thresholds are set. For example, the heated water at the outlet must have at least + 60°C; it is at this level that the majority of pathogenic microbes and harmful bacteria die. The highest temperature threshold is set at + 75°C - with a higher value, it is possible to get minor burns.
Consumers should take into account that when tap water is heated above + 40°C, the carbonate hardness of the liquid increases several times. This most often leads to the formation of scale on the inner surface of the pipes, which causes clogging and premature failure.
To independently verify the quality of the hot water supply, you need to order a full biochemical analysis of the liquid flowing through the pipes. Based on the results of laboratory tests, we can say with confidence whether the water is of poor quality or, on the contrary, meets all sanitary standards.
How to avoid faucet leaks
In order for the faucet in the kitchen to serve for a long time without leaks, it is necessary to install products made of high-quality material, for example, stainless steel, brass, copper. Provide water pipes with filters.
If you need to repair a mixer that has two valves, then you need to disassemble the locking box and install new rubber and ceramic gaskets. For repair work on single-lever mechanisms, it consists of replacing the cartridge. To work, you will need an adjustable wrench and new sealing gaskets with a set of structural elements that must be replaced.
To quickly make repairs, you need to:
- Know how to quickly shut off the water from the riser.
- A set of necessary tools for repairs.
- Have a stock of new faucet parts that are installed in the house.
- Know the rules for carrying out repairs.
How to clean a faucet from rust, scale and other types of contaminants
To begin with, it should be clarified that the faucet should not only be cleaned, but also the condition of the seals and faucet axleboxes should be assessed. If the rubber gaskets are pressed through or have lost their elasticity, you need to pick up the same ones at a plumbing store. When the cartridges themselves are damaged, there is no point in disassembling them - taps are inexpensive and the easiest way is to replace them with new ones.
As for cleaning, if the faucet in the kitchen is clogged, you first need to wipe off everything you can with a cloth and rinse the parts well. The choice of product depends on personal preference; there are no strict restrictions.
How to clean a bathroom faucet: step-by-step disassembly and cleaning of taps
The moving mechanisms of faucets often become clogged with deposits and begin to leak, make noise, or turn poorly.
I will tell you how to disassemble a two-valve type faucet in a bathroom or kitchen and its single-lever version, and also give simple recommendations for cleaning them at home.
You can clean the faucet yourself.
- Types of cranes
- Dismantling a two-valve type faucet
- Single lever
There are several main types of cranes.
Before you begin disassembling the crane, you should determine its type.
The most commonly used types of taps are:
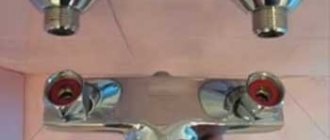
- Two-valve with valve axle boxes;
We suggest you familiarize yourself with How to lubricate the oil seal of a washing machine
Double valve faucet with shower.
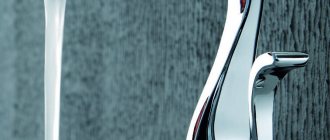
- Single lever with cartridge;
Single lever faucet model.
- Ball (for switching shower/gander).
There is a ball with a hole inside.
These are the most common types of faucets. Determine which of them yours belongs to and read the corresponding section of the article.
Methods for getting rid of limescale
Modern household chemicals are the simplest and most common method of cleaning plaque on bathroom faucets. But the use of such funds has several nuances. To avoid damaging taps and mixers, use only cleaning fluids that are suitable for them.
Under no circumstances should rust removers or bleaching agents be used. Chrome, which is usually used to coat plumbing fixtures, is very active. When interacting with acid, it begins to break down. This results in dark spots that are difficult to remove. Before using household chemicals, you should always study its composition. Liquids for chrome-plated products must be free of chlorine, hydrochloric, phosphoric, and sulfuric acids.
Do not use powdery substances for cleaning. Abrasive particles can damage the integrity of the coating. After using each product, it must be thoroughly rinsed with water, especially before applying the next one. Otherwise, a chemical reaction between various products may damage the product. To avoid damaging your hands, you must use protective gloves. If you need to remove plaque inside the product, it should be disassembled. If this cannot be done, then simply disconnect the tap and soak it for 30 minutes in a vinegar solution, then rinse.
Folk remedies
You can also clean plaque at home using folk remedies:
- 1. One of the most common ways to clean a product from plaque is to use a metal scraper. This product is designed to remove old food or solids from dishes. The shape of the mesh allows you to remove dirt even in hard-to-reach places. But it is recommended to use special gloves for washing so as not to damage the skin of your hands. The only drawback of the scraper is that pressing hard can leave marks and scratches on the faucet.
- 2. Using table salt allows you to remove limescale in a few minutes. To do this, just pour salt onto a damp cloth and rub the surface of the plaque. If the plaque is no more than a year old, then removing it will not be difficult. In this case, there will be no marks or scratches on the tap.
- 3. Using lemon is also quite effective, but you must remember the harmful effects of acids. To clean, rub the plaque area with lemon and leave for 20 minutes. To enhance the effect, you can first rub with a cloth with salt and then with lemon. After time has passed, rinse the resulting solution with cold water and wipe with a dry cloth. By the same principle, you can use citric acid by dissolving it in water.
- 4. Using baking soda not only removes limescale, but also makes the chrome surface of the faucet shine. The principle of use is similar to the use of salt. You need to pour baking soda onto a damp cloth, rub the surface of the plaque, then rinse everything off and wipe dry. If the plaque is not removed the first time, you can repeat the procedure, but leave the soda on the mixer for two hours. To help the baking soda absorb better, you can apply it with a soft brush.
- 5. The easiest way to remove dirt is with vinegar. There are several options for doing this: apply the solution to the faucet and cover with cling film, or soak a rag in vinegar and leave on the tap for 30 minutes. Be sure to rinse off the vinegar thoroughly after cleaning. Shower heads simply need to be disconnected and placed in a plastic bag along with a weak acid solution.
Single lever
The photo shows a single lever faucet.
Now I will tell you how to disassemble a single-lever faucet in the bathroom. This type of faucet has been used for a long time, and many apartments have just such models installed.
The instructions are slightly different from disassembling a two-valve mixer:
- Before disassembling the single-lever mixer, turn off the water supply. Using a screwdriver, remove the plug from the lever handle;
We take out the plug with a screwdriver.
- Unscrew the screw that secures the lever handle to the cartridge rod;
We turn out the fixing screw.
- Remove the lever handle from the cartridge rod;
Pull the handle up and remove it.
- Unscrew the skirt that covers the cartridge;
Unscrew the decorative skirt.
- Unscrew the nut holding the cartridge;
The clamping nut must be unscrewed.
- We take out the cartridge from the mixer body;
We take the cartridge out of the mixer.
- We remember the disassembly process in order to put the mixer back together.
Disassembly diagram for a single lever mixer.
As with the two-valve faucet, the gaskets should be inspected. They are located on the bottom of the cartridge. If there are cracks, tears, or the rubber has lost its elasticity, replacement is necessary.
The gaskets are on the bottom.
Before disassembling the cartridge, consider replacing it completely. The price of a new product is 200 - 400 rubles. Take the old cartridge with you and ask the seller to give you a similar one.
Do-it-yourself valve repair
Valve taps can be called classics of water supply. And, although they are gradually being replaced by new designs, there are still plenty of them. Their internal structure has not changed over the decades. Only the design has changed - it has become more diverse and sophisticated. Today you can find both the most ordinary models and very exotic ones.
Structure of valve taps
Water taps of this type are still used today, as they are simple and reliable, serving not for years, but for decades. If all the “filling” is of proper quality, all that can fail during this time is the gaskets. Replacing them is the main way to repair a valve.
Replacing the rubber gasket
If the faucet in the kitchen or bathroom continues to drip when the valve is completely closed, most likely the reason is that the gasket on the valve has lost its elasticity (see photo in the next paragraph). It no longer presses tightly against the saddle, which is why water continues to flow and sometimes the faucet not only drips, but even flows. To repair the faucet in this case, replace the gasket. To do this, you will need a wrench, or better yet, an adjustable wrench and a set of spacers.
Before fixing a dripping faucet, turn off the water supply (you can completely, you can only in this thread, if possible). Next, it’s a good idea to make sure that the water is turned off. The water doesn't flow - we're starting repairs. You will need a wrench or wrench. They will need to unscrew the head housing (the top part of the housing).
It is better to work with an adjustable wrench. To avoid damaging the surface during the operation, wrap it with a soft cloth and then apply the key. Unscrew the head and remove the valve. Now you can replace the gasket or install a new valve. You pry off the old one with something sharp - you can use a screwdriver with a flat blade, you can use an awl, etc.
When choosing a gasket, please note that its edges should be beveled at approximately 45°, otherwise the water supply will make noise during operation. If you don’t have one like this in your arsenal, you can trim the edge with something sharp - a knife or scissors.
Replacing the gasket in a faucet in pictures
If there is no suitable gasket, it can be cut from a sheet of dense rubber (porous is not suitable). The thickness of the rubber sheet or gasket is 3.5 mm, the inner diameter is slightly less than the diameter of the rod, the outer one should not protrude. Don't forget about the 45° beveled edges.
Having installed the gasket, put the valve in place and tighten the head. New models do not require winding on the thread. Moreover, winding is contraindicated - it can cause a crack in the body. If an old tap from the times of the USSR is being repaired, tow is placed on the threads, lubricated with packaging paste, and then tightened. After this, you can turn on the water little by little.
Sometimes the opposite story happens with this gasket on the valve - water does not flow or barely oozes out. In this case, the gasket came off the stem and blocked the flow of water. First, you can try opening/closing the tap a couple of times, and if that doesn’t help, you need to repeat the operation described above, that is, repair the tap by replacing the gasket. Just remember to remove the old one stuck to the saddle.
Water seeps out from under the stem
If water drips from under the valve, the seals are most likely worn out. There are two ways to repair a faucet with a leaking stem. To begin with, you can try to tighten the head housing more strongly. They do this again with an adjustable wrench. It is not advisable to use pliers, as they leave marks. Tighten the head as much as possible (just don't overdo it).
Valve valve structure
If the threads are tightened as much as possible and water continues to ooze out, the gaskets on the oil seal must be replaced. To do this, first tighten the tap to the limit, then remove the tap head again, pry it with something sharp and remove both rubber rings, replacing them with new ones.
The water does not shut off
If the gasket is changed, but the water does not shut off, when the tap is rotated, the thread breaks, the rod needs to be changed - the thread on it has worn off. There are two options here - replace the stem itself or the entire valve head.
There may be a hole in the saddle
If the threads are not worn, the gasket is new, but the valve is leaking, inspect the seat. There may be a hole in it. It forms gradually - it is washed away by water supplied at high pressure. If the gasket is not pressed tightly in some place, a sink will form in this place. Sometimes water completely undermines the entire circumference, forming sharp edges that quickly damage the gasket. The hole and sharp edge must be removed. Take a regular screwdriver and run it along the edge to dull the sharp edge. The same operation can be done using a natfil or a piece of fine-grain sandpaper. The main thing is to achieve a smooth (as much as possible) and non-sharp edge.
Reasons for low pressure in the mixer
If the blockage is particularly severe, you will need to dismantle the contaminated section of the water supply; all sediment accumulation will have to be removed manually.
The best solution is to replace old worn out pipes.
“It is better to install plastic pipes, since rust never settles on their inner walls.”
If the flow of water from the tap becomes weak, it is not at all necessary to immediately replace the plumbing unit.
Of course, when a new faucet is installed, low pressure may be puzzling, but the problem may affect other elements of the plumbing system.
Causes of blockages
Before you begin the task of unclogging your clogged kitchen sink, determine the cause. It can be:
- corrosion of metal plumbing elements. Due to corrosion, rust particles appear that settle on the surface of the plumbing fixtures, narrowing the passage and causing a blockage;
- low quality water containing impurities. They accumulate and clog pipes;
- fatty plugs formed when washing dishes without special products. Fat does not dissolve, settles inside plumbing elements and disrupts the flow of fluid;
- large food debris that accumulates in various parts of the drain;
- foreign elements clogging pipes;
- the design of the sink itself, which has a drain hole that is too narrow, a small siphon, many bends, etc.;
- improper installation of plumbing;
- damage to the inner surface of plumbing elements.
Attention! Almost all of the sink blockages described above can be eliminated even by a housewife, but to fix a malfunction of the washing device, you will have to call a specialist.
Reasons for low water pressure
To find out the reason, first of all check with your neighbors if everything is okay with them. If the answer is yes, first look for a clog in your sewer pipes.
- A common problem that leads to low water pressure is certain deposits and contaminants on the walls of the pipes. Rust and scale tend to detach from aging pipes and spread through the water throughout the water supply.
Cleaning sewer pipes is a very tedious and boring process, but it is still worth doing, it will give you the opportunity to forget about the problem of low water pressure for many years.
If the problem is not in your pipes, you still need to find the cause and get rid of rust, which can clog both sewer pipes and all the appliances in your apartment, such as a washing machine or dishwasher.
Weak water pressure in the bathroom tap
- Pipes can be clogged not only with rust, but also with various impurities. Try turning off the valve and draining the entire riser into the basement. This will help clean out contaminants due to the pressure difference.
- The presence of garbage, which is caused by the inability to properly use the sewage system and throw leftover food or other garbage into it. You can easily clear such a blockage using a cable, plunger or chemicals.
How to repair a leak in a pipe: emergency methods without shutting off the water supply
During the operation of systems containing pipelines, leaks often occur. Such malfunctions can occur as a result of careless handling, improper installation, or simply due to wear and tear of the material. Moreover, a leak can occur in pipes made of both metal and plastic-containing substances (plastic, metal-plastic, polypropylene, etc.)
The following troubleshooting methods are available:
- Mechanical
- Chemical
- Combined.
The first type is associated with the use of improvised means. Self-tapping screws, harnesses, clamps and more can act in this capacity.
With the chemical method, the malfunction is eliminated using adhesive and astringent chemicals, such as silicone or other sealant.
The latter method involves the use of mechanical means and chemicals.
Regardless of which method will be used, it is necessary to decide “whether it is necessary to shut off the entire water supply system, only a separate part of it, or whether shutting off is not required at all.”
In case of small diameter holes (up to 2-3 mm), shutting down the system is not necessary. If holes of a larger diameter appear, in order to avoid emergency situations, it is better to shut off the network above the leakage point (along the direction of movement of the liquid in the pipe).
Kitchen renovation work
To repair a sink, you will need a set of tools and a little knowledge about the structure. The easiest way to repair a single lever mechanism is to replace a broken cartridge.
A set of tools that you need to have with you:
- Availability of an adjustable wrench for plumbing fixtures. Using a wrench, the two-valve model is dismantled; to do this, unscrew the nut with the lining that secures the cartridge.
- Availability of screwdriver and hexagon. For disassembling valves while unscrewing handles and mixer heads.
- The presence of a knife is determined by the need to adjust seals to size, remove plugs, and cut linen thread or FUM tape.
Before starting work, you need to make sure that the necessary elements for repair are prepared, this is a new cartridge, rubber seals, silicone sealant, flax thread. You may need a limescale remover; all parts must be cleaned of it before installing new ones.
Cleaning agents for removing limescale
For adherents of household chemicals, the market offers a huge selection of cleaning products for cleaning faucets or mixers from limescale.
Tip: when buying a special powder, carefully study the label. Otherwise, there is a risk of saying goodbye not only to plaque, but also to your own plumbing.
Anti-corrosion inhibitors
Cheap detergents do not contain valuable anti-corrosion inhibitors. Inhibitors prevent aggressive additives from damaging the metal. With them, the entire attack is aimed exclusively at lime deposits. Therefore, look for anti-corrosion inhibitors in the composition of the product.
Sulfuric, hydrochloric or nitric acids
Acids are rather heavy artillery for cleaning faucets. They decompose not only plaque and rust, but also enamel and metal coatings. Products with such acids can only be used in advanced cases and only when wearing gloves.
For daily treatment, it is better to choose softer products - based on surfactants.
. When released into water, they are almost completely biodegradable and do not damage the skin of the hands.
What to choose: liquid or cleaning agent?
The powder has an abrasive structure and is best used for cleaning bathtubs and sinks. It is better to entrust the care of metal surfaces to liquid products. Apply the product to the surface, leave for 5 - 10 minutes, rinse with water. And enjoy the shine!
Tap water contains minerals, which determine its hardness and the faucets' hardness during operation.
Impurities settle on pipes and taps, and limescale forms. Faucet care includes not only daily wiping of moisture, but also regular cleaning of mineral deposits inside and outside.
Low water pressure in the apartment: where to go? sequencing
Replacing the water supply system in an apartment with plastic pipes, overhauling and replacing faucets and valves as necessary, cleaning or replacing flexible hoses can significantly increase the water pressure in the apartment. You should also pay attention to coarse filtration meshes. They can be cleaned or replaced as needed.
We suggest you read How to descale anything
Interesting: Why do people get divorced after 25 years of marriage?
If within a month the company has not taken effective measures (which it must report to the applicant in writing or orally), it must contact the control authorities. As a rule, this role is played by the city administration’s housing and communal services department.
How to fix it yourself?
According to the method of adjusting the water pressure, taps are divided into rotary and lever products.
Lever models come in two types:
- based on a metal ball;
- based on a cartridge with a ceramic mechanism.
The principle of operation and design of different cranes is different, therefore disassembly is carried out differently.
Dismantling the entire product is required in rare cases, but the removed faucet is easier to inspect and disassemble.
To do this you need:
- Prepare: a flip screwdriver, pliers, straight and lever adjustable wrenches, a container for water.
- Close the cold water supply valves to the system and to the storage tank.
- Unscrew the nut that secures the supply tube and disconnect the tube.
- Unscrew the clamping nut of the faucet shank.
- The tap has been removed.
If the nuts have become stuck, they are treated with WD40 or an analogue, leaving them to “sour” for 10-15 minutes.
Note! Do not heat with an open flame or knock on the nuts, as the sealing elements will fail and the fragile body may crack.
Bathroom mixer with shower if the pressure is low
How to turn on an overhead shower with a Grohe mixer? I don't know if you even sent a photo of it or not. On modern showers, the “switch” for the shower is either a lever or a special “piggy” that needs to be pulled up or towards you, it all depends on its location, otherwise when the water pressure is on.
The faucet in the shower has low pressure. it says “economical water consumption”.
in fact, what could be the reason? In theory: to save water (with the same pressure into the mixer), the watering can should have smaller holes to prevent water from leaving it and create the illusion of greater pressure.
If water flows weakly from it, then apparently there are too many holes in it. Usually this. Chinese? Are the valves screw-type or do they open in one movement, in the sense of a slight turn?
The most common symptoms of malfunction and methods of elimination
To avoid unnecessary repairs or replacement of the faucet, you should ensure that there are no flaws in the cleaning system. As a rule, the signs and causes of problems are standard.
| Defect sign | Probable cause, solution |
| The water is white. | The cleaning system is contaminated. After some time the air will go away. |
| A sharp decrease in pressure. | The filter (membrane) is clogged. Replacement or regeneration. |
| A sharp increase in pressure. | The filter (membrane) is damaged. Replacement. |
| Undermining in a closed state. | Defect in the shut-off device. Repair or replacement. |
| Complete lack of water pressure when there is water in the system and the tap is open. | Problems with the cleaning system. Repair. The splines on the flywheel or on the axle box are worn out. Replacing the flywheel or axle box. |
| Presence of pressure when the tap is closed. | The splines are worn out, there is a defect in the locking mechanism. Replacing the flywheel, repairing or replacing the mechanism. |
| Immobilization of the flywheel (lever) | The locking mechanism is jammed. Repair or replacement. |
| Water leaking from the base of the faucet or from the connections. | Defective housing or malfunction of the locking mechanism. Product replacement or repair. |
The most popular are inexpensive single-lever samples that are easy to repair. However, their failure often raises questions and is therefore worth considering.
How to clear blockages
In the modern world, there are many different methods that help not only get rid of blockages, but also take preventive measures in order to avoid unpleasant situations.
All chemicals that help deal with clogged sewer pipes are alkaline and acidic. Mixing them at the same time is under no circumstances acceptable.
There are a large number of different means, but the principle of operation is the same. It is necessary to pour the chemical into the sewer hole and add a small amount of water.
Then you should wait about half an hour and add plenty of hot water.
Anti-clog remedies
- Volley discharge of water. Close the drain and fill the bathtub with plenty of warm water. After this, open the hole and a large stream of water will help get rid of the resulting blockage.
- When asked how to clean bathroom pipes, the answer is simple - soda and bleach have proven themselves to be the best. To clean, pour these substances into the bathroom and fill with vinegar. After a huge amount of foam has formed, turn on the hot water and thoroughly rinse the entire system.
- Caustic is the main element contained in special preparations intended for cleaning sewer pipes.
All chemicals should be used according to instructions.
The peculiarity of all of the above remedies is that they help to effectively deal with blockages that have just formed. For old contaminants, more effective methods must be used.
Store-bought cleaning products
When choosing a composition, you need to proceed from what needs to be removed. Most often, gentle formulations from brands such as Comet and Sif or the Russian Selena are used. The main thing is not to use too aggressive compounds that can damage the outer coating.
Regarding application features, it is imperative to follow the manufacturer’s instructions in order to clean the system effectively. Chlorine-containing products can be used as long as they are thoroughly rinsed afterwards. Sometimes gentle compounds cannot cope with contamination, so more powerful ones have to be used.
It is important not to use those that can damage the outer coating, since it will not be possible to restore it. It's best to try a drop of the mixture on an inconspicuous area to make sure it doesn't cause harm.
Cleaning metal-plastic sewer pipes
Cleaning a metal-plastic pipe is much easier than cleaning a steel pipe. If there are a large number of identical components, number the parts and write the name of the fastener if necessary.
Clean the metal-plastic water supply using a flexible string from any side convenient for you. Make the most of fittings that can be removed to reach all parts.
Contaminants in metal-plastic pipes form mainly on bends and turns. Dirt generally does not linger on the walls.
It is best to clean such pipes using saline or alkaline chemicals that can destroy contaminants without causing any harm to the plastic.