Monotonously and inevitably, with the precision of a metronome, the slapping sounds are repeated, carrying brains and money straight down the drain. The reason is simple and banal - the faucet is dripping in the kitchen or bathroom.
The situation is simple and familiar to everyone; such breakdowns are far from uncommon and this situation is fraught with many troubles. Starting from the risk of flooding your neighbors from below to rising water bills.
Such phenomena can be avoided by constant monitoring of the operation and condition of plumbing equipment, as well as careful adherence to operating rules.
A kitchen faucet is not a very complex technical product, but it still functions under pressure. Despite the apparent simplicity of this mechanism, it needs increased attention.
The main causes of leaking taps
The breakdowns that lead to the faucet leaking are different, but the main ones are the following:
- Wear of the rubbing parts of the mixer: gaskets or oil seal.
- Wear of the locking element: valve axle box or cartridge.
The method and technology of repair depends not only on the place where the faucet is leaking, but also on its type. According to the type of design, faucets are available in two-valve and single-lever types. The latter are also divided into cartridge or ball models.
Spool switch
The main and most common problem with a spool-type device is the appearance of leakage from under the handle, which is located between the shower and the spout. Leakage can occur for several reasons:
- wear of the rubber base rings, which are located in the area of the crank rod;
- wear or absence of the sealing element made of rubber base, which is located on the switch box;
- weak fixation of the crank screw or mixer axle box.
To find out the type of breakdown, unscrew the switch handle and turn on the water supply. Where the water will flow from is where the repair work should be done.
If liquid leakage is observed at the place where a special screw or axlebox is attached to the housing, then a sealing gasket element made of a rubber base will need to be installed for the axlebox, and a sealing type will need to be wound for the screw.
If leakage is observed at the outlet of the rotary rod from the screw or axlebox, then you need to completely remove them using wrenches or gas-type wrenches. Then the rubber sealing elements in the rotary rod are replaced.
Repair of single lever faucets
Such models have one control handle, by turning which you can easily adjust the strength and temperature of the water flow.
Single lever with cartridge
Taps with a disc cartridge are the most common option.
Cartridge mixer device.
The cartridge is made in the form of a barrel, with rotating ceramic plates that block the flow of water. The main failures of this type of device are as follows:
- Leaking from under the control rod.
- Comfortable water temperature cannot be adjusted.
- The handle began to move very tightly or completely jammed.
- Incomplete opening/closing of water.
Plastic cartridges do not have replaceable elements, so in case of the described problems, the entire consumable element is replaced. This is done in this order:
- The plug is removed from the faucet lever to protect the handle lock from moisture.
To unscrew the lever, remove the colored plug. - Using a thin flat screwdriver, loosen this screw 1.5–2 turns, after which the handle is removed.
The handle is fixed to the cartridge rod with a screw, which just needs to be loosened a little. - Then the dome-shaped cover covering the fixing nut is unscrewed.
- Use a wrench to unscrew the nut holding the cartridge in the mixer body.
- The broken cartridge is removed and a new part is installed.
- The remaining parts are assembled in reverse order.
Before buying a new cartridge, unscrew the old one and take it to the store as a sample, since cartridges from different manufacturers differ in both diameter and design.
Step-by-step algorithm for replacing the cartridge.
Note! At the bottom of the cartridge there are protrusions that should fit into grooves located in the faucet body. If the protrusions and grooves are not aligned, water will flow out from under the cartridge, and if you try to tighten the fixing nut more tightly, the barrel may crack.
Repair of ball mixers
If a ball faucet is installed in the bathroom and is leaking, it can be repaired. The function of the locking mechanism is performed by a small ball made of stainless alloys. When the control lever is turned, the shut-off ball moves in the mixer body and opens or closes the openings for supplying cold and hot water. Springs made of corrosion-resistant metals are used to hold the check ball in the neutral position.
Ball valves are very reliable and durable in terms of leakage. To disassemble the ball mixer if a leak is detected, you need to do the following:
- The lever is removed. To do this, pry off the decorative plug and loosen the screw located underneath it.
- The faucet cover is unscrewed.
- There is a nut under the cover that also needs to be unscrewed.
- After unscrewing the nut, the cam washer is carefully removed from the body - a plastic seal that holds the locking ball. If the washer is worn out, it must be replaced.
- The next step is to remove the locking ball from the body. It is cleaned of rust and deposits using a soft cloth and inspected to determine the degree of wear. If the wear on the ball is insignificant, the ball is polished with a soft rag using cleaning agents in the form of an aerosol or paste (the use of abrasives is prohibited), after which the faucet is assembled. If the check ball is damaged, has deep pits or pits, it should be replaced.
Note! When assembling a ball valve, you need to correctly install the springs in the special recesses provided for this.
Features of the design of such devices
Ball, single-lever, joystick, articulated - all these are names for a mixer that is controlled by only one lever. Using such a faucet is simple and convenient: moving the lever vertically regulates the amount of water flow, and turning it horizontally sets the appropriate temperature.
This diagram allows you to understand the principle of operation of a single-lever mixer: changing the size of the hole for hot, cold and mixed water allows you to adjust its temperature and pressure with just a couple of movements
The internal structure of single-lever faucets usually comes in two types: a ball mechanism or a ceramic cartridge. The center of the ball mechanism design is the circular mixing chamber. It looks like a hollow metal ball with three holes in it.
Cold water flows into one of the holes, and hot water flows into the other hole. Inside the chamber, the flows are mixed and then flow to the third hole, which is connected to the mixer spout. The control lever moves the ball in such a way as to adjust the clearances in these holes, i.e. change the amount of hot and cold water entering the mixing chamber and the size of the outgoing flow.
The ceramic cartridge consists of two or three plates. At the bottom, as in the ball mixer, there are three holes with exactly the same functions: hot water, cold water, mixed flow. But mixing hot and cold water is done at the top of the device.
Both types of mixers operate approximately the same, but they react differently to operating conditions. For example, limestone deposits almost never accumulate in a ceramic cartridge. The fact is that the plates in such a device are ground to each other very tightly, the size of the gap is comparable to the parameters of the molecule.
This diagram shows in detail the structure of a single-lever ball valve. Information about the individual elements of the device helps to understand the procedure for disassembling and assembling it
But ceramics are not friendly with sand and other mechanical contaminants. A small grain of sand that gets into the faucet cavity can lead to chipping of the ceramic elements, and the entire cartridge will have to be replaced. Sand is practically not dangerous for a metal ball, but there are almost no obstacles for a raid.
The weak point of single-lever faucets is the rubber gaskets. In any case, these elements will have to be replaced at least every two years. Some buyers complain not about problems with the accuracy of temperature settings. This is a characteristic feature of inexpensive models with a small adjustment angle. Such devices break down much more often.
Double valve mixers
In mixers with two valves, the locking mechanism is called a faucet, which can be half-turn or valve type. Let's look at methods for repairing both types of taps.
Replacing a half-turn crane axle box
Breakage of half-turn axle boxes is the main reason why a bathroom faucet drips. These mechanisms are similar in design to single-lever cartridges: inside they have tightly fitted ceramic plates that act as valves and shut off the water. When these plates wear out or are damaged, the faucet stops holding, water may start to drip, and then a stream of water will flow out. Most often, semi-rotary mechanisms are changed completely. Let's consider the algorithm of actions:
- The decorative plug is removed from the valve. In some models it can be pryed off with a thin screwdriver, and in others it has a thread and can be unscrewed.
- There is a fixing screw under the plug - it must be completely unscrewed. You need to be careful here, as these screws often become sour or rusty, so you can easily lick the screw head.
- When the valve handle is removed, use a suitable wrench to unscrew the valve box counterclockwise.
- After this, a new axle box is screwed in and the handle is installed.
Advice! When assembling the tap, the axle box should not be over-tightened, as it will be difficult to unscrew it the next time it is replaced.
Valve box repair
A valve or wing-type faucet regulates the water supply by moving a retractable rod with a rubber gasket at the end using a worm gear. If this gasket wears out, the faucet stops holding water and begins to flow when closed. The advantage of the valve box is its maintainability. The gasket is replaced in the following order:
- The valve handle is removed.
- The key is used to unscrew the axle box.
- The gasket is removed from the underside of the axle box and a new consumable is installed.
If a leak occurs between the clamping nut and the valve stem, the worn oil seal must be replaced. When the axle box is removed, the rod of the valve mechanism is unscrewed and the oil seal is replaced - a thin rubber band (sometimes double) inserted into the groove of the rod. If there is no new seal, then a sealing tape can be wound around the rod, which will act as a seal and prevent leaks when the valve is opened.
Gasket replacement diagram.
Other faults
Specialists also encounter other types of breakdowns:
- Continuous water flow indicates a broken brass valve or a clogged space between it and the gasket. The mixer can be restored if it is disassembled, the insides are cleaned and, if necessary, the valve is replaced.
- If no water comes out when the valve is open, it means the rubber gasket has dried out. To make sure of this, hit the open tap with a hard object.
Pad - A scrolling valve indicates that the rod thread has broken. Depending on the degree of wear, you will either have to wrap the thread with thread or change the rod.
Faulty valve - Turbulent noise is usually caused by damage to the rubber gasket. They can be eliminated by cutting off the edge with abrasions.
Repairing a bathroom faucet with your own hands does not require special skills. This craft can be mastered not only by men, but also by women. Regardless of the type of faucet in the bathroom, repairing and replacing parts is not difficult.
Other leaks independent of the type of structure
After we have studied how to replace the shut-off elements of various types of faucets, we will consider other reasons why a bathroom faucet leaks, regardless of its design.
Malfunction or leakage of the switch from the gander to the shower
Bathroom faucets have a switch that allows you to redirect the flow of water from the gander to the flexible shower hose and vice versa. The most common breakdown of such switches is that water flows from both the gander and the shower at the same time. Most often there are two types of switches:
- Flag or pendulum type. Installed on valve mixers.
Mixer with flag type switch. - Push-button or pull-out type. Most often they are installed in the body of cartridge valves, but can also be mounted on valve devices.
Push-button switch.
Let's look at how to repair these types of switches.
Replacing the pendulum switch
The rotary switch is a brass valve or cartridge, which is replaced with a new one in the same way as a faucet:
- The decorative plug on the lever is picked out, allowing access to the screw.
- The screw is unscrewed and the lever is removed.
- Use a key of suitable diameter to unscrew the switch.
- A new spool is screwed in, the lever is put on and fixed.
Button switch repair
In this design, the most vulnerable element is the gasket, which is subject to wear, deformation and hardening, due to which it no longer holds water. If the button no longer redirects the flow of water, it is necessary to replace the gasket, which is done in the following sequence:
- The button is unscrewed with an adjustable wrench. It must be removed from the case carefully so as not to damage other structural elements.
- There are rubber sealing washers on the metal rod - they need to be replaced with new ones.
- After changing the gaskets, the button is inserted into the housing and screwed in.
Note! Another breakdown of the push-button switch is jamming in the raised (upper) state, as a result of which water flows only through the shower. Such a malfunction means that the spring that returns the rod to its original position has become unusable. This part cannot be replaced, so the switch is replaced completely.
Leak at the connection point of the gooseneck to the mixer body
One of the common places for leaks is the connection between the gander and the mixer. This connection is sealed with a ring made of dense rubber, which is placed on the body of the gander. When turning the gooseneck, the gasket gradually wears out and a leak forms. To eliminate this problem, you need to replace the gooseneck O-ring. This is done in this order:
- Use an adjustable wrench or Swedish screws to unscrew the gander fastening nut.
To replace the gasket on the gooseneck, you need to unscrew the mounting nut. - The worn gasket is picked out and a new one is installed in the groove. It is convenient to do this with tweezers, since the fastening nut is non-removable and remains in place.
- After changing the gasket, the gooseneck is put in place and the nut is tightened.
Advice! In order for the gib with the new ring seal to easily fit into the mixer body, the ring must be lightly lubricated with silicone grease or sealant, which will ensure easy sliding.
Leak at the connection point of the shower hose and shower head
Even during the operation of the mixer, leaks often form at the connection points of the flexible hose to the mixer and shower head. Gaskets are installed in these places, which become deformed and fall in over time. If a leak occurs, disconnect the hose and replace the gaskets.
The hose is connected to the mixer using a hex nut. You need to unscrew it and change the gasket.
To replace the gasket where the shower hose connects to the faucet, you will need a wrench.
The connection between the hose and the shower head is made using a conical relief nut, which can be unscrewed without a tool and even a girl can do it. There is a gasket on the pressure hose that needs to be replaced with a new one.
Note! The hex and flare nuts for connecting the shower hose are very thin, so you should not use much force when tightening them, as they may burst.
Leaks where the faucet connects to the water supply
There are situations when the tap begins to leak at the points of connection to the water supply. The procedure for eliminating a leak depends on the installation location and the method of connecting the mixer.
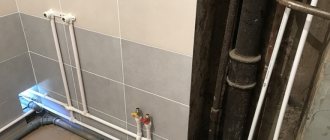
Leakage at the junction of supply pipes
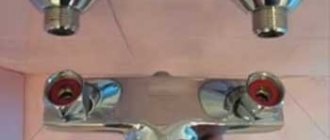
The cause of leakage at the connection point of the wall-mounted mixer at the connection points to the pipes coming out of the wall is the sealing or misalignment of the gasket. To eliminate this malfunction, you need to unscrew the fixing nuts, disconnect the mixer and replace the gaskets with new ones.
Leakage of supply flexible hoses
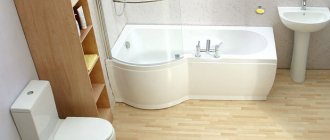
Faucets installed on the side of a bathtub or sink are connected to the water supply using flexible hoses. The formation of a leak at the connection point is the result of wear or chafing of the seals placed on the thinned end of the hose.
The O-rings on the thin end of the hose can wear out, causing a leak.
To replace the rings, you need to remove the faucet from the sink, since doing this from the bottom of the plumbing fixture is difficult and sometimes impossible. Having removed the mixer, unscrew the hoses one by one with a wrench, replace the rubber rings on them, after which all the elements are installed in place.
To replace the O-rings on the flexible hose, you need to dismantle the mixer.
If the water pressure drops
There are situations when the water pressure in one of the taps decreases significantly. The reason for this problem is an aerator clogged with scale and other debris - a mesh filter screwed into the end of the gander. To fix this problem, just unscrew the aerator, rinse with water and clean the filter mesh with a needle or thin awl, and then screw it into place.
A clogged strainer is the cause of reduced water pressure.
The considered malfunctions and methods for eliminating various leaks will allow you to repair faucets yourself without calling a plumber. As practice shows, many types of leaks and breakdowns can be avoided if you take good care of your plumbing. The quality of mixers and the degree of mechanical purification of water also play an important role, so installing coarse and fine filters is sometimes simply necessary.
Advice! If you need bathroom renovation specialists, there is a very convenient service for selecting specialists from PROFI.RU. Just fill out the order details, the experts will respond and you can choose who to collaborate with. Each specialist in the system has a rating, reviews and examples of work, which will help with the choice. Looks like a mini tender. Placing an application is FREE and does not oblige you to anything. Works in almost all cities of Russia.
If you are a master, follow this link, register in the system and be able to accept orders.
Tips and tricks
The water supply system in an apartment or private house is a source of increased danger. Therefore, when operating it, it is necessary to adhere to certain rules to avoid problems. Let's list them:
- Have the ability to quickly turn off water from the riser.
- A set of tools for performing repair work should always be at hand.
- It is necessary to keep in the house a set of replaceable components for faucets and mixers that are in use.
- Be prepared to urgently call emergency water services in the event of a serious accident.
- And, of course, you need to know the rules and procedures for independently eliminating an emergency situation.