The screed is most often a leveling, load-distributing layer, but depending on the type and purpose, it can also serve as additional sound insulation and thermal insulation, as one of the elements of the heated floor system. In some situations it is also a topcoat, for example in a garage or utility room. For a long time, the traditional screed remained the most popular - pouring with liquid concrete mortar followed by hardening with humidity control. Today, dry screed in several versions is becoming increasingly widespread, and FORUMHOUSE users, based on classical technologies, come up with their own and share the results of successful experiments with everyone interested.
Classic dry screed
Dry screed refers to a multi-component system and a method of creating a floor covering without wet processes. The floor pie consists of several layers, each of which performs specific functions.
Waterproofing is most often a thick polyethylene film, but depending on the type of base, it can be specialized membranes, bitumen, or built-up insulation. The last two types are relevant on slab foundations when it comes to first floor floors with an unheated basement or directly on the ground.
Compensation (damper) tape is a gasket between the wall and the base with which the filler layer will be in contact. Commercially available varieties are made of polyethylene foam and may have an adhesive strip for ease of installation and an oilcloth “skirt” that goes down onto the rough coating. Replacement finished insulation is cut out from substrates such as Isolon and other foam materials with a thickness of 5 - 10 mm. The width of the tape should be greater than the expected thickness of the screed layer; the excess will be cut off. When finishing, the tape will be covered with a plinth mounted on the wall.
The filler is an even, compacted layer of dry backfill made of small composite materials: expanded clay and screenings, perlite (coarse expanded sand), slag, slag pumice, etc. Expanded clay of different fractions is most often used.
Rough coating - sheet materials laid on top of the backfill; they become the basis for finishing. This can be DSP, chipboard, OSB and the like, but the most popular are GVL and GVLV, in ready-made dry screed systems the sheets already have a mounting groove.
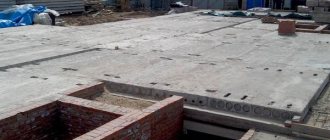
Technique for installing a concrete foundation on soil
Before laying the rough screed begins, it is important to ensure that you acquire all the necessary materials and tools. It can be:
- expanded clay and sand;
- cement mixture;
- slats for lighthouses;
- waterproofing and insulating materials;
- rule;
- building level;
- spatulas;
- container for mixing the mixture;
- construction mixer;
- shovel;
- reinforcement mesh.
Instructions for making a rough floor screed on the ground.
Step 1. The soil base is thoroughly leveled. The top fertile layer of soil is removed, the remaining one is brought to a horizontal state.
Ground leveling
Step 2. The base is compacted. The procedure can be carried out manually or using special equipment. The main thing is that the soil is compacted as much as possible.
Soil compaction
Step 3. A sand and gravel cushion is created on the soil surface, which is also carefully compacted. After this, a layer of waterproofing is laid. In this case, dense polyethylene is used. A reinforcing mesh is laid on top of it with an overlap of 2 cells.
Laying reinforcing mesh over polyethylene film
Step 4. Beacons are installed. They are necessary in order to bring the screed to a perfectly flat horizontal level as conveniently and accurately as possible. The beacons are installed at a distance of approximately 50 cm from each other and fixed.
Examples of installing screed beacons
Two mistakes at once: the reinforcement lies on the floor surface, and the beacons are installed on gypsum mortar
Usually securing is done using small piles of mortar, but they can be secured in other ways. Beacons must be strictly level.
Installation of beacons
Step 5. A damper tape must be glued along the perimeter of the walls, which will act as a kind of compensator in the event of thermal expansion of the screed and will not allow the base to crack.
Laying damper tape around the perimeter
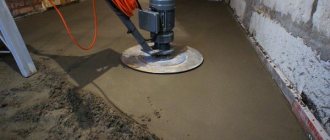
Step 6. Mix a solution of cement, sand and water using a construction mixer. Next, the solution begins to be laid out on the previously prepared layers.
The prepared solution is laid out
Step 7. Before the mortar completely covers the reinforcing mesh, it is raised slightly above the waterproofing layer by using small supports or piles of mortar.
The reinforcing mesh is raised
Step 8. The solution is evenly distributed over the waterproofing layer and mesh.
Solution distribution
Step 9. Using a rule laid on two adjacent beacons, the solution is leveled, if necessary, its excess is removed, and the shortage is replenished.
Leveling the solution using the rule
Step 10. The entire base is poured in the same way. After the cement mortar has set a little, its evenness is checked using a building level.
Checking the evenness of the base
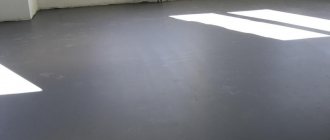
The screed will dry for about 28 days
Now the screed should dry well. During the first days, it is recommended to moisten it with water so that it does not dry out and cover it with polyethylene. It is then dried under natural environmental conditions.
Video - Floors on the ground
Creating a rough screed is both a simple and quite complex task. However, all the subtleties here lie in the correct implementation of the technology. And provided that the process is not disrupted, the screed will be of high quality and durable.
Dry screed laying technology
Installation of dry screed is carried out according to the standard algorithm:
- Preparation of the base - it must be strong and level; if necessary, the old coating is dismantled down to the floor slabs; this may also be required to lower the starting level. There should be no irregularities left on the base, either bulges or depressions. The bumps are knocked down, and the holes are sealed with any quickly hardening mixture and leveled, construction debris and dust are removed. Large cracks on the wooden base are sealed, loose areas are replaced or strengthened, and they are also cleaned of dirt, ideally with a vacuum cleaner in both cases.
- Waterproofing – the concrete is covered with a polyethylene film of at least 200 microns or a special substrate. If it is necessary to connect the pieces, they are laid with an overlap (10 - 15 cm), the joints are sealed with tape, the insulation should extend onto the wall (10 - 15 cm). If the base is wooden, construction bitumen paper is laid using the same principle.
- Damper tape - purchased or cut from insulation, glued to the wall (on liquid nails).
- Backfilling - depending on the available equipment, you can maintain the level using a laser level or a water level. The beacons are set according to the level (galvanized profiles for drywall are considered convenient) in the usual way. Unlike conventional screed, they are removed from dry screed as the areas are filled. Remaining in the mass, they will worsen the parameters of the floor. The filler is poured in excess, the layer is leveled as usual, and, if necessary, compacted with a plaster float.
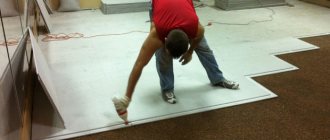
- Rough coating - it is most convenient to use a special gypsum fiber board with mounting grooves; the sheets are laid, glued with PVA (tiled and similar) and additionally fixed with self-tapping screws (the caps are recessed). The second row is laid with a bandage (250 mm indentation), it is not recommended to make a joint in the doorway, this will be a weak point of the coating.
- Trimming - remove the protruding parts of the film and compensation tape.
The average thickness of the dry screed layer varies from 30 to 40 mm; if it is necessary to increase the thickness to 60 mm, the rough coating is reinforced with a second layer of slabs. Dry screed provides a reliable, durable coating that can withstand dispersed loads of up to a ton per 1 m², and a point load of 360 - 400 kg. The popularity of this method is explained by the characteristics of the resulting base.
- Reduced load - the dry option is much lighter, when the weight of the screed is critical, for example, on wooden joists, or when there are doubts about the quality of slab floors, a dry screed is preferable.
- Reduced thermal conductivity - a screed with expanded clay filler 30 mm thick has a thermal conductivity of about 0.12 W/(m*C).
- Sound insulation - with a thickness of 30 mm, dry screed dampens up to 40 dB of noise.
In addition, dry screed is attractive due to its ease of installation, speed and the absence of wet and dirty processes; concrete mixers, mixers, heavy containers with mortar and other “delights” of pouring are eliminated. The limitation for dry backfill is the slope of the surface; it is also not designed for heavy partitions, only light frame ones. Although a dry screed is “afraid” of moisture, and if the coating is poured, it will have to be dismantled, when using moisture-resistant gypsum plasterboard, this danger can be avoided. In rooms with high humidity (bathroom, kitchen), ceramic tiles are used as the finishing layer. If the technology for preparing the base and masonry is followed, the coating becomes airtight.
In order to reduce the cost of dry screed as much as possible, forum member dusha82 decided to turn the rough coating into a finishing coating, saving on finishing.
dusha82 Member FORUMHOUSE
As I decided, I will make the floor using dry screed technology - loose screed, but with some finishing touches. I chose this floor for several reasons:
- I don’t want lags - they will creak.
- Filling is difficult.
- Self-leveling flooring is expensive.
Loose flooring is simple, quick and relatively inexpensive. Now about the finishing touches: the dry screed itself is leveling and the subfloor, but I need (to save money) to have a finishing coating right away, so instead of gypsum fiber sheets, I decided to take plywood, then coated with varnish, which will work for the first time. I chose two sheets of 8 mm each - I think it’s more difficult to mill a thicker one for a rebate. But one problem arose in the process - when I poured expanded clay and put one piece of plywood on it for testing, it turned out that all the “rustle” of the expanded clay could be heard. Fortunately, I had polyethylene foam at hand, the sound stopped after I laid it under the plywood.
How to make support posts
The technology for installing concrete pillars under logs is quite simple:
- Let's start with markings: mark on the foundation or walls the places where future logs will be attached. Next, stretch the cords from wall to wall, after which, stretch them between other walls, observing the pitch of the columns, for example, as mentioned above, 80 cm. Under the intersections of these lines, you need to mark the place on the ground where you will fill the columns.
- The support post form is placed in the hole, so you need to dig it out. The optimal dimensions of such a pit are 50-60 cm deep and 40 cm wide.
- Having dug a hole, you need to start organizing the backfill for the foundation. The bottom of the pit is carefully compacted, and a layer of sand 10 cm thick is poured, after which a layer of gravel of the same thickness is poured. Don't forget to compact each layer.
- One of the most difficult stages is preparing the formwork. The height of the formwork also depends on your decision: if you want to make a support column from brick, then make the formwork protruding from the ground by 10 cm, however, if you decide to make the column entirely from concrete, then the height of the formwork should reach the base of the log.
- The step of creating a reinforcing frame will not cause any problems. Just take steel rods 6-8 mm thick and tie them together.
- Pour the concrete. If you are only making a foundation for future brick supports, then you don’t have to worry about the horizontal level of concrete pouring, however, completely concrete pillars must have horizontally level tops.
- After drying the concrete, cover the surface of the support column with roofing felt in several layers without backfill; you can also use roofing felt. Cover the surface and joints with mastic.
Having done all the work, you can remove the formwork. You can improve the quality of your work by replacing the fertile layer of soil with homemade soil:
- Remove the top 20 cm of soil.
- Fill the entire area with a 10 cm thick layer of gravel and compact it.
- Fill and compact the same layer of sand
"Floating" dry screed
It differs from the classic dry screed in that it has a base - an additional layer of thermal insulation materials is placed under the backfill: EPS boards or mineral wool (hard). The screed is called a floating screed because the backfill is isolated from the base by a layer of insulation, and from the walls by a damper tape, and due to the absence of a rigid ligament, it is not subject to deformation. This cake allows you to maximally soundproof the room, which is especially important in high-rise buildings or private houses for children's rooms and bedrooms.
The installation of a floating dry screed is no different from the installation of a classic one, only the installation of insulation is added, it is laid closely, the seams are taped. Forum member Alexcrab used a floating screed specifically to drown out extraneous sounds.
Alexcrab FORUMHOUSE Member
There is a reinforced concrete floor, the main purpose of the screed is sound insulation. There will be a dry screed throughout the apartment (except for the kitchen), I will make a “floating” screed on extruded polystyrene foam, 30 mm thick. There is also wiring running along the floor, high-power - in corrugated pipes, low-power - without, all wiring is laid with a reserve cross-section.
Considering that the main purpose of the slabs is insulation, such a screed is indispensable in cold regions or when the slab is laid directly on the ground, or dampness and cold are drawn from the basement.
Selection of paint and varnish material
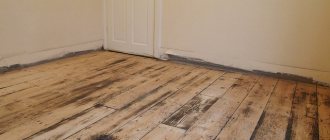
The final stage of floor restoration is the application of some kind of paint and varnish material. If small areas have been damaged, they are painted in the same way as the main floor. In cases where you have to go through and sand all the boards, the question arises about choosing a coating
In this case, it is important to take into account not only the aesthetic component, but also the ability of the composition to provide reliable protection for the tree.
One of the most popular materials is paint. The modern market offers a wide range of different paints, which include substances that increase the fire resistance of wood and its resistance to rotting. The paint reliably protects the floor in conditions of high humidity.
Another popular material is varnish. It allows you to see all the beauty of wood texture, but is less resistant to high humidity. Materials such as oil and wax are used much less frequently. They provide good protection for wood, but oil mixtures are sensitive to temperature changes, and wax is sensitive to mechanical damage.
Semi-dry screed
With a semi-dry screed, instead of expanded clay or other dry filler, a cement-sand mixture with plasticizers, fiber and similar additives is used. Expanded clay or perlite may also be present in the mixture or replace part of the sand. The main difference between a semi-dry screed and a dry one is the use of liquid when preparing the backfill and the absence of a rough layer. The finishing coating is laid directly on the hardened screed in accordance with the technology of the selected type of floor.
Semi-dry differs from ordinary cement screed in the minimal amount of liquid used - it is enough to start the hydration process, but the batch turns out to be almost dry and is laid out on the base rather than poured. The molding process produces a smooth, streak-free floor that does not require finishing. Among our forum members, many use semi-dry screed as something between dry and regular. It can withstand dynamic and vibration loads, which are contraindicated in the dry method, but it is done faster and with less labor than pouring with a liquid solution.
TurbosolFORUMHOUSE Member
I myself am engaged in the construction of such couplers; in Moscow we were one of the first to offer this technology, although we were looked at wildly because of the cost at that time. As practice shows, the semi-dry method quickly replaces the classic liquid styling method. Semi-dry screed usually does not require additional leveling with self-leveling floors or levelers, and they cost quite a lot of money, although a lot depends on the master layers.
CupcakeFORUMHOUSE Member
I think that at the moment this is the optimal screed option: no dirt, no need to worry about flooding someone, no problems with delivery, no problems with lifting the mixture to a height, no need to worry about where to get a concrete mixer, you can start the next day for further finishing work. The screed is made on the basis of sand and cement, even if there are water leaks somewhere in the future, it will survive it without problems, and the price, in my opinion, is reasonable.
Unlike dry screed, semi-dry screed needs to be moistened during the hardening process.
Turbosol
Moisturize, at least once, but it is necessary! In order for cement to fully gain strength, it requires moisture; the reaction occurs only in the presence of liquid (hydration). The first time moistening is carried out five days to a week after installation; before this period, the screed contains its own moisture, and it gains a primary compressive strength of up to 15 MPa. This, in principle, is enough for a household floor, but it is advisable to increase it to 20 MPa by humidifying it.
A semi-dry screed is often made to float due to the high thermal conductivity of concrete - a layer of insulation can significantly improve the heat-saving parameters of a room if there is an insulating layer under the screed. In addition, a floating semi-dry screed is less susceptible to deformation, cracking and shrinkage. And due to the absence of direct contact between the ceiling, the wall and the screed, sound insulation is also effective.
Subfloor on adjustable joists
Subfloor on adjustable joists
A very effective option that is rapidly gaining popularity among domestic developers. To perform the work, plastic screw racks are used, characterized by high reliability and service life.
The adjustable floor is the modern ancestor of the floor on joists, providing the ability to quickly build a subfloor
This technology allows you to quickly install a subfloor that will not creak in the future. At the same time, you do not have to waste time determining the required thickness of plywood pads and arranging them - the verticality of the legs can be easily adjusted to the required level. After installation, the logs will not come into contact with the base, which is also an additional advantage.
The procedure is as follows:
- in places where screw posts are planned to be installed (necessarily along the edges and along the length of the product with an average step of 0.5-0.8 m), holes are prepared in the logs;
- The log is laid in the right place, starting from one of the walls. A 1-centimeter gap must be left between the wall and the support;
- the support is attached to the base, starting from the outermost screw posts. This type of stand has a hollow structure. To fix it, the performer just needs to drill a hole about 4.5 cm deep in it, drive a dowel into it, and then hammer in a nail or screw in a self-tapping screw.
Stages of installing supports for adjustable joists
Finally, the racks are tightened to the level, and work continues in accordance with the scheme for arranging the subfloor on standard joists, discussed earlier.
Drilling a hole
Adjustable Plywood Subfloors
A rather effective and interesting option for a subfloor is a plywood base installed using special bushings equipped with internal threads. The bushings are inserted into pre-created holes in the plywood. For one sheet of standard size, 16 holes are usually sufficient. As a result, the plywood will seem to stand on legs. Moreover, such a base is characterized by impressive resistance indicators - 1 m2 of subfloor can withstand a load of about 5000 kg.
Adjustable floors
Conclusion
In some situations, the only correct solution was and remains a conventional screed using the wet method as it best meets the conditions of use. And nothing can be done about the phlegm, dirt and other associated inconveniences. In places where increased loads and dancing for days on end are not envisaged, dry screed and its variations can be a worthy alternative.
Dry screed is one of the suitable types of base for an infrared film floor, which is described in the article “Infrared heated floor - from theory to practice.” To prevent the heat retained by the floor from escaping through the windows, read the article about do-it-yourself wooden Euro-windows. In a video about working with floors and walls, a specialist will demonstrate a light screed device.
Subscribe to our Telegram channel Exclusive posts every week
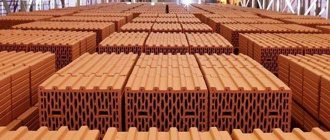
Moisture-resistant chipboard
This material is capable of withstanding very high mechanical loads and can be laid both on frame joists and on leveling backfill. Has a slight variation in thickness and allows you to create a fairly even base
Please note that this must be high-density chipboard (used in furniture countertops or window sills). Chipboard has good sound and heat insulating characteristics
In Europe, ready-made tongue-and-groove panels are made from chipboard (including those with additional insulating layers). If you use these slabs, then, like plasterboard, they are laid in two layers with glue and coated with a water-repellent compound. If you have special requirements for soundproofing the floor, then you can lay a layer of technical cork on top (on glue). It is recommended to use chipboard only in dry rooms under parquet, linoleum or carpet.
Panel buildings
They are much newer than Khrushchev and Stalin buildings. But the floor in them also has to be replaced and repaired.
In a panel house, the floor base is concrete. There is no such complex structure here. Therefore, if replacement is necessary, we remove the old coating and thoroughly clean the base.
Usually we create a screed here: dry, semi-dry or wet.
In the first option, expanded clay is used. We cover it with slabs with gypsum fibers.
In the second case, we mix the composition so that the proportions of water in it are very small.
In the third option, we use sand, cement and plasticizers, as well as insulation - expanded clay.
This is a popular method. But we don’t use it when the floor slabs are already heavily loaded.
Today, people are increasingly ordering self-leveling floors. They are easy to prepare and sell, both in panel houses and in older ones.
You might be interested
What floor to install in an apartment Warm floor in an apartment: a modern choice How to fill the floor in an apartment
Eliminating squeaks
When the boards rub against each other, the floor creaks. We usually eliminate this dilemma by driving wedges directly into the cracks. We work in areas where squeaks appear.
The second option is talc.
If the floor creaks at the junction of the board and the joist, we make a special stretch of the floor. To do this, we drive in self-tapping screws designed specifically for wood.
The second option is polyurethane foam. We fill it in the area under the floor.
In general, the causes of this trouble are loose joists and rot in the boards.
We do this:
- We carefully analyze the floor. We replace boards with defects.
- If the condition of all elements is acceptable, then we strengthen their fastenings.
If the floor begins to spring back, it means that the quality of the previous work is rather modest. The floor needs to be re-laid.
We remove the flooring and study the distance between the joists. If it is significant, then this is the cause of the dilemma. Another reason could be the weak thickness of the boards.
Working with lags
Their correct location is:
If they are connected incorrectly, we correct this picture using competent options.
We place more pads under the joists. We fasten the joists only to the base.
We maintain a suitable gap - a maximum of 60 cm.
Important
If the previous workers left the parameters at 70-80 cm, we install another logs, and until the end of the covering. We cover its entire perimeter.
The final phase is laying the flooring. We secure the boards thoroughly.
The second option for strengthening the lags involves the use of crossbars.
.
You might be interested
What floor to install in an apartment Warm floor in an apartment: a modern choice How to fill the floor in an apartment
Replacing the floor in an apartment with your own hands
If you are thinking about replacing the floors in a Khrushchev building with your own hands, first you need to study their structure.
It has already been indicated above. This is five layers. Schematically, the picture looks like this:
Next, you must decide on the type of repair: cosmetic or major.
When implementing the first, the following operations are required:
Eliminating cracks.
- Dismantling the old covering.
- Installation of a new floor
Have questions ? Call!
Fighting small cracks
How to effectively eliminate such shortcomings? Putty and high-quality laminate will help here.
Work can be carried out without opening the coating. The cracks need to be thoroughly filled with putty. In this process, the boards should be looped. Upon completion of the operation, lay the underlay and lay the laminate.
Elimination of large gaps
These are what I call gaps exceeding 6 mm. This requires dismantling the floor plinth and floorboards.
Old wooden baseboards should be carefully removed around the entire perimeter of the room.
Carefully lift the boards with an axe. Pull out protruding parts.
Worn wood floors should also be removed. Before doing this, study the conditions of the lags. Replace damaged components.
Advice
Do the same with the boards. Replace defective parts with new ones. Install them tightly and mount them using self-tapping screws.
After which the baseboards return to their positions. You can lay linoleum or carpet.
Treat new supporting elements with an antiseptic.
Installation of new boards
Before this stage we treat them with varnish. After complete drying, we install them on the joists. We fasten them tightly to each other.
When we re-lay the floors, we use dowels with parameters 10 x 1000. To improve the strength under the joists, we arrange supports every 50 cm. For this we use bars.
The positions of the lags in relation to the boards are perpendicular. The interval between adjacent logs is 50 cm.
Next, we check them for evenness using threads. We stretch each thread. There should be a millimeter gap between it and the lag.
We fasten the boards with self-tapping screws 6 cm long if the material density is 3.5 cm.
At the joint areas between the boards we keep tiny gaps. This prevents squeaking.
The final stage is laying the flooring. Its choice is made by clients based on their preferences.
When we carry out the indicated operations to re-lay the floors in a Khrushchev-type apartment, we usually end up laying linoleum. This option is chosen most often.
Preparing the floor for finishing and painting
To use tongue and groove boards for a subfloor is the best option. This material is reliable and durable. The final floor covering can be carpet, parquet boards, laminate, linoleum and other materials.
You can leave it as a finished floor. To do this, the tongue-and-groove floorboard is scraped and coated with varnish, mineral oil or paint.
The floor is painted using a roller and brushes. After choosing the paint, they begin to work. Apply layers one after another and allow them to dry. When choosing paint, you should consider its resistance to mechanical stress. There are two types of paints used to paint the floor: acrylic and enamel.
Proper dismantling procedure
What are the features of repairing and replacing floors in a Khrushchev-era building? The beginning here is formulaic. We dismantle the previous structure. We remove boards or parquet. Here we use a nail puller.
If there is an uneven or damaged layer of screed, carefully break it with a hammer. When there is insulation under it, then we pry it off from the bottom and crack it over the entire area. The elimination concerns all layers up to the slab.
We install waterproofing in the kitchen and bathroom. If necessary, we apply sound insulation to it.
If the customer’s apartment is located on the ground floor and there is no basement below, we provide thermal insulation. If it is available, the client himself determines what kind of insulation to install - sound or thermal, or both.
Question about screed
How to arrange it correctly? We upload it to:
- Floor slabs between floors.
- Expanded clay insulation layer.
- A layer of glass wool/basalt wool or polyurethane insulation.
Before pouring, we cover the cotton insulators with hydro- and vapor barrier sheets.
An alternative to them is a very dense polyethylene film.
When replacing the floor in an apartment, we prepare a screed from the following components:
- Cleaned sand.
- Cement.
- Special plasticizers.
- Modifiers.
- Water.
Make the composition quite liquid. And after pouring, it spreads over a horizontal surface.
On this layer we can lay:
— pipelines of the water-type “warm floor” system,
— cables of an electrical analogue of this technology.
We cover such communications with a second layer of identical screed. The next stage when replacing floors in an apartment is laying the selected coating.