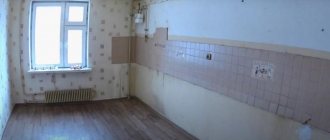
Laminate is successfully expanding into new areas of application. The wealth of textures, patterns and colors allows you to successfully integrate the material not only into the extravagant design of the walls, but also the ceiling. Simple styling and care also helps with this. Price also plays an important role. It is available to consumers with different income levels.
To ensure that the original design of the ceiling space does not stand out from the overall interior and lasts a long time, the StroyGuru portal talks about the nuances of choosing a finishing material, how to fix the laminate on the ceiling, and resolve issues that arise during the work.
Pros and cons of this solution
The number of people wishing to decorate their ceiling space with laminate is growing every year. The explanation must be sought in the advantages of compressed lamellas:
- durability - can last several times longer than on the floor, because the interlocking connections and the panels themselves are not subject to mechanical stress and abrasion;
- A huge selection of colors, patterns, textures and sizes allows designers or homeowners to bring to life the most unusual ideas and give the room a natural feel in many interior design styles. For example, the effect of an aged board made of oak, ash or walnut transforms a room into a chalet, a country house in France or a living space in the industrial cities of the USA in the late 20s of the last century;
- light weight - the material does not create large additional loads on the ceiling;
- relatively affordable price. When performing finishing work on their own, the owners will spend about the same amount of money on finishing as when installing a stretch ceiling. Installation of laminate over a metal frame is slightly inferior in this criterion, but due to its longer service life it pays off much faster;
- strength - difficult to damage;
- the original color scheme is maintained until the end of use. There are two reasons: firstly, the applied protective film prevents fading, and secondly, the sun’s rays (ultraviolet) cannot reach the ceiling even if they want to;
- assembly technology accessible to home craftsmen - all work, from installing the frame to attaching the slats, can be done with your own hands;
- the ability to hide electrical wiring, cables, pipes in the interceiling space, and lay heat and sound insulating material;
- easy care - just wipe with a wrung-out cloth;
- convenient delivery from the retail outlet to the repair site due to compact packaging and low weight;
- when using a lathing or frame, there is no need to level the ceiling surface;
- You can emphasize special areas in the room and adjust the visual perception of space.
Disadvantages of this solution:
- laminate is afraid of high temperature and humidity, and in the ceiling space in the kitchen and bathroom they are critical for the material. Here it is better to refrain from using slats. For the same reason, experts do not recommend using laminate flooring on the balcony, in the toilet and in the country house. According to the editors, not everything is clear here. In some cases, nothing prevents you from covering the ceiling with lamellas in all of the listed rooms, except the bathroom. To do this, you need to buy a waterproof (moisture resistant may not withstand high humidity and at the same time high temperature) laminate class 33-34 with a bevel treated with wax. Expensive, but doable;
- gets dirty quickly. The protective film accumulates static voltage from operating electrical appliances (TV, PC, laptop, etc.). It, in turn, attracts dust, soot, and volatile fats;
- resonates perfectly (increases sounds) when mounted on a lathing or frame. Therefore, if there are noisy neighbors above, it is still better to lay soundproofing mats;
- It is extremely difficult to attach laminate flooring to the ceiling on your own, without an assistant;
- there is a danger of phenol emissions. It is found in almost all types of laminate (formaldehyde resins are used for production). At temperatures above 28oC it begins to separate. On the floor such temperatures are hardly possible, but at the top they can be. This must be taken into account when heating the apartment. The solution is to control the temperature and constantly ventilate the room;
- In Khrushchev-era apartment buildings, laminate ceilings look heavy and gloomy. An active tree pattern will visually “eat up” the already small height of the room. Such a ceiling requires spacious rooms. In addition, it is difficult to match the lighting to the slats (low ceiling, not every lamp looks good on wood, etc.).
Reviews
The popularity of using laminate on ceilings is confirmed by numerous positive reviews from those who have tested the technology in their homes and apartments:
Sergey (Samara). “I had a terrible ceiling on the loggia. I couldn't get it to line up. Smart people advised to use laminate. I made the wooden sheathing with my own hands and installed the panels. Now I have a gorgeous “oak” ceiling on my loggia.”
Alexander (Perm). “I always wanted to create a beautiful, but cheap interior for my dacha. I thought: if laminate looks great on the floor, why not use it for the ceiling. I selected the thinnest material of class 21, i.e. cheap, and lined the ceilings in all the country rooms with it. I recommend it to everyone - it looks great and will last 100 years.”
Anton (Tver). “I heard about laminate on the ceiling, but I had my doubts. Finally I decided. I purchased light-colored German panels and installed them with my own hands in the hallway and on the balcony. I must say that the result was simply magnificent.”
Laminate on the ceiling as a design solution
Laminate ceilings in the interior make it possible to use several design techniques:
- layout - dies can be attached staggered, diagonally, herringbone;
- cover the joint with the wall with various types of ceiling plinth;
- mask the connection with other ceiling elements with connecting strips;
- leave beams visible or create them artificially (false beams);
- install the ceiling in several levels;
- use recessed, overhead or pendant lighting systems.
By combining technical techniques with the texture, color and size of the panels, you can design the ceiling space in country, Provence, loft, or chalet style. But the most common is the modern style.
Modern. The framework of modern style is just being formed. Therefore, combinations of wood on the ceiling with concrete, metal, stone and other materials characteristic of the new direction in home decoration are allowed. Laminate emphasizes the graphic lines of the interior and sets off other decorative elements.
Country. The interior in a rustic style is country and Provence. It is distinguished by a large number of simple textiles and natural materials or their imitation, 18th-century furniture, and wooden beams. In this case, the slats on the ceiling should look like aged wood (oak, pine, walnut, cedar), untreated, with imitation oil paint.
Loft. When developing a loft-style design, you need to remember that this is housing in former factory workshops. Hence the rough finish of brick, concrete, plaster, metal and wood. The ceiling can be finished with lamellas with a special texture:
- True-Touch Deep Nature (embossed);
- Aged Wood (artificial aging);
- Handscraped or Handcrafted (manual processing).
Interesting design solutions for decorating the ceiling space with laminate are possible in any residential area.
Living room. The living room is the face of an apartment or private house. It personifies the wealth of the owners, their status in society. Therefore, everything is used: visual effects, wall decoration, furniture, flooring and ceiling.
When decorating the ceiling, you can use several tips from designers.
- A high room makes it possible to experiment with the design of the ceiling decoration. It can be one-, two- or multi-level. For low ceilings, it is better to abandon the frame or lathing and glue the lamellas to the ceiling.
- Finishing the ceiling with laminate in the living room of apartments looks best in the following styles: high-tech, classic, modern, industrial, loft. In country houses - country, chalet and Provence.
- Follow the rule: dark ceiling - lighter floor, and vice versa. This advice can be formulated in another way: an active ceiling space design requires a calm, neutral floor covering.
- The lamellas look impressive in combination with rough materials - the contrast of textures works. On the one hand they are relatively smooth (lamellas), on the other they are rough, poorly processed (brick, clinker, concrete, etc.).
- Slats on the ceiling can be used to highlight areas in the room, for example, a TV zone or a reading area. Leave the rest of the ceiling white.
Bedroom. In the bedroom, slats allow you to reflect the individual tastes of the owner in creating a chamber atmosphere and comfort. Multi-level ceilings and combined materials are appropriate here. It becomes possible to use the color of natural wood to highlight the colors of a bed, wardrobe, bedside tables and other types of furniture.
Soft night light against a wooden ceiling creates an intimate, relaxing environment. As an option, you can cover the ceiling at the head of the bed with dark-colored slats or stripes that also cover the walls.
Children's room. Laminate flooring looks stylish in a children's room. At the same time practical.
Kitchen. A laminate ceiling in the kitchen can be an extraordinary solution. But you need to remember that, firstly, it must fit stylistically into the overall interior of the apartment, and secondly, the lamellas you buy are waterproof class 33-34 (others simply will not withstand operating conditions). Design options can be seen in the photo below.
Corridor and hallway. The corridor is the visiting card of the owners. Therefore, it is important to greet guests with dignity. Laminate on the ceiling will help emphasize the geometry of the corridor and tie the entire interior of the home into a single whole.
Attic. A room under a roof requires “warm” finishing materials. Wood looks most harmonious here - it creates comfort and coziness. The laminate on the ceiling fits organically into the design of the attic and meets the requirements.
Balcony or loggia. The ceiling cladding with lamellas looks impressive on the balcony (loggia). Only the material must be moisture-resistant and of a high strength class.
Wooden house. Designers warn: interior design in a wooden house is the most difficult. There are several reasons. Firstly, competent decoration of the room should be based on one of two concepts: either everything is presented in the same color scheme, or the design is carried out according to the zone principle, based on the play of shades. Secondly, wood does not like companions made of plastic (PVC), MDF and drywall. Therefore, it seems logical to use wood-look laminate to finish the ceiling space.
When choosing slats, you need to start from the dominant color and texture of the wood already used and look for a laminate with a similar pattern, but lighter or slightly darker in tone. To make the interior expressive, the width of the planks should differ from the size of the natural board. It doesn't matter which way.
Laying diagonally or herringbone looks good. A number of design solutions use an extravagant option: overlapping adhesive fastening.
Advantages
Spectacular design and minimal maintenance are not all the advantages of laminate as a ceiling covering. Reviews from people who have made such a ceiling covering with their own hands show how practical it is.
Inexpensive laminate is ideal for ceilings, because... it will not be required to withstand loads.
A wide selection of shades, textures like wood, stone, leather, ceramic tiles, metal allow you to make the right choice. There is also matte, structural, laminated laminate, etc.
Laminate material insulates noise well and retains heat in the room. Installation is quite simple and can be done independently.
Laminate is a fire-resistant building material. When it comes into contact with an open fire, it does not burn, but only becomes deformed. Selection of material There is no special laminate for ceiling coverings, so they use the one intended for the floor. You should not spend money on durable material with increased moisture resistance; thin and light material with a low level of strength will do. It is used for interiors of rooms with low humidity and temperature.
When choosing the dimensions of a laminate board or tile, you should take into account the area of the surface to be finished. So, to cover a loggia with an area of 2x6 meters, choose 200 cm boards. In a room 3x6 meters, it is better to purchase boards 150 cm long. At the same time, it is more convenient to work with a board no wider than 15 cm, because it is lighter and easier to install.
Which laminate to choose
Most home craftsmen know the criteria for choosing laminate flooring. The ceiling is a little different. Firstly, the strength, wear resistance and class of the laminate are not taken into account, with the exception of a few non-standard cases (kitchen, balcony, cottage). Secondly, you can use wall panels without a lock. Thirdly, the design and dimensions of the planks come first.
Based on this, experts have made recommendations for selection.
- The color and texture of the slats should fit into the overall design style of the room. Warm, light colors are best suited for the living room, bedroom, kitchen, and children's room. In an official room (study, office) you can use dark colors (brown). Classic wood imitation is also used here. But in residential areas, options for aged wood or rough manual processing are interesting.
- It is not recommended to mix laminate flooring models in the same room - the effect obtained is not what the owners expected.
- It is not advisable to mix sizes, even if the color and texture are the same. At the top, external differences are very striking, spoiling the entire effect of the work done.
- Laminate with a chamfer looks good in loft, Provence and country styles. Inconspicuous, light joint lines are more suitable for a modern interior.
- All material must be from the same batch. The requirement is strict. After all, the panels may not match not only in tone, but also in size.
- Optimal dimensions: width - 15 cm, length - 2.2 m. This way there will be fewer joints (a large number of connecting seams visually makes the room smaller), and installation is easier.
- The panels should be thin - heavy structures at the top are undesirable.
- The texture is preferably matte or satin. Gloss has a lot of glare from street lighting or a working TV, which irritates not only vision, but also psychologically.
- The amount of laminate should be with a margin of 10-15% in relation to the ceiling area - part of it will be used for trimming.
- Always check panels for manufacturing defects. There should be no chips, cracks or damaged locks.
Methods
You can attach the laminate to the walls either with glue and liquid nails (but you will need to thoroughly level the base and prime it), or using slatted lathing (but it will take up some of the space, so it is not recommended in small rooms). If you decide to nail the covering to the entire wall or to its upper part, work begins from the ceiling to the floor; Decoration of the lower half of the walls is carried out from the floor upward. To ensure that the planks are firmly fixed, check their correct installation using a building level. When there are locks in the panels, they should be glued like this: first coat the surface with glue, then connect them into a lock, and only then attach them to the wall.
If you think that glue alone is not enough, additional reinforcement of the structure with nails or staples is acceptable. The tongue and groove board is attached to the sheathing with clamps at the top and bottom.
Materials and tools
Installation of laminate flooring on the ceiling can be done using three technologies. Each of them will require an individual set of tools and auxiliary materials. However, in all cases it is impossible to do:
- without laminate - finishing material. What would it be like without him?
- plastic channels for plugs or baseboards. At the same time, they act as technological gaps instead of wedges (the laminate greatly changes its linear dimensions as the temperature rises). After completion of the work they can be dismantled;
- plugs or plinths (many designers suggest installing a floor version of the plinth);
- scaffolding, construction trestles or aluminum scaffolding for painters. You can also use a stepladder (preferably two, since in many cases you will need help with installation);
- hacksaws for cutting lamellas (for metal or wood with fine teeth);
- roulette;
- level;
- construction pencil.
Then everything depends on the chosen technology.
On glue. When gluing lamellas to the ceiling you will need:
- acrylic putty;
- primer;
- glue - can be liquid nails, universal type “Titanium”, etc.;
- grinder with an abrasive attachment;
- putty knife;
- container for primer;
- roller;
- brush - to handle joints with the wall and pipe passages.
On the sheathing. To install the sheathing and attach the panels to it you need:
- wooden slats at least 3 cm wide, any thickness, from 10 to 50 mm. It all depends on whether sound insulation (insulation) will be carried out and what kind of lighting is planned;
- drill or hammer drill for drilling in concrete to cover holes for self-tapping dowels;
- screwdriver;
- crown - needed for recessed lamps;
- self-tapping dowel - the length is 2 cm longer than the thickness of the slats;
- fasteners: clamps, finishing nails or staples;
- hammer, stapler - depends on how the panels will be attached.
On the frame. When constructing a frame from a metal profile, many specialists use parallel fixed guides, which does not provide the required structural rigidity. A little extra money and time will allow you to get a rigid, perfectly flat plane of the frame, and, consequently, the ceiling. You will need:
- metal profile UD (PN) 28*27*3000;
- profile CD (PS) 66*27*3000;
- direct suspension;
- crab mount;
- self-tapping screws 3.5x25 mm;
- self-tapping dowels 6*60;
- “bug” screws;
- clamps;
- hammer drill with attachments;
- screwdriver;
- "Bulgarian";
- laser level;
- hydraulic level (can be made from a fuel pipe);
- chop cord (made with your own hands from twine).
What is better to mount it on?
The choice of type of laminate fastening depends on many factors.
- Ceiling surface quality. So, on a flat ceiling you can use an adhesive fastening method or lathing. On a floor with a slope or a large difference in height, a frame system is installed.
- In terms of finances, it is cheaper to equip a wooden sheathing - there is no need to carry out preparatory work. It makes installation the easiest and fastest.
- With low ceilings, it is better to glue the lamellas - the volume of the room will be preserved.
- Utilities can only be hidden behind a metal profile frame.
- Insulation or soundproofing of the ceiling space is possible with lathing or frame.
- Frame construction is the most expensive way to construct a laminate ceiling. But it has a number of advantages:
- you can use any schemes, types and types of lighting;
- Not only electrical wiring is hidden, but also utility pipes;
- actually install a multi-level ceiling;
- it becomes possible to carry out heat and sound insulation work.
Having correctly assessed the above factors, it is easy to choose the optimal fastening system.
Additional items
The choice of items to strengthen and hold the structure is extremely important. The most common seemingly ordinary clamps are available in a wide range, and if you purchase the wrong product, you will devalue all your work. The thicker the panel that needs to be held, the larger the diameter of the tongue should be . Compared to other types of mechanical fasteners, clamps have the advantage of having a low risk of panels splitting. They are great even in rooms with significant humidity. A bracket with a jagged protrusion is driven into the board and held in place with self-tapping screws; a bracket with a flat protrusion will help press the protruding part of the click lock against the wall or sheathing.
When choosing liquid nails, be sure to check their area of application. They are both universal and intended for interior work. Very dense laminate cannot be attached to walls , so there is no point in using liquid nails to hold heavy objects. Acrylic composition cannot be used at subzero temperatures.
Covering the end of the laminate on the wall is not so easy, but this task can be solved. According to experts, profiles in the shape of the letter P, which are made from a variety of materials, will help - there are aluminum, plastic, and even wood. As an option, you can purchase a flexible rubber threshold. All these blocks can be attached using the same liquid nails or glue-sealant. Sometimes they also offer edge tapes, but any method should not disturb the color harmony of the canvas.
Preparatory work
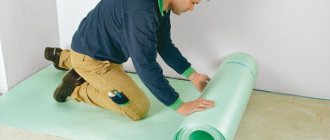
When attaching laminate to a frame or sheathing, preparatory work is kept to a minimum:
- remove any plaster that is ready to fall off from the floors;
- Use polyurethane foam to seal the joints between the floor slabs if the plaster has fallen out of them;
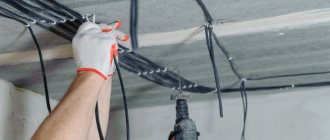
- carry out electrical wiring and fasten it securely.
The adhesive method of fastening requires more serious preparation. After all, laminate flooring needs to be laid on a very flat surface - defects in the coating are difficult to hide with glue. These are not foam boards, where acrylic plaster can easily level out errors of up to 5 mm.
You can level the ceiling with “dry” and “wet” plaster. The dry method involves attaching plasterboard, plywood or OSB to the ceiling. But here the question immediately arises: why do the same work twice? After all, sheets in 99% of cases are attached to a frame or sheathing. It is easier in all respects to attach decorative slats to the sheathing instead of leveling material.
The situation is approximately the same with the “wet” leveling method. If differences in height exceed 3 mm, the surface needs to be plastered. And this is a lot of additional operations that require significant financial costs, physical effort and time. Need to:
- clean the ceiling of old finishes and plaster;
- clean the surface from plaster residues with a grinder or grinder with a grinding wheel;
- prime the joints;
- seal the joints with plaster mortar;
- After the first layer of plaster has dried, apply a thin second one;
- press a sickle mesh into the plaster mortar;
- prime the entire surface of the ceiling twice;
- plaster;
- after the mortar has dried, go over the plaster mortar with sandpaper, in case errors were made during the work;
- prime the surface again (the task is to bind the dust);
- finally level the surface with putty;
- After the putty solution has dried, prime it with glue.
From the list of operations it is clear that making a simple sheathing is much easier. By the way, it is for this reason that the adhesive method of attaching laminate is used in isolated cases.
Characteristics of laminate coating
The main difference between such a board and flooring is that there are no special claims regarding its wear resistance (since there will be no impact on it from high mechanical loads).
Laminate consists of several layers that are folded into a single structure. These layers are:
- A polymer protection film (based on melamine or acrylic) protects the patterned layer underneath it from mechanical defects.
- The decorative layer is a paper backing with a pattern made on it (like stone or wood), which determines the appearance of the laminated board.
- The base provides the laminate with the required density (MDF board impregnated with a special agent).
- The waterproofing layer is the bottom layer of protection for the “sandwich”.
Installation instructions
Each method of attaching laminate has its own instructions.
Glue method
The step-by-step work algorithm is simple:
- The laminate is brought into the room, unpacked and left for 3 days;
- Wedges are attached along the perimeter of the ceiling to create a technological gap. But it is difficult and time-consuming. It’s easier to buy plastic channels for attaching plugs (their width corresponds to the size of the technical gap). Upon completion of work, they can be removed or left;
- Contact adhesive is applied to the ceiling and back. If other adhesives are used, you need to look at the recommendations for their use;
- after the exposure time indicated on the package, the panel is attached tightly to the wedges or channel in the corner farthest from the door, left or right - depending on which hand is working and is held for about 10 minutes. Some experts advise using table spacers and squeegees to hold the finish until it sets;
- for better fixation, the entire surface of the lamella is lightly tapped with a hammer, preferably with a mallet;
- 1/3 of the panel is cut out. It is necessary to drive two rows at the same time, otherwise there is a high risk of displacement towards the second panel glued to the end. Correction will be difficult, if not impossible;
- glue is applied to the second, short panel and the ceiling;
- the protruding connecting strip of the glued panel is treated with silicone sealant, but only where it will join the second panel.
After this, the whole panel of the second row is glued, and so on one by one (you can continue the first row, but make sure that the edges match down to a micron - otherwise a millimeter gap will be noticeable). The third and subsequent rows are attached in a way that is convenient.
Attention: buying laminate with locks for the glue method is not advisable for financial reasons. Much more expensive, but the result is the same.
Using this principle, a laminate without a lock is glued (in the photo there is a PVC laminate - shown to illustrate the process).
On the sheathing
The easiest way to install laminate flooring is to use lathing on the ceiling. The bar (slats) are attached parallel to the wall with the window - this way the joints will be perpendicular to the light flux, and, therefore, less noticeable. Operations are performed in the following sequence:
- the distance from wall to wall minus wedges or plastic channels is measured;
- slats are cut to size;
- are applied to the ceiling and drilled through so that marks for dowels remain on the ceiling. In this case, the first and last beams are attached close to the channel, the rest are at a distance of 50-70 cm from each other;
- holes for dowels are drilled using a drill or hammer drill;
- the dowels are driven in, the slats are fastened with self-tapping screws - you can screw them on manually (it takes a long time) or with a screwdriver;
- The level constantly monitors the surface level. If the rail is somewhere lower, then something should be placed under it. Above, the small bump on the ceiling is removed and knocked down manually or with a hammer drill;
- a tenon is cut off from the first row of lamellas;
- You can start installation from any angle, but in such a way that it is convenient to work: right-handed on the left, left-handed on the contrary;
- At a distance of 1-2 cm from the edge with the cut tenon, finishing nails are driven into the body of the laminate. The groove can be secured with the same finishing nails (they hold perfectly, but are difficult to hammer in), clamps, staples or self-tapping screws. Alternatively, you can use glue. But this is labor-intensive and time-consuming. Therefore, it is better not to consider it at all.
Attention: how to install lamellas correctly is described in detail here.
You can see the diagrams for laying the panels in Fig. below.
On the frame
When attaching a ceiling to a frame, it is difficult to install a metal profile. The work is performed in the following sequence:
- is the lowest point of the ceiling. The easiest way to do this is with a laser level. If it is absent on the ceiling, use a water level and a level to draw a horizon line (approximately 10-15 cm below the ceiling). The distance between the drawn line and the ceiling is measured. The shortest segment will show the underestimated place;
- The line of passage of the suspended ceiling plane is determined. To do this, subtract from 3 to 7 cm from the shortest segment - depending on the type of lighting and the presence or absence of insulation. So, for recessed lamps you need about 5 cm. In a combination of insulation + hidden light sources, you need to retreat from the ceiling by about 7 cm. The remaining segment is extended above the horizon line and another line is drawn along the entire perimeter of the room;
- a metal profile UD (PN) 28*27* is attached along the ceiling line so that the ceiling line does not overlap, but runs strictly along the lower edge;
- Markings are made for the ceiling profile. Distance 50-60 cm;
- using a beating cord (thread rubbed with chalk or charcoal) a line for attaching the hangers is applied. To do this, you need to place the string on the ceiling opposite the marks, pull it, then pull it in the middle and quickly release it;
- install hangers;
- mount the frame (details here) with jumpers. Without inserts it is impossible to obtain a rigid structure.
- You need to lay the ceiling in the same way as on the sheathing. Only fastening with clamps.
Fastening with clamps.
Important: in some types of locking joints you need to trim the tenon a little - the clamp prevents it from going into the groove.
The work is completed by attaching the plinth or molding. How to do it correctly is here.
Attention: when using a floor plinth, it is attached to the laminate with a base.
Private questions
During the work, questions arise that are not discussed in the main material.
Where to start
When laying the floor, the rule is: you should start from the left corner farthest from the door. When finishing the ceiling it is ignored. You can start from any angle, focusing on your working hand. For right-handed people - from the far or near left, for left-handed people - vice versa.
Mounting lamps
For recessed lamps, a hole is cut with a crown. For overhead lighting fixtures, drill a large hole and pull out the wiring with a hook.
How to bypass pipes
The most difficult moment when installing a ceiling occurs when passing pipes. Here the operations are performed in the following sequence:
- when approaching the pipe, the panel of the next row snaps into place and fits close to the pipes;
- Mark the middle of each pipe with a pencil;
- the panel falls to the floor;
- use a tape measure or ruler to measure the distance from the channel on the wall to the middle of each pipe;
- a mark is made on the laminate in the middle of the pipe - you should get a small cross;
- using a drill or crown, holes are drilled with a diameter larger than the size of the pipes by 2 cm (due to the cut, the diameter will decrease);
- the end of the lamella is cut off in the center of the holes;
- on the outside of the pipes, the panel is snapped into a locking connection and moved close to the obstacle;
- Between the wall and the pipes, the end of the panel is glued to the side strip and the main body of the panel. Additionally attached to the sheathing or frame with finishing nails, glue or self-tapping screws;
- a protective cover is installed to hide the larger diameter.
What to do if the walls are uneven?
First of all, you need to carefully check whether they are really uneven. Take a lath, the size of which is equal to the height of the wall without taking into account the baseboard. Important: before starting the test measurement, the plaster layer and trims should be removed so that they do not distort the result. The rail is moved vertically, the slightest bulges and dips are marked with a pencil. Protruding parts must be scraped off or knocked down with a chisel.
The holes are filled with putty and rubbed over. Such simple methods will allow you to strengthen even the most uneven and chaotic wall. Assessing how smooth the control rail itself is is also not particularly difficult. Attach it to the wall and trace the outline with a pencil, turn it 180 degrees and attach the ends of the strip to the end points of the line. If both lines completely coincide, you can safely use this tool in your work. But the slightest deflection or bend indicates that you need a different rail (which, of course, is checked in the same way).