Author: Sergey Grigoriev. Master, 11 years experience
Plastic windows are considered a very reliable design. But even with proper installation, after a few years the window may require adjustment. We’ll figure out how to do it yourself in the article.
IMPORTANT! We recommend that you adjust the fittings yourself only if 2 conditions are met:
- The window's warranty has already expired. Because whether you can achieve results is unknown. But the warranty will almost certainly be lost.
- You are firmly confident in your abilities. Otherwise, you can only make the situation worse.
Any window problem should be resolved by a professional. Remember that any incompetent third-party intervention can lead to serious damage to the window system.
Leave a request for a free call of a specialist to your site
Features of PVC windows
- The service life of plastic windows is 25-45 years;
- Provide excellent thermal insulation, maintaining an optimal indoor climate;
- Plastic windows boast a variety of shapes and colors;
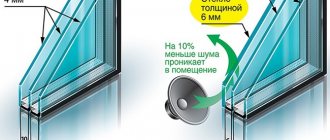
- Excellent sound insulation, superior to windows made of other materials;
- Plastic windows are quite durable, do not burn and withstand external influences well.
The main feature of the design is that even during the operation of the windows, they can be adjusted and various problems can be eliminated. The adjustment procedure may be necessary for any window, since it does not depend on the time of operation and the quality of the structure. To avoid serious problems, it is necessary to periodically check the condition of the mechanisms that open and close the window. In addition, when the seasons change, it is important to inspect the fittings, checking their condition. Compliance with this recommendation will help avoid unexpected repairs and extend the service life of the entire structure.
Lubrication of PVC window mechanisms
Every self-respecting manufacturer of plastic windows offers its own lubricants. At the same time, there are separate lubricants for the mechanical part, and different ones for the rubber seals. They are not always available, so any silicone-based lubricants will do. Do not use water-based lubricants or those containing aggressive substances.
The best option for the physical state of the lubricant is a spray. It easily penetrates into any place under pressure.
Lubrication points:
- loops;
- pen;
- trunnions and strikers;
- scissors.
Lubricating the fittings is easy. There are technological holes in the end sides of the sash element, where the window closing mechanism is located. Lubricant is added to them. Moving and rotating elements located on top are lubricated in the usual way - on top of the contact planes.
Tool for adjusting plastic windows
To adjust the window yourself, you need to prepare the necessary tools in advance:
- Hex wrench (No. 4). The hexagon is used to adjust internal threaded screws. The tool can have any shape, for example, curved like the letter “L”;
- A set of “star” bits for a screwdriver (marked T or TX). It is better to have a whole set at once, since different types of fittings may require attachments of different sizes;
- Phillips screwdriver (No. 3 or No. 4). This tool will be needed to work with various parts of plastic windows;
- Pliers or pliers. Any of these tools can work with eccentrics of different shapes;
- WD-40 spray, special grease or oil (table or machine oil). Any of these products can be used to lubricate the elements of plastic windows.
Common problems
To repair the handle on a plastic window, you must first understand the reason that caused the breakdown or malfunction. What are the most common problems that users encounter when using plastic windows?
- Handle jamming.
- Handle not turning.
- Incorrect turning.
- Handle loosening.
- Mechanical failure.
Based on the nature of the malfunction, it is necessary to trace its cause and evaluate the possibility of adjusting the mechanism.
Adjusting the pressure of a plastic window
The tightness of the entire structure depends on how tightly the plastic window sashes are pressed against each other. This means that with sufficiently strong pressure, neither in winter nor in summer you will feel that cold air is drawn from the windows. It is also worth saying that depending on the season, the clamping density may also change.
Cleaning the fittings from accumulated dust
Once every 5-7 years, windows need deep cleaning to remove accumulated dirt in hard-to-reach places. Without cleaning them in a timely manner, sooner or later you will have to repair them, since their functioning will be impaired. Repairs are quite labor-intensive in terms of the weight of the structure, so it is advisable to carry out the work with assistants.
(function(w, d, n, s, t) { w[n] = w[n] || []; w[n].push(function() { Ya.Context.AdvManager.render({ blockId: "RA-510923-1", renderTo: "yandex_rtb_R-A-510923-1", async: true }); }); t = d.getElementsByTagName("script")[0]; s = d.createElement(" script"); s.type = "text/javascript"; s.src = "//an.yandex.ru/system/context.js"; s.async = true; t.parentNode.insertBefore(s, t) ; })(this, this.document, "yandexContextAsyncCallbacks");
Scheme for adjusting elements to keep them clean and tidy:
- remove the sash from its hinges, removing the overhead frame elements;
- remove the top axle;
- remove the sash from the lower hinges;
- carefully set aside.
Removal of elements must be done with an assistant.
The surface of the sash is carefully inspected and the screws attached to it are unscrewed. The mechanism parts are washed well, preferably using specialized solutions that are easy to apply with a brush. After this, the structure is dried well in the fresh air or with cold air from a hairdryer. Lubricant is applied to each driving mechanism. The fittings are assembled in the reverse order and installed in their original place.
Before assembling the window, all fittings must be lubricated.
Adjusting plastic windows winter summer
Video
When winter cold sets in, the window should let in as little cold air as possible. If you ensure that the doors are pressed fairly tightly, this will protect the room from the cold. When the winter season gives way to a warm summer season, and there is no need to protect the apartment from cold air, the pressure on the windows needs to be loosened a little.
If at the beginning of winter you increased the pressure on the window sashes, then with the arrival of spring everything needs to be returned to its original state. The fact is that if you leave the sashes in this state, this will lead to rapid wear of the structural elements due to high stress, and will shorten the service life of the insulation, which quickly becomes thin due to constant and strong pressure and loses its heat-protective and sound-proofing properties.
In any case, before increasing the pressure, you need to make sure that the plastic windows really need this type of adjustment. To do this, you can run your palm along the entire window perimeter to feel the source of cold air. Instead of your palm, you can use a lit match or lighter, the flame of which will be more sensitive to even the smallest drafts. If after several years of operation of the windows the sealing material has worn out, then you will also need to strengthen the pressure.
Possible consequences of incorrect settings
The biggest trouble with incorrect adjustment is wide gaps through which it will leak. In the cold season, this is fraught with heat loss, which should not be allowed.
A distortion of the structure will lead to incorrect operation of the hinges, which, in turn, leads to their failure. This can also lead to damage to the window sill - traces of the affected profile will remain on it.
But you should not treat the adjustment as an operation with simple manipulations. Any movement can change the settings. And although the process itself is simple, it must be approached with great care.
Did you know that plastic windows can be adjusted this way? Perhaps you have already encountered such a process? Tell us in the comments. Save the article to bookmarks and share it on social networks.
Clamp on windows with eccentrics
When opening a window, look at its end. There you will find three eccentrics, which also have another name - trunnions. They regulate the pressing force of the plastic window. To change the sash pressure, slightly move each eccentric away from the surface on which it is located and turn it a few millimeters to the side. This can be done using pliers.
To make the pressure stronger, start turning the eccentrics to the left. By turning these elements to the right you will achieve the opposite effect. Making the pressure stronger is quite simple, so you can adjust the windows yourself. The main thing is that the pressure density is the same. To do this, make sure that all eccentrics are unscrewed equally.
Tools needed for repairs
How to finish the handle on a plastic window? What hexagon is needed to adjust the window sash mechanism?
To counteract one or another vagaries of a plastic window, you will need the minimum of tools that will ensure a complete repair of the identified faults.
- First: screwdrivers. You will need both a cross and a flat one.
- Second: a set of “stars”. The fittings in the windows of individual manufacturers differ, so you cannot do without screwdriver attachments.
- Third: hexagon. This must be a 4mm furniture wrench; you can find one in almost any tool set.
- Fourth: In some cases, WD-40 spray may be required.
Clamp on windows with plates
In some designs, window sashes are pressed using special plates. To adjust the pressure of such a window, pay attention to the end of the sash, where the hinges are located. If you tighten them clockwise, turning them with a key, the sash will press harder. Before tightening the sashes, be sure to check if there is a slight draft, so as not to increase the pressure on the sashes unnecessarily.
General adjustment instructions
| Malfunction, problem | Causes | How to fix |
| The window does not open | Handle malfunction The sash is sagging | Replacement Adjusting the sash vertically and horizontally using adjusting screws on the hinges |
| The window does not close | Handle malfunction Loss of sash geometry Incorrect height adjustment | Replacement Place a pad under the strikers of the closing mechanism Adjust the position of the sash correctly |
| The handle doesn't work | It's broken, jammed, difficult to turn | Replacement Disconnect the lock Reduce the pressure and clean the handle |
| Micro-ventilation is impaired | Small gap | To adjust the gap and increase it, use a screw located on the scissors. When it rotates clockwise, the gap increases |
| Blowing through the window | The sash sagged and sagged | Raise the sash structure by rotating the top screws on the hinges Rotating the side screws |
| Transfer to winter-summer modes | Installing the trunnions in the winter or summer positions by rotating them to the required position |
Adjusting plastic window hinges
Video
Sometimes, even after putting the eccentrics into a state of strong pressure, the windows remain leaky. This can happen when the building shrinks. In this case, they say that the window has begun to sag. If this happens, then when the window is closed, not all the eccentrics end up behind the plate. For this reason, the sash is not pressed tightly enough, drafts appear and some of the heat from the room gets out. To correct this problem, it is necessary to move the sash to the side so that the eccentrics that are missing from the plates can freely engage with them. To do this, you need to determine which protrusions cannot reach the strike plates.
First, look carefully at the sash and remember where the locking lugs are. Now close the window, carefully grasp it in the places where the eccentrics are located, and gently pull it towards you. If the contact of the locking elements is good enough, the window will remain motionless. Otherwise, you will feel that the sash gives in to your traction and moves a little. This way you can understand in which part of the window the problem occurred.
At the very beginning of work on the site, I published a small material - a guide on adjusting plastic windows. Despite the short and insufficiently informative post, in my opinion, it is still in demand. Many years have passed since then, and it seems that the time has come to expand the information “in depth.” So what can you do yourself, and what is better left to the master?
Content:
What is window adjustment Preliminary diagnostics Adjustment of windows by width and height using a key Adjustment of slot ventilators Strike plates and their correct installation Adjustment of windows by clamping Adjustment of sashes by geometry, or “crossbar” Adjustment of windows - profitable Summary
What is window adjustment?
As a rule, people think about adjusting plastic windows when they close or open poorly, touch and stick, blow out from different sides, etc. That is, when the window is not yet broken, but is already acting up and has difficulty performing its functions. Many people believe that window adjustment is a simple “tightening” of the trunnions and hinges of the fittings, which need to be “tightened” almost every year. And it’s not surprising, because sooner or later your plastic window sags again and starts to blow. Think about it: PVC structures have been installed in Russia for three decades now. Everything was calculated, even by the Germans, down to the smallest detail, and tested in practice. However, the same problems with windows are observed year after year. Why is this happening? How to adjust the window “once and for all”, and is it possible? The answer is yes, it’s possible if you know what to do. Window adjustment is a process whose ultimate goal is not just eliminating basic faults and bringing it into working condition. The window must again (or for the first time) become the way the manufacturer intended and designed it. This is, in fact, a whole set of measures in which, contrary to popular belief, screws and hinges are assigned a modest, auxiliary role.
In all the years of my work (more than 15 years), I remember only a couple of cases when it was more expedient to replace windows rather than repair them. Adjusting windows, even those that have served for many years, and “returning them to service” is much more profitable than replacing them. After all, in addition to the obvious costs of purchasing new double-glazed windows, you have to go through the entire “debacle” of installation work again, and, often, renovate the apartment. The material will go “from simple to complex.” You can easily do the simplest adjustment of the window fittings yourself (twist it a little, so to speak), but, for example, I strongly recommend entrusting disassembling the sash and correcting its “geometry” (that is, shape) to an experienced specialist.
Diagnostics of the sash position of a plastic window
To determine the algorithm for future window adjustment, it is advisable to make simple diagnostics. You need to take a regular pencil and mark the position of the corners and the middle part of the sash, as shown in the photo.
Then open the window and measure how many millimeters the sash “overlaps” the frame. The average amount of the so-called “overlap” should normally be approximately 8 mm.
For correctly assembled and installed windows, the overlap on all sides is almost the same. If a window does not close well, after diagnostics it will be immediately clear whether it is sagging too much. By comparing the marks in several places, you will get an idea of how much the sash is skewed relative to the frame. If there is a slight (1-2 mm) deviation from the norm, it is enough to adjust the window by tightening or loosening the screws on the fittings. If the difference in height between the corners is more than 2-3 mm, the sash geometry may need to be corrected (this is done from the inside; here, adjusting the window with a key will not help).
If the “overlap” is too large, the sash will constantly touch the frame, and if it is too small, it will blow from the window.
Adjusting the window sash position using a key
If the window does not close well, touching the frame from below, above or from the side, the easiest option is to adjust it with a key, using screws specially designed for this. As a rule, these keys are not some special “window” keys - one suitable for our purposes can almost always be found at the nearest auto parts store. Most often you need a regular 4 mm “furniture” hexagon, but there are other options, for example, stars. The problem can only arise when adjusting windows with non-standard keys, but this rarely happens. For example, a branded key for the lower hinges of Aubi 300 fittings, due to its discontinuation, can be difficult to find on sale (however, most experienced craftsmen have it).
Window adjustment when sagging and touching the lower corner under the handle
When closing a window that has sagged downward, it usually has to be “pushed” into the frame. To raise it, you can use two screws - a height adjustment screw in the bottom hinge, and a width adjustment screw in the top hinge. We screw these screws in clockwise, and the angle under the handle rises (the features of adjusting the lower hinge of the Aubi 300 fittings can be found here).
In some fitting systems, for example Winkhaus, the top hinge can be tightened by turning the screw counterclockwise. On Roto swing doors, the width adjustment screw is located on the opposite side of the hinge, along the same axis.
In the Aubi 300 system, instead of a screw, there is a shaped washer for several fixed positions.
If the sash knocks on the top striker on the frame when closing
To eliminate the knocking, screw in the screw for adjusting the upper hinge width, and the sash moves away from the strike plate.
When touching the side of the window (in the center) , the width adjustment screws of both the upper and lower hinges are used. At the same time, the sash moves towards the hinges.
If the contact occurs above the sash , you can try to slightly unscrew the height adjustment screw in the lower hinge (the sash will drop lower). Problems with slot ventilators are discussed in the next section.
When opening a window, does something click between the hinges? Try to lift the sash up a little using the same screw for raising the height of the lower hinge. In addition, it may be necessary to rearrange the corresponding striker (see below).
That, in fact, is all you need to know to adjust a window that slightly touches the frame.
If the window is sagging a lot, and simple adjustment does not help (for example, when you try to lift the sash, the top immediately begins to touch), you need to correct its “geometry”. I will tell you about the features of window sash at the end of the article.
Adjustment of slot ventilators and their counters
The fittings on the swing-out doors may include a 45-degree slot ventilation system. For all its advantages, it requires fairly precise adjustment of the window, often causing jamming, noise and knocking in the mechanism. Diagnosing this malfunction sometimes causes difficulties, since the ventilator is usually located in the upper part of the sash and is not visible during operation.
To adjust the window, it is better to stand on a window sill or stepladder and look from above the sash. When turning the handle strictly horizontally or vertically , the pin of the fittings should be at the same distance (2-3 mm) from the central protrusion of the bar, without touching it. Correct position of the strike plate relative to the fittings (using MACO as an example):
Displacement of the plank or sash causes rubbing and knocking.
To adjust the position of the strip, the holes for the screws are usually made oval. You should completely unscrew them, remove the bar and install it correctly. If the cause of the jamming is the sideways movement of the window sash (determined by the overlap), use the corresponding screw in the upper hinge. Plastic windows with ROTO NT fittings may require sash height adjustment.
Due to the design features of the slot ventilator, the locking pin of the fittings works “closely” to the strip and often touches it. You should adjust the sash using the key, lowering it down a little, and if this does not work, adjust it according to the geometry.
Before rearranging the strikers on a plastic window, you need to make sure that the sash is not skewed relative to the frame.
Pressure counters and adjustment of their position
The clamping of the plastic window sash is provided by strikers on the frame. They are the hooks for the locking pins of the mechanism and must be installed correctly.
Checking the position of the strikers
Have you determined whether the sash is level, or even adjusted it to overlap, but it is still blowing from the window? This often happens when the strikers are incorrectly positioned on the frame. Even in the most modern window factories, there is a “human factor”, not to mention the fact that the assembly of sashes and frames usually takes place in different areas. In general, the distance from the strike plate to the locking pin of a plastic window should be 3-5 mm (with the window open, the handle is strictly horizontal).
If the gap is significantly larger, the sash may simply not be pressed all the way, and if there is practically no gap, knocking and clicking can be heard when opening and closing the window.
Errors especially often occur when installing strips on swing-out sashes on the hinge side (they are not visible if the sashes are not fully open).
There are also frequent cases of intentional rearrangement of strikers by installers after unsuccessful attempts to adjust the window. When you remove such a strip, you will see a second hole from the screw.
If the sash is level and does not sag (the overlap at the top and bottom is the same), the planks should be installed in the desired position and the screws should be screwed into new places. However, you should be aware that such discrepancies may also indicate serious deformation of the sash. In the case of a strong diagonal distortion, first of all you should adjust the window according to its geometry - then most likely there will be no need to rearrange the slats.
If the distance between the locking pin and the strike plate is too large, the fittings do not work - therefore there is blowing from under the seal, and attempts to adjust the window to the clamp do not bring results.
Adjusting windows for pressure
To begin with, you need to answer yourself the question - why, in fact, adjust the clamps? To eliminate the blowing - most likely, you will say. There are many such recommendations on the Internet, and, in part, they have a right to exist. But only under two conditions that do not always occur simultaneously: - your window sashes are not deformed; - windows (or their seals) are more than 10 years old. Then adjusting the window to the pressure will help delay the replacement of “tired” tires for some time. If there is a deflection of the plastic profile of more than 2-3 mm, most likely, such an adjustment will not help, and closing the window will become much worse. In practice, on the contrary, I often have to loosen the clamps (return them to the factory position), since after adjusting the windows according to their geometry, the tightness is usually completely restored - the window stops blowing. That is why the “winter-summer” adjustment is not discussed in this article. After all, under maximum load, and even in winter, the seal does not last long, and the fittings behind it, due to constant torsion back and forth and increased wear, will require replacement ahead of schedule. I consider absolutely unnecessary any regular manipulations with fully functional plastic windows, except for mandatory annual lubrication . As they say, don’t interfere with the mechanism working properly :). And I answer clients’ questions about their service life like this: it will last for our lifetime!
A simple adjustment of the windows to the pressure is done as follows.
If you want to increase the pressing density of the sash, the eccentric (usually this is the locking pin) must be installed with a point (or its wide side) to the sealing rubber .
If, on the contrary, you need to loosen the pressure and make the handle move easier, turn the point (or the wide part of the eccentric) away from the rubber .
With the “old” Roto Centro fittings (the one in which the eccentric is located in the striker), to adjust for increased pressure, you should turn that part of the strip towards the rubber, on the side of which the locking pin is located.
The pins of the Winkhaus AutoPilot fittings are adjusted without a key, simply by hand, by pulling and turning in the desired direction.
Adjustment of the sash pressure in the lower hinge (not available for all windows). There are options for both an asterisk and a regular screwdriver.
It is also possible to adjust the pressure in the top loop.
However, the latter adjustment is used extremely rarely, since the degree of pressure practically does not affect the blowing through the upper loops (in most cases, in the upper loop, air constantly passes through small gaps, this is a normal situation).
And remember, the rubber window seal is not designed for constant operation in “winter” mode. Being strongly “flattened”, it will quickly lose its elasticity and finally stop retaining heat.
Adjusting windows according to geometry (“crosslinking” sashes)
What happens to a plastic window sash over time? To put it simply, the main influence on it is exerted by two forces - the force of gravity and the force of, so to speak, “friction” (it occurs when the window is closed).
The first turns the rectangle of the plastic profile into a parallelogram, causing the corner under the handle to sag and problems with opening and closing. This also causes air to blow through the top of wide windows, and the pressure in the area of the handle deteriorates. The second causes a significant deflection of the “hinged” vertical part of the sash, due to the lateral pressure of the rubber on the plastic when closing the window. The notorious blowing between the hinges begins, which has become almost a “calling card” of low-quality plastic windows. Sometimes the deflection is so great that, combined with installation defects, the fittings on the hinge side simply do not engage. The window, in fact, does not close completely, and often you can even hear the street. Therefore, the usual adjustment of the window trunnions with a key in this case is pointless, and replacing the seal does not help for long, or does not help at all. The problem with skew and deflection of profiles also has internal reasons. The fact is that the rectangular shape required for normal operation is given to the window by a double-glazed window. Yes, yes, everything is supported by glass and special adjustment plates. This is how plates under a double-glazed window should be installed according to GOST 30674-99.
Why is this so? Let's look at a simple example, using a children's construction set as a model of our window sash.
If you assemble a rectangle from planks, under the influence of gravity, at the slightest loosening of the screws, it will tend to turn into a parallelogram (provided that one side is rigidly fixed).
A plastic window sash without a double-glazed window behaves the same way - the profiles are reinforced with metal, but there is no reinforcement in the corners. If we install another bar diagonally, then our “sash” will no longer sag, right? A block of 2-3 glued glasses, or a double-glazed window, is one of the load-bearing elements in the design of a plastic window, and must expand (or “wedge”) the sash in a strictly defined way. For this purpose, there are special support (leveling) and adjustment plates (or pads). The linings, indicated in the GOST diagram in black, give the sash the necessary rigidity, holding it diagonally. In cases where they are located differently, are incorrectly selected in thickness, or are missing (and are not visible from the outside), there can be no talk of any successful window adjustment with a key . Moreover, despite GOST, in practice it is often necessary to install additional side plates (in the center of the vertical sides) to prevent deflection, especially on high sashes.
The adjustment plates have a thickness of 1 to 6 mm, different colors corresponding to their thickness, and must be installed with the flat part against the glass unit. Available in different widths, in the photo - 32 mm plates.
Attention! The following outlines the general principles of adjusting plastic windows “according to geometry”. I categorically do not recommend doing this to “home craftsmen”! To correct the shape of the sash, it is necessary to remove and reinstall the glazing beads, and sometimes the glass unit. The re-linking should be done by a window repair specialist, or at least an installer with relevant experience and special tools. Without practice, you can dent and scratch the plastic, as well as seriously cut your hands on the sharp edges of the glass (or even break the glass unit). I am not responsible for the consequences of disassembling and repairing windows myself. This section is purely informational in nature and will help you understand what an experienced, knowledgeable master should do.
When the sash sag
Often, when disassembling such sashes, it is discovered that one or several adjustment plates are missing at all, or they are not in the right place, or their thickness is incorrectly selected.
To correctly adjust the window height, it is enough to achieve the same “overlap” at the top and bottom by rearranging and adding adjustment plates of suitable thickness. Sometimes it is enough to simply move the existing plates as close to the corners as possible to eliminate sagging of the sash.
Before adjustment:
After adjustment:
An attentive reader may notice that according to GOST, the linings are installed at some distance from the inner corner of the sash, but in my photos they are right in the corner. The fact is that in reality, the rigidity of modern metal-plastic window profiles is usually, alas, significantly lower than it should have been according to the calculations of German engineers. Therefore, I install the plates in this way to reduce the deformation of the sash (which occurs mainly at the bottom, due to the weight of the glass unit).
When touching the middle of the lower part of a wide sash
If a wide sash rubs a lot from below, in the center (often against the striker bar), and does not close well, you should, again, move the lower adjustment plate to the very corner, until it stops. The load on the profile is reduced and grazing stops in most cases.
Please note that when adjusting the windows according to geometry, the hinges do not need to be “twisted” at all - they remain in the optimal, middle position.
When blowing
When blowing from the side (usually the window blows between the hinges), it is often necessary to install additional adjustment plates in the center of the sash.
Thus, the sash is leveled, the fittings engage, the seal is pressed against the frame, and the blowing stops. If the window blows from the side of the handle, the actions are similar. The width of the “overlap”, again, is checked with a pencil (should be approximately 8 mm).
You probably already realized that the main thing in adjusting the window geometry is to ensure uniform overlap of the sash along the entire perimeter of the frame . Without this, there will be neither a normal fit of the rubber seal nor correct operation of the fittings. No matter how you twist the screws, it is usually impossible to achieve such a result with them alone.
Using a crossbar can also correct some mistakes made during the installation of plastic windows. For example, if the frame was “stretched” during installation, the craftsman can slightly pull the sash in the same direction. In this relatively simple way, it is often possible to ensure good pressure on the seal and eliminate blowing without redoing the installation (no need to break and rebuild the side slopes again). Visually, a slight “barrel” bend of the sash will be invisible.
If even after all the manipulations, alignment of the geometry and adjustment of the window, it still blows from it - then, and only then, the seal should be changed.
Window adjustments, done correctly, will save not only your health, but also your money.
At the time of writing this article, the author was repairing windows in a new building. The satisfied housewife said that she will now reduce the temperature of the radiators in the apartment to a minimum, and the monthly heating bill will immediately decrease. It turned out that earlier, when it was blowing strongly from the windows, she was forced to pay for heating the street - heat meters were already installed in the house. Over time, such metering devices will appear in all apartments, so the cost of calling a specialist, sooner or later, will pay off many times over. The service life of the seals and fittings of plastic windows, adjusted according to geometry (and therefore operating without unnecessary loads), also increases significantly.
Summary
Simple window adjustment with a key is within the capabilities of almost anyone. But this should only be done in case of minor faults. If your windows close very poorly, or there is a lot of wind coming out of them, it is better to contact an experienced specialist who will correctly adjust them according to their geometry just once. And you can, as they say, continue to sleep peacefully!
Adjusting the top hinge
- Open the door;
- Using a hexagon, turn the adjusting screw located near the top hinge at the end of the sash clockwise several turns;
- We close the sash.
If it turns out that the upper corner of the window does not close well, you need to move it. To do this, open the window as wide as possible so that you can easily reach the hinge. At the top of the sash you will find a hinge. Please note that its design is different from the bottom one, but it also has a hole for a hex key. Find the adjustment screw in the hinge (it's located on the side). If, while checking the sash, you find that the eccentrics located further from the hinge do not close, turn the screw in the opposite direction from them.
Please note that the sash and hinge should not fit tightly against each other. There should be a small distance between them (a few millimeters) so that the tilt and turn window mechanism can fit into it. Therefore, after turning the key half a turn, be sure to check that the window can open and close freely.
If tightening the hinge does not help, you need to press the upper corner of the sash against the frame. To do this, you will have to use the screw located on the tilt-and-turn mechanism. To access this element, open the window in two positions at the same time. To do this, open the sash and press the lock. This element may look like a locking tab or tab.
Pull the lock all the way (while holding it), turn the handle, pulling the top edge of the sash towards you, and open the rotating mechanism. Locate the hexagon tab on one of the plates. By turning this protrusion, you can control how tightly the upper corner of the sash will be pressed against the window.
Winter and summer mode
Most often, plastic windows need to be adjusted for the new season: in winter, complete tightness is desirable, and in summer, you can let in a little fresh air. This is achieved by adjusting the sash pressure density. It's easy to do it yourself. Once you figure it out, you’ll be surprised how simple everything is...
The window sash is pressed to the frame using pins. These are movable metal protrusions on the side surface of the sash. When the handle is turned, they move behind the mating metal plates mounted on the frame. In order to be able to adjust the tightness of the fit of the sash and frame, they have an eccentric - either they themselves are made of an oval shape, or in the center of the round protrusion there is an adjustment with an offset center. By changing the position of the trunnions (see photo), you change the degree of pressure, that is, eliminate the draft from under the sash.
Adjusting the pressure of the plastic window sash to the frame
As you can see, the shapes of the locking protrusions can be different. Various tools can be used to adjust them. If your window has eccentrics like those in the picture on the left - oval-shaped protrusions - change their position using pliers: clamp it and turn it in the desired direction.
If the locking tab is round, as in the picture on the left, it can be slotted for a screwdriver or hex key. After examining them, you will easily understand which tool you need: a regular screwdriver or a No. 4 hexagon. Insert a key or screwdriver into the slot and also turn it to the desired position.
Place all the protrusions in the same position. Please note that they are not only on one side of the sash - the outer one, but also on the inner side (at least one, but there is one), and can also be at the top and bottom. Set all the existing locking lugs in the same position, otherwise the frame will warp and there will be blowing from under it.
Turn the eccentric using pliers or a hex wrench.
When adjusting the fittings of plastic windows, remember that weak pressure corresponds to the summer mode of closing plastic windows, standard or strong - to the winter mode. If you carry out maintenance work in winter, first set it to the standard position and check if there is airflow. It is not recommended to immediately pinch the rubber bands on new PVC windows. In this position, the rubber seal installed around the perimeter is strongly pressed. Because of this, over time it loses elasticity. A normal seal has a 15-year warranty, but still... If the pressure is immediately set to maximum, the rubber will deteriorate faster. As a result, once again setting the winter position on the plastic windows, you will find that it is still blowing from under the sash, and the rubber is all cracked. This means it's time to change the seal. This is also not very difficult, but it takes more time, and you still need to buy tires.
So: the winter and summer positions of plastic windows are set by changing the position of the locking lugs - trunnions. Everything is explained in detail in the video below. After viewing, adjusting plastic windows yourself will finally cease to be a problem.
Read how to install a mosquito net on a window here.
Bottom Hinge Adjustment
- Remove the cap from the bottom loop;
- We insert the hexagon into it and make several turns clockwise;
- We check the free movement of the sash and, if necessary, make adjustments until the problem is eliminated.
If, during the check, you find that cold air enters the apartment from the bottom of the window, then it is the bottom of the sash that needs to be pressed. To do this you will have to adjust the bottom loop. At the bottom of the window, you can make two types of adjustments: in the horizontal and vertical plane. In this case, we need to adjust the sash in the horizontal plane.
First, open the window and find the adjustment hole at the bottom of the hinge. A hexagon must fit into it (sometimes an asterisk is suitable for this hole). Insert the key into this hole and turn clockwise to bring the bottom corner of the sash closer to the hinge.
After moving the sash a little, check the result of the work by trying to close and open the window. If the sash closes tightly, you can finish. If you have tightened the bottom hinge all the way, but the window still does not close tightly enough, return everything to its original state and find another adjustment screw on the bottom hinge. To do this, open the window as much as possible and remove the plastic cap from the hinge. To do this, pull the bottom edge of the plastic towards you a little, then up and the protective element will easily come off.
Once you remove the plastic, you will find a small indentation at the top of the hinge where the screw is located. Insert the hex key (#4) into it. After you turn the key clockwise, the sash will begin to rise. To begin, make only one turn and check the result of your work by closing the window. If one turn is not enough, repeat again.
When is it required?
The hinges on PVC windows are adjustable in 3 directions - horizontally, vertically and for clamping. Changing the position of the mechanisms for securing the sashes is necessary when any of the following situations occur:
Up down. The hinges are adjusted in the vertical plane by turning the screw located in the upper part of each suspension, where the fixing pin is installed.
Position adjustment is required when the sash sag or sag over time.- Right left. The hangers can also be adjusted horizontally by turning the corresponding screw. The correction mechanism is located on the inside of the hinge, at the point where it interfaces with the movable sash.
- Clamp - relevant for the lower hinge, it provides an even gap at the junction of the sash with the fixed frame, when tilting the element.
If a misalignment is detected on the sash, an individual position is set on each hinge.
On a note. If a structural element needs to be moved entirely, the screws on different hangers must be turned equally.
Primary
At the factory, the hinge mechanism is automatically adjusted to the neutral position so that when adjusted in all directions, identical play is formed. After installing the window, this position does not always ensure comfortable operation of the window, which requires minor adjustments to the structural element.
This work is most often performed by the installation team upon completion of installation and sealing of the cracks. Before making adjustments, specialists check the normal movement of each movable leaf and the functionality of the mechanisms. As a result, the customer receives a fully adjusted window with the correct position of the hinges.
After use
During long-term use of the window structure, the hinge mechanisms may become deformed, or their settings may be lost. This is expressed in the onset of the following symptoms:
The sash touches the adjacent fixed frame profiles when closing or opening the window, which indicates a misalignment of the frame.- A crunching sound or creaking sound that is heard every time the moving part of the window is turned - the mechanism requires adjustment, since an uneven position causes stress concentration.
- The movement of hinge joints is difficult in the absence of lubrication on the contact surface.
Note! For normal operation and increased service life, the window structure must be adjusted at least once every 12 months. These measures apply not only to the hinge mechanism, but also to locking pins, handles and other fittings.
Window maintenance: replacing or lubricating the seal. Lubricating hardware
Video
It is quite easy to understand that the seal has worn out. To do this, just run your hand around the entire perimeter of the window and check if there is a small draft or cold spot. In this case, no matter how hard you try to press the sash or tighten the hinges, nothing will help. The only way to correct the situation is to completely replace the sealing material. Remove the old material and secure the new one in its place using a flat-head screwdriver. To avoid rapid wear of the material, do not stretch it too much when installing.
In order for window parts to last longer, they need care. Therefore, it is so important to lubricate regularly using special products, as well as machine or household oil. It is necessary to process all parts of the window that are subject to friction - eccentrics, adjusting screws, etc. Before starting lubrication, clean the parts to be treated from dust, dirt and the old layer of lubricant.
Possible errors and difficulties
When adjusting the hinge mechanism of a PVC structure, beginners may encounter a number of difficulties:
- Tight movement of the adjustment screw when turning with a screwdriver or wrench. This problem indicates low quality or lack of maintenance of the fittings over a long period of time. Before making adjustments, all metal parts should be treated with a penetrating lubricant to facilitate the sliding of the metal.
- Turning the adjusting screw should be done using hand tools only. A highly sensitive mechanism ensures that the element moves with each rotation of the part by 90-180 degrees, and therefore the use of a screwdriver will not allow achieving increased accuracy.
- If, after making the adjustment, the sash opens with a crunch, this indicates a lack of synchronization between the positions of the upper and lower suspension, which must be eliminated immediately after identifying the problem.
If, after completing the adjustment, the sash does not meet the requirements for comfortable operation, you should seek help from professionals. Such malfunctions indicate a breakdown of individual mechanisms and the need to replace them as soon as possible.
Adjustment, repair and replacement of handles
If the handle on the window is a little loose, adjusting it will be quite simple, since this problem arose due to loosening of the mounting screws. To fix everything, move the plastic trim to the side and tighten the screws with a simple screwdriver. If you notice that the handle has become difficult to turn, try to fix this problem as soon as possible. Otherwise, it may turn out that this element completely breaks due to excessive efforts in trying to open or close the window.
To make the handle easy to open and close again, you need to clean and lubricate the locking mechanisms. Remove dust and dirt from them, wipe and lubricate all moving parts. For this purpose, use only those oils that do not contain alkalis or acids. After lubricating all moving elements, check the operation of the handle by opening and closing the window several times. After lubrication everything should move more smoothly.
If the handle still does not move, or the window does not close when you turn it down, the lock may have moved while adjusting the window. You can find this element at the end of the sash - it is a metal plate placed slightly obliquely relative to the end. Now align the lock and turn the handle.
It also happens that the breakdown cannot be fixed, and the only way out is to replace the handle. First remove the plastic cover. To do this, you need to find a small recess on the protective element, which is designed so that the cover can be easily removed. Pick it up with your finger and pull it towards you, turning it in any direction. Under the plastic you will find two bolts. Unscrew them, remove the handle and replace it with a new one.
What tools are needed to tighten the sashes?
To adjust the hinge mechanism of a window structure, you need a set of simple tools that every home craftsman should have:
Chisels with a sharp edge or a construction knife for convenient dismantling of the plastic cover without damaging it.- Pliers, if necessary, to grip decorative trims in case of problems with their removal.
- A screwdriver with a set of bits, if complex adjustments are impossible without dismantling the sash, or minor repairs to the fittings are required.
- A slotted or Phillips-head screwdriver for turning the adjustment screws.
- An L-shaped internal hex key, or an asterisk, if there is a corresponding head on the adjusting screw.
- Oil can for lubricating all fittings after adjustment is completed.
- When straightening skew or sagging, you may need a laser or bubble level.
Advice. When choosing a tool, you should make sure that the tips of the keys, screwdrivers and adjusting screw heads are compatible. Otherwise, there is a risk of damage to both metal and adjacent PVC parts.
Features of brand adjustment
Plastic windows from different manufacturers are manufactured using the same technology. However, during operation, you can discover some features inherent in certain brands of eye systems and accessories, which are worth knowing about in advance.
Adjusting plastic windows Rehau
- The windows of this brand can be adjusted in several planes: down and up, right and left. In addition, you can adjust the clamping force;
- If the window is equipped with fittings from the Siegenia Aubi brand, to adjust the structure it is necessary to tighten the screws;
- When purchasing a REHAU blitz product, please note that it uses Roto brand fittings. This means that you will only have to use hex wrenches to make adjustments.
Adjusting VEKA plastic windows
- To increase the pressure and prepare the structure for winter use, turn the locking tenon 90 degrees using a hex wrench. This tenon is located under the top turn;
- If the handle is jammed and you cannot close the window, move the sash slightly in the opposite direction. To do this, use the adjusting screw, which is located under the lower hinge;
- If the handle breaks down and there is no way to restore or repair the element, turn the plastic attachment 90 degrees, unscrew the screws located under it and replace the handle with a new one.
Adjusting MACO fittings
- It is necessary to adjust the window sash in the vertical plane only if, when closing the window, problems arise with the lower edge of the sash. To do this, you need to get to the top of the lower loop by removing the protective cap from it;
- If you need to adjust the sash horizontally, find the second screw on it. It is located on the side at its base. Using a key, turn the screw in the desired direction: clockwise - bringing the sash closer to the hinge, counterclockwise - moving it away;
- To adjust the pressure, find the eccentrics at the end of the sash. Their standard position is an angle of 45 degrees. To increase the pressure, turn the eccentrics to a horizontal position clockwise using a spanner or pliers.
Now you know that adjusting plastic windows is quite simple. If you follow the tips and recommendations described in our article, you will be able to solve almost any problem on your own, without the help of a specialist.
Main components that need adjustment
Adjustment may be required for any moving elements of plastic window fittings, which include:
Bottom swivel hinge
Top hinge with tilt and turn mechanism
Locking pins
Do-it-yourself repair and adjustment of plastic windows may be required at several points. In particular, it may be necessary to adjust the sash vertically, horizontally, adjust its pressure to the frame, and set the lower angle correctly
Pressure debugging
One of the first hardware elements that needs to be checked is the clamping bar. The tightness of the frame closure and the absence of drafts in the apartment depend on it. Here you should know that each manufacturer offers its own solutions for tuning and adjusting the pressure. In most cases, the density can be adjusted using an element such as trunnions.
To do this, you can use a screwdriver or pliers, which should be used to make a small turn. The trunnion has a notch that indicates the level of pressure of the plastic block. Since there are several such devices on the window, in order to achieve accurate operation of the fittings, it is necessary to adjust each pin. Some manufacturers may offer a manual on these procedures. The instructions are usually located on the website of the company that manufactures the accessories. There you can also find specialized photos that clearly show the entire debugging process.
Sometimes the pressure level can be adjusted using the bar itself. In this case, there will be an adjusting screw located on it, which needs to be turned by changing the position of the element. To make changes, first unscrew the fastener. Here you will need to use a screwdriver. Next, using a hex key, just like the hinges, the bar is adjusted with a slight movement. When the displacement is achieved, the clamp is again fixed to the profile of the plastic window.
By turning the handle, the functionality of the mechanism is checked, which should smoothly pull the sash to the frame. In this case, each trunnion should not experience problems with entering the seat of the rebate strip. If this happens, the trunnion or bar is again subjected to the adjustment process. For accuracy, you can find a plan. This scheme will allow you to complete the work as quickly and efficiently as possible.
The window is stuck and won't open
In most cases, the reason is the blocker mentioned above, or rather, its untimely operation.
If you inadvertently turn the handle down in the open swing position and then close it, the lock may operate.
The further sequence of actions depends on the model of the mechanism. First you need to try to re-close and open the sash alternately in tilt and turn modes.
If the handle does not rotate fully to any of the open positions, try the following:
- With one hand, lightly pull the top corner near the hinges;
- At the same time, try to rotate the handle to the swing position;
- Place the trunnion clamping eccentric vertically.
There are situations when the handle is not jammed, but, on the contrary, rotates around its axis, but the sash does not react in any way to the rotation. This indicates a breakdown of the fittings and in this case it is unlikely that you will be able to do anything on your own. The good news is that such breakdowns do not occur suddenly, but it all starts with play in the handle, which increases over time. Therefore, if you take timely measures and replace the faulty part, you can avoid unpleasant surprises.
Elimination of blowing from the hinge side
This ailment appears as a result of the poor quality of the purchased window. To solve it, you will need plates, which you can either buy or make yourself from, for example, plastic rulers.
Important! When creating the plates, keep in mind that they should not rest against the inside of the glass unit, otherwise it may crack. For greater efficiency, we recommend making plates whose thickness is equal to the thickness of the glass.
Once you have purchased or created the plates, you need to find a place to insert them. First, remove the glazing bead, which is located on the hinge side. When you remove it, you will see other plates underneath - you don't need to touch them.
Move the sash away from the glass unit by 3-6 millimeters, and insert your plates approximately in the middle. Then push the sash back and check if there is any air flow.
Replacing the rubber seal yourself
The service life of the rubber seal is 5-10 years. Its wear is easily determined visually. When purchasing a new element, it is advisable to give preference to German manufacturers; the quality of their products is always at their best. In addition, the rubber band will have to be replaced both on the frame side and on the sash.
The work algorithm is as follows.
| Illustration | Description of action |
| Remove the sash, unfasten the scissors and remove the seal, starting from the top. | |
| Insert the sash seal into the groove of the profile with the protruding “leg”. You can't pull it. Installation always starts from the middle of the top. When joining, coat the edges with glue. | |
| Replace the scissors. | |
| The seal is removed from the frame from the corner. | |
| Insert the seal into the grooves. In this case, the thick side should be directed towards the edge of the frame. Glue the edges of the elastic band and put the frame in place. |
The entire algorithm is presented in more detail in the video:
Handle stuck open
Usually it gets jammed due to a malfunction of the locking mechanism. To unlock the handle, you need to return the locking mechanism to its normal position. To do this, find the blocker and identify the manufacturer. For example, the locking mechanism of the AUBI brand and the Roto brand will be different.
Important! The blocker itself is usually located on the end side of the sash and looks like a plate.
- If you have the “AUBI” , then the mechanism should be positioned vertically. If it is in a different position, press the lock and, without releasing it, turn the fittings to the position you need.
- If you have the brand “Maco” , “Roto” or other brands, then find a metal protrusion, the so-called. “tongue”, in the normal position it is located at an angle to the frame. Then push it down until it is parallel to the frame. After this, start turning the handle to the required position.
Ready! As you can see, repairing window fittings is not a difficult task at all.
Go ahead.
Damaged double-glazed windows - no problem, step-by-step guide to action
In more complex cases, a complete replacement of the double-glazed window or glass will be required. It is advisable to invite professional specialists for such work. If desired, all manipulations can be performed at home yourself.
Complete glass replacement
A double-glazed window is a sealed structure that consists of several sheets of glass. Sometimes there is a need to replace it. This may happen in the following cases:
- glass is broken or cracked, respectively, depressurization of one chamber has occurred;
- condensation appears on the glass surfaces, and the desiccant rolls down in the form of yellow resin;
- street noise can be heard in the room, it became necessary to install a noise-absorbing double-glazed window;
- drafts have appeared that are not regulated by any of the above methods. Accordingly, heat is not retained in the room;
- the structure has lost its tightness, or it is necessary to install a double-glazed window with a large number of chambers.
Depressurization of a double-glazed window
To replace a double-glazed window, you must perform the following manipulations.
- Determine the marking of the glass unit, which is printed on the aluminum frame, and order a similar one from the manufacturer.
- First, remove the bead from the vertical side of the glass unit, then the closest one from the free corner. After dismantling all beads, remove the glass unit. It is advisable to use a spatula and mallet when working.
- Install a new double-glazed window, having previously laid the straightening plates.
- Secure the beads until you hear a characteristic click.
Glass unit marking
The procedure for dismantling a double-glazed window
How to replace glass in a double-glazed window with your own hands
Replacing glass in a double-glazed window requires certain knowledge and skills. Let's look at the whole process in more detail.
| Illustration | Description of action |
| Remove the beads around the perimeter of the glass unit. | |
| Remove the glass unit and place it on a horizontal surface with the broken glass facing up. Using a utility knife, cut through the sealant around the perimeter to the spacer frame. | |
| Remove the broken glass from the glass unit. | |
| Cut off the sealant layer at a slight angle, wipe the new glass with a cleaning agent, remove all dirt and place the washed side inward on the glass unit. | |
| Thoroughly treat all connections with plumbing grade silicone. Acrylic sealant cannot be used in this case. Wait until it dries completely, cover the edges of the structure with tape, insert it into the frame, and install glazing beads. |
You can watch the entire process in more detail in the video:
Why did the sash sag occur?
There are quite a large number of reasons why plastic window sashes sag. In most cases, this is caused by an incorrectly installed glass unit that has gradually slid to the side and caused an imbalance. If this problem is not eliminated, then not only the hinges, but also the entire frame may fail. Therefore, it is urgent to adjust the position of the glass unit.
To do this, you need to remove the layout that holds the glass within the profile.
It is pryed off using a hard metal spatula or a thin but wide chisel. The work must be carried out very carefully, otherwise the layout may be damaged, which will not allow it to be secured in the plane of the sash. Next are plastic linings that support the double-glazed window in the center of the PVC frame. You can check the exact position using a regular ruler. Once everything is done, the layout returns to its original place.
Another reason for sagging PVC window sash is the turning of screws. Not every manufacturer conscientiously monitors how personnel comply with such laws as instructions. And if it is broken, then the hinges on the windows will not be fastened properly. The curled thread in the profile will not be able to hold the device, which will affect the position of the sash in the plane of the PVC frame.
This cannot be seen either in person or in photos, but the screws will need to be moved to a new location. But this may not be possible, since the position of the fittings is not intended for such displacement. There is another reason, where self-tapping screws are also present. In this case, the hinges are secured properly, but the length of the screws is too short. Here it will be enough to simply replace the short screws with longer ones.
Other reasons for sash sagging require complete replacement of windows or new installation. And you can do this yourself only if you have certain knowledge and the necessary tools.