24.12.2019 17:38
Cersanit toilet installation systems are designed for loads of up to 400 kg/hour and long-term uninterrupted operation, which is confirmed by the manufacturer’s warranty from 2 to 10 years. But breakdowns occur even in the most reliable structures. There are several main problems that can cause a Cersanit installation to be repaired.
What it is?
Cersanit is a Polish company that occupies a leading position in the production of sanitary ware. The company has been known for many years and offers its audience only high-quality and modern solutions. Today, Cersanit installations are manufactured in 12 factories that are equipped with modern equipment. The manufacturer has repeatedly received Superbrand awards and is considered the best trading brand in Russia. The manufacturer enjoys the attention of buyers as it offers its audience stylish, high-quality models at affordable prices. Devices rarely break down, which is why the Cersanit brand is considered a reliable plumbing supplier.
Peculiarities
The installation is a metal structure on which plumbing fixtures with auxiliary elements (for example, a drain button) are attached. Before purchasing, you should study the pros and cons of this device to make sure that Cersanit products are suitable for your purposes.
The advantages of the installation include the following qualities:
- attractive appearance;
- saving free space: the seat is fixed directly to the box, so you can rationally use the space by installing built-in cabinets and shelves above the toilet;
- cleanliness: since installation is carried out directly into the wall, users do not encounter the accumulation of dirt - wall-hung toilets are easy to clean;
- the drainage system is located in the wall, so the device operates quietly;
- Plumbing installations have a long service life.
Despite the fact that the devices occupy leading positions in the ranking of manufacturers, the products have disadvantages.
Disadvantages include:
- price: the devices are overpriced compared to traditional toilets;
- no direct access to pipes;
- complexity of repair work: in case of malfunction, the box will need to be dismantled.
The manufacturer offers several installations that differ in their design.
Depending on the fastening, two types are distinguished:
- block system - such a device is suitable if there are conditions for fixing the system to the wall;
- frame installations are considered complex devices; installation is carried out on the floor surface, and the frames are fixed to the walls. The frame system allows you to adjust the height of the toilet above the floor, which is quite convenient.
The choice may also be influenced by the drain mechanism of the device.
The flush button can be of several types:
- dual-mode;
- with “flush-stop” option;
- contactless.
The first two options are simple and easy to repair. The contactless button has a special sensor that independently checks whether there is a person near the toilet and drains the water.
Features of Cersanit toilets
Toilet Cersanit
The company's catalog presents several lines of toilets, which can be combined into two large categories: wall-hung and compact.
Compact models have a toilet combined with a cistern, such as Cersanit Hit. The main advantages of this category: ease of installation, low price and long service life.
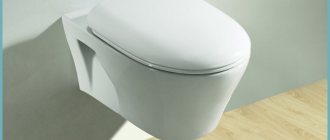
Hanging models differ in the need to install a tank for draining water. It is built into the wall, attached to a frame or blocks that remain hidden. All the necessary inlet and outlet pipes and hoses are also located there. Such a system is called installation.
The toilet bowl is hung from the wall. The design looks most attractive, since the tank and all supply pipes are hidden from view. The floor under the seat remains free, making cleaning the bathroom easier. Moreover, it becomes possible to install heated floors in the toilet.
However, wall-mounted models require complex installation and are more expensive than conventional floor-mounted counterparts. The manufacturer from Poland offers several series of compact and suspended models:
- ARTECO - this line includes compact toilets designed for floor mounting. The devices are distinguished by a laconic design, rounded soft lines that fit perfectly into the interior of almost any bathroom. The main feature of the series is CleanOn technology, thanks to which the inner surface of the tank self-cleans, which prevents the formation of mineral deposits and plaque. The seats are made of duroplast. Designs with microlift are available.
- CARINA is a popular series from a Polish manufacturer. This collection includes compact and hanging models. The shape is close to a square with beveled corners, smooth lines and soft outlines. Made from high quality sanitary ware. The seats are installed and removed easily and simply by pressing a special button.
- CITY is a series of toilets, the design and dimensions of which were developed for city apartments. They are distinguished by their oval shape and small size. Compact and wall-mounted models are available.
- COLOUR is an original collection that includes toilets in traditional white and gray colors. You can choose either a wall hanging model or a compact one. Rimless models are in great demand, as they guarantee hygiene, easy care and protection against the formation of mineral deposits. Seats with a microlift system ensure smooth closing of the lid.
- EASY is an original series of toilets of regular geometric shape, made from sanitary ware. The main difference between the products is that the surface of the plumbing fixtures is additionally treated with silicone coating. This makes cleaning easier and prevents the formation of soap scum and mineral deposits on the walls of the tank and toilet.
- NATURE - the line stands out from the rest with its original design. Soft lines and regular geometric shapes allow the plumbing fixtures to fit into any interior, be it strict classics or organic minimalism, soulful Provence or fashionable eclecticism. The collection includes two types of toilets: rimless floor-standing models and rimless wall-hung ones. The Duroplast seats are equipped with a soft-closing system. The company provides a 10-year warranty on plumbing fixtures and 2 years on seats.
- JUST is a unique series of compact fixtures, as their shape and design make it possible to combine toilets in this line with any other sanitary ware from the company. Another difference of the series is the 100% coverage of the surface with snow-white glaze, which does not form a yellow coating.
- RICH is a line of compact porcelain models, distinguished by oval shapes and an oblique direction of release. Toilet seats are made of polypropylene.
- DELFI is one of the latest developments from the manufacturer. This is a series of wall-hung toilets and bidets, offering a complete installation system. The line is complemented by original seats made of material with antibacterial impregnation and equipped with a lift lowering function.
- NANO is another modern development from the manufacturer, designed for small spaces. It is no coincidence that it is produced under the motto: “Every centimeter counts.”
The main advantages of all Cersanit collections are their affordable price, recognizable, organic design and functionality.
Equipment
The wall-hung toilet kit consists of the following items:
- control levers paired with a special block;
- fittings that are fixed to the wall;
- fastening material;
- adapter, drain tank;
- sound insulation.
There are models with and without a flush button. You should carefully read the model and check that all the necessary components are present so as not to return to the store again.
Self-installation instructions
Let's take a closer look at how to install a classic-style bidet - a floor-standing type with water supplied from a mixer. As a rule, it is located in close proximity to the toilet, but taking into account the minimum “working” area, which is 70 cm wide - the product itself plus the area around it.
Stage #1 - equipment preparation
Before installing the bidet, you should carefully read the instructions and check whether all the necessary equipment is available. First you need to figure out the holes in the bowl. The standard number is three, one of them (the top one) is intended for mounting the mixer, the other two are located inside the container and are related to the overflow and siphon.
Before purchasing in a store, as well as installing the product, you should carefully check it for integrity, absence of cracks and chips.
Usually the mixer and siphon are not included in the product package, so you should take care of purchasing them in advance. It is desirable that all parts of the equipment form a unified style - a bowl with retro decor requires a suitable antique-style faucet.
There are two options for faucets - external, traditional, and internal, when installed on the shelf there are only valves and a hole for water outlet
In addition to the tap on the shelf, the bidet bowl is distinguished by its rear part. The toilet is equipped with a direct outlet for draining into the sewer pipe, while the presence of a siphon is required here - a similar device is also available for sinks. The mixer has one feature that is useful for its use - a divider, which allows you to change the direction of the water depending on its purpose.
The back of the bidet serves to maintain the bowl in a horizontal position. The upper niche is for connecting hoses, the lower hole is for installing a siphon and outlet pipe
Stage #2 - installation of mixer and siphon
As an example, let's take the most common inexpensive option - a mixer for hot and cold water with a pair of valves. To connect it to a water supply source, you will need two thin connections, reinforced on the outside with metal braiding. The support kit also includes a set of nuts, studs, washers and rubber gaskets. The traditional siphon (diameter - 40 mm) is partially made in the form of a body and a corrugated pipe.
A bidet siphon consists of two components - a solid body and an elastic, often corrugated outlet pipe. Sold unassembled
Dimensions
The dimensions of the systems may vary depending on the engineer’s ideas. There is a norm according to which standard Cersanit installations are made:
- the length of the products is 50-60 cm;
- bowl height - 30-50 cm;
- product width is 30-40 cm.
The structures can withstand loads weighing up to 800 kg.
There are traditional tank sizes. In rare cases, its length exceeds 50 cm; models with a width of 10 cm are mainly used. The parameters depend on the type of installation. Frame structures have the following dimensions:
- depth - 15-30 cm;
- height - 80-140 cm;
- width - 40-60 cm.
Block systems have the following parameters:
- width - 50-60 cm;
- depth - 10-15 cm;
- height up to 100 cm.
How to position?
First of all, you will need to decide on the place where the suspended structure will be located. Select an area that is close to water and sewer lines. Keep in mind that the toilet should not interfere with users’ free movement around the bathroom.
Once the location has been determined, installation activities can begin.
To do this, you need markup, which should have a number of features:
- is responsible for the accuracy of the entire process and proper fastening of the structure;
- applied based on the dimensions of the installation;
- signs should be placed on the surface of the wall that will indicate the location of the central axis of the system;
- measure at what distance the product will be placed relative to the wall. The distance should not exceed 13.5 mm;
- indicate a location for the cistern. The norms are about 1 meter from the floor surface;
- On the floor or wall, indicate the places where the fasteners will be located.
These steps will help simplify the installation and eliminate installation errors.
Installation
To install a plumbing installation, you need to follow the step-by-step guide and follow the sequence of actions. Correct actions guarantee system performance and save time. The installation instructions consist of the following steps:
- At the marked points you need to drill holes for fasteners and secure the dowels;
- then you should fix the anchor bolts in the dowels on which the toilet will be held; the body part of the installation is secured using bolts and adjusting nuts, which are included in the installation kit;
- Next you need to adjust the installation horizontally and vertically; the horizontal level is adjusted using legs, which must be secured after setting, the vertical level is adjusted with an anchor bolt, closed with a plug;
- connect the communications: it is necessary to connect the pipeline and the tank using a hose, and also connect the structure to the sewer system; to connect to the sewer, it is recommended to use rigid pipes rather than corrugated ones - this is due to the fact that the latter have a very limited resource, and to replace them you will need to dismantle the wall on which the entire structure is attached;
- connect the toilet to the flush cistern using a pipe;
- fasten metal plates to the lower edge of the structure: for this you should use anchors inserted through the installation strip into the holes in the wall;
- secure the plate using fasteners;
- check all connections and make sure installation is secure;
- install false wall cladding that will hide the entire structure;
- install the necessary fasteners;
- when installing to a false wall, you must remember that the wall-hung toilet should be 40-42 cm above the floor level;
- connect the sewer pipe to the toilet, it is located no lower than 22-23 cm from the floor;
- install the drain tank, drain valve together with the button;
- connect the tank to the water supply system.
When working, remember that the required sewer slope must be at least 45 degrees.
First of all, a pipe is brought into the equipped niche , the cross-section of which is 100 mm, with a slope towards the sewer of at least 5 cm. Its edge should be 25 cm from the center of the niche, and only after that is it possible to install its outlet at 45 degrees.
During the installation process, it is necessary to constantly monitor the installation level to prevent the formation of unwanted distortions.
Models and reviews
Plumbing installations from the Polish manufacturer Cersanit are in great demand. The popularity is due not only to the high quality of the products, but also to the affordable prices. If we compare with German brands, one toilet costs the same as a Polish company’s entire system and components. The manufacturer produces several types of products, among which are the following popular models that are in great demand.
Leon Delfi "5 in 1"
This model is considered the best budget choice. The Delfi line is the most popular collection, about which there are numerous positive reviews online. Despite the plastic components, there are very few complaints about the operation of the device; the model is characterized by a long service life and uninterrupted functionality. The systems are equipped with an antibacterial seat or a polypropylene seat with a microlift device.
Some customer reviews indicate that the drain mechanism breaks. Finding spare parts for repairs is quite difficult, so most consumers replace the entire tank completely. The installation is affordable, which attracts a lot of fans.
Tiger
Such systems are considered a fashionable and modern solution for arranging bathrooms. They are based on a durable steel frame, which is fixed to the load-bearing walls and to the floor surface. A shallow cistern and a wall-hung toilet are installed on the frame.
The model allows you to save free space in the room, simplifies the cleaning process and makes the design stylish and modern. The set consists of metal stands, a wall-hung toilet with a seat, a chrome flush button, a tank, a seal and a basic set.
Buyers highlight the following advantages of the model:
- small sizes;
- structural strength and reliability;
- ease of installation;
- convenient use of the installation;
- long service life.
Users who purchased this model note that the product looks expensive and stylish. Each element is reliable and high quality, despite its affordable price. There are practically no complaints about the operation of the installation.
Link Pro
The model can be mounted in a corner of the room, thereby saving free space. Users appreciate the possibility of water supply on both sides of the system, height adjustment and the inclusion of a ball valve in the kit. The manufacturer guarantees quiet operation of the installations and the availability of auxiliary mounting points. In addition to high technical characteristics, the model has an attractive appearance and stylish design that can fit into any interior.
To learn how to install Cersanit, see the following video.
Wall-mounted plumbing fixtures are no longer a curiosity from advertising brochures. Domestic developers are increasingly using installation systems, and there are reasons for this.
1. The wall hung toilet looks light and creative. 2. The bathroom is much easier to clean when there is no floor pedestal. 3. Sewer and water supply pipes are completely hidden. There is no external tap. 4. It is convenient to install warm floors. 5. The tank is well insulated from the noise of rising water. 6. The plastic drain container has a foam casing. There is no condensation at all. 7. We have the ability to adjust the installation height. 8. Saving space is a controversial issue, but there is some mobility in placement.
Although the design looks like something out of space, do-it-yourself installation is accessible to any home craftsman who is at least a little familiar with plumbing. The manufacturers tried to keep our work to a minimum - they assembled and adjusted everything they could in advance, and also provided the kit with detailed instructions. We recommend that you study it thoroughly first, and we will help you with the rest.
Popular models
Design “Cersanit Parva 011”
Toilets of the Cersanit brand are very popular in Russia. Therefore, after analyzing reviews from customers and experts, we can highlight the most famous models:
- Parva 011 is a compact product with a bottom water supply, designed for floor installation. The bowl and tank are made of high-quality sanitary ware, the seat is made of duroplast, equipped with a lift lowering function. The model weighs 19 kg and is easy to install.
- Eko 2000 E031. This Cersanite compact toilet attracts with its classic design, thanks to which it fits perfectly into any bathroom interior. Others note a rather voluminous tank and two drain modes.
- Cersanit Pure is a wall-hung toilet whose popularity can easily be explained by its small size. It is perfect for small apartments. Made of ceramic, equipped with an anti-splash system and horizontal drain. The main highlight of all models in this series is the antibacterial coating of ceramic parts.
- Cersanit Carina Clean On is perhaps the most popular model of compact toilets. It is distinguished by its small dimensions and discreet design. The square-shaped bowl is made of sanitary ware, the very comfortable seat is made of antibacterial material. Additionally, it has two drain modes. From the same series, it is worth noting the Cersanit Carina New Clean On model.
The quality of Cerzanit toilets is confirmed by numerous nominations, including the Russian “People's Brand” award. All designs are durable, easy to install, and have a full set of components.
Experts advise choosing toilets made in Poland or Romania, since Russian analogues often have low-quality plastic parts.
Installation sequence
So, the first step is to assemble the frame structure for fitting work.
Next, we select a place for our ceramic friend. Typically, the height of the sewer tee does not make it possible to install a floor-standing toilet at a significant distance from the riser. In the case of installation, everything is much simpler; the outlet elbow can be deployed, thus providing the required slope, often without even resorting to complex manipulations to lower the main indoor tee. In addition, you can always gain a few precious centimeters on the adjustable legs of the frame. By the way, think about the layout of the tiles in advance; the seams should be symmetrical to the toilet and the button, otherwise it will be a design failure.
We install the structure in its original position, using the adjusting bolts we set it vertically and horizontally. We pay special attention to the verticality of the front part.
Using the legs, we adjust the height of the toilet installation - usually it is about 40-50 cm from the finished floor to the top of the plumbing fixture. You can use a paper template to control the height.
We mark the locations of the fasteners on the floor and on the wall. We also draw a projection of a corner sewer elbow on the wall (it is usually black with a reduction from 90 to 110 mm).
We remove the frame and drill holes for installing dowels; as a rule, plastic plugs have an outer diameter of 12 mm. Please note that if the strength of the screed is insufficient, it is better to clear the place for the bracket and “drill” directly into the slab.
Now you need to assemble the entire sewer, including the black corner elbow. This is where the projection on the wall comes in handy. After installing the installation, working with the “ditch” will be very difficult.
The next stage will be organizing the cold water supply. Yes, yes, even before installing the frame, while it is convenient to solder and pack, we recommend screwing a threaded coupling onto the fitting (usually a ½-inch angular MPB) and soldering a “tail” of any length.
We put the installation in place again, but now we can tighten the fastening screws. Be sure to check the plumbness of the product again and tighten all adjustments. There should be no backlash.
We bring the sewer elbow to the installation and fix it with a special plastic clamp. We recommend installing an expansion gasket between the sewer pipe and the wall, for example, from EPS scraps. The same applies to the pipe that goes from the tank to the drain. This will help stabilize the rather mobile sockets and will greatly simplify the finishing installation of the ceramics.
We finish soldering the water and connect a flexible hose to the tank. We put a plastic protective cover in place of the button - during subsequent operations it will prevent debris from getting inside the tank and will serve as the basis for fastening the facade.
Sequence of work
Preparation
Installation of the toilet installation will take place without any questions if the company's recommendations are fully followed. Correctly dividing the installation process into operations is an important matter.
Start installing a standard installation by carefully reading the instructions.
Check the composition of the fastening kit, connections to the sewerage system, and water supply.
Whether you are going to install a pendant device with your own hands or with an assistant, prepare a set of tools:
- Pencil, tape measure, spirit level or laser level.
- Wrenches or socket heads corresponding to the size of the fastener.
- A hammer drill with a drill for the diameter of the dowels, a screwdriver, and a hammer.
- A hacksaw for metal, a personal file.
- Construction knife, silicone grease, sealant, tube gun.
- Adjustable wrench up to 30 mm.
If the installation will be attached directly to the floor and wall, it is necessary to mark the center of the holes along the fastening elements. The fitting is performed by setting the height to the mark - 1 m using retractable legs.
Manufacturers indicate the size reference point with a sticker (Cersanit) or paint (Alcaplast) on the frame. Roca tanks have molded level marks: a triangle with its apex resting on a line.
The distance from the wall to the structure is taken according to the documentation. The standard range of 140 – 200 mm ensures that the sewer pipe is laid in the clearance.
Draw a line at the selected distance.
It is advisable to carry out the marking with a partner holding the frame aligned along the line from moving.
A typical layout contains two attachment points to the floor, two or four to the wall. Thus, for Cersanit models, the studs serve as both a wall support and a bowl fastening, so they are screwed in before installing the frame. Roca, Alcaplast, Grohe - share functions, the studs can be tightened at any time.
Note! Hanging bowls are produced in two standard sizes according to the mounting center-to-center distance (180 and 230 mm), so the frames have four threaded fittings or holes; measure the center-to-center size before assembly.
Fastening the frame
Holes are drilled using a hammer drill according to the marks, and the included plastic dowels are hammered in.
It is rational to perform operations without attaching a frame. Anticipating mistakes, the marks are cored, lightly drilled, and then the hammer is switched to impact. Working alone, you can temporarily secure the bottom, mark the wall holes, then unfasten it.
In some videos, wall holes are drilled after the legs are secured, trying to avoid the drill from moving away from the initial marking. You will need a long drill, often the tool enters at an angle.
Tighten the screws.
The upper adjustment for Cersanit is provided by slide rails, while for Roca it is provided by a embedded pin with a nut welded to the corner.
Geberit offers a more flexible setting. A vertically movable upper profile with elongated grooves gives a chance to be fixed in the interweaving of old pipes.
Viega designers have developed a module with independent adjustment of the nodes.
Video from Geberit, Cersanit:
When exposing the installation, check the horizontal and vertical positions with a spirit level.
Verticality is controlled in two planes.
Profile systems
from guide profiles, quick-release connectors, fastening components - they help to quickly make sheathing and build in plumbing installations.
The Tese set includes four types of parts:
- Basic profile.
- Single fastening – used for fastening structures to surfaces.
- Double fastening – the purpose is identical, it fixes two elements at the same time.
- Corner connection – connects the parts together.
Analogs similar in principle are produced by Viega. There is something common to all systems:
- The spatial frame of the partition or wall cladding is formed by two flat frames. The base profiles are screwed to the surfaces in increments of 100 mm.
- The frames are connected to each other by crossbars using corner joints.
- The installation is attached to the outer sheathing.
Viega supports are connected to the profile by turning the latches of the quick-release clamps. According to the company standard, the yellow color of the elements indicates manual assembly (adjustment, clamping) without tools.
The installation should be attached to the grille from below, above, in the middle.
Video from Viega:
Control the relative position of the components with a level.
Option for fixing the middle connection of the Tece set:
TECEprofile assembly practice:
The video from Geberit discusses the method of fastening with self-tapping screws to the sheathing in increments of 30 cm. The racks are additionally connected with plasterboard overlays.
Details:
Sewer connection
The basic meter height corresponds to the standard position of the top of the bowl (+ 0.43 m). Based on the physical features and the connection with the slope of the waste pipeline, adjustments at the previous stage are permissible.
Viega products have an independent movable frame, eliminating the need to change the overall height using supports.
The drain elbow is fixed with a plastic clamp. Alcaplast has provided for the latter to move along the guides.
Connect the outlet to the riser tee. Install safety plugs on flush and drain pipes.
Installing toilet studs
The sheathing is sheathed with finishing materials, leaving only the ends of the studs on the outside. The screw depth cannot be adjusted because the locking nuts are not accessible. Before sewing, it is necessary to correctly calculate and adjust the protruding length of the studs and tighten the nuts.
Measure: distance from the outer surface of the sheet to the installation – Y; the thickness of the bowl edge is Z. Taking into account the nuts and washers, the required value is A = Y + Z + 25 mm.
Protective polymer covers are put on.
Connection to water supply
The water supply is carried out from above, behind, and from the side of the tank. To connect:
- Turn out the pressure rods. Remove the front protective panel by pressing inward from below.
- Remove the flush activation mechanism, disengaging it from the rods. The illustrations in the manual explain the fixing method.
Be careful! You may need to unlock the mechanism by turning the special locking knob. The block can be inserted into the guide grooves, from which it is removed by moving it upward. Having pressed the flush valve loop out of the holder, remove the activator towards you.
- Unscrew the union nut from the flange of the angle valve.
- Attach the supply hose to the valve.
- Place the tap into the hole in the container and secure it from the inside with a union nut.
Modification with rear inlet:
- Connect the filling valve hose.
- Open the tap for a couple of seconds to flush the line.
To adjust the volume and drainage speed, you will probably have to remove the flush valve. Among the variety of approaches, Viega's thoughtful concept stands out:
Assembly is carried out in the reverse order, finally attaching the box.
Sheathing operations are carried out according to general recommendations for the sheet materials used. Use the supplied gasket as a marking template.
Many models of boxes and corks are equipped with spikes at the tops. To outline the outline, just press the drywall against them.
The points are connected to each other with a pencil. Cut along the contour with a jigsaw.
The inspection tunnel is shortened flush with the wall panel.
Bowl installation
Before hanging or fixing the toilet, it is necessary to determine the length of the drain and flush pipes, cut off the excess, and process the ends.
The Grohe instructions illustrate the algorithm of actions step by step. The manufacturer advises adding 3 mm to the measured values.
The Roca video demonstrates the process more clearly:
On the pipe, draw a line with a pencil flush with the plane of the lining.
Insert the pipe into the bowl and place the mark flush with the mating end.
Measure the distance X between the lines
Mark the X dimension from the end of the outlet, if indicated in the documentation, add 3 mm.
Cut off the excess with a hacksaw.
Process the lead-in chamfer with a file.
Repeat the procedure for the sewer outlet.
Insert the bends into place, pressing until they stop. It is recommended to lubricate the cuffs with silicone lubricant.
The ceramics are attracted to the wall through a soundproofing gasket. As a rule, products are equipped with a sheet seal, although profile gaskets are also available.
Tighten the nuts, checking the position of the seat with a level.
After tightening, the protruding part is cut around the perimeter with a knife.
Sometimes it is recommended to apply sealant to the joint to eliminate leaks due to local defects. However, as usual, the unevenness is compensated by the gasket; significant distortions are not allowed.
There is a known method of resting on brackets. For example, Villeroy & Boch products are attached to the consoles with special bolts from above.
Tece engineers have developed original clamps with a wedge mechanism.
Rotating the screw, open the plastic collet with a wedge. The method eliminates harmful constriction.
Bidet
The technology for assembling products with a bidet function has no fundamental differences. Additionally, hot and cold water is supplied, taps are installed, and the supply is checked.
The fittings are connected to the device using hoses with union nuts.
Viega Prevista Dry has a separate bidet sleeve connected inside the tank.
Adjust the water temperature of the hygiene fountain.
TECE reveals the nuances:
Lid
Having installed the guide pins, put the seat with the lid on them.
With TECE products, correct seating is indicated by a click.
Screw the stopper in with a hexagon.
There are other mounting options.
Control assembly
Initially, you need to secure the tunnel frame. Roca solves the problem like this:
- Bushings (blue in the photo) are inserted into the holes in the container window frame and secured by turning.
- Attach a frame.
- Tighten the screws.
The pushers (red) are inserted and screwed into the holes of the activator.
Snap the panel with keys.
They open the water.
Check flush modes.
How to choose a toilet
You can attach not only a wall-hung toilet, but also a floor-standing toilet to the installation. The tank will be hidden in the wall. Basic requirements for a plumbing fixture:
- strength;
- comfort;
- hygiene (ease of cleaning, careful flushing without splashing);
- compatibility with the bathroom interior in size and appearance.
It is important to choose a toilet so that the fastenings match. It happens that the designs are incompatible: the holes or their diameter do not match. To avoid mismatches, it is recommended to choose the installation and toilet from the same manufacturer, or even better, from the same model range.
There are two types of installations:
- Block - represent a block that is attached to the wall. It needs to be installed in a niche. It is fixed with anchors and it is these fastenings that bear the main load. This option is optimal for installing a floor-standing toilet.
- Frame - attached to the floor and wall, have legs. The main load falls on the lower part of the structure. The legs are adjustable in length, so you can install the toilet to the desired height.
The first installation option will cost less, but it is only suitable for main walls. The second type of structure is attached not only to brick and block walls, but also built into plasterboard partitions. Low and wide frame installations are suitable for wooden walls.
Installation location
The frame is attached to the main wall or load-bearing partition profiles. The first option is convenient to implement in a spacious bathroom combined with a bathroom.
In addition to free space, the layout of pipelines is taken into account. Studs unscrewed to the maximum, factory extensions - reduce the rigidity of the structure.
For an open-plan apartment, the second method is suitable. In a narrow toilet, the installation of a support frame increases the reliability of fastening, allows you to hide the risers behind drywall, and simplifies tiling.
Typical dimensions are illustrated by the Cersanit drawing:
Installation of the device frame in a niche is possible with the appropriate room configuration. It is allowed to install a niche in the partitions. In small combined rooms, corner placement is advantageous. In order not to come up with designs, they purchase factory corner versions.
Removing part of a load-bearing wall without a reinforcement plan is a gross violation of building codes, fraught with an emergency situation, including destruction! Photos and videos with horizontal grooves and broken pieces of concrete are an example of the technical illiteracy of plumbers and the criminally negligent attitude of residents towards the safety of themselves and their neighbors.
For use and maintenance, inspection hatches, pipeline fittings and meters are located above or to the side of the structure.
What's included
When purchasing an installation, you need to check the package contents so that you don’t have to purchase the necessary elements later. It includes:
- steel supporting frame with retractable legs;
- cistern;
- drain fittings;
- water supply pipe from the cistern;
- sewer drain pipe;
- holders, studs for fastening the installation to the wall, mounting plate;
- nuts and washers.
At the manufacturer's discretion, the kit includes:
- soundproofing of the tank;
- toilet gasket installed between the toilet and the installation;
- flush elbow adapter;
- flush buttons.
The button panel is one of the important elements. Firstly, it determines the manufacturability of the model: it is made of plastic, wood, glass, and can be single-mode, dual-mode, or touch-sensitive. Secondly, it plays the role of an inspection hatch.
DIY installation repair instructions for Cersanit
You can perform simple repairs to the Cersanit installation yourself. The cistern fittings are dismantled and installed through the inspection window behind the flush panel.
Step-by-step instruction:
- Remove the decorative trim of the flush button.
- Unscrew the screws and remove the plastic mounting frame-key holder.
- Rotate the two plastic holders and remove the transparent partition.
- Remove the rocker arm block with pushers of different colors.
- Turn off the water and disconnect the connection.
- Remove the filler fitting, disassemble it, wash it or, if necessary, replace it with a new one.
- Perform all steps in reverse order.
Planting frames and fittings for different lines of Cersanit installations can be purchased in our Aquasliv online store.
Spare parts for installation of Cersanit
from 1,200 rub.
Go to catalog
Preparing the bathroom
Installation of the installation is carried out before finishing work in the bathroom. Moreover, “before” means that the tiles have not yet been laid on the floor, and in some cases there is even no screed, and the walls have not been plastered.
Before installing a wall-hung or floor-mounted toilet along with the installation, choose a suitable location. The optimal place for installation is the least accessible place or the one farthest from the door: the plumbing fixture should not be located in the passage. In limited conditions, the installation should be mounted in a corner. In general cases, plumbers do not recommend moving the location of the unit, but advise putting the toilet in the same place where the old one stood. This will greatly simplify the work. A niche with risers is suitable for installation, but the risers will have to be moved apart.
If the installation site is moved, it is necessary to maintain the correct slope of the sewer pipes to the drain (2 cm by 1 m). In addition, the toilet should be located closer to the sewer drain than other plumbing fixtures, otherwise when the water is drained, the water seals will break and a sewer smell will enter the room.
If the floor screed has not yet been poured, calculate its height. Sewer and water pipes are connected to the installation site. All pipes must be secured to prevent them from moving before the screed is poured.
Sometimes the design of a room requires:
- installing a toilet under the window;
- installing a plumbing fixture on a partition separating the space of the bathroom.
In the first case, it is necessary to purchase a low installation (below 82 cm), in the second, it is advisable to use a double frame structure, which is more stable.
On the wall, mark the central axis, the contours of the installation, the location of the tank, holes for fastening, including on the floor, setting aside the required distance from the wall (at least 13.5 cm).
Recommended dimensions to follow: seat from the floor - 43 cm, button from the floor - 100 cm, frame from the wall - 15 cm, tank from the wall - 2 cm.
Self-repair VS calling a professional plumber
Periodic inspections, cleaning, and replacement of the tank mechanism do not take much time and can be done independently. To facilitate further maintenance and search for spare parts, after installation, save the instructions with the installation diagram and part numbers.
But, if you do not understand plumbing, then it will not be easy to determine the cause of the malfunction, carefully dismantle the fittings, and select a similar one for your model.
If you lack practical skills, it is better to refuse to repair the Cersanit installation yourself and entrust the work to a professional.
Leave a request for a technician to visit you within the Moscow Ring Road for free
To other materials:
- Wisa installation repair
- How to remove a button from installation
Tools
To install the installation you will need the following tools:
- stationery for marking the wall;
- a hammer drill to drill holes for fastening, along with drill bits appropriate for the type of wall;
- open-end wrenches;
- tow or FUM tape for sealing threaded connections;
- level;
- roulette;
- silicone sealant.
Additional tools may require pliers, screwdrivers, and a stationery knife.
Installation of frame installation
Installation of the toilet frame installation is carried out in accordance with the step-by-step instructions:
- The frame is secured at least at four points with dowels. First, holes are drilled for the fastenings slightly smaller in diameter than the dowel itself, and then, changing the drill, they expand it to sizes corresponding to the diameter of the dowel. Then the hole will be the desired diameter with smooth edges.
- Secure the lower part of the structure. Then, after checking the evenness of the installation using a level, fix the upper part. Anchors and brackets are used as fasteners. The nuts are tightened using open-end wrenches.
- The 90 degree bend is secured with a plastic fastener clamp. When connecting pipe elements, silicone sealant is used.
- Connect the water pipe to the toilet cistern. The water supply location can be located on the side or on top. It is better not to use flexible hoses - they are short-lived. Preference should be given to polymer pipes or stainless bellows connectors.
- After installing the pipes, check the system for leaks.
- Upon completion of installation of the frame, the holes in the pipes, drain tank and installation studs are closed with plugs.
- The wall is covered with moisture-resistant plasterboard. The drywall profile is attached to the installation and to the wall.
- Install the tiles by first cutting out the necessary holes for pipes and studs. You can hang a toilet after tiling only after the tile adhesive has completely hardened - after 7 days.
- The pipe included in the kit is connected to the toilet drain hole. Then, using a level or other level object, draw a line coinciding with the plane defined by the edges of the toilet.
- Measure the depth of the pipe in the installation. From the marking on the pipe connected to the toilet, set aside this distance and cut it off. The same is done with the pipe for supplying water to the toilet.
- Silicone sealant is applied to the rubber cuffs and the rubber elements are inserted into the pipes, and the pipes themselves are inserted into the toilet. Moreover, the pipes must be inserted first into the toilet, and then the device is secured together with them, and not vice versa. If you do otherwise, the rubber bands will let water through.
- An insulating gasket is attached to the studs and the plumbing fixtures are installed, having previously lubricated the corresponding holes in the pipes with sealant.
- Having placed the toilet on the studs, install the rubber band, washer and nut. The fasteners are clamped, after which caps are put on them so that the bolts and studs are not visible. The fasteners should not be tightened as tightly as possible; the tension may cause the bowl to burst.
The wall-hung toilet has been installed. Now, using a utility knife, cut the insulating gasket along the contour of the device.
Installation of a toilet with a compact tank
The store usually delivers the toilet bowl, tank, flush device and float separately. Before installing the toilet, everything except the float must be assembled.
What does a floor-standing toilet with a compact cistern consist of?
Assembly
The process begins with the installation of a drainage device. It comes assembled, you only need to install it in the hole in the bottom of the tank. A rubber gasket is placed between the drainage device and the tank.
We install the drain mechanism inside the tank, first placing a rubber gasket
On the reverse side, the plastic washer included in the kit is screwed onto the pipe. It is tightened by hand, then using a key, but very carefully, since it is easy to break the plastic. To prevent the drain device from spinning, it must be held with your hand.
Carefully tighten the nut
The next step is to install the mounting screws on the tank. They are also included as standard. These are long thin screws made of galvanized or stainless steel. They are inserted into two small holes at the bottom of the tank, put on rubber gaskets, then washers, and only then screw on the nuts.
Install the mounting screws on the tank
Before installing the tank on the toilet bowl, a gasket (included) is placed under the tank. To prevent odors from leaking out of the sewer, it must be “seated” with sealant. First we coat it on one side, place it on the toilet, coat it on the other, and place the tank.
Coat the gasket with silicone and place it on the toilet
Coat on the other side
We install the tank on the shelf of the bowl, passing the screws into the corresponding holes. We put washers and nuts on the screws from below and tighten them. At the same time, make sure that the tank is level.
Installing the tank on the bowl
Next, we install a float - a device for controlling the water level in the tank. There are two holes at the top of the tank. Here we insert the device into one of them. It is mounted on the side from which the water supply will be connected.
We put a float in the tank
We wrap a little flax around the outlet pipe, coat it with plumbing paste, and install an angle (brass or stainless steel). Do not overtighten the connection, do not hammer it in; the pipe is made of plastic.
Installing a tee
Floor mounting
The toilet is almost assembled, it can be put back in place. The toilet is connected to the sewer using a corrugated adapter. It has rubber seals at the ends that fit tightly into the pipes and onto the toilet outlet.
Corrugation for connecting the toilet to the sewer
If the sewer pipe is plastic, the corrugation is simply inserted until it stops. If the riser is cast iron, and not yet new, so that the smell does not seep through the microcracks, the pipe is cleaned to the metal, washed and dried. A layer of sealant is applied around the circumference of the dry, clean metal (a little more in the lower part), then the corrugation is inserted. To be more sure, you can also apply sealant to the outside of the joint.
To ensure that the installation of a toilet on old cast iron is airtight, a layer of sealant can be laid under the corrugation
In any case, we insert a corrugation into the sewer pipe.
Insert the corrugation until it stops
The second end of the corrugation is put on the toilet outlet. This is the connection of the toilet to the sewer. It's so simple. There is just one caveat. So that it can be removed later, the corrugation outlet and the toilet bowl outlet are lubricated with soap soaked in water, and only then the bell is put on. If this is not done, removing the toilet without damaging the corrugation will be problematic. But you still have to drill holes for fasteners. It will be much more convenient to remove rather than try to move a partially fixed device.
Having put the corrugation on the outlet, we position the toilet the way it will stand. Having installed the lid on the tank, we check that there is room for it. Next, you need to sit down, check the comfort of use, and adjust the position if necessary. Then take a pencil or marker, insert it into the holes in the sole, and mark the places for installing the fasteners.
Mark places for fasteners
After removing the toilet, drill holes for dowels in the marked places. If the kit comes with plastic fasteners, do not use them - they will break in a few days. It is necessary to immediately install powerful dowels.
If the toilet is installed on tiles, to prevent them from cracking, it is better to cover the glazed surface. Take a self-tapping screw, mark it, and hit it with a hammer several times. This is called “kerning”. Then take a drill or hammer drill and drill the tiles, turning off the impact mode. Once the tiles have been passed through, you can turn on the perforation mode.
Drilling holes for fasteners
We put plastic plugs from dowels into the holes. They must be in the same plane with the floor. If there is a thicker edge, cut it off with a sharp knife.
We sweep the floor, removing dust in the area where the toilet is installed. We put it in place, insert dowels into the holes, and tighten them using the appropriate key. The bolts must be tightened alternately, first on one side, then on the other. Tighten until the toilet is secure and free of play.
We tighten the fasteners
The final touch is connecting to the water supply. Connect the outlet of the water pipe with the tap installed on it with the corner on the tank that was connected earlier. For this you need a flexible hose. There are union nuts (American) at its ends, so there will be no problems with fastening. We tighten well, but without fanaticism.
Connecting the toilet to the water supply
Next, put the lid on, install the release button, and do a test run of water. If drops are found somewhere, tighten the connections. That's all. Do-it-yourself toilet installation is complete.
Features of installing a block installation
The block installation does not have legs, so the mounting to the wall must be reliable:
- Mark the height from the floor - 1 m. Mark the holes for the dowels. Horizontalness is checked with a level, ensuring that the holes are equidistant from the vertical axis.
- Drill holes with a hammer drill. They hammer in the dowels.
- Insert anchor fasteners into the dowels and, having leveled the installation, fix it.
- Plugs are placed on the fasteners.
- Attach the drain tank to the base.
- The system is connected to communications: a water pipe is connected to the tank, and a sewer outlet is attached. In order to maintain tightness, the connections are treated with silicone sealant.
- Subsequently, the installation is walled up. This can be done using drywall, foam blocks, and tile adhesive.
- Finishing the wall. Secure the toilet.
In general, the installation procedure coincides with the instructions for installing a frame installation.
Installation selection criteria
When choosing which installation to purchase, you need to pay attention to its quality. The structure is retracted into a box, so in the event of a leak, the malfunction will not be detected immediately, and to eliminate it, you will have to refinish the toilet. Quality is determined by the thickness of the metal, plastic, and the appearance of the welds. In addition, take into account:
- Compatible with toilet model. The installation holes do not always match if the installation and the toilet are made by different manufacturers. There may be differences even between models belonging to different lines from the same company.
- Complete set. The kit sometimes lacks fastening elements, soundproofing gasket, and drain buttons - they need to be purchased separately. At the same time, another company may offer not only these elements, but also the toilet itself.
- Drain buttons. The buyer has the right to choose a regular “start/stop” drain button, dual-mode buttons or touch buttons.
- Manufacturer. Leading companies provide a 5-10 year warranty on installations, not only on the frame, but also on all components, so you can be confident in their quality.
These are the most general conditions for choosing an installation; in each specific case, it is necessary to take into account the manufacturer’s recommendations.
Installation and connection methods
Compact models of Cersanit toilets are available in a variety of options: the outlet can be straight and oblique, horizontal and vertical. Users often note the main advantage of the models - the silent operation of the tank.
All floor types are quite easy to install. Detailed instructions and a set of all necessary parts allow you to assemble the toilet yourself.
It is recommended to purchase pendant models of this brand with the attached installation system, since it is developed for this specific model. The installation of such structures is complex, so it is better to entrust it to professionals.
Popular lines
The reliability and quality of the toilet installation largely depends on the manufacturer.
Grohe is a German plumbing company that carefully controls the quality of its products. The reliability of the brand and the possibility of combining sanitary ware from different lines is confirmed by customer reviews.
Geberit is a Swiss brand that directly competes with Grohe. Once upon a time, it was with Geberit that Russian consumers began to become acquainted with installations for toilets. In terms of quality and price, the products are approximately comparable to Grohe.
TECE - the company offers premium German equipment at an affordable price. All products are compatible with each other. Installation is simple. You can install any installation yourself.
Viega is a German brand whose products are aimed at the mass consumer. When compared with the three main competitors, the cost of installation, all other things being equal, will be significantly lower. At the same time, the designs are reliable and meet all the latest technological requirements.
Cersanit is a Polish manufacturer that has earned its place in the top thanks to its high quality products and affordable price. This is the most budget option for the Russian consumer.
Customer Reviews
Alena, Moscow : “My husband and I spent a long time choosing an installation. I wanted to choose something that was optimal in price and quality, not very expensive, but a worthy option. We settled on Grohe Rapid SL 5 in 1. Even from its appearance it is clear that it was made to last.”
Roma, Moscow : “We installed the Ideal Standart installation. It turned out that she was not ideal at all. In 5 years - three repairs: the cuff does not hold, the inlet valve is broken, the buttons stopped working. In addition, the water entering the tank is too noisy. I don’t even want to estimate how much I overpaid for it. Grohe is much better."
Anna, Moscow : “I don’t regret at all that we installed the installation and wall-hung toilet. Although at the purchasing stage, an unpleasant discovery was that you need to buy an additional button, and it is not cheap at all. When I consulted with friends. They all said that Geberit could not be found better. They bought it. It has been in service for 6 years without any complaints.”