A real owner should have order not only on the site, but also in the workshop! Check out these 12 easy ways to store important items in a small space.
As a rule, few of us can boast of a large, spacious garage or utility room, where a walk-behind tractor, a tool cabinet, or even a woodworking machine can easily be stored. There is always a catastrophic lack of space, so you have to resort to little tricks. We offer a few more ideas for your piggy bank.
Criterias of choice
For those who are not ready to start making shelves themselves, there is always the option of buying a ready-made device of the desired shape, size and functionality.
However, even if you have any organizer in mind, consider the following selection criteria, selected by experienced craftsmen:
- Material: Choose metal structures as they are guaranteed to last longer.
- Dimensions: choose a model that is not too bulky or too miniature.
- Load: Consider how much load the shelf can support and relate this to the tools you have at your disposal.
- Adjustment of dimensions and design parameters: if you need to modify your shelf, it is better to purchase a model that will consist of removable blocks.
Log
The tree lives long, weighs little and can be easily processed with almost any tool. I am a supporter of not only convenience and compactness, but also a creative person. It is important to me that everything fits organically into the interior. So, at first, most of the furniture in the workshop was represented by wooden structures and furniture made of stumps, boards, and plywood. While I was heating the potbelly stove, the idea of practical use of logs appeared. I attached them in the corners, made grooves or holes and placed small objects in such seats. The result was “trees” with branches made from saws, drills, bits, pencils and other things.
Source rinscom.com
Step 10: Vise Holder
For portable vices, I cut out two hooks from wood. They fit into slots on the sides of the vice and hold it in place. This makes it easy to remove the tool if necessary.
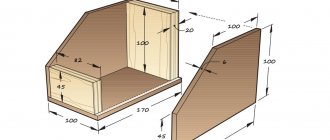
Cardboard tubes
Few people know that toilet paper rolls and paper towels can also be used to create insulated containers for storing small items. To do this, take a cardboard box and insert cardboard sleeves into it like pencils into a pencil holder. They are tightly fixed due to the contact of the walls, and you can put anything inside, from folded wires to radio components. For ease of use of the system, you can wrap several tubes with tape, thereby fastening them together.
Step 15: Stencil and Protractor Holder
I have a large and a small protractor. Each of them has the same holes, which allowed us to create a simple holder.
Fasteners for garden tools
At your dacha, you can’t do without shovels, rakes and other fairly large tools, which, when simply stored against a wall, tend to fall and take other items with them. Finding the right shovel among such a pile is also not very convenient. If you attach two pieces of wide pipes along the perimeter of the wall, this problem will be solved. The diameter should be larger than the handle of a shovel or rake. One piece of PVC pipe is fixed as a holder directly to the floor, and the second at such a height that the tool can be inserted from above, and it will not fall out, being supported at the top. This is one of the options for storing the necessary tools in the country. In this case, one or several cuttings with gardening tools can be placed in one pipe.
Technology for creating a wooden tool rack in the garage with your own hands
Before you create a storage rack with your own hands, you need to decide on the total number of tools that need to be placed.
The tool must be placed on a vertical stand in a safe position.
Creating a project - important points
To make the wall system convenient, draw up a plan-drawing of the future structure on paper, which takes into account all the requirements for the system:
- Calculate the height and width of the rack - it is better to use the entire wall from bottom to top.
- The recommended depth of niches for shelving is up to 65 cm, and the width between the vertical supports of the shelves is up to 1 m.
- Determine the required number of shelves, including how many holder shelves with cuts for tools.
- At the bottom there are spacious floor shelves and racks for tires, wheels and large carpentry tools.
- Mark places for magnetic tapes, hooks, and holders.
- They calculate how many organizers and containers are required, what sizes, and also determine their location.
- Sort tools and all small fasteners and parts for storage.
What you will need
To make a rack, prepare the following tools:
- measuring tape, square, level;
- saw, grinder;
- fasteners;
- hammer, drill.
It is recommended to drill holes in shelves and containers for natural ventilation. This is necessary to protect items from rust.
What materials need to be prepared
All the necessary material to create the rack is prepared according to the drawn up project:
- For the main panel of the holder, you can use a perforated panel.
- If the rack is made of wood, it is recommended to purchase oak or pine lumber without cracks or knots.
- Wooden boards up to 2.5 cm thick will be required for shelves.
- Shelves can be made from regular and laminated plywood.
- The vertical posts of the frame are made of 10x10 cm timber.
- It is recommended to pre-treat wooden boards with anti-mold and mildew agents and paint them.
- To assemble a metal frame, you need a rectangular profile and corners (up to 2 cm).
Manufacturing of components
The procedure for manufacturing the rack and components is as follows:
- Vertical racks made of timber and boards or plywood are cut into shelves according to the given dimensions, and a perforated panel is prepared. Mark out places for shelves.
- To make a metal frame, cut blanks of the required height with a grinder and mark the locations of the shelves. The frame is assembled using fasteners and corners. A primer is applied, then the parts are coated with anti-corrosion paint.
- The shelves are assembled from boards. They are pressed tightly together and nailed together with nails or screws.
- Shelves from boards are assembled by laying elements across the frame, so they can withstand a lot of weight. If the shelves are assembled by laying boards along the frame, then there is a chance that they will sag under the weight of the tools.
- The structure is assembled using self-tapping screws, nails and wood glue.
- The joints of all parts are additionally reinforced with metal corners.
- The entire structure is installed on the wall and secured with metal brackets.
- Shelves with grooves, holders, magnetic tapes, racks, containers and organizers are manufactured separately in the required quantity.
- You may need a small workbench with a vise made from wooden boards. It can be attached to the wall system as a fixed or folding surface on metal or wooden holders.
How to handle the organizer
Like any other thing, this device needs proper handling and care. The first will help extend the life of the organizer, the second will help prevent or correct possible breakdowns.
The list of such actions includes:
- Checking the structure for cracks or other mechanical damage;
- Depending on the type of material chosen, its surface must be subjected to special treatment from time to time to prevent rapid wear;
- It is strongly recommended to calculate the load-carrying capacity and capacity of the structure in advance, so as not to overload it in the future, thereby leading to breakdown;
- If the organizer or shelf is portable, it must be handled with care;
Depending on the material, the fixture should not be placed in areas with an unsuitable environment. For example, hang wooden shelves in rooms with high humidity, etc.
Bottles or canisters
Another convenient option is to use cut plastic bottles or canisters for storage. The volume is selected individually, trimmed to the required height. Canisters are suitable for larger components. The only drawback is the lack of lids, but if plastic containers are considered as an option for storing tools in a closed garage, then even metal products are not afraid of atmospheric phenomena.
The advantages of this method are obvious: containers for such placement are free. If you choose no less convenient closed containers, then you will have to spend money on their purchase. Although, if you consider the one-time investment, it is worth it: the ability to choose containers of different volumes, hermetically sealed, which can be stacked on top of each other, is attractive.
Tire rack
In the garage you can often see a accumulation of old tires that have not been used for a long time. Also in a separate pile are the wheels that are installed in the winter.
To solve the problem of clutter, you can make a simple shelving unit that is quite simple. To do this, you need to find free space.
The rack looks like a regular cabinet, but is designed to accommodate wheels. Its width must be made in such a way that four tires fit on one shelf.
A tire rack will solve the problem of clutter Source vibiraite.ru