A technical hair dryer is a universal power tool that is used in the household for construction or repair work. With its help, they prepare surfaces for painting, bend plastic pipes of any diameter when installing water supply and sewerage systems, perform operations with heat-shrinkable materials, solder and perform many other works. If at the right time a construction hairdryer is not at hand, you can make it yourself. This task is especially relevant for those who do not have a constant need for this tool, so it is not economically feasible to buy it for one-time work.
Prologue
In the past, for all sorts of “thermal technologies” (of course, except for soldering and dismantling radio components), I used a small lighter with a nozzle. But a gas burner, in terms of producing a hot stream of air, has a number of disadvantages. With its help, it is impossible to smoothly regulate the temperature, the size of the torch depends on the amount of gas in the tank, an open flame can cause a fire, and finally, you need to buy gas in cans.
So, it was decided to make a small hairdryer from all sorts of rubbish that can be found in the bins of a DIYer. An additional incentive to produce this device was the price of a factory-made hair dryer, which starts at about $30.
I note that during the assembly and testing of the subject, I built another, still speculative, model of a hair dryer with higher power. So, if you need a more serious unit, stay tuned for new publications.
A little about the connector
I used COM dad-mom. From somewhere on the boards. I wired it like this: two groups of three contacts each for heating (more than enough for 5 amperes), one for the fan. Then I fixed it with hot glue and insulated it.
Thus, the power supply is stabilized (if it is not operating at maximum voltage), the fan power supply is stabilized, and therefore the outlet air temperature is stabilized.
I'm happy with the design. For amateur purposes it is quite enough. At maximum heating, the metal pipe in the area of the handle heats up quite noticeably, but the hand is quite tolerable. During normal operation, the pipe is simply warm. Those. nothing will melt there. The air flow through the tube does a good job of cooling. And it is advisable to place the air duct like mine, closer to the handle. To prevent backflow of air from the hot zone. The hairdryer was tested by turning off after maximum heating. I was simply deprived of power. Along with a fan. Nothing melted.
For beginners: to start constructions of this kind, you need to get into bins, stashes, etc. and contemplation of previously accumulated wealth. And with a high degree of probability you will find something that can be used quite easily. What I mean is that the design does not have to completely replicate mine. Good luck. 03/05/2017. Trishin A.O. Komsomolsk-on-Amur.
Main parts and materials
I've had this fan lying around idle for a while now. These 40mm fans used to be widely used in PC 486 and video cards.
This unit will require minimal modification. You will need to re-insert the wire into the attachment point.
I didn’t have a tube of a suitable diameter for the heater air duct, so I borrowed it from a ten-watt resistor type C-5-5. To free the tube from the insides, I sawed off one of its rolled edges with a file.
I do not recommend using ceramics or quartz glass for the heater air duct, as these materials can be destroyed if flux or wash accidentally gets on a heated surface. I’ll tell you a secret, I did my first experiments with a ceramic heater air duct, which collapsed at the first thermal shock. So, it is better to choose steel or, at worst, some non-ferrous metal.
In order not to bother with making a mica frame, I used a wire with a diameter of 1.2 mm from some kind of rheostat. I think a wire with a diameter of 0.5-1.5mm will do. If you choose a thinner wire, it will not be securely fixed in the housing, and if you choose a thicker one, you will have to increase the cross-section of the cable, which will make the latter too rigid.
Mica will be needed to make a gasket that insulates the coil from the heater tube. The fiberglass will serve as thermal insulation between the heater tube and the hair dryer body.
To make it more convenient to work with recalcitrant materials, you need to use “Rubber Glue”, “88H Glue” or “Moment” glue. Mica can be glued to fiberglass or even paper. The fiberglass can simply be glued and dried. As a result, the glue will burn out, but at the assembly stage it will provide indispensable help.
The heater spiral must be wound in such a way that it is inserted into the tube with a gap, which will subsequently have to be filled with a mica gasket. If you can find a tube of suitable diameter, you can insert the end of the wire into the tube and only then wind the spiral. I didn’t have such a tube, so I simply wound the wire around a metal rod, and then screwed the central wire inside the spiral. This technique is shown in the video>>>
I have used these wonderful products many times to solve completely atypical problems. In this case, electrical terminal blocks will transmit current from the cable to the spiral and fix the position of the spiral relative to the front edge of the tube (to prevent the spiral from shorting to the body).
To make the body of the hair dryer, we will use tin obtained from any non-corrugated tin can.
Often the cylindrical surface of the cans is hidden by a label. If you run your fingernail along the side of a jar in a store, you can easily recognize a jar with a smooth side wall.
From the cylinder of a five-gram syringe we will make a hair dryer handle.
Nozzle shapes
The nozzle that forms the flow of hot air is the main working part of the device. Depending on the shape of the nozzle, it is intended for a specific range of work:
- Flat. Form a wide flat flow. Used for removing paint and film coatings, wallpaper, and directional deformation of plastic sheets.
- Round. They form a cylindrical flow and are used when working with copper pipes.
- Reflector. They have a rounded petal that forms an annular shelf. Used for bending plastic pipes
- Slotted. Create a narrow, flat stream of high intensity. They are used to weld sheets of plastic.
- Lateral. Used to remove coatings and dirt from window frames. They have a separate petal to protect the glass.
- Cutting. They create an even narrower flat flow and are used for cutting foam sheets.
- Ring. Create a flow in the form of a ring. Used for welding polypropylene pipes.
A self-made hair dryer can use all these attachments; it is enough to make its nozzle with the appropriate diameter. Nozzles can be made from sheet metal or with your own hands.
Drawings of a homemade soldering gun
This is an assembly drawing of a soldering gun. I was too lazy to draw isometric projections, but you can see the soldering gun from all sides by watching the video posted at the beginning of the article.
And this drawing shows the attachment point for the electrical terminal block. The M3 screw securing the terminal block is isolated from the tin body using a small piece of cambric (polyvinyl chloride tube) and an M4 fiberglass washer. An M3 fiberglass washer is placed between the screw heads and the nylon handle of the hair dryer. This washer prevents heat transfer from the electrical terminal block to the hair dryer handle through the M3 screw.
A drawing of the body of a miniature soldering gun in A4 format and 300dpi resolution is located under the thumbnail. If you print it on a printer and stick it on a tin from a tin can, then you can easily make the most complex part of this homemade product.
What is the reason for the ban on gas workers using a stove with a gas nozzle?
A ban by representatives of gas services regarding the use of stoves with gas nozzles may be due to the poor technical condition of the heating device. Or using a homemade nozzle.
This is due to the fact that there have been numerous accidents in furnaces with homemade gas sprayers. In this case, the actions of city gas representatives comply with directive materials on the safe operation of gas equipment.
If the owner uses a factory-made nozzle for reconstruction with all the necessary documentation. And the reconstruction itself to convert the furnace to gas fuel was agreed upon with Gorgaz, then in this case there should be no ban on the operation of such equipment.
Small details
Let's look under the fan to see how the coil is connected to the cable. The design turned out to be very repairable. It is enough to unscrew just a few screws to replace the spiral, for example, in order to adjust the resistance of the spiral to the voltage of an existing power source.
I soldered the petals to the heater cable, but it was possible to roll the ends of the conductors into rings and tin them, just like we do when we change a collapsible power plug.
Most of the things I intend to do with a soldering iron require both hands free. Therefore, I made this stand for fixing the hair dryer on the table. A clamp with an open perimeter allows you to securely hold the hair dryer and, if necessary, easily remove it from the stand.
This is how the soldering gun turned out.
Manufacturing recommendations
Without modification, a hair dryer device for drying hair will not bring success in operation, so it is recommended to use only a motor with a fan and a spiral that will be wound taking into account the requirements for a homemade device. Strong heating, together with a decrease in fan rotation and a decrease in the diameter of the nozzle, leads to burnout of the spiral and melting of the plastic case, and also, if the insulation is poor, a short circuit can occur.
By installing an additional power button for the fan, you can speed up the cooling process of the soldering iron. If you turn off the heating element and leave the cooler on, the heated part of the device will be blown through with air, thereby cooling the entire system. For convenience in working with the device, it is recommended to make a stand with a metal base, as well as using magnets. Thanks to the use of a neodymium magnet, the hot air gun will be securely held in the desired position.
Technical data
The hair dryer fan is powered from a 12 Volt DC source.
The heating element of the hair dryer is powered by an alternating current source of 0...12 Volts. With its help, you can change the temperature of the air flow, from room temperature to 600°C.
Mini-hair dryer parameters at temperature limits.
The diameter of the nichrome wire of the heating element spiral is 1.2 mm.
The heater supply voltage is 9 Volts.
The heater current is 11 Amperes.
Heater power - 100 Watt.
Air flow temperature - 600°C.
The time it takes for the hair dryer to reach the selected temperature mode is 1 minute.
I didn’t make a special power supply for my hair dryer, so I have universal sources of different power at my disposal.
If you do not have a suitable power source, then you can adjust the resistance of the spiral to one of the output voltages of the ATX computer power supply or make the simplest power supply from the ballast of a burnt-out CFL (Compact Fluorescent Lamp). For a detailed description of the modification of the power supply based on CFLs, see here>>>
In the picture, a circuit of a switching power supply for a miniature soldering gun, assembled on the basis of a CFL ballast. Additional elements are highlighted in red. Pulse transformer TV2 has two secondary windings. One of them powers the fan, and the other powers the heater coil. To adjust the temperature of the coil, switch S1 is used.
How does liquefied gas differ from natural gas?
As is known, the main gas composition is dominated by methane, whose lower calorific value is approximately 9 kW/m³. The substance is transported and burned exclusively in a gaseous state; the transition to the liquid phase occurs as a result of cooling to deep low temperatures.
LPG – liquefied hydrocarbon gases, used in boilers, water heaters and internal combustion engines of cars, are a homogeneous mixture of propane and butane. Let us list the properties of this fuel:
- calorific value - about 6.4 kW per 1 dm³ (liter);
- gas easily transforms into the liquid phase under pressure;
- LPG is transported and stored in the form of a liquid, pumped into standard cylinders or storage tanks;
- Before combustion, the fuel must evaporate; propane-butane is supplied to the boiler burner or internal combustion engine cylinders in a gaseous state;
- Over time, condensation accumulates at the bottom of the container, taking away the useful volume of the container.
Addition. A significant advantage of methane over LPG is its price - natural gas is significantly cheaper. Even the higher calorific value and lower propane consumption do not cover the difference in cost. A more detailed comparison of different types of fuel is presented in a separate review.
When refueling with liquefied fuel, the container is never filled to the top. 1/5 of the tank (20%) must remain empty - this volume is used to transfer the fuel into the gas phase. If the vessel is filled to capacity, the evaporation area and the amount of LPG ready for combustion will sharply decrease. A standard 50 liter cylinder can be filled with a maximum of 40 liters of propane.
About the heater temperature and the choice of material for its body
The operating temperature of the nichrome spiral should not exceed 1000°C. The temperature of a hot coil can be approximately determined by its color. The table shows temperatures in degrees Celsius.
| Metal | Temperature °C |
| Aluminum | 660 |
| Duralumin | 650 |
| Brass | 1000 |
| Copper | 1080 |
| Nickel | 1450 |
| Nichrome | 1550 |
| Steel | 1300 |
As you can see, copper, brass or steel are best suited for making the heater body. But, copper and brass quickly oxidize at high temperatures. Therefore, it is better to choose steel or nickel-plated steel.
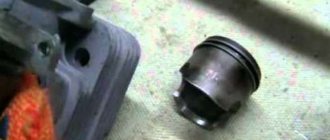
If you have defective lithium-ion batteries at your disposal, you can make a tube from the body of one of the cans. The housings of the cans of any lithium-ion batteries and lithium-ion batteries are made of stainless steel.
The picture shows a disassembled laptop battery. The diameter of the can body is 16mm, length – 65mm. How to disassemble a laptop battery is described and shown here>>>
And this photo shows a disassembled “EN-EL1” battery from Nikon cameras. Can diameter 14mm, length – 48mm.
Attention!
The contents of lithium-ion battery cans and lithium-ion batteries are extremely toxic! Therefore, cans should be disassembled outdoors, and the extracted products should be sealed in a secure container and taken to a battery recycling point. Such items are usually available in large supermarkets and specialty stores.
How to choose, install and convert a gas heating boiler to liquefied propane
You have built a residential building and want to move in as quickly as possible and finish the interior arrangement. The question arises: how to heat water and heat rooms if the home is not gasified? The simplest way to quickly organize heating and hot water supply is to install a double-circuit boiler that runs on liquefied gas (abbreviated as LPG).
The heating unit must be reconfigured to a propane-butane mixture, and after connecting the main line, the factory settings must be returned. We will reveal the features of installation, adjustment and operation of a heat source using bottled gas.