Recently, wooden houses made of timber are experiencing their rebirth. Their high popularity is determined by many factors, among which the most comfortable microclimate for humans and the very high environmental friendliness of these buildings predominate.
As a rule, lighting in a wooden house plays the role of a kind of magic wand, helping to significantly transform the interior with all its practical and decorative components.
Features of home lighting
As a rule, the lighting design of wooden houses has many subtleties and nuances. When designing a lighting scheme, it is necessary to take into account not only the size and architectural features of the room, but also certain properties of wood (for example, the high tendency of this material to absorb light).
If lighting fixtures are placed unevenly or incorrectly, instead of a beautiful and cozy interior, you can end up with a very depressing environment with a medieval atmosphere.
Requirements for lighting organization
Since any wood is a flammable material, when organizing a lighting system it is necessary to take into account a whole range of important nuances.
To avoid accidental ignition and fire, when electrifying wooden buildings, you must strictly adhere to the following rules:
- When organizing wiring, use only high-quality copper wires and cables with a reliable sheath made of non-flammable materials.
- For additional protection of wires, use special metal boxes and armored hoses made from fireproof materials.
- To protect cables and electrical appliances from sudden surges in voltage, it is necessary to install a surge protection device.
We should also not forget that the junctions of protective pipes and boxes must be carefully sealed.
Electrical wiring of a wooden house
Depending on the installation method, wiring in wooden buildings can be internal or external. According to established standards, the second option is the most preferable, since open wiring is considered more fireproof and practical.
As a rule, the external or open installation method involves fixing electrical cables with special electrical mounting brackets directly to the surface of the walls or ceiling.
Another variation of open wiring is placing cables in flexible corrugated pipes or in specialized electrical boxes.
Provided that the insulation is correctly selected, this method of cable routing has many advantages. The most important of them is the ability to repair or completely replace a faulty wire in the shortest possible time and with minimal financial losses.
We advise you to look at the most detailed article on the RuNet about how to make electrical wiring.
Preparatory work
Plan diagram
The work of installing any electrical wiring, including open wiring, begins with the implementation of a plan diagram.
To compose it correctly, you need to decide in advance on the location of all elements, such as:
- Lighting;
- Switches;
- Sockets.
In order to correctly position sockets in a wooden house and calculate the required cable cross-section, you need to decide on the main electrical appliances that will be used in the house.
It can be:
- Electric heaters;
- Washing machine;
- TVs;
- Kitchen appliances, etc.
Having decided on all these points, you should draw up a house plan and graphically depict the wiring with the most optimal cable arrangement.
In this case, you must be guided by the following rules and recommendations:
- It is more expedient to place the distribution board in the corridor. The level above the floor should be about two meters so that children cannot reach it.
- Sockets can be located at any height, since neither GOSTs nor PEU regulate this parameter.
Optimal layout of switches and sockets
- The recommended height for switches is 80 – 150 mm. For aesthetic reasons, it is better to place them at the same height.
- The line can run either vertically or horizontally, with all turns made at right angles.
Based on the resulting diagram, you should calculate the required number of wires and other elements that need to be purchased to complete the wiring installation.
Scheme of introducing electricity into the house above ground
Laying a line from the street to the house
The most critical stage is introducing electricity into the house. It can be done in two ways:
| Input method | Peculiarities |
| Overhead | The cable is inserted into the house from a pole, with the entry point located at a height of at least 2.75 m. This option is the simplest and cheapest, however, the line can be damaged as a result of strong gusts of wind, falling trees, etc. In addition, if the line is located at a distance of more than 25 meters from the house, additional support will be required, which will increase the cost of introducing electricity . |
| Underground | This method of laying wiring in a wooden house is more labor-intensive and expensive, but at the same time more reliable and durable. |
Scheme of introducing electricity into the house underground
It should be noted that the cable is inserted through the wall through a steel sleeve made of a thick-walled pipe. As for connecting the wiring to the power line, this work should be carried out exclusively by specialists from the relevant service. They also install the meter and seal it.
Lighting the house inside
Interior lighting in houses made of laminated veneer lumber or rounded logs is not only purely functional, but also performs a very important decorative function. Lighting scenarios can be very different, however, when choosing lighting devices, it is necessary to take into account not only the size of the room, but also the general functional purpose of the room.
Proper selection and placement of lighting devices can make any interior as cozy and comfortable as possible.
Attic
As a rule, attic lighting largely depends on the design features of the roof. It is best not to overload narrow attics with sloping roofs with voluminous crystal chandeliers, since too active general lighting will visually narrow the already small space.
To visually expand the room and raise half-sloping ceilings, designers recommend using laconic wall soffits and sconces. With a small number of windows, you can also use active neon or LED lighting.
Veranda
Lighting for an open veranda should be selected especially carefully, since this room is usually located outside the house. For safety reasons, only specialized electrical appliances designed for outdoor use are allowed to be installed on open verandas.
As a rule, such lighting devices have an increased level of moisture resistance, which helps prevent the risk of short circuits even if moisture (for example, raindrops) gets inside the lamp.
Most often, practical and functional lighting devices made of natural wood or metal are chosen to illuminate open verandas.
Hallway
When choosing lamps for the hallway, first of all, you should focus on the functional purpose of the room. As a rule, the level of artificial light in a given room should be such that you can clearly see your reflection in the mirror without any blurry shadows. In this case, the lighting should not be too bright, otherwise the mirror will cause quite strong glare.
As a central lighting fixture, you can use a small, laconic chandelier with matte shades and a few arms. For ease of movement, you should not install lamps that hang too low in hallways with low ceilings.
In spacious hallways, designers recommend using zonal lighting, creating additional light accents on various mirror elements and the entrance area.
Kitchen
Lighting in the kitchen interior should be bright enough and functional. Small spotlights with diffused daylight are usually used to highlight the kitchen work area.
In the eating area, it is best to install a ceiling chandelier with the ability to regulate the overall light intensity. Thus, during a romantic family dinner, the lighting in the kitchen will be softer and subdued, and during cooking and routine cleaning, the overall intensity of the light flux will increase significantly.
You should also make sure that the kitchen interior does not have blinding surface glare and too dark, unlit corners.
It is better not to use cheap fluorescent lamps in the eating area, as they quite distort the color of any cooked food.
Bedroom
The main purpose of the bedroom is to sleep, so too bright and intense light would be inappropriate here. It is not recommended to install fluorescent lamps in such a room, since in most cases they create an atmosphere that is too bright and not conducive to relaxation.
The most optimal solution is to install traditional ceiling chandeliers, complemented by separately adjustable local lighting. Additional light sources can be wall-mounted floor lamps, sconces and laconic bedside lamps with calm and slightly diffused light.
As a rule, local lighting very softly illuminates only one part of the room, while the other part remains in a mysterious and cozy twilight. To create the effect of diffused light flux, local lamps should be directed at the walls or up to the ceiling.
Children's
The issue of organizing artificial lighting in a children's room must be approached especially carefully, since for a child it is often a sleeping place, a play area, and a study room.
To create the best quality lighting, it is highly advisable to follow these tips:
- To protect your child’s vision, you should not use fluorescent lamps when arranging the lighting in a child’s room, as they create flicker that is harmful to the eyes.
- Lamps with metal shades must be placed out of the reach of small children, since when they are turned on they become quite hot, and an inexperienced child can be seriously burned by them.
- For children of school and preschool age, it is necessary to provide a work area. For local light, it is recommended to install a table lamp with an LED lamp with a power of approximately 6-8 W. Electric welded coupling 110 is for sale on the website ingplast.ru.
When arranging the lighting for a children's room, one should not forget about the basic safety requirements, according to which all switches and sockets must be located out of the reach of small children. All electrical wires must also be lifted up and covered with special protective covers.
Lighting for low ceilings
Properly lighting rooms with low ceilings is quite a challenge. When choosing lamps, it is necessary to take into account that some models in such rooms will be categorically inappropriate. For example, designers advise against using overly voluminous classic chandeliers with long crystal pendants.
It is best to opt for more laconic overhead lighting fixtures that are attached directly to the ceiling surface. If desired, you can also use classic three- or five-arm chandeliers with translucent shades pointing upward.
Installation of switches
One of the basic rules in installing any type of switch, lighting or automatic, is that it is always placed on a phase wire. It would seem that what a difference it makes - after all, if you install a switch on the neutral conductor, the circuit will still be open and the light will go out.
There is a difference. Let's say the switch is installed on the neutral conductor. The light bulb in the lamp burned out and needed to be replaced. Your first step is to flip the switch, disconnecting the circuit, and calmly unscrew the faulty light bulb in full confidence that there is no current in the circuit (the light bulb is not lit). However, if the circuit is broken at zero, the voltage in the phase wire does not go away. Having accidentally touched the phase contact in the cartridge, a person instantly becomes a freshly baked zero, that is, he gets an electric shock. If the TPG contacts the lamp body as a result of a breakdown, then touching such a device may be the last.
For an analogy, we can give an example with a water pipe: having turned off the tap, the would-be plumber begins to drill the pipe before the tap, and not after. As a result, a fountain of water will come out of the pipe, although not a drop will flow out of the tap.
Connecting wires inside a distribution box, when the power for sockets and lighting comes from one common cable
There is always one wire going to the switch, which opens and closes inside the switch. From the outside it looks like there are two wires. This is easy to explain - the phase conductor forms a loop that goes down or up to the switch. At the top, the loop is cut and the ends of the disconnected wire are connected to the switch contacts. Now, by clicking a key, you can connect and disconnect the circuit. The wire becomes 3 if the switch is two-key. Current flows in through one conductor, and out through two. One key breaks one line, while the second one works. Accordingly, a three-key switch will have 4 wires - 1 for input and 3 for output.
As an example, you can show how wires are installed in a chandelier with several light bulbs. Let's say there are 5 light bulbs in a lamp. It is required to install a two-key switch so that when you press one key, 3 light bulbs light up, and when you press the second, 2. Almost every chandelier has a block in the bowl through which the wires are connected. A phase wire is inserted into this block on one side, and a cable on the other end, which branches into 3 - according to the number of connected cartridges. The second phase conductor is connected in the same way, only it branches into 2 wires. Neutral wire 1, and it, joining the second contact of the cartridge, is combined into an outgoing conductor. In order not to remove individual wires from the outer shell, a regular two-core wire is used to supply and drain current to the switch, a three-core wire to the two-button switch, etc.
Wiring diagram for a chandelier with 5 bulbs and a two-key switch: 0 - zero; ph—phase; 1 - chandelier; 2 — connection box; 3 - two-key switch; 4 - connecting terminals
If you install a dimmer as a switch, then the first thing you should pay attention to is what power it is designed for. If the dimmer says 300 W, it means it is designed for a chandelier of 5 bulbs of 60 W each
There are devices for home use with a power of 1000 W. With the help of such a dimmer, you can change the lighting level in several rooms at once. The dimmer is installed in the same way as a regular switch. The only difference is that on the contacts of the dimmer there is a designation indicating which wire to connect to which contact. The correctness of its operation depends on this. The contact for the incoming wire is designated by the Latin letter “L”.
Example of using pass-through switches (switches)
Lighting the area near the house
Almost every country house located in the countryside necessarily has its own private yard or garden, which also needs properly organized lighting at night.
Depending on the purpose, there are several types of outdoor lighting:
- General or functional lighting. It greatly contributes to safe movement around the local area. To illuminate garden paths at night, various street lamps are mainly used, made primarily from natural materials, such as glass, wood or metal. If desired, to illuminate garden paths, you can also use new-fangled slot lamps mounted directly into the garden soil or paving stones.
- Private security lighting. Usually installed around the perimeter of the house or the entire plot of land. Lighting devices are often powerful spotlights that turn on automatically when a moving object appears in their coverage area. As a rule, security lamps have a fairly high brightness and are installed in such a way that motion sensors cover all the most vulnerable areas of the territory for intruders.
- Decorative lighting. As a rule, decorative lighting of a summer cottage allows you to achieve very interesting visual effects, especially when using original hand-made lamps.
Thus, lighting the area of a country house can be implemented in a variety of ways. The main thing is to choose the most suitable option specifically for your land ownership.
Video description
About contour lighting in the following video:
Silhouette
Silhouette lighting creates an unaccentuated light background; the structure appears against a dark background, attention to detail is not drawn. Such hidden lighting for a country house can be successfully combined with local lighting; each of them serves to emphasize individual details of the structure, only the task is performed in different ways. The main idea is to reveal an element, to outline its shape using a source hidden behind the silhouette of the house (decor, architectural detail, plant). In many modern projects, such light pouring out of nowhere has an additional functional meaning.
Silhouette against the background of the night Source www.accentslighting.com
Contour
A method of decoratively highlighting the outline of architectural details of a building (stairs, balconies, bay windows); Often a specific outline of the architecture is highlighted. Fluorescent and LED lighting lamps are suitable for this method; lamps are mounted in the corners of the house, in window and door openings, and on the roof. In private homes, contour lighting is used mainly during the New Year holidays. To create colorful illumination, diode strips, duralight (a type of garland), and multi-colored lamps are used.
Outline design Source aovox.com
Facade lighting
High-quality illumination of the facade of a country house is another of the most powerful lighting design tools. As a rule, professionally executed decorative lighting not only gives a country building a special solidity and respectability, but also in many ways makes it safer for moving around the local area at night.
With proper implementation of facade lighting, you can most advantageously emphasize the original architectural features of the house, as well as add additional decorative aesthetics to the entire surrounding landscape.
No. 6. Laying cables across rooms
The cross-section of the wiring cables depends on the load that will be placed on them. This is the subject of serious calculations, but you can also use tables in which the cross-section of the wires has already been calculated depending on the current, power and voltage.
Open wiring in cable channels
Before starting work, it is best to mark the future locations of sockets and switches. For safety and aesthetic reasons, it is best to install open wiring in cable ducts in a wooden house. They are made of self-extinguishing plastic, are a box with a latch, the size and color may vary. The wiring process in this case is as follows:
- choose a cable channel that corresponds to the number of wires and their cross-section;
- remove the cover and attach the channel box to the surface with self-tapping screws;
- Distribution boxes are installed at the cable connection points;
- the base of sockets and switches (only those intended for external wiring are used) are fixed to the designated places;
- the cable is laid in the channel and covered with a lid;
- The ends of the cables will be connected in junction boxes. Connect the cable to sockets, switches and circuit breakers.
https://www.youtube.com/watch?v=eJSBBRaCJH0Video can't be loaded because JavaScript is disabled: Do-it-yourself electrical wiring in a wooden house. (https://www.youtube.com/watch?v=eJSBBRaCJH0)
Internal wiring in a metal pipe
If you decide to install hidden wiring in a wooden house, then the procedure will be as follows:
- preparation of grooves and installation of open junction boxes; they must be freely accessible even after wall cladding;
- The passage of wiring through the walls is made using metal pipes, which are called feed-through sleeves. First, a hole of the required diameter is prepared in the wall, then a sleeve is placed; it should have a plastic sleeve at the edges. Special metal sleeves are placed under sockets and switches;
- The diameter of the pipe is chosen such that after installing all the cables, there will be 60% free space left in it. Preference is given to copper pipes, which bend well and are easy to cut. After cutting, the ends of the pipes are well ground or provided with plastic rims. Pipes are attached to a wooden surface with clamps, to metal sleeves - thanks to the flaring of the pipe inside the sleeve;
- pull the cable through the pipe and check the insulation;
- connecting cables in junction boxes and connecting to sockets and switches.
Connecting wires
In junction boxes, wires can be connected in one of the following ways:
- gray connection. These are special insulating caps that allow you to connect two wires that have been previously stripped by 2-3 cm and twisted together. The caps are very easy to put on and are inexpensive;
- The wagami connection is no less simple, but more reliable. A cage with the appropriate number of holes for the wires is selected, and the cables are inserted into them until they click;
- crimping with sleeves is one of the most modern methods, but special equipment will be required;
- It is better not to use the old-fashioned method of twisting followed by insulation with electrical tape in a wooden house.
All that remains is to install sockets and switches. For a wooden house, fittings made to look like wood are best suited, but this is not necessary. This is followed by work on connecting all groups of wires to the panel, installing a meter, RCDs and automatic machines.
You will also need to perform grounding. To do this, a hole is dug near the house in the shape of an equilateral triangle with a side of 1 m. The depth is at least 30 cm. A metal corner or pin 3 m long is driven into the vertices of the triangle, they are connected to each other with a corner 1 m long using welding. A hole is made in one of the corners and a grounding conductor is secured in it using a bolt and nut, it is brought out into the distribution panel and connected to the grounding bus, and the grounding conductors of the cables are also connected to it.
After completion of all installation work, electrical laboratory specialists are called in, who carry out all the necessary tests and issue a protocol confirming the correctness of the wiring and its safety. It is recommended to stick the wiring diagram on the inner surface of the panel door - this will make it much easier to navigate in the event of an accident.
It is necessary to carry out all work on installing electrical wiring in a wooden house only if you have the appropriate knowledge and experience. If you have the slightest doubt, it is better to call specialists - the safety of the house and its residents depends on the quality and correctness of all stages of work.
The article was written for the site remstroiblog.ru.
How to choose the right lighting fixtures
Lighting devices used for indoor and outdoor lighting of a country house can be very diverse. Depending on their purpose, they are divided into decorative and functional.
Functional lighting devices, first of all, perform certain practical tasks, for example, illuminating the road to the house or the area for the car.
When choosing a lighting device, you must first decide for what purpose this light source is being installed. It is also necessary to understand how harmoniously the design of the lamp matches its surroundings.
As a rule, the following fit most organically into the decor of wooden houses:
- lamps with elements made of wood or ceramics;
- forged chandeliers, floor lamps, sconces;
- table lamps with fabric lampshades;
- Spotlights.
When choosing street lamps, first of all you need to pay attention to what materials these devices are made from. It is advisable to purchase products with shades made of anti-vandal plastic or impact-resistant glass. The main body must be made of stainless steel or high-quality aluminum alloys.
Equipment
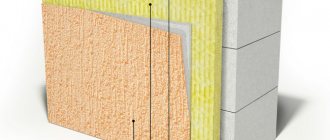
For façade lighting, professionals use a wide variety of lighting equipment, which includes the following lighting materials:
- LED spotlights and lamps . They can be monochrome or use RGB technology and change color.
- Cantilever luminaires with metal halide lamps . Recently, they have been used quite rarely for facade lighting.
- Gas-discharge (fluorescent) lamps.
- Spotlights under DRL lamp.
- LED strips and garlands . Long gone are the days when only the New Year tree was decorated with garlands. In modern design, garlands with various effects (mesh, rain, waterfall) are a favorite decoration technique.
Types of lamps and their advantages
Types of lamps Just 10-15 years ago, every home had an ordinary incandescent lamp.
At the same time, the stores did not have a large assortment. Users only had to choose the power of the product. Today there are so many light sources that it is quite easy to get confused among them. So, the following options are considered the most common types of lamps: Incandescent lamps are gradually leaving the market, as they cannot compete with less resource-intensive products. Their advantages included low cost, however, the disadvantages easily outweighed such an advantage. In particular, such products consume a lot of electricity, they also heat up very much, which does not allow their use in combination with stretch or suspended ceilings. Therefore, energy-saving lamps based on LEDs or gas are considered the best modern choice. It is worth saying that, perhaps, it is LED lamps that have the maximum number of advantages. In particular, the positive aspects of such lamps include:
It is also worth noting that such products practically do not heat up, which allows them to be used as built-in lighting. In many cases, LED lighting can bring a feeling of comfort, tranquility and coziness to rooms with low ceilings.
Safety
Organization of lighting in a wooden house requires compliance with the following rules:
- In wooden houses it is important to provide for fire safety. Fires often occur due to improper electrical wiring. The design and installation of lighting equipment must be carried out by specialists. In buildings made of logs and timber, it is recommended to install open electrical wiring, for which they use cable ducts or fastening wires to porcelain insulators.
- When laying wiring, it is necessary to take into account that log buildings are subject to shrinkage. Internal wiring must be very carefully thought out and executed. It is performed using wires protected with non-flammable insulation. Be sure to ground the circuit to prevent breakdown or sparking.
- You cannot lay cables on wood, use corrugated pipes, plastic boxes, or metal hoses. After all, once a flame spreads inside a wall, it is very difficult to extinguish it. For wiring, it is better to install boxes and pipes made of steel and copper. For wooden buildings, copper wires with up to five solid cores are used.
- Electrification of a building requires the installation of a good electrical panel. Electrical circuit breakers and a residual current device (RCD) are installed on it.
- For lighting, do not use halogen lamps with high heating temperatures.
- When arranging lighting for a wooden house, it is necessary to observe the overall stylistic direction and harmony. Style experts advise using brass, forging, and hand painting.
- It is necessary to design in advance all the lighting details of the building, take into account where the switches will be located, the height of which is best calculated based on the average height of the residents. Some switches can be equipped with dimmers to adjust the level of illumination.
- Try to make more use of natural daylight by using large windows; installing roof windows is a plus.
Having considered the features of lighting a wooden house, everyone will be able to decorate their home competently, functionally and originally.
Next, see interesting ideas using LED lighting for a wooden house.
Wiring Requirements
The main requirement for lighting a wooden house is fire safety. Standards regarding electrical wiring are regulated by SNiP. This document imposes significant restrictions on cable installation.
There are three possible wiring options:
Hidden. One of the undesirable types of electrical wiring in wooden buildings due to the high degree of fire hazard. If you have to settle on this option, then the wire is laid in metal pipes with mandatory grounding. You can use self-extinguishing plastic. There should be no external pressure on hidden wiring, since a log house is subject to shrinkage, this must be carefully monitored and taken into account when planning.
Open. The easiest way to lay cables, which can be hidden in cable ducts made of fire-resistant material. Some people don’t like this option because the cable channels running along the walls will spoil the appearance. But such wiring can be turned into an original design solution if you select the appropriate devices.
Radio bus. The most convenient method of electrification, in which there is no need to run cables to switches. Control takes place using a remote control. Radio buses can be used in places where it is difficult to extend wires, for example, in gazebos or on verandas.
Lighting in a wooden house is best organized using LED devices. It is not recommended to use halogen lamps due to the high heating temperature.
How to choose a lamp for a country house with low ceilings
Unlike other rooms and premises, the concept of a “country house” is different for everyone. For some it is a whole country house, for others it is a small village house where they rarely stay overnight.
Therefore, a lamp for a dacha should first of all be chosen based on its purpose and definition.
Since summer cottages are often left unattended in the winter, it is better to choose an inexpensive, unpretentious lamp there. Practical enough to match its main function – lighting. Moreover, in winter, summer cottages remain without heat, and winters in Russia are still cold. Therefore, lamps for your summer cottage should be chosen so that they can withstand low temperatures. LED lamps cope well with cold weather and also consume less electricity. In any case, you should choose lamps with an increased protection class to be sure that the lampshade will not burst from the cold, and the lamp will not deteriorate, which can lead to wiring malfunction and repair, or even a fire.
A country house is a house left unattended during the winter. Snow and frost threaten the house not only from the outside, but sometimes from the inside as well. If the roof leaks or breaks due to the cold in winter, you will only find out about it in the spring. Therefore, it is better to choose moisture-resistant lamps for such rooms, so as not to multiply unpleasant surprises in the spring if some kind of emergency happens in the house.
It’s another matter if by the concept of a dacha we mean a full-fledged country house, quite suitable for living at any time of the year. Here are some tips that are suitable for any room with low ceilings:
Ceiling chandeliers and lamps are ideal for rooms with low ceilings. If you think that ceiling chandeliers are pretentious, strict and minimalist, then visit our website. In catalogs you can find chandeliers that have horns, a variety of decor and even crystal pendants. We must remember that ceiling lamps are sometimes decorated with such cascading decor that it takes up the entire room from ceiling to floor. When choosing a chandelier or lamp for a country house with low ceilings, pay attention to the dimensions, namely the height of the chandelier and its decor. You can use pendant lights with a minimum wire length.
For really low ceilings, spots are a good solution. The advantage of spots is that most often they are mortise, that is, they are located inside the ceiling itself. You can use several spots to illuminate the room evenly and to ensure that the room is illuminated in the same way as if a full-fledged chandelier was installed in it.
It is better to choose lamps with light shades or lampshades to provide bright light in the room, but not transparent. It is also better to choose chandeliers that are not very heavy, weighing no more than 6 kg.
Our website presents a huge variety of chandeliers, ceiling and pendant lamps that will help not only decorate a country house, but also harmoniously transform its interior.
Source