Poultry farming is simply impossible without a “poultry house”, because in winter, birds, including chickens, need warmth and are not able to survive in the open air. If there is a good-quality barn on the site, it may well serve as a home for chickens. Otherwise, the chicken coop will have to be built from scratch. Don’t be scared - it’s not at all difficult to do if you follow the advice of experienced poultry farmers.
So, when arranging a chicken coop, you need to pay attention to the following points:
- wall material;
- chicken coop dimensions;
- lighting;
- ventilation;
- walking hole;
- perches;
- nests
Cellular
Cage housing of chickens is widely used in broiler breeding and for mass egg production on large farms.
The cages are equipped with feeders and drinkers. There is a heating system that is carried out into the cell structure. This method of keeping significantly saves the farmer’s time on cleaning and feeding, and makes it easier to collect eggs. In the cage, the hens are protected from rodents and major epidemics. Planting density is an important criterion for good conditions. If the chicken is alone in a cage, the area of the room should not be less than 0.5 square meters. If the cage is standard, then about 3-4 individuals can be placed in it. Chickens of the same age are placed in one cage. The breed must also match
It is important to promptly clean the inside of the cage, change the water in the drinking bowls, and monitor the cleanliness of the feeders. Breeds that are not particularly active are suitable for cage keeping.
Chickens of the same age are placed in one cage. The breed must also match. It is important to promptly clean the inside of the cage, change the water in the drinking bowls, and monitor the cleanliness of the feeders. Breeds that are not particularly active are suitable for cage keeping.
Nests
A place for chicken nests should be allocated in the darkest corner of the chicken coop. The nest must be 40 cm deep in order for the hen to fit in it. The nests must be installed on a hill (40 cm from the floor). For a dozen laying hens, 3-4 nests are enough.
Chickens of different ages must be kept separately, otherwise the adult bird may offend the pullets. In addition, the hen and brood should also be separated. As for the presence of a rooster, its presence is not at all necessary if you plan to keep chickens only to obtain eggs. But for breeding domestic chickens, you can’t do without it.
How to build
To build a good poultry house, you need to carefully consider each stage, using already prepared diagrams and drawings. Also make sure that all materials necessary for construction are ready. It will also be interesting to learn about how to build a country toilet yourself.
Necessary materials
Taking into account what type of foundation will be built for the chicken coop, several bags of cement and bricks will have to be prepared. But bitumen or mastic will perform a protective function during the construction of the foundation. The walls of the structure can be made of timber with insulation. After this, you have to think about boxes for ventilation and perches for perching. Also, to build a chicken coop you will need windows, doors, and a number of construction tools.
Step-by-step instruction
The first step is to build a foundation. In this case, it is worth choosing a strip, monolithic or columnar foundation. Such a base is durable and strong, and rodents will not be able to get through it to the birds, which spoil not only the eggs, but also the chickens themselves. Place a mesh at the bottom of the dug hole.
The next procedure is as follows:
When the foundation is completely dry, you can proceed to the construction of the walls of the future chicken coop. All actions are performed using standard technology for constructing timber walls. It is necessary to lay insulation between the base and the first crown. Next comes the installation of the floor joists. To do this, use beams with a cross-section of 10x15 cm. Lay them on edge, maintaining a distance of 50 cm. The resulting gaps must be eliminated using scraps from the same material. In the same way, lay the crowns, which are connected at the corners, using a tongue-and-groove system. Place a heat insulator between the crowns. When constructing walls yourself, you must take into account that their height should be about 2 m
At the same time, it is extremely important to achieve an even installation of the crowns, avoiding distortion. For these purposes, it is necessary to use wooden dowels. Drive them into the bars in a checkerboard pattern
A distance of 1 m must be maintained between them. When the ceiling beams have been strengthened, you can proceed to the installation of the roof. The maximum amount of heat will not escape through it, so you have to take care of its high-quality insulation. The roof itself should be gable so that precipitation can drain freely. The gap under the roof should be used for practical purposes by placing inventory or food there for storage. Now all that remains is to equip the ventilation according to the individual drawing, insulate the floor and equip the chicken coop inside. The floor in the chicken coop must be made double. In this case, the first layer consists of a rough rough board, followed by a layer of vapor barrier, and then you can proceed to installing the floor using edged boards.
Video on how to build a chicken coop:
Useful tips
Every farmer has his own little tricks for raising chickens, and livestock breeding forums can give you some interesting farming ideas.
- Chickens need to sleep in complete darkness to get proper rest. But a problem arises with the sudden switching off of the light, since the laying hens cannot see in the dark and will not be able to settle on the roost in time. For gradual darkening, a phased power outage is used. The easiest way to purchase a dimmer for this purpose is an electronic device for adjusting the brightness of light.
- At the stage of equipping the walls, a small hole can be made at the bottom of the chicken coop door. Through it, it will be convenient for the bird to go out into the yard, and for you to clean up the dirty litter, raking the waste to the exit to the street. The size of the hole should correspond to the size of the largest individual in the chicken coop.
- There are various preparations for parasites on poultry - ticks, fleas, lice eaters, but it is easier to install a spacious container with wood ash on the territory of the poultry house. Birds will happily “swim” in it and clean their feathers, thereby freeing themselves from uninvited guests.
To learn how to properly set up a chicken coop with your own hands, watch the following video.
Poultry farming is simply impossible without a “poultry house”, because in winter, birds, including chickens, need warmth and are not able to survive in the open air. If there is a good-quality barn on the site, it may well serve as a home for chickens. Otherwise, the chicken coop will have to be built from scratch. Don’t be scared - it’s not at all difficult to do if you follow the advice of experienced poultry farmers.
So, when arranging a chicken coop, you need to pay attention to the following points:
- wall material;
- chicken coop dimensions;
- lighting;
- ventilation;
- walking hole;
- perches;
- nests
Features of a poultry house for 50 chickens
It is better to build a good chicken coop on your own. This way, the owner will be able to take into account all the features of his farm and navigate the storage of equipment. The convenience of organizing it “for yourself” will allow you to save time in the future on caring for the flock. In addition, this way you can adjust the air temperature and humidity as much as possible, and provide protection from other animals.
It is better to build a good chicken coop on your own.
A capacity of 50 heads will be the most optimal for a small home farm. This number of chickens will be enough for our own needs and for sale. A poultry house of this format is compact and inexpensive.
To design a chicken coop, you need to understand the basic requirements.
The poultry house must meet the following parameters:
- good stable lighting;
- optimal temperature for birds;
- heating system.
If all three points are observed, the room will have a comfortable microclimate, excess humidity will not harm the chickens, and twilight will not interfere with egg production
It is important to consider the ability to maintain all parameters regardless of the season
It is good to provide windows, but their absence can be corrected with artificial light. Heating is created by special devices, bedding on the floor, compacted walls and a roof without gaps. Even in winter, the room temperature should not fall below 5C. For many breeds, at least 12C is required.
To design a chicken coop, you need to understand the basic requirements.
Wall materials are selected with low thermal conductivity. An air vent for ventilation is required. It will help avoid accumulations of mold and stuffiness.
You will need to install perches inside. Thin (4-6 cm in diameter) long bars are suitable for these purposes. It is better to place them on one level, since from the second “floor” the chickens will dirty their neighbors with droppings. It is convenient to place 2 poles of 4.5 m along two walls. The poles should be located away from the doors.
50 chickens will need 10 nests. Boxes and wooden baskets with straw bedding are suitable. It is convenient to make a rack with nesting cells. Ladders are connected to them so that it is convenient for the chickens to climb to their place.
Find out how to properly and quickly make nests for chickens with your own hands, and we also suggest reading an article on how to build a chicken coop for 20 chickens.
It is preferable to make the floors thicker and raise them at least 40 cm above ground level. This will protect the chicken “house” from the penetration of rodents and small predators. Also, the floor should be level so that moisture does not accumulate in the corners. The coating is impregnated with environmentally friendly compounds against pests and rot.
Nests, perches, drinking bowls and feeders are placed inside the chicken coop.
The design itself is selected on the basis of stability and strength. A columnar foundation is considered the strongest. In addition, it is financially beneficial.
The chicken coop plan will need to include an inventory corner where bedding, food troughs, and cleaning tools will be stored.
Where to begin?
In order for chickens to be healthy and lay eggs well, they need to be provided with comfortable living conditions. The main one of these conditions is the proper arrangement of the chicken coop. Whether it is a newly erected building or a barn already existing on the site is not at all important, the main thing is to create a suitable microclimate inside, equip the space with everything necessary for the comfortable life of poultry. This can be done with your own hands, without the involvement of outside craftsmen. It’s probably no secret that a chicken coop must have nests, perches and feeders. But this is far from the most important thing in arranging a bird house. The growth, well-being and egg production of chickens are greatly influenced by air temperature, humidity level, ventilation and, of course, lighting.
If you decide to use an old barn, just hang a lamp there and put a feeder, then don’t be surprised that the chickens will get sick and have poor laying eggs. Neither elite food nor an advertised breed of chicken will help here. It is worth spending not so much time and effort on landscaping in order to get the maximum return as a result. It is worth considering in order all the subtleties of the proper arrangement of a chicken coop.
dimensions of the hole for chickens in the chicken coop
In the Other living creatures section, the question is how to properly build a chicken coop yourself? thanks asked by the author Enlighten the best answer is For 1 sq. m of floor are placed 5 guinea fowl, or 4 egg-laying hens, or 3 meat-egg breeding chickens, or 3 ducks, 1 turkey or goose. The site for the poultry house should be flat, dry, sloping to the south. such an area is cleared of snow faster, dries out faster and becomes covered with greenery. In a damp area, make an embankment of crushed stone 15-20 cm above the soil surface. The embankment is filled with a layer of clay with broken glass to protect against rodents. A second layer of crushed stone of 10-15 cm is poured onto such a “cushion”, which is filled with a cement solution; after drying, it is covered with a layer of hot liquid bitumen for waterproofing. such a floor is cheaper, more hygienic and more durable than a wooden or adobe one. To protect the poultry house from groundwater, drainage grooves up to 50 cm wide are installed around it; large, medium and small crushed stone is laid successively at the bottom of the grooves, which is covered with sand. The grooves must have an entrance to special collecting wells. wooden chopped or frame walls should have a thickness of 22-27 cm, the inside walls should be smooth, made of plywood or dry plaster. The walls are whitened with lime with the addition of bleach. Smooth walls are easier to clean and disinfect. The roof is made of two layers of roofing felt. Windows provide natural light. They are placed at a height of 0.6 m from the floor. From the outside, windows can be protected from unwanted intrusion with mesh (from accidental stones) and bars. I also have a mesh on the inside - so that the bolarium has an area of at least half of the atic one. Fenced with mesh. For chickens, the height of the net is at least 2.2 m, for geese 1.5 m, for ducks 0.5 m. The top is also covered with a net to prevent kites and contact with wild birds. While waiting for the birds to be released into the solarium, a hole is made. to which they attach a ladder with padded transverse strips so that they do not slip. the size of the hole for chickens, ducks and guinea fowl was no less than broken by the beaks of geese and ducks. The window area is at least 1/10 of the floor area. I have windows on both sides - west. East. And I made a window to the south in the attic. To the north in the attic in the summer I open a window covered with mesh so that it is not so hot. I use the attic of the barn for hay. Feeders are placed under the windows, then the chickens can clearly see the food in the morning. and in the evening. The solarium is installed on the south side of the poultry house; its area is at least half the area of the poultry house. They are fenced with a net and covered with a net on top to protect against kites. To release birds into the solarium, a manhole with a ladder and wooden planks filled with it is arranged. manhole for chickens, guinea fowl and ducks 40 x 40 cm, geese and turkeys 50 x 50 cm. To avoid heat loss in winter, manhole doors are made double at a level of 20-25 cm from the floor. At the entrance to the poultry house there is an insulated vestibule for storing equipment, feed and bedding.
Wall and floor finishing
The walls and roof of the poultry house should protect the inhabitants from rain moisture and drafts. When constructing a new building, these parts are prepared in advance; albeit inexpensive, but high-quality material is purchased for wall cladding and roofing. If an existing barn is used for a chicken coop, make sure that the roof does not leak and the walls are quite strong and do not form cracks. An ordinary shed made of simple boards can be sheathed on the inside with sheets of plywood or old wooden clapboard. For winter chicken coops, thermal insulation material must be placed under the skin. These can be artificial fillers or natural mixtures of clay and straw.
Remember that facing materials that birds can reach must be natural. There are no protruding pieces of polystyrene foam, hardened polyurethane foam or any other artificial fillers in the chicken coop. Birds are capable of pecking indiscriminately at any surface, which can lead to poisoning and death. After completion of the arrangement, the walls of the chicken coop must be covered with a layer of lime. Lime mortar reduces the risk of the spread of pathogenic bacteria, the proliferation of parasites, tormenting birds, and also ensures the durability of the wood.
The arrangement of the floor in the poultry house occurs in two stages and deserves special attention, since it must be warm.
- The main floor is made of concrete or wood. In the first case, hydro- and heat-insulating material is laid under the concrete screed. If the floor is planned to be wooden, then first lay out the subfloor from any substandard boards and add a layer of gravel or sand for insulation. The finished floor (the floor covering itself) should be made of smooth edged boards. They should be painted, which will extend their service life and also protect them from insects. You should be wary of advice to cover the floor of the poultry house with old linoleum. If the material is of a non-industrial category, it will quickly crumble under the blows of the beak, which means that pieces will fall into the birds’ esophagus.
- The second stage of floor arrangement is a warm bedding , which is changed as it gets dirty. The main floor, like the walls, is covered with lime for disinfection, followed by a five-centimeter layer of sawdust or sand. In winter, peat is added to this litter, making it thicker and warmer. Some farms use straw instead of sawdust and sand, but such bedding quickly gets wet and requires frequent replacement.
In the greenhouse
In the absence of the necessary space for a chicken coop, farmers keep chickens in a greenhouse during the winter. It is installed and the hens are placed. Tricks that must be observed for the comfortable life of laying hens:
Regular ventilation. With the greenhouse effect, a certain microclimate is established inside the greenhouse. The air stagnates and needs to be renewed regularly. This prevents the development of diseases in chickens. Heating inside the greenhouse space
It is important that the temperature is maintained at an optimal level (+15 degrees). To do this, purchase a special heater (preferably with temperature control). You should not save space and put a lot of chickens in the greenhouse
There should not be more than 3 individuals per 1 sq. m. From mid-February, you need to take care of the presence of a nest. The hens will start laying eggs as soon as they feel the first spring sun.
In the garage
At the end of the summer season, many poultry farmers move their chickens to garages. Winter is not a reason to quit your business. It can grow and develop when chickens are kept in a garage.
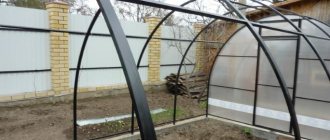
To do this, space is freed up inside the building for an aviary for chicken walking, which is surrounded by a fence.
With this method, you need to pay attention to the equipment:
The heating system is an important element necessary for keeping chickens in a garage. It is needed to control the temperature inside the room. The farmer needs to buy a heater. It dries the litter and prevents excessive air humidity. For some chicken breeds it is not required (for frost-resistant ones)
It is important to monitor air temperature and humidity indicators due to the possible characteristics of some breeds. The organization of lighting using supplied electricity will make it possible to regulate daylight hours. The correct daily routine is an important factor in maintaining egg production at a high level
Standard daylight hours are 12 hours. Some breeds have a waking period of up to 14 hours a day. There are no windows in the garage, which excludes natural light. Because of this, it becomes impossible to do without the help of electricity. Warm bedding made of straw and sawdust. It serves as additional insulation. In summer, this layer should not exceed 15 cm, in winter - 25 cm. The hay should not be moldy or wet. Otherwise, the chickens may start to get sick.
Sometimes poultry farmers use a cage method of keeping chickens in the garage (if broiler chickens are kept).
When you can not heat
To organize heating of a chicken coop, two methods are used - artificial and natural. Each of them has its own strengths and weaknesses, differing from others in energy consumption, efficiency and the amount of money spent. So, for regions located in southern or temperate latitudes, the natural method is quite suitable. The main condition for using this method is the absence of a significant decrease in night temperatures and strong winds. If the temperature in an unheated room can be kept within 7 degrees, then the natural method is more rational and, when carrying out a number of heat-saving measures, can be safely used.
The first object to insulate a chicken coop is the floor. This is due to the fact that, thanks to the plumage, the bird’s body is not particularly sensitive to cold, and the only vulnerable point is the legs. That is why floor insulation must be done first. Before you begin laying the insulation, the floor surface must be sprinkled with powdered slaked lime at the rate of 1 kg/m2. The presence of lime will rid the chicken coop of fleas and ticks. Then the lime layer is covered with any heat-insulating material, which can be sawdust, fallen leaves or straw. The total layer thickness should be 25-30 cm.
The most effective means of natural heating of a room is manure. During the process of overheating, mullein releases a significant amount of heat, which is quite enough to “heat” the chicken coop during the winter. The only condition for using manure is the prohibition on removing old, already trampled mullein. In such cases, a layer of new fertilizer is placed on top, while preserving the previously laid manure.
After insulating the floor, it is necessary to begin thermal insulation of the walls and ceiling. To do this, you need to plug all the cracks, not forgetting to form a small ventilation window. When building a chicken coop that is not equipped with artificial heating, double walls and a ceiling should be made. The cavities between the two surfaces are filled with foam plastic or mineral wool, and the thickness of the insulating layer must be at least 15 cm. A room constructed and insulated in this way will “work” on the principle of a thermos: the heat generated by chickens and manure will be retained for a long time, which will allow chickens can tolerate frosts down to 12 degrees. The final stage of insulating the chicken coop will be the insulation of windows and doors, which is carried out using polyethylene or thick fabric.
Preliminary external layout
Before starting work directly, you should carefully consider the required space of the entire structure. To do this, you need to know the future number of individuals living in the poultry house. The more birds there are, naturally, the more free space they need. It has been established that the best option is to place 2-3 chickens on an area of at least 1 square meter.
However, it must be remembered that chicken, both meat and egg, requires a comfortable space of about 3 sq./m. Calculations should be made based on this indicator. It is impossible to answer the question of how to equip a chicken coop without drawing up a plan for the future structure. Fortunately, today on the Internet you can find ready-made schemes; the poultry farmer will only have to adjust them to his requirements.
When drawing up a poultry house plan, it is imperative to take into account the presence of a pen, which is necessary for birds to walk around. Its dimensions should be calculated based on the calculation of 1 sq./m per 1 bird. Naturally, the more space, the better:
- Laying hens need to move more to “maintain their shape.” This helps both maintain and increase egg production. Birds of egg-bearing breeds should not gain excess weight, otherwise they will not lay eggs.
- Meat birds also need to exercise a lot, which allows them to increase their muscle mass. This is exactly the result that is expected from them.
Before you think about building a chicken coop inside, you should remember that the structure should be mounted on a hill. If there is none, you need to make it artificially by pouring crushed stone, gravel, broken brick or just soil. The resulting hill is covered with a thick clay layer mixed with broken glass, which will prevent rodent infestation.
Care
Caring for nests is extremely simple. Let's look at some mandatory activities.
- Regular cleaning. The filler is changed as it gets wet, and the eggs are collected in a timely manner.
- Disinfection. It would be good to accompany the change of filler with treatment with a disinfectant solution. This procedure should be done weekly.
- Fumigation with smoke bombs. This is necessary because harmful pathogens multiply quickly in poultry houses. To prevent infection, the nests and all parts are wiped with a bleach solution. After treatment, the room must be well ventilated.
- Timely maintenance. To avoid injury to birds, check nest attachments at least once every three months.
Please note that if chickens ignore the constructed structure, it means they have special reasons for this. Errors must be corrected in a timely manner. If there are no errors, perhaps the young hen just needs to be trained to the nest. For these purposes, it needs to be closed in the nest for one or two nights. You can also place an egg laid by another individual inside. You can also find an item that will fit the shape
It is recommended to place feathers and down in new nests, which will attract the attention of birds. Birds may refuse nests because they are bothered by parasites, mold and dampness inside.
Construction of poultry premises
The foundation and pillars of the poultry house are deepened 10-20 cm below the freezing level of the soil in the area. When building walls made of brick, stone, concrete or slag concrete, a foundation is required; when building walls made of logs, it is desirable. The foundation should protrude 30-40 cm above the ground level and be insulated from the walls with roofing felt or roofing felt. The waterproofing layer should be carried out with special care.
Floors should be dry and warm, easy to clean and disinfect. They need to be made so that ferrets, rats, and foxes do not enter the room, so underground spaces are not suitable. The floor level should be at least 20 cm higher than the planned ground level. Earthen and adobe floors do not protect against predators; birds rake them up, and over time they become uneven. It is best to make a double wooden floor: it is well processed, warm and cheap. The floor beams are sunk flush into the greasy clay solution, and after the clay has dried, the floorboards are laid. Beams and boards, except for the ends, are impregnated with resin twice. Asphalt and concrete floors are cold and expensive.
The walls of premises for poultry of all ages and types must have a flat, smooth surface and be accessible for disinfection, cleaning and whitewashing. They should not have cracks or cracks to prevent wind from blowing through and causing parasites to appear.
Ceilings in the middle and northern zones of the country in winter rooms must be made warm. The best ceilings are double wooden ones. As insulation, you can use oily clay, sawdust or dry earth. Such ceilings are sufficiently impenetrable to spoiled air, and therefore poultry feed can be stored in attics.
Windows can be made at the same height as in rooms for people, but in this case they are covered with a large metal mesh so that the bird does not break the glass. The windows can also be placed close to the ceiling to prevent birds from flying into them. Windows should be made so that they open well in the warm season and in winter to enhance ventilation. It is recommended to make windows or transoms in them. In cold regions of the country, windows are made double, and in warm regions - single.
Many poultry farmers install fabric frames in window openings. They provide the necessary air exchange in the house without sudden air movement. Fabric frames, in addition to ventilation purposes, also serve as additional lighting, since when open they allow sunlight to pass into the house. In severe frosts and winds, fabric frames are covered with plywood panels. In poultry houses where fabric frames are not installed, glass should be removed and the windows should be covered with a double layer of thin gauze. Fabric ventilation should be used only in winter; during the rest of the year, fabric frames should be raised.
For all types of adult birds, the ratio of window area to floor area should be 1:10 in the southern zone and 1:12 in the central and northern zones. For young animals this ratio is 1:8 and 1:10, respectively. Doors are made from the front side. To prevent the outside cold wind from immediately rushing into the room, vestibules with two doors are installed. In the southern regions you can get by with one door. Some poultry farmers cut the doors crosswise. The open upper half serves as a window; the bird can be examined through it without disturbing its rest. In the summer, thick winter doors can be replaced with mesh ones.
Tags: room equipment, windows, floors, foundation.
Category: Poultry keeping | no comments
Results
A chicken coop is not an object for the construction of which it is customary to involve professionals. Often, owners build houses for laying hens with their own hands, using inexpensive materials at hand for this purpose.
However, this does not mean that the chicken coop must necessarily be nondescript and ugly; it is quite possible to make it attractive and fit favorably into the landscape of the entire site.
Making a wooden door with your own hands and its subsequent installation is not a very troublesome task, accessible even to a novice builder. But first things first.
The first thing we did was remove the old door and measure the opening. It turned out that the size was non-standard: 80 cm wide, 160 cm high. Apparently, the builders wanted to reduce heat loss in the room and went away from the usual height of 2 m.
There were no doors with these dimensions in construction stores. In addition, we needed a window for light; it was not made of veneer, so it would be inexpensive. What is not sold in the store can be made to order, but the manufacturing price turned out to be such that we could build another shed, so we decided that making and installing it ourselves would be cheaper.
Fortunately for us, there was a lot of 2 cm thick pine planks of suitable length left in the attic of the dacha. The board was in excellent condition, well dried, smooth on one side and treated with drying oil. We will use it to make a wooden door for the chicken coop.
We started by cutting 7 tesins 160 cm long with a jigsaw.
Then they put them together, measured the size 80 cm from above and below with a tape measure, drew a line on the last board, and cut off the excess width with a jigsaw. Use a jigsaw to cut lengthwise carefully to ensure an even cut. We got 7 pieces, 160 cm long, 80 cm wide, just right.
Chicken coop design
Depending on the climatic conditions, the poultry house is built from wood, brick or stone. Many poultry farmers make the common mistake of not attaching much importance to the construction of the poultry house, and as a result, do not receive the proper economic benefits from poultry farming. The poultry house must be built spacious and warm so that the birds have enough space to walk in the cold season. Near one of the side walls of the poultry house it is necessary to build a poultry run equal in area to the poultry house. The height of the fence for the run should be at least 2 m. When building a poultry house, it is necessary to carefully consider the design of the roof (it is advisable to make a roof with an attic), since a good roof protects the poultry house from hypothermia, overheating and water ingress. The floor should be warm, dry, preferably plank. It is necessary to make windows in the wall facing south, southeast, southwest. The ratio of the window area to the floor area is 1:12. For poultry to go out for a walk in the wall at a height of 5–7 cm from the floor, it is necessary to equip manholes measuring 30x40 cm for chickens, 40x50 cm for turkeys and geese, and 40x30 cm - for ducks. Electric lighting intensity - 3-4 W per 1 m2 of floor. Electric light bulbs must have sealed shades and suspended at a height of 1.7–1.8 m from the floor. Density of poultry placement per 1 m2 of floor: for egg-laying chickens - 5 individuals, meat and egg breeds - 3.5-4 individuals, turkeys - 2.3 individuals, ducks - 6, geese - 2-3 individuals.
Ventilation
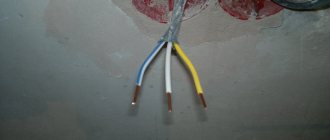
Chickens feel fine in normal humidity. When they fall or rise, they begin to hurt (high humidity is more dangerous), so ventilation in the chicken coop should creep in during the planning period. A hole is made in one of the walls for air flow. To do this, you can insert a piece of plastic pipe into the wall and select a cover for it.
Ventilation is very important
The air outflow from the chicken coop (exhaust) is a pipe passed through the roof or the top of the wall. On the street, the pipe rises some distance above the roof and ends with a fungus or a canopy - for protection from precipitation and foliage. The supply and exhaust are located in opposite corners so that the air travels the greatest distance. This type of ventilation is called natural, but it does not always work stably.
For stable operation, a fan with a cover is embedded in the upper part of the wall. It's better if it has several speeds. The operation of this type of ventilation does not depend on the weather, but depends on the availability of electricity and requires human intervention. In principle, you can do both methods and use them as needed.
Step-by-step instructions for building a chicken coop for 50 chickens
First, a drawing of the chicken coop is drawn up. Dimensions are set on it, places of ventilation, lamps, heaters, windows, doors, perches and nests are marked. When the plan is drawn up, materials are purchased, the construction phase begins.
Foundation:
- Marking. The future foundation is measured on the selected area. At the corners, steel rods are driven into the ground and connected to each other with rope. Measurements are taken of the lengths of the sides and the diagonals between the corners. All angles must be right, opposite sides and diagonals must be equal. If everything matches, pegs are driven in - the centers of future pillars. The distance between pegs is 1 m.
- Digging a hole. A hole 50 cm deep is dug along the established perimeter. Sand is compacted to the bottom with a cushion. The sides of the pit are 50 cm.
- Pouring the solution. Sand (2 parts), cement (1 part), crushed stone (3 parts) are mixed with water (1 part). The resulting composition is poured into the hole at ground level, leveled, and left for a couple of days.
- Lifting. When the concrete has dried, the columns are increased by 20-30 cm using cement and bricks or stones. With a column width of 50 cm, 2 bricks are enough for each row. Evenness is controlled by level.
- Laying the first layer of construction. The resulting foundation is lined with roofing felt, and the first row of timber is laid. For a strong connection, cuts are made in the corners.
Floor:
- Installation of lags. The beams (15 by 10 cm in cross section) are placed with edges every 1 m. It is advisable to maintain a slight slope in one direction so that later inside (for example, when cleaning) the water flows in one direction.
- Installation of subfloor. The bottom boards are laid.
- Insulation. Waterproofing and vapor barrier is spread on the rough boards. Bars (10 by 10 cm) are driven in every 70 cm. The resulting space is filled with insulation.
- Formation of the floor. Finished floor boards are laid and secured onto the insulation.
Walls:
- Placement of bars. The beams are sequentially laid with a tongue-and-groove connection up to 1.8-2 m or higher. The coupling points are treated with flax jute oil for insulation.
- Installation of dowels. Small holes are made in the corners and perimeter every 100 cm. The dowels are driven 7 cm into the wood.
- Wall treatment. For smoothness, plaster is applied or upholstered with plywood. Surfaces are covered with lime.
- Final insulation. Cracks and holes are plugged with polystyrene foam. The floor is lined with a thick layer of straw and sawdust.
After the foundation is poured and the floor is laid, the walls begin to be erected.
Ceiling and roof:
- Formation of the attic and roof. Additional boards, beams, and rafters are installed.
- Insulation. Expanded clay or coal slag is laid.
- Attic flooring. Finish boards are laid out, secured, and covered with impregnation.
- External roof deck. Roofing felt is laid out and secured.
It is recommended to abandon a single-cascade roof in favor of a double-cascade one. This shape allows you to create an attic, which creates more heat and allows you to store some equipment.
Final works:
- Windows are inserted.
- Doors are being installed. It is also advisable to make a closing hole for the chickens to go out for a walk.
- Internal equipment. Poles, troughs, and nests are placed around the room.
For additional protection from drafts, you can attach an external vestibule. This will create an ideal poultry house for keeping 50 chickens.
We invite you to watch a short video review of an insulated chicken coop with a walk.
It is convenient to place the flock in sections of 10-15 heads. To do this, the inside of the chicken coop is demarcated with beams and nets into improvised enclosures. The walking area is also fenced with high nets (for “flying” chickens with nylon).
Making a wooden door
The background to the question is this: at our dacha we have an old chicken coop, which was once built by the previous owners of the site. We repaired this chicken coop, plastered the walls, and stocked it with chickens. We liked everything except the front door. Firstly, it was very flimsy and thin, secondly, large cracks formed in it, and thirdly, it began to rot from below. In connection with all of the above, it was decided to replace it. I should immediately note that it took us 3 days to manufacture and install the door.
The first thing we did was remove the old door and measure the opening. It turned out that the size was non-standard: 80 cm wide, 160 cm high. Apparently, the builders wanted to reduce heat loss in the room and went away from the usual height of 2 m.
There were no doors with these dimensions in construction stores. In addition, we needed a window for light; it was not made of veneer, so it would be inexpensive. What is not sold in the store can be made to order, but the manufacturing price turned out to be such that we could build another shed, so we decided that making and installing it ourselves would be cheaper.