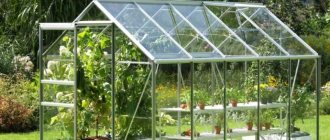
A mini-greenhouse for an apartment is a greenhouse that helps you obtain fresh vegetables and herbs throughout the year without leaving your home. It can even be placed on a windowsill. It is characterized by efficiency and compact dimensions. A mini-greenhouse can be purchased ready-made or made by yourself.
Mini-greenhouse for an apartment
Purpose
The main purpose of the design is to obtain a harvest of fresh vegetables and herbs at home throughout the house. Inside, the device creates an optimal microclimate necessary for normal growth and development of plants.
A greenhouse helps not only to grow plants at home, but also to prepare seedlings for the new season for further planting on the site.
A greenhouse helps not only to grow plants at home, but also to prepare seedlings
Mini-greenhouse for an apartment: garden all year round without leaving home
A mini-greenhouse for an apartment is a greenhouse that helps you obtain fresh vegetables and herbs throughout the year without leaving your home. It can even be placed on a windowsill. It is characterized by efficiency and compact dimensions. A mini-greenhouse can be purchased ready-made or made by yourself.
Mini-greenhouse for an apartment
Requirements for mini-greenhouses
Home greenhouses must meet the following requirements:
- maintaining the microclimate inside the structure necessary for plants. Only in this case can you get a rich harvest;
- ease of use. The structure should be easy to open so that you can access the plants at any time, perform irrigation, etc. All plantings must be visible when viewed from any angle;
- aesthetics. The design of the structure must fit into the interior of the room in which it is installed;
- strength, reliability. The device must withstand repeated opening and closing;
- transparent walls. They provide light access to plants.
Transparent walls in the mini-greenhouse provide light access to the plants
Types of structures
There are several types of greenhouses that can be used at home. Each of them has advantages and disadvantages that need to be taken into account when choosing a greenhouse.
Simple
It is a metal frame on which a cover made of polyethylene film is fixed. On one side there is a rising flap, providing free access to the inside of the greenhouse.
The cover can be easily removed. This allows the structure to be used as a flower stand.
Another version of the product is with glass or plastic walls.
There are several types of simple structures, which are distinguished by size, number of shelves, and method of arrangement. You can purchase a compact greenhouse to place on a window or a floor-mounted greenhouse of impressive size.
The main task of a simple design is to maintain the optimal temperature inside the device. Additional lighting, ventilation, and irrigation are provided by the user.
Attention! Simple designs are placed near the window. This allows plants to receive natural light, which promotes their growth and development.
Automated
They are greenhouses that provide plants with complete care. Functions of structures:
- maintaining optimal temperature inside the device;
- automatic irrigation of crops;
- organization of additional lighting;
- regular ventilation in automatic mode, etc.
Attention! There are other additional options, depending on the type of greenhouse, manufacturers. They increase the functionality of the product, but increase its cost.
Hydroponic farm cabinet
Automated greenhouses can be placed anywhere in the apartment, regardless of the light source. This is due to the fact that the devices are equipped with lamps. For this reason, they do not depend on natural, artificial light.
There are several types of automated mini-greenhouses:
- Growbox. It is a closed structure. A reflective coating, lighting fixtures, and a ventilation system are installed inside. Occupy an apartment area of up to 4 m2;
Growbox, greenhouse for an apartment
- thermobox. A device that completely relieves the user of caring for plants. The design is equipped with an automated system that regularly irrigates crops, monitors the level of humidity in the greenhouse, controls the supply of nutrients, and turns the lights on and off in a timely manner. Allows you to grow plants even at sub-zero ambient temperatures;
Thermobox, greenhouse for an apartment
- Aerogarden. A device in which crops are grown not on soil, but on aeroponics. This is a material that is a nutrient solution in the form of a mist. Plant roots are placed in it. The nutrient solution promotes the rapid growth of crops and their proper development, which allows for a rich harvest. In addition, an optimal microclimate is maintained inside the greenhouse.
Aerogarden, greenhouse for an apartment
Foundation
For the construction of a foundation, a beam with a cross section of 100x100 mm or 150x150 mm is suitable. It is measured and cut according to the required dimensions. Before laying in prepared trenches, lumber must be treated with an antiseptic.
Advice! For the foundation for a wall-mounted greenhouse, it is best to choose larch timber, as it is characterized by high strength and moisture resistance.
Immediately before laying in the trench, the beams must be connected to each other. The connection can be made using a metal corner and self-tapping screws; fastening with dowels is often performed by connecting “into a paw” or “in half a tree”.
The resulting box of beams is then carefully placed in the trench, after which the box is leveled horizontally using a level.
The last thing to do is fix the foundation made of beams. This can be done in two ways:
- Drill a through hole in the beams at the junction, and then drive a metal rod at least 50 cm in length into the ground through it.
- Install metal pins 50 cm long at the inner corners, driving them firmly into the ground.
After the foundation of the greenhouse is securely fixed, you can begin to assemble the frame for the extension to the house.
DIY apartment design
It is not necessary to buy a greenhouse for an apartment. You can make a greenhouse with your own hands. There are several ways to do this.
From the aquarium
To make such a greenhouse, you will need an old aquarium of large dimensions. And they simply cover the plants or seedlings.
Aquarium greenhouse
From plastic bottles
To set up a greenhouse you will need empty plastic bottles. The bottom is cut off from the containers. The tops are fixed onto pots with culture.
Pranik made from plastic bottles
Greenhouse showcase
This design looks aesthetically pleasing and fits into any design. Make the device as follows:
- Assemble a rack whose dimensions correspond to the size of the window opening.
- Install shelves made of plexiglass.
- A lighting fixture is fixed on top.
- Transparent material is fixed on all sides. Typically, polyethylene film is used.
The design of the Miya-greenhouse looks aesthetically pleasing and fits into any design
Creating a wireframe
To create a frame, it is best to use a profiled pipe with a cross-section of 40x20 mm for frames and 20x20 mm for spacers. Measure the required length and cut the required number of pipe sections. Then they begin to attach the inside of the frame to the wall. To do this, you can use brackets or clamps. If the wall material allows, then you can fasten the pipes using dowels. External supports are also fixed
Important! There must be a gap of at least 40 cm from the overhang of the roof of the house to the highest point of the wall-mounted greenhouse. Otherwise, icicles growing from the roof of the house can damage the roof of the greenhouse.
Then horizontal transverse pipes are installed from the internal pipes, which are directed from the wall to the external supports. They are fastened (you can make a screw connection or use welding). Then they begin to install the rafters. Their tilt can be arbitrary, but not less than 30 degrees. The length of the rafters should be such that they extend beyond the outer edge of the frame up to 25 cm. Also at this stage it is necessary to consider the presence of a window in order to create natural ventilation inside the wall-mounted greenhouse.
If they plan to make an attached greenhouse to the house more than 2 m, then the installation of additional spacers is required.
Upon completion of the frame assembly, it is advisable to paint the profiled pipe to prevent corrosion.
Pros and cons of a homemade greenhouse
Advantages of compact greenhouses for an apartment, made by yourself:
- low price;
- ease of creation;
- mobility.
Flaws:
- To effectively use greenhouses, it is necessary to maintain optimal conditions in the apartment. It is necessary that the room is always warm and dry. Low temperatures and high humidity will lead to a lack of seedlings and poor crop growth. Consequently, the user will not be able to get a rich harvest;
- the need to organize an additional lighting source. This will lead to higher energy costs;
- can only be used in an apartment. Cannot be placed on a loggia or balcony, otherwise the plants will die;
- external unattractiveness. This especially applies to plastic bottles. Because of this, the entire design of the room is spoiled. The exception is the display greenhouse.
Compact greenhouse for an apartment
Heating systems
So, if you plan to use the winter garden all year round, then it is necessary to upgrade the room with a heating system. To choose a suitable heating system, you need to know the criteria that influence the choice:
- Dimensions of the winter garden. The larger the size of the room, the correspondingly more heat is needed for heating.
- Frequency of use of the winter garden. If you plan to use it continuously throughout the year, then the system is required.
- Type of plants grown. Most plants develop at temperatures above +18 degrees, with the exception of some frost-resistant ones.
These factors should be taken into account when planning and choosing a heating system. Garden heating systems can be used in the following types:
- electric heaters;
- air conditioners;
- heating type "warm floor";
- water heating;
- stove heating;
- air heating.
The technology of facade insulation with polystyrene foam is described here.
Let's consider the main parameters for using each of the above types. Electric heaters are the use of convectors or fireplaces to heat a room. You can install automatic heaters that will turn on and off when the room temperature drops.
The number of fireplaces for heating is selected by calculating the area of the room. Air conditioners allow you to create a microclimate in the room. In winter, heating is carried out, and in summer, cooling is carried out. Air conditioning includes: air conditioners, split systems or mounted UFO heaters.
Heating with a “warm floor” system allows not only to heat the room, but also to create proper air circulation. The room is completely heated in this way. Water heating is carried out by installing radiators in the winter garden. Water flows through the batteries and is heated by a steam boiler.
The boiler can be gas, solid fuel, electric. Stove heating is carried out by firing the stove. The construction of the stove is not necessary in the greenhouse itself. The stove can be heated either with wood or coal.
Air heating is carried out by installing a fan in the wall between the heated room and the room with the winter garden. Warm air is distilled by a fan, thereby producing heating.
When the room temperature reaches a certain level, the fan turns off. You can choose any heating that is more suitable for the price. To finally settle on a specific option, we will consider the pros and cons of each type.
Greenhouse lighting
If simple or homemade greenhouses are used, it is important to provide them with natural light. To do this, the structures are placed on the windowsill or near the window.
Such greenhouses also require additional light sources. Usually special devices are used. It is important to choose the optimal lamp color for plants:
- blue, purple. These colors promote photosynthesis. Thanks to this, crops grow actively and bring a good harvest;
- yellow green. They impair photosynthesis. This leads to the appearance of pathologies in plants. For this reason, these colors are not used for greenhouses;
- red, orange. Lamps with such shades are used during the flowering period of plants, the formation of ovaries, and the formation of fruits. However, red and orange colors are served in doses. Its excess can lead to the death of the entire crop.
LED seedling lighting
It is also important to choose the right type of lamps:
- incandescence. They provide high-quality lighting and heat the air. However, they are rarely used for greenhouses, since they promote leaf curling and cause burns on plants.
- luminescent. These lighting fixtures can be used for home mini-greenhouses. They are characterized by low heat transfer, low energy consumption, and moderate cost.
- ultraviolet. They have different wavelengths, which allows you to select a lighting device for specific crops.
- mercury. Used for photosynthesis, but in limited dosages. Usually used at the stage of fruit formation.
- LED You can use several ribbons of different shades to create the optimal color scheme for the crop. The devices are characterized by durability and low power consumption.
- infrared. Optimally suitable for plants. Their light is identical to natural light, which has a beneficial effect on the development of culture. In addition, infrared lamps heat the air.
Greenhouse lighting
How is a winter garden created in houses?
The process of creating a winter garden consists of several stages, the first of which is the design of the room.
Typically, designers envision dividing a home greenhouse into three functional zones:
- for relax;
- for growing plants;
- and an area for free passage.
It is important to think about the purpose for which your “green paradise” will be used: if you plan to relax here or receive guests, you need to leave more free space, and reduce the number of plants and push them into the background. If the garden will be used for its intended purpose - for growing plants - the recreation area, on the contrary, should be reduced.
An excellent solution is a two-level winter garden, on the second floor of which you can relax and admire the “nature” below. Such repairs will, of course, cost a little more, but will bring much more pleasure to the owners and guests.
Advice from professionals
When organizing a home greenhouse, it is recommended to listen to the advice of professionals:
- The windows should be decorated with blinds or small curtains that are fixed directly to the frame. This will help control sunlight, which can cause burns on plants, especially on young shoots.
- Instead of soil for crops, you can use hydro- and aeroponics. These nutrient mixtures saturate plants with substances necessary for normal growth and fruit formation. As a result, the gardener reaps a rich harvest even at home.
- A window for ventilation and irrigation is placed on top of the structure. This ensures a uniform air outlet and a fresh, clean flow inside. If the door is made at the bottom, then cold air will enter the structure, which will negatively affect the health of young shoots.
Video - How to make a mini-greenhouse at home
A mini-greenhouse for an apartment is a small greenhouse that will allow you to enjoy fresh vegetables, berries, and herbs all year round. You can make it yourself, or you can purchase a ready-made version. It all depends on the desire of the user and the size of the budget.
Excavation
The very first thing that needs to be done is to clear the construction site. Be sure to remove all debris, remove weeds and other vegetation. If there is a flooded blind area near the wall of the house, it should be dismantled. Afterwards, the surface of the site is leveled and excavation work begins.
Mark the contour of the foundation using pegs or small pieces of reinforcement and rope. Then, along the marked border, they dig a trench of the required depth for laying the timber frame (the depth and width of the trench should be slightly larger than the cross-section of the timber). A sand cushion is formed at the bottom of the trench, followed by leveling the sand using water and a tamper. Afterwards you can begin building the foundation.
