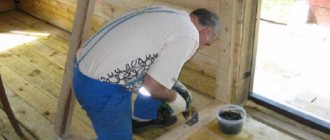
Wanting to make their bathroom more neat and convenient, many people decide to hide the water and sewer pipes when carrying out renovations. The best way to do this without transferring communications and with a minimum of dust is to build a box for pipes in the bathroom. You can assemble a plumbing box with your own hands; there are several options available for this.
Plasterboard box
The most common option for hiding pipes is to assemble a box from moisture-resistant plasterboard. This is due to the fact that ceramic tiles, which are most often used to decorate bathrooms, can then be glued onto the drywall. Let's consider the main stages of constructing a gypsum plasterboard box.
Stage 1: marking
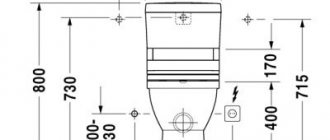
Before starting to assemble the frame, markings are made at the installation site of the box. The initial mark is placed at a distance of 30–50 mm from the most protruding element of communications.
The frame stand is located at a distance of at least 3 cm from pipes and other communication units.
Next, using a level, a vertical line is drawn along the surface of the wall, indicating the line of fastening of the frame. A similar mark is placed on the other wall, as well as in areas where horizontal pipes are closed.
Note! It is advisable to select the size of the box for tiling in such a way that whole tiles are used to cover all protruding parts. In addition to saving tiles, this allows you to create a neat and complete cladding.
Stage 2: frame construction
Assembly of the frame begins with the installation of a guide profile, which is attached to the walls with dowels along the marking lines. The step between the attachment points is 20–30 cm. The guide profile is also attached to the ceiling and floor to form the angle of the frame and install the front pillar. To ensure that the corners of the frame below and above are located in the same plane, first the guide profile is attached at right angles to the ceiling. Then a plumb line is tied to it and a point is marked on the floor where the lower corner of the frame should be located.
A rack profile is screwed to the guide profiles located on the floor and ceiling with self-tapping screws, which is fixed with 3-4 horizontal jumpers for additional mounting rigidity.
Note! Reinforcing jumpers are mounted taking into account the future location of inspection hatches that provide access to valves and meters.
After assembling the vertical part of the frame, if there are horizontal pipes for them, the frame is assembled according to a similar scheme:
- A guide profile is attached to the wall and floor, which sets the dimensions of the future box.
- The front frame element is attached to the guides using jumpers cut from the rack profile.
All jumpers are also installed taking into account the location of the sewer outlet for connecting the toilet, inspection hatches and shut-off valves.
Stage 3: framing the frame
The finished frame is sheathed with moisture-resistant plasterboard, cut into pieces of the required size. GKLV is cut with a sharp knife: first, the cardboard is cut along the line on one side (with a slight penetration into the gypsum core), then the sheet is broken along the cut line and the cardboard is cut on the second side. The sheathing is fastened to the frame using black self-tapping screws in increments of 15–20 cm. The place where the inspection hatch will be installed is not covered with plasterboard or a hole is then cut out.
Note! It is advisable that at this stage the inspection hatch has already been selected by type and size and purchased so that you can immediately try it on for a tight fit.
Types of hatches used for plasterboard boxes:
- Plastic hatches. They can be hinged, folding or sliding.
Plastic flap. - Push-type invisible hatches are installed before the cladding is completed and are fastened with self-tapping screws to the metal frame of the box.
Hidden push hatch. - A tile hatch with magnets is a popular design, which, if made independently, is cheaper than self-extending models.
Magnetic tiles are one of the types of hidden hatches
Stage 4: finishing
Before finishing the box, it is necessary to prepare it, this is done in the following sequence:
- All seams between the drywall are opened with a knife, then, along with the corners and other edges, they are sanded.
- The seams are filled with putty, and sickle tape is glued on top.
- The corners are also treated with a putty mixture and glued with sickle tape.
- After the putty has dried, the box is treated with a primer in two passes, with a break for each layer to dry.
A plasterboard box is most often faced with ceramic tiles: a continuous layer of tile adhesive is applied to the back side of the tile, which is smoothed with a notched trowel. The tile is applied to the drywall and pressed, then the next one is glued. Having completed the installation, the seams are rubbed using the usual technology, and the corners are covered with decorative elements of a color suitable for the finish.
Read more about laying tiles on drywall here.
An approximate step-by-step plan for creating a box in the toilet
Regardless of the material you choose, the initial stage will be to create a structure from wooden beams or metal profiles.
- It is necessary to make markings, taking into account that the walls of the box should be located at a distance of 5-10 centimeters from the pipes.
- The profile is attached to the walls with dowel nails, using a hammer drill for this purpose.
- After this, levels are laid off from them on the ceiling and floor, attaching them in a similar way.
- The creation of the frame is completed by attaching a corner profile, which is attached with fleas to the top and bottom, and then connected to the wall profiles using additional pieces.
- The plasterboard box is installed in the toilet using self-tapping screws or plastic panels are screwed on.
In the first case, the drywall must be marked and cut into pieces that will be used to sew up the frame. The process uses 27 mm self-tapping screws, which are screwed every 30 centimeters. Excess parts at the joints can be trimmed with a paint knife or hacksaw.
Before you make a plasterboard box in the toilet, you need to take into account that it will cost more than with panels. But its advantage is that you can choose any finishing option, including paints, wallpaper and tiles.
Recommendations
Installing a box in a bathroom requires caution and compliance with the following recommendations:
- Before installing the box, they check not only the tightness of the joints and the stability of the valves and meters, but also the correct functioning of communications, for example, a sufficient slope of the pipes.
- If the frame of the box is made of wooden beams, it is worth additionally impregnating it with a protective composition. The same procedure will be useful for wood boards.
- At the measurement stage, it is useful to take into account the location of household appliances in order to avoid unnecessary problems in the future.
Toilet with a box system Source mykaleidoscope.ru
Material requirements
The bathroom is a specific room with high humidity and high air temperatures. Based on these factors, the following requirements are imposed on the materials of the boxes:
- Water resistance. The main criterion when using a material in wet rooms is that it should not change its physical and chemical properties when exposed to water or from prolonged exposure to wet steam.
- Corrosion resistance. It is desirable that not only the covering of the box is not afraid of moisture, but also other elements of its design, for example the frame or fasteners.
- Environmentally friendly. During or during long-term operation, materials should not decompose or change their chemical characteristics with the release of harmful substances. It is desirable that the finishing coating does not contribute to the formation of fungus, mold and bacterial colonies.
- Decorative. The box should not stand out and spoil the aesthetic appearance of the bathroom; the main option for its manufacture is for imitation or the same coating as the walls. Considering that the traditional decoration of bathroom walls is ceramic tiles, the surface of most boxes should be suitable for cladding.
- Small volume. The materials from which the bathroom box is made should not take up too much space in a small room.
- Ease of care. The covering of the box should be easily and quickly washed from dirt and water stains with minimal expenditure of detergents and useful time.
- Convenient access to pipes. Almost every box is equipped with a hatch for access to the pipeline, under which an inspection, shut-off valves, metering devices, and other equipment or fittings are placed.
- Strength and reliability. The box must be durable and resistant to normal physical influences; its service life should be for any period at the owner’s discretion, and not depend on age-related changes in the material.
- Affordable price. When considering the price of engineering implementation of closing pipes, they take into account not only the materials, but also the complexity of the work performed. In many cases, it is quite possible to make a pipe box with your own hands without using special expensive tools; to implement some options you will need the help of hired specialists. It is clear that carrying out work by invited workers will cost the owner a much larger amount than installing it yourself.
Plasterboard boxes of complex shape with tiled finishing
Why don't builders hide pipes?
The bathroom is rich in all kinds of communications. Sewage pipes, hot and cold water supply, as well as additions in the form of a heated towel rail or heating system are on public display here.
This “openness” is not accidental. Even if the room is spacious enough and the layout allows, builders leave most of the pipes in sight. The reason lies in building codes that directly prohibit the hidden installation of pipes connected by certain types of fittings. For such devices, easy access in case of problems occurs.
Another reason for open installation is the formation of condensation on metal pipes with cold water. Only air constantly circulating around the pipe can effectively remove condensate.
That is why in the bathroom you can see pipes anywhere on the wall, in a corner or in a niche. They can be vertical or horizontal, running under the ceiling or near the floor. A separate class of pipes that need to be hidden are products of different diameters coming from plumbing equipment, as well as toilets with installation.
Not every pipe needs to be hidden Source izhevsk.ru
Advice from a box installation specialist
When faced with the problem of how to make a pipe box in the bathroom, it is useful to listen to the following recommendations from experts:
- The most budget-friendly option for box walls is made of PVC panels; thanks to the wide range, you can always choose products to match the coloring of the tiles or make the coating interesting from a design point of view.
- If a wooden beam is used for the frame, it is advisable to cover it with antifungal and water-repellent impregnations; similar procedures are useful for carrying out similar procedures with wood boards.
- The distance from the frame and panels to the pipe shell should not be less than 30 mm - in this case, the temperature effect of the pipeline on the materials will be at an acceptable level.
- Hatches and doors should provide convenient access to metering devices and shut-off valves. It is also important to install them in such a size that it is possible to remove and replace metering devices through the opening without the need to destroy the box with tiles.
When deciding what to make a box for pipes in a toilet from, most often they choose structures made of plasterboard with a tiled finish or plastic panels. Recently, it has become fashionable to use roller shutters, which allow for the most convenient access to the pipeline and at the same time save free space. The choice of a suitable option depends on the financial capabilities of the consumer and ranges from the most budget one with PVC sheets at a price of 100 - 200 rubles. per piece to the most expensive ones with plasterboard and tiles, roller shutters with the cost of the latter starting from 4,000 rubles. without installation.
Hatches
No less important components than the boxes themselves are the hatches that are placed in the fences for access to pipelines, fittings and metering devices.
During installation, the following types of hatches are most often used:
Factory made for tiles. They are sold in standard sizes with an opening system and a lid, the surface of which is designed for gluing and holding ceramic tiles. Typically, such hatches have a rigid hinge system that allows them to hold a high weight of ceramics and cover large areas; almost all designs are designed to be torn off by pressure.
Factory made from PVC. These are lightweight hatches, usually white with a frame and doors, great for plastic panels; they are often installed in plasterboard lined with tiles. They are usually opened by turning the doors while pressing from the side.
Rice. 10 PVC and painted steel hatches
Factory made from steel. In everyday life, hatches made of painted steel are not used very often due to their low decorative value and heavy weight (not suitable for installation in a PVC panel); they are opened through recesses in the doors.
Homemade for drywall. The most popular option for installing hatches is to make them yourself from a profile frame and a piece of drywall, onto which tiles are then glued. The tile maker can make a handle in the hatch by drilling a through hole in the tile, or they can purchase a special vacuum suction cup to open it.
From tiles. In a tiled plasterboard covering, openings can be covered directly with tiles by gluing them onto a sheet of dense material (plywood, chipboard, gypsum fiberboard) along with magnets. When installed in a profile niche, the magnets will stick to the metal frame.
You can do the opposite - if the frame is made of wooden beams, steel plates are glued to the tiles, and magnets are screwed to the sheathing. You will have to use suction cups to open tile hatches with magnetic fasteners.
Rice. 11 Homemade hatches
Design selection
There are several different ways to disguise utility lines. The most popular box designs:
- the cabinet is installed above vertical pipes and can be equipped with shelves for various small utensils and household items;
- a partition box is a fairly large structure that is installed along the entire length or height of the room. This option hides all engineering systems well, including sewer pipes, and is ideal for large premises. The box can be used when installing various plumbing elements; it hides the toilet installation well or the inlet pipes from the sink coming from the mixer. Behind the partition, shelves are installed for storing household chemicals;
- compact horizontal or vertical boxes are used in small bathrooms. The structures occupy a minimum amount of usable space.
Important! Before choosing a specific option, it is necessary to determine the dimensions of the structure and make appropriate notes on the wall.
Kinds
- Dull screen. It does not provide the opportunity to look under the bathtub. This is a capital, one-piece structure that does not have a door. Visually, such a screen is good, but in terms of functionality it has one big caveat: the impossibility of repairing the sewer system. Indeed, in the event of a leak or any other breakdown, it is impossible to get to the place where it occurred. You have to destroy the screen to get inside. And the most unpleasant thing is that the breakdown cannot be seen immediately. A water leak can ruin the interior of your bathroom and more. The ceiling of the neighbors living below will also be damaged. You will have to fork out not only for repairs in your own apartment, but also to compensate for the damage to your neighbors.
- Partially open. This type of screen is quite functional and safe. Shelves and niches where you can place detergents or anything else will be a rational solution for a small bathroom. The presence of a door provides unobstructed access to the water supply and drainage system.
- Sliding. You can create such a screen, but the process will be very complicated. Moreover, tile is not a very suitable material for it.
- Screen with a slope. A slight tilt creates a niche in the screen where you can place detergents. This type of screen is ideal for families with small children. It will be very convenient to bathe your baby.
Required Tools
To make a removable box for pipes in the toilet, you will need:
- galvanized metal profile for framing;
- dowel-nails for fixing guides on the surface of the walls;
- a laser or regular building level is used for marking work;
- Serpyanka or reinforcing tape is used to securely connect plasterboard sheets;
- stationery knife;
- a screwdriver and screws or self-tapping screws for securing finishing materials to the frame;
- perforator;
- putty and spatula;
- electric jigsaw;
- tin snips or a grinder with an abrasive disc are used to cut the guides.
How to hide communications?
The wiring in the bathroom includes pipes connected to various plumbing fixtures (bathtub, washbasin, and with a combined bathroom, to the toilet), as well as various devices and devices: valves, filters, water meters.
To prevent communication systems from being conspicuous, they are hidden using various methods.
When organizing hidden wiring, the pipes are hidden in specially cut channels in the walls. Please note that this method has many limitations.
One of them is hidden wiring. In this case, the pipes are hidden inside the walls, arranging special grooves in the latter.
True, this method is not universal, since it has a number of limitations:
- wall gating can only be carried out during a major overhaul, since in this case the complete elimination of finishing coatings and replacement of communication equipment is required;
- when installing hidden wiring, it is impossible to hide a filter, meter or other device;
- building regulations prohibit punching grooves in load-bearing structures, since they sharply reduce the strength of the walls;
- there are restrictions on the dimensional characteristics of pipes that are used for hidden wiring: their diameter should not exceed 50 mm. Therefore, this method is in no way suitable for masking a thick sewer pipe;
- This method is not suitable for risers, the appearance of which is unlikely to decorate the bathroom interior.
An alternative to hidden wiring is a combined system that involves installing a box on the surface of the walls. In this case, the pipes are placed in a specially allocated space, and the outer walls are finished in accordance with the style of the interior.
Features of boxes for heating and sewerage pipes
Boxes for pipes in the bathroom or for ventilation are made of perforated metal 1.0 mm thick according to the required dimensions. The maximum length is up to 2000 mm, then they can be composite. Perforation serves as decoration and also promotes heat transfer when closing heating pipes.
In addition to dividing the boxes into L-shaped and U-shaped, they are:
- With corners turned outward.
- With corners turned inward.
- With mesh fold.
- Combinations of these options are also possible.
With a length of more than 2000 mm, the boxes are made in composites. The joint is covered with a strip. This is a 20-30 mm strip welded onto one of the parts of the box. Having cut off part of the box, the strip will hide the cut.
The simplest way is decor
When the budget does not include repair costs, and the pipes in the toilet are quite annoying, you can get by with minimal expenses. We are talking about decorating visible parts of the pipeline.
This method can be a real salvation when the head of the family, instead of repairing, chooses other ways to spend his leisure time - for example, fishing or basketball with friends. Moreover, both women and men can handle decoration. The main thing is to have inspiration.
Remarkable imagination and free time on a day off will help turn your thoughtful office into a realistic jungle
Depending on preferences and mood, the pipeline can be disguised as anything - turned into a tree, into an animal, or decorated with beautiful decorative elements.
Main types of decoration:
- stick a film with a suitable pattern over the pipes;
- paint with waterproof paint to match the color of the walls in the toilet room;
- depict a unique pattern or reproduce a birch trunk, oak bark or other material using paints;
- use decorative stones, beads, chains, twine and other elements used for needlework.
The simplest and most convenient option is to paint the pipes with paint that harmoniously matches the color of the walls. Or stick a film with a pattern.
Image gallery
Photo from
Decorative paint, shells, beads
The pipe can be turned into a giraffe
Make a birch tree from a pipe in the toilet
Unique pattern on pipes
It is important here that the material can withstand a humid environment and high temperature if hot water enters the apartment through one of the pipes.
For the toilet room it is better to use water-based paint, choosing the most favorable shade that can harmoniously fit into the overall style of the room
The decorating method is also great for hiding pipes in the kitchen or bathroom. In addition to decorating pipes in these rooms, you can use other methods of covering communications.
We also recommend that you familiarize yourself with the best options for masking gas pipes, used by resourceful owners.
Creating a box from plasterboard
To create a decorative box from sheets of moisture-resistant plasterboard, you must follow the following step-by-step instructions:
- At the preparatory stage of work, measurements are taken on the walls at the locations of the pipes, the distances are transferred to paper, and a detailed plan for the construction of the structure is drawn up (opposite the meters and shut-off valves, a hole is provided for the installation of a hatch).
- Marking lines are applied in the bathroom on the surface of the walls and ceiling, if necessary (the minimum distance between the extreme part of the utility line and the inner surface of the box is 3 cm).
- They proceed to the construction of a frame made of galvanized profile (dowels-nails are used to fix the guides, and screws or self-tapping screws are used for fastening on wooden structures).
- In the case of installing a box for masking vertical pipes of engineering systems, first of all, a metal profile is installed along the walls, then on the ceiling. To ensure the rigidity of the structure, jumpers are installed. The box should have a minimum number of bends, this will greatly simplify installation work.
- Cut sheets of moisture-resistant plasterboard in such a way that a minimum number of joints is obtained.
- The sheets of material are secured with self-tapping screws to the previously installed frame.
- Lay serpyanka (reinforcement mesh) and apply putty on the corners of the structure and at the junctions of the sheets.
- Insert doors or an inspection hatch.
At the final stage of the work, the box is coated with a primer and finishing work begins. The structure can be painted or tiled to match the color of the walls in the bathroom.
Collapsible design
If necessary, you can make a collapsible box, which will simplify the repair of utilities. In this case, sheets of drywall are secured with screws to the edge of the frame. The finishing material in the end part is not puttied; in the future it will be covered with a metal corner. To disassemble the structure, simply remove the corners and unscrew the screws.
Tiling
To disguise utility lines, ceramic tiles must be selected according to the color and pattern of the existing finishing material. At the initial stage of work, drywall is coated with a primer, which will promote better adhesion of the base surface. Make a preliminary layout of the tiles and determine the most advantageous placement of the elements.
Now you need to prepare the glue. The solution is mixed with water according to the manufacturer's instructions. The mixture is applied to the surface using a notched trowel, after which the tiles are laid. To maintain equal gaps between adjacent elements, plastic crosses are used. The position of the ceramic tiles is adjusted with a rubber hammer and a building level.
To trim tiles, use a tile cutter or grinder with an abrasive disc. During work, it is necessary to take into account the size of the gap between the tiles. When the glue has dried, fill the seams with grout of the selected color using a rubber spatula and clean the surface of dirt.
How to make a box from plasterboard
One of the distinctive qualities of gypsum boards is the ability to create the required shape, which is very convenient for the structure of the box. Installation work can be carried out independently, and it is not necessary to have special skills. It is appropriate to use curves, rounded lines and other design options, expanding decorative possibilities.
The most common shape is considered rectangular and is much easier to assemble. Let’s look in more detail at how to make a plasterboard box to securely cover pipes, with your own hands, following step-by-step steps.
We start with the drawings, make marks on the wall in the places where the metal profile is applied, also below and along the top, using a level; it is especially convenient to work with a tool with a laser beam.
We prepare holes in the walls for fastening screws and dowel nails using a hammer drill. The pitch between fastening holes varies from 30 to 60 cm.
When working with the material, the profiles are cut with metal scissors, and the sheets can be easily cut using a construction knife or a circular saw; no difficulties arise, the main thing is to follow the installation instructions. If wooden slats are used, we trim them with a regular file.
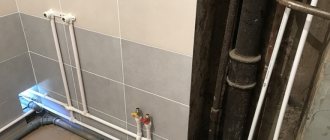
We hide the riser and water supply in the toilet.
A frame is assembled from profiles.
We fasten the profile vertically along the walls, along the ceiling and floor, a stand is installed from the same profile, which we connect with horizontal jumpers to the wall profiles, and secure with self-tapping screws or a staple gun, creating a frame.
The recommended step between horizontal jumpers is from 40 to 60; here you need to take into account that the edges of the sheets, when they are applied, fall on the profile.
It is important to design the frame so that when assembling the box, the sheets do not come into contact with the pipes or riser and have enough free space for inspections and replacement of worn elements.
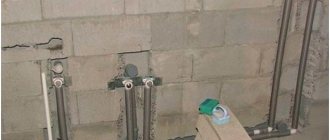
Pipe outlets are taken into account.
In the right places we leave space for pipes to exit, places for meters, and reinforce them with jumpers, places for possible windows and doors to enter the building, we also create them using profiles. Inspection hatches are purchased separately; these are finished products with a frame and a door, which are mounted in a specially prepared place.
Windows are created for inspection hatches.
Where necessary, the frame can be strengthened using a large number of jumpers between the vertical profiles, and with the help of built-in bars into the empty profile cavity.
Attaching sheets to the frame.
We lay polyurethane tape on the assembled skeleton of profiles, on the part where the sheet is placed. It will serve as a shock-absorbing layer to reduce vibrations and the building will be better protected from cracks in the joints.
Installation features
Before starting work, check the condition of the pipes. The main attention is paid to connections, especially if they are threaded; detected defects are eliminated.
Then the dimensions of the future structure are measured, taking into account that the distance between the pipes and the walls of the box cannot be made less than 3 cm. The pipe box is installed in the following sequence:
- A metal profile (wooden slats) is fixed to the walls. If wooden blocks are used, they are treated with a moisture-repellent compound.
- The front face stand is mounted.
- The metal structure is attached to the floor and ceiling. If the frame is high (exceeds 1.5 m), additional horizontal lintels are provided.
- The selected material is cut to size. The parts are secured to the frame with small self-tapping screws.
- It is highly desirable that the box has a technical hole for a hatch. If a leak occurs, you can easily fix it.
- If necessary, finishing work is carried out. Drywall, MDF and plywood can be painted or tiled. Plastic panels are beautiful in themselves and do not need additional finishing.
Making the frame Source design-homes.ru
For options for installing and decorating a plasterboard box in the toilet, see the photo.
Features of assembling a plasterboard box in the bathroom
Any home craftsman who is at least a little familiar with construction tools can assemble a plasterboard box in a toilet with his own hands.
The action plan will be like this:
- first of all, remove the old covering from the walls;
- level the walls if necessary; if the curvature is slight, this can be done by gluing drywall to tile adhesive;
- replace plumbing;
- install installation;
- make markings;
- assemble a box from profiles;
- cut and screw drywall;
- perform finishing.
There is not as much work as it might seem at first glance, and you can do it yourself in one day.
Installation of a box in the bathroom: frame assembly technology
No matter how you twist it, no matter how you move the plasterboard box from plane to plane, the technology for its manufacture remains the same - whether to sew up the risers, or to the distribution pipes passing above the floor, there is no difference. Both versions of boxes are used very often - sometimes they are even combined into a single structure, neatly fitting into the interior of the room. For clarity and a better understanding of the essence of constructing plasterboard boxes, let’s consider the technology of their manufacture using the example of a vertical box designed to hide communication pipes.
- We install ud guide profiles on the walls in one single piece from floor to ceiling. We mount them using a level, strictly observing the vertical position. Profiles need to be secured with dowels at least every half meter, or even more often. Any dowels will do, but the most optimal size is ø6mm and a length of 40-60mm. Another nuance that will need to be taken into account when deciding how to assemble a plasterboard box is the position of the profile relative to the pipes - you need to try to move them as close as possible. Here, as they say, every millimeter counts - the result of ignoring such moments can be a washbasin or some other plumbing fixture that does not fit into its place. In general, everything needs to be carefully calculated.
- We install guides on the floor and ceiling. At this stage of the installation of plasterboard boxes, it is necessary to lay a foundation that will provide the volume of this product. From the guide profiles installed on the walls at an angle of 90° to the wall, we mount a couple more sections of the guide profile so that they form an outer corner, giving the product a three-dimensional look. We install exactly the same profiles on the ceiling.
Installation of plasterboard boxes photo
We assemble a corner structure from ud guide profiles. Here you will need to twist a pair of guide profiles into a single product - they are folded together so that the shelves are positioned relative to each other at an angle of 90°. The profiles are connected using ties (metal screws ø3.5mm and 9mm long), installed every 150-200mm. It is better to cut the profiles according to the height of the room before you connect them together.
Set the angle. Everything here is as simple as two and two - we install one edge of the corner element in the floor guides, and the second in the ceiling. Just in the place where they form the outer corner. At the bottom and at the top, the corner is fixed to the guides with the same taks, the direct purpose of which is to simply and quickly attach drywall profiles to each other.
We secure the corner structure with load-bearing cd profiles. To begin with, take a tape measure and measure the distance from the wall guide to the corner element - you need to measure this size on one side and the other of the future box, and this needs to be done along the entire height. If the walls are crooked. then perhaps each of the cd profiles will have to be cut to an individual size. If the distance is approximately the same and varies within 5mm, then you can choose the average size and cut all the stiffeners according to it. When the workpiece is cut, we insert it between the wall guide and the corner on both sides of the box and securely fasten it with tacks. On each side of the stiffener it is necessary to install two tex.
We cover the frame of the drywall box. This is the final stage of making a box in the bathroom with your own hands and it looks quite simple. First, we cut the plaster into strips of the appropriate width and length. Then we screw on the first one - this is the one on which the inspection hatch will be installed for access to the taps that shut off the apartment’s water supply. When the drywall is screwed in, you will immediately need to cut a hole for the inspection hatch - as long as the other side is not covered with plaster, this is quite easy to do with high precision. After preliminary marking, the hole is simply cut out with a small hacksaw - you need to be careful not to damage the pipes.
Ready-made solutions for DIY installation ↑
After counting the points where it is necessary to install rotary wells, the type of container is selected. Manufacturers offer a sufficient number of ready-made structures of different sizes. The main materials from which sewage tanks are made:
Reinforced concrete.
Fiberglass.
Polypropylene, polyethylene.
Polypropylene rotary wells
For home sewage systems, rotary wells are made from composite and polymer materials. Designs of different configurations, with the possibility of selecting a finished product with full preparation for pipe routing.
Holes for tapping are made in sizes equal to standard pipe diameters
If the container is intended for both inspection and repair, select a tank with a larger diameter. The height of finished products varies. In non-standard conditions, prefabricated plastic structures with fasteners for installing rings are used.
Polyethylene wells are multilayer products made using seamless technology. The material is sealed, but quite soft: in hard rocks with a lot of stones, an empty tank can deform under soil pressure.
Factory rotary wells with splitters
Polypropylene wells are highly durable and can be installed in any conditions. The construction is welded. The walls are made with stiffeners.
Plastic container with a sealed hatch
Fiberglass products are used when working at great depths, in complex rocks, and in soils with high year-round groundwater levels. Heavy-duty walls can withstand increased loads. Such wells are installed at the junctions of branches of central sewer mains.
Composite Swivel Tank
Advantages of polymer products:
Low price.
Light weight.
Easy to transport and install.
Finished rings made of reinforced concrete are installed as reinforced rotary control wells. Products with particularly low wall permeability are chosen - such concrete does not allow groundwater to pass into the container.
Standard ring sizes
Structures of varying levels of complexity are assembled from reinforced concrete parts. Main parts for assembling a rotary well:
A plate up to 20 cm thick to protect the wiring. Select the product according to the turning diameter.
Rings: factory products with locks are connected to each other until the required height is achieved. When ordering individually, manufacturers can make holes for the entry and exit of pipes according to the drawing.
Necks and ceilings with lids. The neck is equipped with a ladder and a hatch cover.
Parts for assembling a reinforced concrete tank
A screen for communications or how to make plasterboard boxes in the bathroom
After completing the renovation in the bathroom, one final detail remains - a screen under the plasterboard bathtub. Most often it performs a decorative function. You can do it yourself or buy a ready-made and assembled screen in a store.
The finished box in the bathroom has a limited service life. This product quickly breaks down. In addition, among the range of ready-made designs, it is difficult to choose a screen whose design fully supports the appearance of the bathroom.
Bathtub with tiled screen
Making such a design with your own hands, of course, is not easy, but it is much more practical and profitable. And the service life of a bathtub screen made with your own hands from plasterboard significantly exceeds the service life of using store-bought products.
Advantages of hiding communications under a box
When decorating bathrooms, boxes are now often used to hide several or all pipes. Such elements not only allow you to create a beautiful design, but also have a number of advantages.
These include:
- Attractive appearance. When made from high-quality materials, a cabinet for masking pipes will not stand out against the general background or spoil the interior.
- Easy to assemble. The structure can be assembled not only at the rough finishing stage. Often pipes are sewn up during a bathroom refurbishment. Frame and sheathing elements can be installed on top of the cladding.
- Possibility of pipeline maintenance or repair. If the box is equipped with a hatch, you can find out the readings of metering devices and monitor the condition of the pipes. If necessary, water supply or sewerage elements are replaced.
- Possibility of combination with shelves, installations and other interior details. This allows you to effectively use the space of a small bathroom.
Creating a box from plastic panels
The construction of a box made of plastic panels is carried out using the same technology. First, marking lines are applied on the walls of the room. After this, they begin to install the U-shaped and corner profile. When the frame is installed, measurements are taken, plastic is cut, and panels are inserted into the frame. Plastic products do not require additional processing; they are perfectly resistant to moisture.
Instructions for building a box from plastic panels
Let's take a step-by-step look at how to make a box from plastic panels:
- Make markings for the box. How to do this, see above, in the instructions for plasterboard construction.
- Install the profile box. It can be made the same as for drywall, or you can dispense with the front edge.
- Prepare plastic panels according to the dimensions of the structure.
- Using silicone, glue the panels to the profile.
- Glue the corner between the panels using silicone.
Two frame covering options
Elements of finishing material should be connected to the base. Let's look at the most common options, each of which has its own characteristics.
Working with PVC panels
This is one of the easiest ways to disguise pipes.
The box made of plastic panels has a collapsible design. If necessary, you can remove a loose part to gain access to pipes and other communication elements
Instructions for implementation:
- Install the starting profile, carefully securing it using small self-tapping screws on the installed guide part. Measure a strip of plastic panel of the required size, then cut it with a knife.
- Fix one panel in the starting profile, fasten the other to the corner profile, after which the latter is installed to another plane of the box. For fastening, you can use “fleas” (small self-tapping screws).
- The second side of the box is assembled using a similar method, while the starting profile is fixed and secured on the last plastic panel, which is most easily done using silicone sealant.
- In places where it is necessary to provide access to important communication elements (taps, joints, meters), it is important to cut inspection holes on which special hatches are secured (with sealant or other means).
- At the end of the work, plastic skirting boards should be installed at the joints of the panels with the floor, walls, and ceiling.
To quickly disassemble a plastic box, it is important to remember which side the loose panel remains on. If necessary, this element is pulled as far as possible to the side, and then taken and removed.
After inspection of pipes or repair work, the integrity of the structure is restored using the same method: the corner of the panel is pulled back, after which it is returned to its place.
Working with GVKL slabs
Installation of plasterboard construction is also quite easy.
Boxes covered with sheets of moisture-resistant plasterboard can additionally be decorated with other finishing materials: paint, wallpaper, decorative plaster, ceramic tiles
Procedure:
- First of all, you should correctly cut the gypsum fiber board sheets in accordance with the calculated dimensions. To do this, they need to be placed on a flat surface, marked with a tape measure and small cuts made on the surface.
- The notches need to be aligned with a metal ruler or long lath, and then the surfaces should be cut with a construction knife. Along the drawn line, break the plasterboard sheet, if necessary, trim the edge with a knife.
- Blocks prepared in this way are attached to the frame using self-tapping screws. In this case, the sheets are pressed as tightly as possible against the profiles, and the screws are screwed first into the drywall and then into the metal guides.
- It is important to ensure that the caps of the fasteners are screwed on the surface line or even below, which is especially important if you plan to further finish the box with tiles. To prevent cracks from appearing on the gypsum board panels, it is important to screw in the screws at a distance of 20-30 mm from the edges.
Having completed the installation, it is important to prepare the structure for subsequent finishing work. To do this, joints and junctions with horizontal surfaces are treated with sealants to create a dense protective layer.
After this, the surface is covered with putty, covering the fasteners. You can strengthen the fastenings by installing perforated corners on the internal and external corners of the parts. Having finished the work and having dried the structure well, you can begin gluing tiles or performing other finishing work.
Options for utility access doors
It is imperative to leave yourself the opportunity to access meters, pipe connections and taps. To do this, you will need a door or several opposite these elements. You can buy it (hatch, blinds, built-in door) or make it. If you make the door yourself, make it from the same material as the rest of the structure. It should be decorated in the same way as the box itself. To make it convenient to use, glue or screw a small furniture handle (these are usually installed on kitchen units). To prevent the door from opening spontaneously, it must be equipped with magnets. You can make an invisible door. How it is mounted is shown in the video below.
Hiding pipes in walls
This method may seem the most suitable. They made a groove in the wall, strengthened the communications there, sealed them with mortar and forgot about them. It’s beautiful, good, and the wall is even, isn’t it? But what if an emergency occurs during operation and you need to hammer into the walls again and look for a leak?
In order to protect yourself from this for a long time, it is necessary to take a number of measures before walling up pipes in the wall:
- make competent and correct wiring;
- make sure the joints are tight;
- test the heating system at high pressure, much higher than operating pressure.
Moreover, the hydraulic test is recommended to be carried out over several days. And only after you make sure that the joints are dry and no other problems have arisen, you can seal the pipes into the wall with cement-sand mortar.
At the same time, do not forget that when fixing heating and water supply pipes in the groove, it is necessary to leave space for their compensatory expansions.
Plasterboard boxes
Installation of a plasterboard box
Plasterboard pipe boxes are used everywhere today due to the remarkable ability of this material to be easily cut, bent in any direction and installed. And the cost of gypsum board sheets is affordable to almost everyone.
What is needed to hide communications in such structures? The first thing you need to do is make a drawing of the future box, marking on it where the pipeline control points will be located - in these places you will need to install windows with doors. Having calculated the amount of material, you can begin building the box.
It is better to make the frame for it from metal profiles. Wooden blocks tend to change their geometry under the influence of dampness or dry air, which often happens in rooms such as a bathroom or toilet.
But this is where b o
most of the communications. Due to dampness, fungus can form on the wooden elements of the frame, which will destroy the entire structure of the decorative box.
The advantage of this method of masking pipes is that:
- You can do all the work yourself;
- at any time you can dismantle the sheets of drywall without much effort and put them back in place;
- Unlike walling up, there is the possibility of access to communications in the wall.
Plastic panels
This method is suitable for rooms such as a kitchen, bathroom or toilet. Plastic products are easy to clean, which is an important condition when choosing a material for decorating pipes.
A wide variety of plastic wall panels in texture and color have made these materials in demand and popular. The construction of a box from plastic panels is carried out according to the same principle as plasterboard structures.
Overhead decorative screens
Decorative panel for pipe and battery
Today, there are a wide variety of screens for radiators and pipes on sale, which will not only disguise the unsightly appearance of communications, but also decorate the interior of the room.
By connecting pipe covers with battery screens, you can get shelves and tables. They will protect children from injury as a result of accidental contact with these communication elements.
False wall
This design is performed when it is necessary to hide the vertical risers found in each apartment of a multi-story building.
A false wall is erected like any other plasterboard box. This method will slightly reduce the living space, but if you use your imagination, you can arrange niches for books or something else in this design.
Decoration of risers
Here the imagination of designers is limitless. You can make a vertical box and lighting. You can use the riser as a stand for decorative flower arrangements. It all depends on your desire and capabilities.
Useful tips
If water pipes are hidden, some nuances should be taken into account. The frame is assembled using the method described above, but in this case we take into account the fact that condensation from the temperature difference collects on the pipes.
We will describe additional measures to protect materials from the harmful effects of water.
- First, we use only moisture-resistant drywall.
- We maintain the required distance at the joints between the drywall and the floor and can be coated with additional putty and adhesive solution.
- The inner surface of the sheets can be treated with a waterproofing compound.
- Coat the pipes with waterproofing and insulate them.
- The sheet should not touch the pipe and the distance between us should be at least 3 cm.
Auxiliary techniques will create additional protection for the material from exposure to water and increase the service life of your structure. Moisture-resistant drywall is a suitable material for use in damp rooms, is easy to use, and has a lot of positive reviews. It is widely used in all types of construction, in any premises and, if installed correctly, has no negative aspects.
Types of utility wiring
Before designing the wiring, you should become familiar with what types of such structures exist. There are only three of them. Moreover, one, with pass-through sockets, is practically not used. Therefore, we will not consider it.
Type #1. Serial type wiring
To implement this, taps are made from the cold and hot water supply risers leading to the first consumer. Pipes are laid from it to the second and further. Each water collection point is equipped with a tee, to one of the outlets of which the consumer is connected.
Overall this is a very simple scheme. It can only be used where the number of water consumers is small.
This is due to the fact that if several water collection points are activated simultaneously, the pressure in them will weaken and may be insufficient for the correct operation of the equipment. This is the main disadvantage of series wiring.
However, for apartments with one bathroom and a small amount of plumbing used, this may be the best option. A significant drawback of the system is the inability to turn off one of the plumbing fixtures for replacement or repair.
Serial wiring is extremely simple to implement, but not very convenient to use. However, for small bathrooms this solution may be quite acceptable.
There are many more advantages to sequential wiring. First of all, it is simplicity in design and installation. There will be no complex schemes here, everything is done very simply.
In addition, such wiring is considered the most economical option. The consumption of pipes and other elements will be significantly lower than in other systems, and installation costs are also minimal.
Even a novice plumber can handle the design and subsequent installation of sequential, otherwise tee, wiring
Type #2. Collector type of wiring
The collector type scheme involves connecting each of the consumers to the main line. For this, a special element is used, which is called a collector - a device that distributes water flows.
In a more complex version, and this is best, each collector outlet is equipped with a shut-off valve. Collector-type wiring can be considered the most convenient option to use. There are several reasons for this.
Firstly, the absence of pressure drops in the system. All consumers receive equally good water pressure, even if all water points operate simultaneously.
If the pressure in the system of an apartment or private house is too low for some reason, you can temporarily limit the water supply to one of the consumers, for example, to the toilet, thereby increasing the pressure for others.
The collector type of wiring is more convenient to use than the serial type. In this case, a separate line goes to each consumer, which guarantees no problems with pressure. However, such a system turns out to be more complex in design and installation.
Secondly, the ability to disconnect plumbing fixtures from the water supply if they need replacement or repair.
Thirdly, reliability. In fact, a single pipe goes to each consumer, without any connections or other elements. A leak can only appear in the collector area or near the device itself. Here it will be very easy to find. For this reason, pipes with manifold wiring can be safely installed using a hidden method.
Fourthly, ease of use. If there is a problem with a plumbing fixture and a leak appears, for example, at a faucet, you do not need to crawl under the sink. It is enough to close the shut-off valve on the manifold leading to the faulty device and wait for the specialists to arrive.
Even a woman or child unfamiliar with plumbing can do this. At the same time, all other equipment will work properly.
Professionals recommend using manifolds with shut-off valves for installation in water supply systems. With their help, if necessary, you can easily stop the water supply to a branch or plumbing fixture in need of repair.
However, collector wiring also has some disadvantages. First of all, it will cost the owner more than a sequential circuit. This is due to the fact that it will be necessary to lay a branch to each consumer. This will take a lot more material.
In addition, the installation of manifolds and shut-off valves will be required if the distributors are not equipped with them. And the circuit itself will be much more complicated than a sequential one.
Frequent errors and problems during assembly and installation
- The dimensions of the box and its marking on the base structures were incorrectly calculated, which can lead to damage to the pipes during its installation.
- The location of the sheathing material and frame elements is too close (less than 3 cm) to the pipes, which leads to their excessive heating and deformation.
- The casing is made entirely of monolithic material, which does not allow warm air to circulate freely. A lattice insert must be installed in it.
- Lack of hatch for inspection of shut-off and control valves.
Preparing to install a masking box
At the preparatory stage the following actions are performed:
- Assess the condition of pipes, fittings, metering devices, and other communication elements. When laying a new pipeline, make as few connections as possible. All joints must be treated with sealant.
- Drawing up a diagram. You need to choose the option that is most suitable for the bathroom. They take the necessary measurements and make a drawing. At the same time, they provide for the presence of a hatch in the places where plumbing fixtures are installed - meters, valves.
- Calculation of the quantity of materials. Determine the dimensions of the future structure by counting the number of frame elements, sheathing and cladding.