- 853
- 04-11-2021
- Author: Mysekret Team
- 0
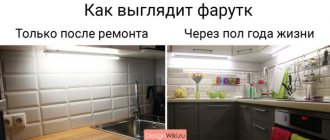
When renovating a kitchen, many people mistakenly believe that the main task is to choose stylish furniture and high-quality household appliances. In fact, the equipment is hidden behind cabinets that look like a single canvas. So what does the eye catch? Of course, for the apron.
A kitchen backsplash is a covering for the walls between the top and bottom rows of cabinets. It performs two important functions:
- protective, as it separates the walls from the work area;
- aesthetic, as it is an open area and attracts attention.
Advantages and disadvantages
Glass aprons have become a fashionable interior detail due to the following consumer qualities:
- Strength. Glass panels are resistant to damage as they are made of tempered glass.
- Wear resistance and, as a result, long service life. The glass of the apron has increased resistance to high temperatures and mechanical loads (accidental impacts).
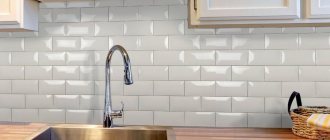
- Easy to care for. The apron has no seams between the tiles. Dirt is removed with water and standard detergents.
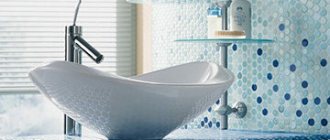
- Hygiene. The smooth, non-porous glass surface is unable to absorb water and grease, and therefore does not create an environment for the development of bacteria.
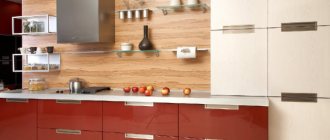
- Design possibilities. A glass apron reflects light and visually enlarges the space. It is possible to choose a finish of any color; color rendering is always impeccable.
There are no seams between the tiles Source ideasonthemove.com
People make a choice in favor of a kitchen apron, being aware of its shortcomings:
- Price. A product made of high-quality tempered glass always costs more than plastic or ceramics. But plastic can be deformed from strong heat, and the seams in a ceramic apron can become a breeding ground for mold.
- Difficult to install. Sometimes delivery and installation are complicated by the design of the corner kitchen skin. This apron must be installed by a specialist.
- Limitations of care. Glass kitchen aprons should not be cleaned with abrasives. The abrasive will not damage the pattern under the surface, but will reduce the transparency of the glass.
Reliable and beautiful Source seoceros.com
Window
Installing a window in place of a kitchen apron in a private home will give the kitchen a unique style and add more light. Window installation is associated with some difficulties, and therefore requires extreme precision and caution from the master.
It is important that the window opening is at the same level as the tabletop, and also does not rise too high, because cabinets are supposed to be hung above it. Users who have a window instead of an apron appreciate this option for its originality, convenience, and easy care. Not suitable for those who like privacy.
Which glass is suitable for an apron?
The kitchen work area is subject to significant (and sometimes unexpected) loads, so for reasons of durability and safety, tempered glass (Stalinite) is preferred. It is recommended to install an apron made of heat-resistant stalinite (7-10 times stronger than ordinary glass) near the stove.
A very strong blow can break tempered glass. At the same time, it will break into small fragments with blunt edges that are not capable of causing serious problems. Understanding the importance of the question of what kind of glass a kitchen apron is made from, most companies use glass 6-8 mm thick. There are other types of glass for kitchen skins:
- Triplex. The material consists of two layers of silicate or tempered glass, bonded with a polymer film. Thanks to this layer, upon impact, the apron does not break into fragments, but becomes covered with cracks. At the request of the customer, the film is made transparent or decorative (with a pattern). In the kitchen, triplex skins are not often found due to the high cost of the material and the complexity of installation (difficulties with installing roof rails and cutouts for sockets).
Bright poppies for a good mood Source opora-stroy.ru
- Plexiglas. The name hides acrylic - a plastic that can be tinted and painted. The material is environmentally friendly, durable and lightweight (weighs 2 times less than glass), but it is prohibited to install it behind the hob. When heated above 80°, it begins to deform.
- Polycarbonate. It is distinguished by its budget cost and durability. The only drawback is that under the influence of ultraviolet radiation it becomes cloudy, turns yellow and becomes brittle. It is better to choose a brand that contains UV stabilizers.
Made from plexiglass Source innofashion.ru
When choosing a material for an apron, you need to take into account the fact that tempered glass comes in two types:
- Float glass (M1, display case). It seems absolutely transparent, but in thickness it acquires a pronounced greenish “bottle” tint. The effect does not appear on an apron with bright, saturated colors. But, if a landscape or still life is made in light colors (or on a light background), a greenish tint can negate all the beauty.
- Lightened (bleached, Optiwhite). Glass from which all iron oxides, which give a greenish tint, have been chemically removed. It acquires special transparency and is suitable for skinnals in pastel colors. The only disadvantage of the material is its price, 30% more expensive than usual.
Float glass is suitable for this range Source mekskinali.ru
See also: Catalog of companies that specialize in the development and implementation of interior redevelopment of a private house
Floor materials instead of tiles in the kitchen
When creating a functional and original design for a kitchen backsplash without tiles, you don’t have to limit yourself to just the food preparation area. There are alternative options for flooring. Instead of tiles in the kitchen, you can use other materials, both modern and traditional.
Laminate
The material is a multilayer coating, which is based on fiberboard or chipboard, and on top there is a polymer film, between them there is paper impregnated with synthetic resins. The middle layer will imitate stone, parquet, porcelain stoneware or any other texture. Available in the form of separate slabs, which will be laid with locking or adhesive fixation. There are several classes of laminate in terms of resistance to wear, and number 23 is suitable for the kitchen. Among the advantages, it is worth highlighting strength (since the material is able to withstand high mechanical loads), comfort and warmth, design that is suitable for all styles and the possibility of self-installation. The disadvantages are that the material deteriorates when water gets into the seams, the floor must be prepared in advance, and damaged boards cannot be repaired (a fragment must be replaced).
PVC tiles
The finishing coating is available in the form of modules with different shades (patterned or plain). After installation, you can get the floor covering. It differs in strength and thickness; in the kitchen it is better to use class 32-42. Among the advantages, we highlight resistance to water, temperature changes and wear, the ability to install on a heated floor system, ease of maintenance, low cost (with the exception of materials with quartz additives), good sound insulation and the possibility of self-installation. The downside is fading in the sun, as well as the fact that heavy furniture leaves dents (this is extremely important for those who like to reinstall in the kitchen).
Linoleum
At first, the material was natural and was made on the basis of linseed oil and jute, but now the PVC version of linoleum has become widespread. The characteristics of the coating are very similar to the previous version of the material. In terms of color, it is an imitation of parquet, ceramic tiles, laminate or natural stone. Among the advantages, we highlight low cost, strength, moisture resistance, practicality, variety of colors and elasticity. Disadvantages include sensitivity to fats and chemical active substances, susceptibility to deformation due to heat, as well as fading in the sun and brittleness due to frost.
Self-leveling floors
A monolithic coating system is created as follows: first we make the base, then lay the image, and then fill everything with a special composition based on polyurethane or epoxy resin. Among the advantages, we highlight durability, strength, resistance to moisture, as well as the possibility of installation on top of a “warm floor” system, and the disadvantages are that the help of professionals is required and the high cost.
Cork floors
They are produced in the form of slabs, which are the same in size as laminate or PVC. The coating itself is natural (made from cork tree bark). The material can be laid using the locking or adhesive method; it is afraid of water, so the top of the panels is coated with varnish (water-dispersed or acrylic). The advantages include aesthetics, environmental friendliness, softness and comfort, resistance to temperature, ultraviolet rays and mechanical loads, heat and sound insulation, ease of installation and durability. Their disadvantage is poor water tolerance, dents remain from furniture with thin legs and heels, and high cost.
Wooden floor
This type of coating includes parquet boards, and wood of different species, natural or tinted shades is used. The material is coated with several layers of varnish on top. This material is great for a living room, where water rarely gets on the floor, but for the kitchen it is better to use linoleum or laminate. Among the advantages of wood flooring, we highlight environmental friendliness, durability, aesthetics and thermal insulation. Disadvantages include fire hazard, high cost, complexity of installation and instability to moisture.
Varieties of design
The glass panel can have different designs and is made in the following ways:
- Budget option: without color or pattern. A transparent apron without a color pattern is chosen to protect a wall covered with paint or wallpaper from splashes. If you don't like the smooth glass surface, it can be sandblasted or chemically etched. The result will be satin (frosted) glass.
Transparent protection Source insideakwaibom.com
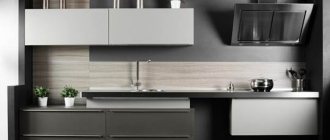
- Made from plain colored glass. The laconic monochromatic surface has a stylish look and can serve as an accent in the kitchen design. Light shades will add volume, bright shades will add a note of cheerfulness to the atmosphere, and contrasting shades will tie together interior details and accessories. It’s nice that you can choose almost any color - the palette of available shades is inexhaustible.
Single-color tinting Source c-di.kiev.ua
- Stemalite (or enamel, enameled glass). A layer of opaque ceramic paint is applied to one side of the tempered glass. The paint is burned into the glass surface and becomes an inseparable part of it. The enamel is applied to transparent or tinted glass, thereby achieving various decorative effects. The stomalite layer is reliable and durable, it is difficult to damage even with a knife.
Enameled glass Source hdinterior.ru
- With photo printing. A full-color image is applied to the back of the glass surface using a UV printer. The drawing looks bright and as realistic as possible, which is why photo printing is the leader in popularity. The panel with photo printing is durable: the UV layer does not fade, is not afraid of moisture and can withstand heating up to 120°. The panel with a 3D effect looks impressive, but such pleasure is more expensive.
Drawing made using photo printing Source 2gis.ru
- With vinyl film. A budget option for designing a work area. The design is printed on clear vinyl self-adhesive and then rolled onto the inner surface of the skin. The decorative film is protected from moisture and temperature changes, but there is a non-zero chance that over time it will begin to fade and peel off.
The film is reliably protected by glass Source dekor-td.ru
- Mirror apron. Glass for a kitchen backsplash with a mirror layer is valuable because it creates the illusion of enlarging the room. To make the work area look like a single whole, it is important to cover the entire surface with a mirror. If you do this only on part of the wall (for example, just above the sink or near the stove), the effect will disappear, the space will look “cut up”.
The best way to increase space Source el.decoratex.biz
- Illuminated with LED strip. Whatever the material and image of the apron, properly selected lighting will enhance its decorative effect. There is a second plus: the working surface will be illuminated by the main and reflected light, significantly saving electricity. The tape is attached around the perimeter of the panel, less often inside. LED RGB strips can change color, which increases their design capabilities.
With lighting Source forum.leroymerlin.pl
See also: Catalog of companies that specialize in completing unfinished houses
Other non-standard ideas
You don’t have to limit yourself to the examples described, and you can add some flair to the design, even if you make a design that is less traditional.
The area between the cabinets and the worktop will be filled with:
Wine corks (they should be cut lengthwise or crosswise, into circles and laid out in different patterns).- Beer caps.
- Pebbles.
- Shards of broken dishes.
- Remains of a parquet board.
- Disks.
- Cereal panel.
Typically the material is attached in one of two ways:
- Glued onto a sheet of chipboard, which is moisture resistant, and screwed.
- Place on mortars (this applies to dishes, stones, etc.).
It is best to use clear glass in the food preparation area. The panel will cover the apron from grease and water, but will nevertheless allow you to admire the incredible decorations of the kitchen space. A rather interesting and alternative option are vinyl stickers, which can be bought at any hardware store, hypermarket, or ordered online. Various designs - color or black and white drawings, patterns.
Interestingly, a panel is usually used as a base (for example, a sheet of moisture-resistant chipboard or MDF). It is mounted on the wall, and the decor is attached to the top. You can easily change it as soon as you get tired of it.
Selection principle
When choosing the color of the skin, the following features of color perception are taken into account:
- Pastel and neutral shades are a must for a small or windowless kitchen. The best solution would be a combination of a glossy finish and LED illumination of the work area.
- If the room design has enough bright, saturated colors (walls, textiles, countertops, cabinet fronts), a light apron will help balance the palette. A monochrome pattern can also serve as balance.
- You should be careful with patterns in acid colors, although in some styles (high-tech) it looks organic. A bright color diluted with white is acceptable for a modern interior, provided it is supported by details: dishes, textiles, fittings.
Contrast solution Source vachtamkinhhagia.com
Other replacement options
Today, different types of coatings are used:
- mosaic, the market offers ceramic, glass, plastic cladding elements, their properties are similar to the previously discussed panels made of the same materials;
- cork covering, in this case the kitchen walls are decorated with bottle caps;
- natural stone is the most preferred option, due to its long service life, moisture resistance, resistance to mechanical damage, high temperatures, and chemicals.
The last option is more expensive, so it is not used as often, despite its excellent characteristics.
Skins in different interiors: choosing a pattern
The image plays an important role in the perception of the kitchen, so it is chosen as carefully as the color scheme. Popular themes include the following:
- With macro effect. These may include birds, wild plants, fruits and vegetables. Pictures with culinary themes look excellent: coffee beans, kitchen utensils, a scattering of spices.
With macro effect Source minsk.deal.by
- With the effect of a false window. An image of a deserted beach, sea surface or a view of a night metropolis will visually enlarge the space.
With a view of the city Source stroimbistro.ucoz.ru
- Abstractions. The image of avant-garde geometric shapes, mesmerizing recursion or soothing expressionist motifs suits the role of interior accent like nothing else.
Abstract motifs Source fishki.net
The popularity of flower images lies in their unsurpassed ability to create a comfortable atmosphere. The type of colors is chosen in accordance with the style of the kitchen:
- Orchids. A universal image that is suitable for both classic and modern interiors. The pattern of luxurious colors will favorably emphasize both the refined range of modernism and the strict palette of high-tech. When choosing, preference should be given to large designs: the exquisite form of an orchid in a small design will lose half of its attractiveness.
Universal design Source glass-store.ru
- Wildflowers. Chamomiles, dandelions and cornflowers are a good choice for a rustic style. For a Provence-style kitchen, the best option would be an apron with a picture of lavender, perhaps in combination with household utensils.
In Provence style Source a-house.by
- Spring flowers. For a kitchen in the Art Nouveau (and Mediterranean) style, romantic images of daffodils, lilies of the valley or tulips are suitable.
- Stylized flowers. For strict minimalism and ascetic hi-tech, a pattern in retro style, in monochrome, blurred (with a rain effect) is suitable.
Spring freshness Source keraton.spb.ru
Images of the underwater world, cities, landscapes and still lifes are selected taking into account the color palette of the kitchen. To make the design of the skinali an accent, choose a color for it that is opposite to the color of the surrounding pieces of furniture. If you want to install a wall panel in the color of the countertop and furniture, transfer the accent to the rest of the furniture - make it a shade or two darker.
Plain wall panels are favorites of urban styles: minimalism, hi-tech, loft, techno, but they are also successfully used to decorate classic kitchens. The color of a plain kitchen apron is chosen to contrast with the countertop and furniture.
In the spirit of minimalism Source kitchenonline.ru
Slate
Painting a kitchen apron with black chalk paint is not only a practical, but also an original option. The wall will be easy to clean, since chalkboard paint is resistant to long-term external influences. You can draw on the apron, leave notes, write menus and recipes.
Before painting, the surface must be leveled. The composition should be applied in three layers to achieve an even coating. One liter is enough to cover a two-meter apron in two layers.
There are many ways to design a kitchen apron - they all have their advantages and disadvantages. Before choosing a material, you should consider your financial capabilities, as well as cooking methods and the availability of a dishwasher. People who rarely use the sink and stove can not worry about the performance properties of the apron and show their imagination without limiting themselves.
Backlight
The use of transparent materials as a kitchen apron provides ample opportunities for using various options for illuminating the work surface. Special glass panels are produced (usually triplex with significant thickness) with built-in lighting from LED strips. This lighting is mounted in a rigid box on the upper or lower end of the apron.
Built-in LED backlight option:
You can also make LED lighting yourself by gluing an LED strip to the bottom of the hanging cabinets in the kitchen close to the apron. There will not be much difference in effectiveness, and the efficiency of lighting the work area will increase significantly. The only condition is to use LED strip with external silicone protection to prevent contamination and damage.
Installing an LED strip near the apron:
Tree
alternative to tiles in the kitchen
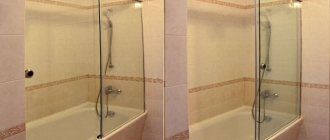
An alternative to tiles in the kitchen is wood. If this idea does not scare you, then remember the most fashionable compositions of bathrooms - in them it is wood that plays the first violin. If wood works well in the bathroom, why shouldn't it be in the kitchen? Although the specifics of these rooms differ significantly, wood is still a good solution in any case.
For the walls in the kitchen, you first need to choose suitable wall panels. You should bet on hardwood such as oak. However, if you are worried that wood will not cope, you can opt for laminated wall panels. Their design resembles natural material, and the film protects against stubborn stains.
How to choose the right glass apron for the kitchen - advice from professionals
In order for the kitchen apron to last as long as possible and not lose all its quality and external characteristics, you should carefully consider the choice of material.
Designers advise following some basic rules:
- You should opt for tempered glass, which is characterized by increased strength. If you accidentally hit it with a heavy frying pan, such glass will definitely survive.
- When choosing a material, be sure to take into account the overall style of the room. The kitchen apron should be in harmony with it and emphasize the attractiveness of the kitchen.
- If the apron will be installed above the hob, it is necessary to purchase glass that can withstand high temperatures - for example, stalinite.
- If there is a lot of daylight in the room, you should not use polycarbonate for arranging a kitchen apron, which is afraid of ultraviolet radiation and will very soon turn yellow in direct sunlight.
- Before making a purchase, it is necessary to take all measurements so that the glass sheet exactly fits the dimensions of the future kitchen apron.
- If you do not have confidence in your own abilities, or lack relevant experience or knowledge, then glass installation should be entrusted to specialists.
Glass is an excellent material that is a good alternative to many expensive finishing materials. It is not only not inferior to them in its technical parameters, but often even surpasses them in many important points. A glass apron is an excellent choice for people who keep up with the times!
Wall requirements
It is better to remove wallpaper and other old finishes, smooth out uneven areas with strong putty, then dry.
In order to assess the evenness of the wall, if possible, apply finishing material to it and see if there are any bends or dips.
If they are not there, you can start gluing the apron. Otherwise, you will have to level the surface, or at least add leveling pads - plastic, cardboard, hardboard, etc. - to problem areas. - and only then glue the trim.
Installation of the apron is the final stage of finishing the kitchen, so by this time all construction, electrical and finishing work must be completed. Take care of installing electrical wiring, sockets, switches, and connecting household electrical appliances.
Step-by-step DIY installation instructions
Installation on your own will not take much time, and you will need the simplest tools.
List of required materials and tools
A general list of what may be required in the work:
- screwdriver;
- hacksaw;
- perforator;
- stationery knife;
- roulette;
- liquid nails or glue;
- dowels;
- level;
- self-tapping screws;
- putty knife;
- primer;
- pencil or marker.
Preparation
At the initial stage, you need to perform preparatory work:
- Dismantle the old covering.
- Apply primer.
- Level the wall with plaster.
Installation of the structure
First you need to calculate the dimensions of the sheet that will be used. They directly depend on the design of the kitchen, the location of the hood, etc. It is necessary to measure all distances: from the edges, between sockets, to devices.
The apron should extend beyond the tabletop by 2-3 cm. You also need to cut holes for the sockets, this is done with a stationery knife. Further actions depend on the chosen mounting method.
When gluing the apron, the algorithm is as follows:
- Mark the upper and lower boundaries of the product on the wall.
- Apply glue or liquid nails in thin lines to the wall or splashback.
- Press the product firmly against the wall, especially at the edges and in the center.
- Cover the cuts with decorative skirting boards and disguise the joints.
Installation algorithm using self-tapping screws:
- Mark the surface, indicate the places of fastenings on the wall, on the product.
- Make holes for the dowels and insert them.
- Remove dust generated during the process.
- Place the sheet against the wall, secure it with self-tapping screws using a screwdriver.
- Attach plugs to disguise fasteners.