Among the various types of tiles, of which there are a great many, mosaic tiles stand out in a special way.
It provides the designer with a much wider range of possibilities than any other.
The presented material will discuss how mosaic tiles are selected for the bathroom and how they are glued.
General properties
An excellent decoration option would be a mosaic for the kitchen apron. The mosaic canvas consists of individual bright fragments, which is a significant advantage over ordinary tiles.
Various materials are used in production, from mother-of-pearl to natural stone. Therefore, mosaics are easy to match to any style of kitchen - from country to high-tech.
All kinds of shades, interspersed in abundance in the mosaic, allow you to combine together all the colors present in the kitchen. At the same time, it produces a hard and fire-resistant fabric, as a result the kitchen apron area is completely protected. There are no abrasions or minor scratches on it.
Material
As for the preparation of the material, the shells for typesetting mosaics should be sorted by size and color. Touch up something somewhere, if necessary.
The sand needs to be boiled several times (a glass or two at a time, no more) until the water underneath becomes almost transparent. Then it will need to be calcined in the oven and sifted several times through sieves with different mesh sizes to separate into fractions.
Sinks are cleaned differently. Large and dark ones - with periostracum with hydrochloric acid, using a soft brush and a mother-of-pearl scraper. Once the cleaning process is completed, the treated sinks are placed in a baking soda solution (2 tsp per 1 l). And then they soak them for several hours, periodically changing the water.
Small shells are cleaned by soaking in a vinegar solution (acid diluted with water twice), and then, if no tinting is required, the acid is neutralized with alkali and the material is washed with plenty of running water.
Toning is carried out using aniline dyes.
It is much easier to prepare material for bulk shell mosaics. There is no need to sort anything here; it will be enough to sort the shells by shade (and even then roughly). And crush more or less finely. And then simply sprinkle the crumbs in a layer over the fresh glue, evenly distributing and adjusting the resulting pattern with your fingers. The final version of individual panel fragments is pressed down with special boards.
As for the adhesive, it is better to use silicone, quick-drying, under the crumbs.
Metal mosaic
The product is made from ceramics or plastic with imitation silver or gold coating.
This is achieved thanks to a special coating of the front surface of the tile with a layer of metal. The finishing material is safe and versatile, but the metal coating itself has a limited service life.
Tiles with mirror fragments
The mosaic consists of individual mirror parts 0.5 cm thick. The tiles have high wear-resistant properties, but require more frequent maintenance. Mirror particles are produced in the form of squares or rectangles.
As a rule, they have a mirror finish, but sometimes manufacturers produce mosaics with tinted mirror fragments in small series.
Laying mosaic flooring in the bathroom
Any mosaic covering can be laid out independently. In order for it to look properly and last as long as possible, you need to adhere to some rules and listen to the recommendations shared by experienced craftsmen.
- The base for laying the mosaic must be perfectly level.
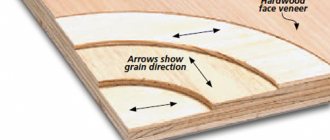
- If the mosaic is formed from individual fragments, for example, cut or broken tiles, or natural stone, then they should all have the same thickness.
- When laying an artistic panel on the floor surface, you first need to apply a schematic drawing, which is gradually filled with mosaic elements.
- Tile adhesive, as well as grout, must be prepared for work strictly according to the instructions provided by the manufacturer. Any amateur activity in these matters is not welcome. And for the process of hardening and strength gain, optimal conditions must be created, without any simplifications.
- You should not ignore the step-by-step technological instructions for laying out the mosaic covering.
Preparatory processes
Any floor covering begins with preliminary work, which consists of selecting tools and preparing the surface for finishing.
The usual set of tools for a tiler
The list of tools that will be required to prepare the surface and lay the decorative mosaic covering includes:
- Electric drill and mixer attachment.
- Spatulas - with a smooth and serrated blade.
- Needle roller.
- Trowel.
- Rubber hammer.
- Building level.
- Scissors.
- Yardstick.
- Containers for mixing solutions.
- Microfiber cloths.
Surface preparation is, in principle, the same for any type of mosaic tile. The process, it must be said, is not so fast (if the “start” is taken from a completely unprepared, uneven foundation), but it must be completed in full.
| Illustration | Brief description of the operations performed |
| The surface cleared of old coating is inspected for damage. During operation, as well as during dismantling of used cladding, cracks, chips, and areas of instability could appear in the concrete surface (subject to unconditional removal). All major defects must be repaired. | |
| To do this, the identified cracks must be widened, then primed and filled with concrete mortar, polymer or epoxy repair compounds (they harden faster). The repair material must be leveled flush with the floor surface. The same applies to large potholes. | |
| Next, the floors in the bathroom, as well as the walls around the entire perimeter of the room to a height of 100÷150 mm, must be primed with a deep penetration solution. If the work will be carried out on a smooth reinforced concrete floor slab that does not absorb water, then it is better to use “Concrete Contact” type soil. | |
| Additionally, it is recommended to first insulate the joints of the vertical surfaces of the walls and floor by applying one of the waterproofing materials to this area (for example, by gluing a special tape), and then its entire surface. This layer will not allow water to leak to lower neighbors in the event of an emergency. More detailed information about this process, as well as the materials that are used for this purpose, is given in the article “Waterproofing bathroom floors” . | |
| After the waterproofing layer has dried, a damper tape is glued to the walls, designed to compensate for the thermal expansion of the next preparatory layer. | |
| A self-leveling floor solution is poured onto the prepared surface in portions, which is distributed over the base, first with a wide spatula, and then with a needle roller on a long handle. The leveled surface must be thoroughly dried. The result should be a perfectly flat, horizontally aligned base for subsequent finishing. You can read about self-leveling compounds and the technology of their use in a special publication on our portal “Unis self-leveling floors” . |
Laying flexible mosaic tiles
Installation of flexible mosaic tiles on a mesh base can be divided into three stages, which can be carried out even by a beginner in finishing matters. This is applying glue, laying cut tiles and filling the seams with grout.
Even without experience in tiling work, with diligence, it is quite possible to cope with laying mosaic tiles.
The table below describes the workflow in more detail:
| Illustration | Brief description of the operations performed |
| The first step when tiling floors with mosaic tiles, after cutting and adjusting the material, is to mix the adhesive solution. Cement-based adhesive is quite simple to make and easy to work with, as it has a relatively long pot life after mixing. The solution is prepared strictly in the proportions specified by the manufacturer. In this case, the dry mixture is poured into water, and not vice versa. To obtain a homogeneous mass, mixing should not be done manually, but using an electric drill with a mixer attachment. | |
| Two-component epoxy-based adhesive is diluted differently. You don’t need water to mix it, but in order for the solution to be of high quality, it is necessary to strictly observe the proportions of the two components that react with each other. Due to the fact that this material has a very short shelf life after manufacturing (the manufacturer must indicate it on the packaging), mixing must be done in small portions in order to have time to process it within the specified period. The reagent is poured into the main adhesive mass and mixed with a mixer until the mixture is homogeneous. | |
| Apply the adhesive to the floor surface using a spatula with a straight blade, and then spread it with a serrated tool. The thickness of the adhesive layer should not exceed 5 mm, otherwise it will be difficult to level the surface of the tile. The adhesive should be applied only to one row of tiles being laid, otherwise it will lose its adhesive properties and the cladding will not stick well. | |
| Next, the tile is laid on the glue (a cut fragment of the mosaic is dense), leveled, and pressed well to the surface. The next tile is aligned with the first, and a joint must be created between them, equal in size to the gaps between the fragments inside the tile. It is important to combine well the horizontal gaps, which should ultimately form a single line. Otherwise, the mosaic will look ugly. | |
| The laid tiles must be additionally pressed using a trowel. When carrying out this process, special attention must be paid to the joints between the individual sheets of such flexible cladding. | |
| The leveling process should be constantly monitored using a building level, placing it on nearby glued phrases. | |
| In some cases, it is necessary to use a rubber hammer (mallet) to level the coating. They are used to gently tap the mosaic areas protruding from the overall area. | |
| Stone mosaic tiles have a fairly large thickness, sometimes reaching up to 10÷12 mm. Therefore, when laying it, the gaps between the fragments may become deformed. To solve this problem, special plastic spacer wedges are installed in the “stubborn” seams, which are removed only after the glue has hardened. | |
| When the surface is completely covered, it is left until the glue dries completely. Only after this can you proceed to the final stage of work. | |
| The next step is grouting the seams of the mosaic surface. If the floors are tiled with ceramic or glass mosaic tiles, the joints are usually filled using an elastic rubber spatula, onto which the grout mixture is collected. To fill the joints of natural stone tiles, which are thicker, the grout is made more liquid. It is poured onto the surface of the cladding, then spread with the same elastic spatula or just a trowel so that the gaps between the tile fragments, as well as the seams between them, are filled with a fugue. As a rule, the solution shrinks slightly when it dries. | |
| After the grout in the joints has set (usually 25-30 minutes is enough for this process), the cladding surface must be immediately cleaned of any mortar that has fallen on it without delay. This work must be done very carefully, since the aesthetic appearance of the coating depends on the quality of its execution. A damp microfiber cloth is good for cleaning, since, unlike a sponge, it will not lubricate the solution in the seams. In addition, the napkin covers a larger surface area at once, so cleaning it will be much faster. The grout dries quite quickly, but it is not recommended to use the lined surface before the period specified by the manufacturer. |
Natural stone mosaic floor
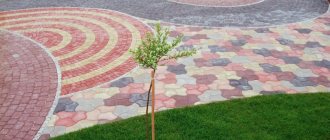
A more complex process is to cover the entire bathroom floor or just the surface of the shower stall with pebbles. But the result is an original, foot-massaging coating that, with high-quality installation, will last for decades.
Prices for flexible mosaic tiles
flexible mosaic tiles
A neat mosaic lining of the floor made of smooth pebbles looks impressive and has a good massaging healing effect on bare feet.
Mosaics made from natural pebbles can be laid out from individual stones or from specially prepared tiles consisting of a mesh, which is their base, and polished stone fragments glued to it. Naturally, laying the coating in such sheets is much easier and faster than selecting each stone separately. But sometimes the last option is the only possible one. For example, if you plan to fill a stone mosaic with a transparent epoxy mortar, giving the coating a 3D effect. Or when you conceive your own composition, which cannot be found in finished form.
| Illustration | Brief description of the operation performed |
| So, the first stage, as in the previous version of the masonry, is to apply an adhesive mass to the prepared surface, which is distributed over the base using a notched trowel. If cement-based adhesive is used for installation, it is applied under a whole row of tiles. If an epoxy composition is used, it is necessary to focus on its hardening time specified by the manufacturer. The thickness of the adhesive layer should not exceed 5 mm. | |
| A stone mosaic on a grid is laid on a distributed layer of glue. This grid usually allows some stones to be moved to the desired position if necessary. One of the tiles should be disassembled in advance into separate stones, which can be used to fill the remaining free space along the walls, as well as between two adjacent fragments. | |
| The laid tile must be pressed against the adhesive layer using a trowel so that the mesh goes deeper into the solution. The process must be controlled at the construction level. | |
| It is more difficult to place individual stones into a single composition, since they can go deeper into the glue to different depths, and this moment must be constantly kept under control. But if this particular installation option is chosen, then the glue is applied to the surface in a thicker layer so that the stones being laid can be slightly pressed into it. A thickness of 6÷7 mm will be sufficient. | |
| Having laid an area approximately 300×300 mm in size, the stones additionally need to be pressed with a trowel so that they are in the same plane. In the same way, the entire surface of the floor or shower tray is filled. | |
| After the tile adhesive has set, the gaps between the stones must be filled with epoxy grout. Since this material sets and dries quickly, the surface of the stones must be immediately cleaned of any solution that has fallen on them. | |
| In addition to the usual two-component grout, to fill the space between the stones, you can also use a transparent epoxy mixture, which is used to create 3D self-leveling floors. This option for arranging the surface will not be cheap, but it will significantly enliven the design of the room and will last for many years, as it is resistant to mechanical stress. In addition, it will perfectly cope with the function of a waterproofing layer, which, one way or another, is necessary for the bathroom. | |
| If you use tiles on a grid with colored stones to decorate the floor, which are subsequently filled with a transparent epoxy compound, you can get an aesthetically pleasing exclusive coating. |
* * * * * * *
Having studied the installation technique of different options for mosaic tiles, you can see that this process is not as complicated as it might initially seem. Therefore, it is quite possible to cover the floor with mosaics on your own, while saving quite a decent amount, which would go out of the family budget to pay for the work of an invited master.
At the end of the publication, watch the video, which demonstrates the process of laying a mosaic floor from start to finish with all the details.
Self-adhesive mosaic
On one side of the matrix of self-adhesive mosaic tiles for the kitchen there is a pattern, on the other there is an adhesive film.
All you need is a flat wall surface and a little care. If you apply the soft mosaic unevenly, it will be difficult to remove it, since it is firmly glued. In case of error, it is better to remove and glue a new plate.
Types of mosaic tiles
Previously, mosaics were made from small pieces. It was a job that required full dedication from the master. Modern mosaics are offered in the form of square plates with fitted small images.
Such plates are called a matrix. Their dimensions are 24 × 24 cm. The maximum dimensions of the matrix are 32 × 32 cm. For finishing 1 square. meter of surface you will need 9 matrices.
The elements from which the pattern is formed are called “tesserae”. They come in the following sizes:
- 1 cm x 1 cm;
- 5 cm × 5 cm;
- 10 cm× 10 cm.
Matrices are produced in the form of squares. This solution allows you to quickly calculate the amount of material. The process of laying mosaics is also much faster. Rectangular matrices are no less popular.
Tesserae are glued to polyurethane meshes, which are located on the back surface of the plate.
There is a second gluing option - paper-based fixation. In this case, the paper is glued to the front side of the mosaic tile and removed after grouting.
Professionals call fixing it on a mesh the most convenient option. In this case, the matrix does not tear and the gluing process becomes less labor-intensive. Moreover, the mesh in this version acts as reinforcement.
Advantages and disadvantages
Mosaic modules have sizes up to 5x5 cm. This provides the following advantages:
- Possibility of covering curved surfaces.
- Availability of cladding of curved surfaces.
- Minimal waste when cutting tiles.
Compared to other types of finishing materials (plastic panels, painting, etc.), mosaic benefits in the following:
- looks noble and respectable;
- retains its original appearance for decades, since it does not deform and, due to its hardness, does not become scratched;
- It is moisture resistant, therefore it protects building structures from water and makes wet cleaning possible;
- does not burn;
- does not emit harmful fumes.
The disadvantages of this material are:
- Like any tile, mosaic has high thermal conductivity and is therefore cold to the touch. Walking barefoot on a floor with such a coating is unpleasant. This disadvantage turns into an advantage if the floor is equipped with electric or water heating (“warm floor”): due to the high thermal conductivity of the cladding, heat transfer is maximized.
- Mosaic is difficult to install. It is difficult to ensure that all the seams, and there are a lot of them, are even and have the same width. The installation process requires skill and a lot of labor. Installation is difficult, even if the tiles are grouped several times on a grid or paper (matrix).
- Grouting joints is labor-intensive and requires a large amount of mortar.
- Due to the large number of seams, the reliability of mosaic as a waterproofing coating is relatively low.
- For the same reason, care becomes more difficult: the seams become easily dirty and difficult to clean.
- Mosaics require careful leveling of the base. If ordinary tiles hide small irregularities, then when pasted with mosaics they all remain visible.
- Many types of mosaics are expensive.
Mosaic on the walls
Mosaic remains a popular type of decoration, especially in expensive interiors. Wide possibilities for creating exclusive artistic decoration compensate for all the shortcomings.
Color solutions for tiles
By correctly using mosaics of different colors, you can get unusual visual effects in the kitchen. In particular, soften corner transitions using colored stretching. Mosaic ornaments are divided into the following types:
- Plain patterns with a glossy, embossed or matte surface;
- mixed colors of different palettes, or consisting of the same monochrome range;
- gradient pattern, characterized by a transition of rich color in the center and weakening towards the edges;
- ready-made or handmade panels.
Popular design models
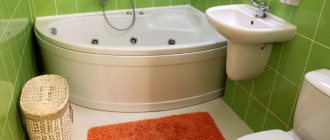
Most often, mosaic tiles are used to highlight a certain area. Considering that the material does not require special care, people like to use it in “dirty” places. Mosaics are used to decorate the area of a bathtub, shower stall, washbasin or other plumbing fixtures.
With the help of such tiles you can give the room a spectacular look or play with the visual perception of the area. Therefore, such material is often used to decorate an accent wall, the area opposite the bathtub or window.
Covering a room completely with mosaics can create an uncomfortable impression. Such design risks straining the eye, seeming pretentious and inappropriate.
How to lay mosaic tiles
There are several stages on how to glue mosaics in the kitchen:
- Leveling and priming the wall;
- marking the wall with a pencil, connecting plates with fragments of images into a single block;
- applying glue to the wall for quick gluing of two or three matrices;
- when fixing tiles with a mesh base, it is important to press each plate into the glue and not allow displacement;
- dry within 24 hours;
- grouting joints.
Mosaic in the kitchen is a fairly unpretentious material that does not require special care. It can be washed with the same products as regular ceramic tiles.
Today, mosaic is again popular. The variety of colors and textures amazes even professional designers.
Varieties
Mosaic is a general name for several types of small-format tiles. They are classified according to different criteria. Let's look at the main ones.
Material of manufacture
This is what mosaic modules are made from:
- Glass : the current level of development of processing technologies for this material allows us to obtain parts of any shape and color from it, which is why glass mosaic has become widespread. Techniques are used to increase the strength of glass; in addition to dyes, additives are introduced to make it milky. But there are also transparent and translucent varieties. In terms of attractiveness, glass mosaic is ahead of all other variations.
- Smalt : a special type of glass obtained by pressing and sintering multi-colored glass chips. Thanks to this structure, it seems that smalt emits light from within. When the nature of lighting changes, the cladding is transformed and can even change shades. The material is characterized by high strength, therefore it is used in places with increased load. Smalt mosaics are quite expensive.
- Ceramics : an inexpensive variety, the raw materials are various types of clay. Being affordable, ceramic mosaic looks quite attractive because it can be painted in a variety of colors and have any texture. In addition to those that are uniform in tone, modules with stains, multi-colored inclusions, and craquelures (small cracks) are produced. Based on the type of coating, ceramic tiles are divided into two types - glazed (glossy) and without glaze (matte).
- Stone : These tiles are expensive, especially those made from semi-precious stones - jasper, malachite, lapis lazuli or amethyst. But this is a rare option. Marble, granite or volcanic tuff are most often used. This cladding looks noble and lasts a long time. The material is characterized by high wear resistance, which is why it is often used for flooring.
Mosaic laying
Metal mosaic is not used as an independent finishing material; it is an effective addition to ceramics for decorating patterns. The ornament with a metallic sheen looks interesting against the background of muted tiles. The main materials used for such tiles are steel and brass. The modules are mounted on a base made of rubber or caoutchouc.
A budget option, it is made from recycled plastic materials - bottles, plastic packaging, etc. Plastic mosaic is multi-colored and at first looks quite attractive, but due to natural aging and numerous scratches (the material is soft) it quickly loses its luster.
Form
Mosaics are produced in several designs. Separate modules of various shapes are in demand:
- square;
- rectangular;
- diamond-shaped;
- polygonal;
- round;
- oval.
Such details make the most exquisite mosaic panels, but working with them is a real art.
Bathroom interior
A more technologically advanced group of modules on flexible material:
- glass: on mesh;
- ceramic: on mesh or paper.
It is easier to work with such a mosaic than with individual modules, but the pattern is standardized.
Ceramic tiles imitating mosaics: the surface of such tiles is divided by grooves into small squares, possibly of different colors.
Otherwise, it is no different from ordinary tiles:
- easy to install;
- only fits on a flat base;
- used to create standardized patterns;
- provides more reliable waterproofing compared to mosaics, since fewer seams are formed during installation.
Dimensions
The size of individual mosaic modules varies from 1x1 to 5x5 cm. The most common tiles are 2x2 cm in size.
Matrices of several tiles on a flexible base have different sizes, most often 30x30 cm. Ready-made panels of large sizes are also made. They are distinguished by significant cost.
An example of using mosaics in a bathroom
The thickness of the mosaic is important. On this basis, the material is divided into two types:
- wall tiles: thickness - up to 6 mm;
- floor: thickness - from 9 to 12 mm.
Concrete mosaic floor tiles have dimensions of 40x40x3.5 cm.