The problem with panel houses is excellent audibility. Even respectable and calm neighbors who do not throw noisy parties and do not drill into the walls every weekend cause inconvenience. A variety of noises penetrate through apartment partitions and interfloor slabs: loud conversation, the sound of falling objects, and even the sound of footsteps and chairs being moved. To create a quiet and comfortable environment in the apartment, you will need soundproofing of the ceiling. In this publication we will find out how to make sound insulation with your own hands and what materials to choose for different cases.
Selecting the level of protection
The effectiveness of a soundproofing structure will depend on several factors, including:
- Selected insulation material . Each type has different noise absorption rates.
- Layer thickness . Some of the latest generation of insulators provide a high level of noise protection even at low thickness. But for traditional materials the principle works: the thicker the better.
- Number and composition of layers . Practice shows that combining many materials with different properties and creating a multi-layer “pie” gives the best results.
- Type of finishing coating.
For an apartment with high ceilings, you can choose any type of soundproofing system, regardless of the thickness. The most effective would be a multilayer structure that combines rolled sound-reflecting materials, sound-absorbing boards and gypsum board or gypsum fiber board. In this case, the ceiling will be lower by 7.5–12 cm.
For a room with low walls, sound insulation under a suspended ceiling is suitable. It can also be multi-layered, but in this case thinner materials are used. As a result, the ceiling will drop by a maximum of 6 cm, the average is only 3 cm.
If the ceiling height allows, no one bothers to use a thick frame structure, reinforced with gypsum plasterboard, in combination with a suspended ceiling.
Soundproofing base
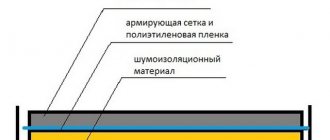
Some people call the soundproofing base a floating floor. Essentially, this design separates the finished floor from the floor panel. Sound insulation in this technology is provided by soundproofing material in the form of slabs; the most common today are: mineral or basalt wool, as well as extruded polystyrene.
A layer of waterproofing is laid on a flat surface of the ceiling, on which insulating boards are laid. Then a leveling screed is applied to the slabs, which will be the basis for the floor covering. The thickness of the screed should be at least one and a half centimeters. This installation technology ensures maximum sound insulation of the floor, while no sounds will reach you, and your steps or jumps will not be heard by the neighbors below. In addition to soundproofing characteristics, the effect of thermal insulation will be obtained, since the porous structure of the plates helps to reduce thermal conductivity.
You can also use dry screed as a base. Fine-grained expanded clay is used as bulk building material. Thanks to its characteristics, it effectively protects the coating from the penetration of noise and cold. In apartments, sound insulation with dry screed is rarely used, since the existing space is lost due to the height of the layer, however, if a new house is being built from scratch, then this option is the best value for money.
Types of noise and features of its distribution in different houses
To fully understand the issue, you need to know that 2 types of noise penetrate the room through the ceiling:
- airborne, caused by air vibrations (talking, singing, music, crying, dog barking, etc.);
- shocks generated by mechanical impact on the ceiling (stomping, moving furniture, hitting the floor).
Next, we will find out what technologies and materials will help protect the apartment from both types of noise.
And one more important point. Before you begin arranging soundproofing for the ceiling, you need to understand how noise coming from above spreads in different types of buildings.
- In a panel house, sounds from neighbors are transmitted through the ceiling itself and through the walls, so ideally, sound insulation will be required not only for the interfloor ceiling, but also for the partitions.
- In brick houses, walls dampen sounds, so it will be enough to insulate only the ceiling.
- In monolithic frame buildings, the partitions are thinner than the ceiling slab, so sounds travel primarily through them. In this case, the walls are the first to protect against noise.
Soundproof ceiling on a self-supporting frame
The self-supporting frame made of metal profiles has no connections with the ceiling.
The frame is secured to the walls through an elastic damping gasket. To soundproof small rooms up to 3 m wide (span), it can be advantageous to make a self-supporting frame from metal profiles. Such a frame has no connection with the ceiling, which has a positive effect on the noise-proof properties of the ceiling.
Holes with a diameter of 10-14 mm are drilled in the PN guide profiles, into which elastic vibration-decoupling mounting elements are inserted.
PN guide profiles are installed on the opposite long walls of the room, under the ceiling. A damper tape is laid between the profile and the wall over the entire height of the ceiling.
The profile is secured to the wall with dowels through elastic elements inserted into the profile. On sale you can find PN profiles with vibration mounting units already installed at the factory.
Elastic vibration decoupling mounting fasteners for guide profiles
Otherwise, vibration mounts for profiles are purchased and inserted into the profile yourself.
PS rack profiles are fixed into the guide profiles in increments of 0.6 m. For a span of more than 2 m, the rack profiles must be double. Acoustic slabs or mats are fixed to the ceiling or laid on top of the frame. You can additionally lay sound insulation slabs between the profiles.
Recommendations for covering the frame are outlined above.
Frame
This installation scheme allows protection from both impact and airborne noise. Vibration suspensions , on which the metal profile is attached, are designed to eliminate impact noise (such as stomping, falling objects, moving objects, etc.). Due to them, vibration decoupling of the ceiling is created - 2 levels of the ceiling are obtained that do not have rigid connections with each other. EcoPlate is a fibrous material for absorbing airborne noise (such as conversations, barking dogs, loud music, etc.). Due to the correct placement of fibers, the sound wave is ground and dampened, transferring sound energy into heat energy.
In this design, the formula “Mass – elasticity – mass” is followed, where in the first case the mass is the floor slab, the elasticity is the sound-absorbing material EcoPlit, and the second mass is the layer of gypsum fiber board and gypsum board. The sound wave entering this structure is reflected from two “mass” and is damped due to the sound-absorbing, fibrous material (EcoPlate).
The frame option, when properly executed, provides more reliable protection than the frameless one. The design consists of a fairly large number of elements, so it requires significant labor costs. But, despite a certain complexity of installation, it is based on technologies for arranging a plasterboard suspended ceiling, which are known to every master.
Elements of the frame system:
- metal guides forming the sheathing;
- vibration suspensions holding the frame;
- sealing tape that prevents sound transmission through profiles;
- soundproofing materials - sound-absorbing boards, shields, soundproofing panels or membranes in various combinations;
- vibroacoustic sealant;
- plasterboard, standard or denser soundproofing, or gypsum fiber in 1 or 2 layers.
The thickness of the structure varies between 75–120 mm. The additional sound insulation index is 11–21 dB (without taking into account the sound insulating ability of the ceiling itself).
A modification of the frame system is also used when arranging a stretch ceiling, but in this case, instead of profiles, wooden slats about 2.5 cm thick are used.
It is the frame technology that allows you to protect the room from all types of noise, both airborne and impact.
How to make ceiling sound insulation under plasterboard
Typically, the sequence of work on constructing a protective structure is as follows:
- Mark lines along the entire perimeter of the room (along the walls) for installation of guide profiles. When you plan to create a single-level ceiling, such markings will be its lower boundary.
- The distance from the ceiling should be sufficient for laying soundproofing materials and laying wiring for lighting design. The minimum distance between the future suspended ceiling and supporting structures is 10 cm.
- Using damper insulating tape, install guide profiles along the previously outlined lines. Fixation is carried out with nails (the step between the fastening points is 40 cm).
- Place a soundproofing membrane on the ceiling and secure it securely using umbrella dowels.
- Along the width of the room, mark lines for mounting the main frame slats, attach vibration suspensions at a distance of 80 cm from one another. There should be about 60 cm between the transverse profiles. To attach the hangers, nails are used, which are carefully driven into the base slab.
- Insert rack profiles into the guides and securely secure them with self-tapping screws. Cross slats are mounted in a similar way.
- Place mineral wool (or other similar products) into the finished sheathing, carefully cover it with a vapor barrier, then lay the wiring for future connection of lamps.
- Using standard technology, cover the frame with plasterboard. In this case, it is important to remove the wire for the purpose of further arrangement of the lighting system. The pins for attaching finishing gypsum fiber sheets should be located at a distance of about 20 cm from one another.
If the height of the room is small, it will not be possible to lower the ceiling enough. Therefore, for lighting equipment it is better to use overhead as well as suspended light sources. Spotlights installed in very tight spaces (between mineral wool and sheets of drywall) may subsequently deteriorate due to excessive overheating.
Laying soundproofing material is carried out only after the creation of a reliable frame structure is completed Source dekoriko.ru
Frameless
For those who count every centimeter and cannot spend 7-8 cm, there is frameless sound insulation.
We will consider 2 options for frameless sound insulation under a suspended ceiling.
MaxForte SoundPro:
Rolled sound insulation for ceilings, walls and floors is a new generation material that effectively dampens airborne and impact noise. Rolls of material are made of aluminosilicate fiber, show a high increase in sound insulation and fully comply with the requirements of SNiP dated March 23, 2003 “Noise Protection”.
The material is completely non-flammable, does not attract rodents, and is resistant to fungus and mold. Rolls are resistant to moisture and do not rot.
It has excellent acoustic properties, high sound absorption coefficient αW at all frequencies. Maximum class “A” for sound absorption. Noise Reduction coefficient =0.85.
MaxForte EcoAcoustic:
Plates made of polyester fiber (acoustic padding polyester) are manufactured using thermal bonding technology and undergo aerodynamic fiber laying for maximum sound absorption. Only primary raw materials, white material, are used in production.
The composition contains no harmful substances (glue, glass, slag). The slabs are easy to install, do not chip, do not generate dust, and do not crumble. The work does not require special clothing, gloves or a respirator. Hypoallergenic product. Suitable for allergy or asthma sufferers. Not afraid of moisture. Maximum class “A” for sound absorption.
The frameless system is more often used for suspended ceilings. But there is a separate variety of it, where the same drywall acts as the finishing layer.
With a stretch ceiling, the situation is as follows: a sound wave coming from the ceiling is reflected from the stretched film, reaches the slab again and bounces off again. A “drum” effect occurs. Sound insulation in such a situation will eliminate this effect and protect against airborne noise, but its effectiveness against impact is low.
Elements of a frameless system for a suspended ceiling:
- soundproofing material - membrane, slabs or panels;
- glue;
- disc-shaped dowel-nails;
- stretch fabric.
The additional sound absorption index of the floor when using this design is approximately 7–9 dB. Its thickness is 14–40 mm.
The second version of the frameless system consists of the following elements:
- ZIPS sandwich panels (soundproof panel system) with special vibration fastening units;
- vibration-isolating gasket;
- sealant;
- special fasteners;
- the finishing layer of drywall screwed to the sandwich panels.
Additional sound insulation of the floor provided by the structure using ZIPS is 11–18 dB. Thickness – 55–133 mm.
Vibration isolation of profiles
During the work on soundproofing the ceiling, the need arises for vibration insulation of the places where the profiles are attached to the ceiling and walls. Rigid contact of the profile with the ceiling through straight hangers leads to the formation of sound bridges, i.e. to the transmission of vibrations to the profile and further to the plasterboard sheets hemmed underneath.
Laying damping materials and tapes under profiles and hangers leads to a slight reduction in vibration transmission, since most of them continue to pass through the dowel-hanger rigid connection channel, which is illustrated in the picture:
By using special vibration mounts instead of conventional suspensions, you can achieve higher vibration insulation and, as a result, the sound insulation of the ceiling works better, reducing noise more.
In practice, the use of special vibration suspensions gives a gain of 6 dB compared to direct suspensions, which is equivalent to an additional reduction in noise by half!
High-quality vibration suspensions (Vibrofix, Vibroflex, Maxforte, Sonokrep) cost about 270–340 rubles/piece. The average consumption is 2.7 pieces per square meter, so the increase in cost of the structure is ~800 rubles/m2. The amount is not small, but the benefits of vibration mounts outweigh their price!
A guaranteed increase in sound insulation will be provided only by vibration suspensions with conducted acoustic tests and a known dependence of the resonant frequency on the load. The use of homemade vibration suspensions or analogues that do not have certificates can lead to an uncontrolled increase in vibrations (weakening of sound insulation) when the forcing frequency of the noise from above and the resonant frequency of the “vibration suspension” coincide!
At our facilities, we use only factory-made products with consistently high vibration reduction rates.
The myth about the difficulty of finishing after soundproofing
There is a myth about the difficulty of finishing the ceiling when using vibration suspensions. Its essence boils down to the inevitable formation of cracks due to the lack of rigid connections with the ceiling. In fact, everything is exactly the opposite - there will be no cracks. Let's find out!
Cracks occur as a result of the accumulated deformation of plasterboard sheets as the house shrinks. If the ceiling is tightly fixed to concrete, then any deformation from the building through rigid connections is transferred to the drywall and leads to stress and cracking. Vibration suspensions work like car or bicycle suspensions, which soften the load on the body, making the ride comfortable. Polyurethane in the suspension absorbs all the stress due to its own deformation (compression/expansion). As a result, no matter what happens to the house, the drywall sheets do not experience stress and do not crack!
Painted ceiling after 5 years - with proper installation of sound insulation, not a single crack!
A suspended ceiling requires a layer of mass for maximum noise insulation, so the profiles are hemmed not with one layer of plasterboard, but with two or three layers with which the ceilings will be even tougher and stronger!
Soundproofing materials
Let's consider the features of common sound-reflecting and sound-absorbing materials.
- Plates made of basalt (mineral wool), polyester or fiberglass . They have an excellent noise absorption coefficient - up to 85%. Effective against any type of noise. They are usually mounted using the frame method. The only drawback is the large thickness. Well-known brands - Rockwool Acoustic, Schumanet, Stopzvuk, Aku-Light.
- Soundproofing membranes . They have a high density and small thickness - 2.5–14 mm. Due to their structure, they do not absorb noise, but reflect it, allowing for high-quality sound protection. The disadvantage is the high cost. The most well-known representatives are Tecsound (self-adhesive ultra-thin heavy membrane made from the mineral aragonite), “MaxForte” (composed of aluminosilicate fibers, a layer of one-component rubber), Fkustik-metal slik (foamed polyethylene and a lead plate 0.5 mm thick).
- Soundproofing panels . Due to the massiveness, multilayer structure, elastic-viscous consistency and free filler particles, both impact and sound energy are reduced. For example, “EcoZvukoIzol” from SoundGuard has a seven-layer cardboard profile filled with quartz sand.
- ZIPS . Sandwich panels of this system consist of gypsum fiber and mineral wool, are equipped with vibration units for fastening, are mounted on special fasteners without a frame, and are sheathed with gypsum boards on top.
- Cork . Natural cork material provides good sound insulation, but to achieve a significant effect, a thickness of several cm is needed. When using technical roll cork with a thickness of 10 mm, one layer will not be enough.
In addition to these materials, coconut coir, felt, liquid sound insulation and others are used for ceilings.
Sandwich panel made of corrugated cardboard
Soundproofing the ceiling using acoustic panels 15 mm thick, with a total thickness of 32 mm together with the finishing layer of plasterboard, increases the airborne noise index by 9-10 dB.
For example, the Ticho acoustic panel (similar products are also produced and sold under other trade names: Fonstar (PhoneStar); SoundGuard, Sonoplat (Sonoplat), etc.) is made of durable cellulose multilayer corrugated cardboard.
Inside the panel there are several chambers filled with sand, feldspar-quartz composition of different fractions using vibration compaction.
The panel has excellent soundproofing properties. This result is achieved by increasing the specific gravity of the panel, increasing the number of alternations of dissimilar layers and an integrated, elastic, vibration-damping layer, as well as free, unconnected filler particles.
The panels are intended for use in dry and heated rooms. Panel dimensions 1200 x 800 mm, thickness 8-17 mm. and weight 10.5 - 21 kg. The panels can be easily sawed with a hand saw or power tool. When sawing, slight spillage of filler may occur. The edge of the cut is covered with construction tape.
Acoustic panels made of corrugated cardboard can have a profiled edge for convenient and high-quality installation of soundproofing coating
The panels are attached so that their smooth side with the label remains on the outside. The panels are fixed directly to the ceiling using plastic acoustic dowels and nails. When marking holes, the distance from the edge of the panel is 50 mm, the pitch is 200-250 mm. The dowel head must be recessed 2 mm deep into the panel and coated with soundproofing sealant on top. This is done to avoid contact between the dowel and the gypsum board sheet, which is sewn over the panels.
The panels are attached to the ceiling profile using GM 3.5x30 self-tapping screws. One panel requires at least 21 screws. The rows of panels are arranged staggered (with a slight offset of the joints so that they do not coincide with each other).
Acoustic sealant is applied to the panel joints. The sealant is also applied to the fastening points, and the holes in the panels for the passage of pipes and other communications are sealed. After installation, the joints of the panels are taped with adhesive tape.
Sheets of plasterboard are secured to the panels with self-tapping screws at intervals of 400 mm. To avoid creating sound bridges, the drywall is secured with self-tapping screws 20 mm long. to the panels, and not to the sheathing profiles.
The edge of the gypsum board, which runs along the perimeter of the ceiling, should not come into contact with the walls, as this can become a sound-conducting bridge. A gap of 3-5 mm is left there, which is also treated with soundproofing sealant.
Finishing work (puttying, painting, whitewashing, priming, etc.) directly on soundproofing panels, without sheathing with gypsum board sheets, leads to deformation of the surface of soundproofing panels and the impossibility of their operation.
Additional methods of sound insulation
As already mentioned, the degree of protection of the room from extraneous sounds also depends on the final ceiling cladding. For these purposes use:
- increased density gypsum board , for example Giprok “Aku-Line”, KNAUF Diamant;
- acoustic triplex - 2 weighted gypsum fiber sheets with increased moisture resistance (GVLVU), connected with a special sealant. Total thickness – 16.5 mm. The top is sewn with a finishing layer of gypsum board;
- sound-absorbing boards Knauf Piano.
Installation of sound insulation using frame technology
Instructions for creating a frame ceiling sound insulation system:
- The base surface is thoroughly cleaned and primed.
- All holes and cracks in the ceiling slab are filled with sealant. This will prevent airborne noise from penetrating through them.
- A sound-absorbing mat or a Texound-type multifunctional membrane is glued to the ceiling.
- Vibrating suspensions are attached at a distance of 50 cm from each other.
- The profiles for the frame are glued with sealing tape.
- Using standard technology, a frame is mounted, which is lowered relative to the ceiling surface by 5–15 cm, depending on the required thickness of the soundproofing layer.
- Soundproofing material is placed in the cells of the frame.
Next, you can choose one of several options for the last layers (arranged in ascending order of sound protection level):
- Two layers of drywall or gypsum fiber.
- Soundproofing panel + layer of gypsum plasterboard or gypsum fiber board.
- A layer of gypsum plasterboard + a heavy sound-absorbing membrane + another layer of gypsum plasterboard.
The layers of the “pie” can vary, especially since new, improved materials are constantly appearing. You can find effective solutions for independent implementation on the websites of companies involved in sound insulation at a professional level.
Frameless installation of sound insulation
Standard sequence of actions when installing a frameless system:
- Ceiling cleaning, priming.
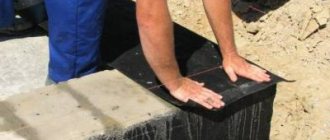
- Gluing the selected sound insulator. These can be roll varieties, panels or slabs. The gluing starts from the corner, the material is pressed tightly.
Note ! The glue is not applied over the entire surface of the panel, but only along the perimeter and in the center. Even the slightest gaps between elements are unacceptable.
- Additional fastening of the panels with disc-shaped dowel-nails (they are called “umbrellas” or “mushrooms”), which are located in the corners and in the center.
- Installation of stretch ceiling.
Required Tools
Correct installation of frameless sound insulation can only be ensured if you have the necessary tools. The list of tools is small, but all elements must be present.
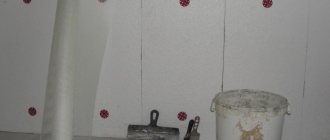
Photo: Sealant required. Author: Dmitry Kotov
To install sound insulation you will need the following tools:
- A stiff brush to clean the ceiling surface from dirt and peeling layers of finish.
- A tape measure is used to measure dimensions and select the most accurate material.
- An embossed spatula with which to apply the adhesive solution.
- Adhesive mixture in ready diluted form. Today in construction stores you can buy glue, which is intended specifically for the installation of soundproofing materials.
- Construction level, to achieve the most even sound insulation surface.
- Fixing dowels or as they are also called fungi.
- In case of drilling holes, you will need a hammer drill and a Pobedit drill bit with a diameter of 6 mm and a length of 16 centimeters.
- Soundproofing material selected according to requirements and characteristics.
If you have all the tools, installation work is quite simple, and if you have the skills of a builder, then all the processes can be completed independently with your own hands.
Important points
When planning to soundproof the ceiling, you need to remember that:
- the best results are obtained by combining several materials with different properties - sound-absorbing and sound-reflecting;
- Self-installation is possible only with careful adherence to technology. It is enough to forget to glue the damper tape or lay the material loosely, and the desired effect will not be achieved.
And finally . Since soundproofing a ceiling is not a cheap undertaking, it is worth consulting with a specialist before choosing material and installation.