To obtain a high-quality finishing plank floor, it is necessary to meet a number of conditions, which include the correct choice of material, careful preparation of the base and compliance with the sequence of laying all layers of the floor structure (hydro- and vapor barriers, soundproofing materials and insulation). In today’s material, we’ll take a closer look at how to lay floors with wooden boards with your own hands.
Wood flooring
Materials for floor construction
Before making a wooden floor in a house or apartment, you must choose one of the following options:
- floor on floor beams or on the ground;
- installation of insulated floors on concrete.
How to lay a wooden floor in a private house? Before answering this question, it is necessary to highlight the same points in the construction of any wooden floor, not only in a private house, but also in a city apartment:
- It is better to install a wooden floor at the end of the heating season;
- if the work is done in the summer, then it must be done at least after a week of sunny weather;
- All lumber for wooden floors must be impregnated with fire retardants and antiseptics.
All these measures are related to the moisture content of the wood and air. At the end of the heating season, the boards prepared for the floor will not absorb much moisture. A durable floor can be made if you follow the rules for selecting materials for it:
- boards need to be inspected for defects;
- Only dry wood should be selected;
- edged and tongue-and-groove boards are purchased in processed form;
- When purchasing boards, make a reserve of 15%.
A wooden floor is assembled with your own hands from unedged and edged boards, sheet material in the form of plywood, OSB and chipboard, and laminated veneer lumber. Rough wood flooring is often made from unedged boards. A finishing floor covering made of unedged boards, laminate, parquet or linoleum is subsequently installed on it.
- wood screws;
- dowels;
- hacksaw for wood;
- hammer;
- nails;
- screwdriver;
- vapor barrier film;
- construction stapler;
- nail puller;
- building level;
- rule;
- sandpaper;
- grinding machine.
Undoubtedly, before laying a wooden floor, you need to choose the best option that suits you. Flooring made from oak, aspen, spruce, pine, fir or cedar is synonymous with elegance and durability. At the same time, the reasonable cost and hypoallergenic nature of the material make it a unique product on the modern market.
When choosing a wooden covering, consider factors such as: • the absence of various defects; • the boards must be at least two meters in length; • the absence of moisture on the product; • choose polished products.
You should buy the material with a reserve of twenty percent, since some of the boards will certainly decrease during processing, and in the future you may not find where to buy the missing products that match the color scheme and texture.
Laying on plywood
An example of laying plywood on joists for additional leveling.
Plywood can be a good option for subfloors on a relatively flat base. With its help you can level an old wooden or concrete base. Plywood practically does not deform, it is strong and reliable. However, the use of such a subfloor is not recommended in places with high humidity.
DIY floors in a wooden house
Plywood can be laid on wood sheathing or directly on a concrete surface. To fix it, anchors, corners, and self-tapping screws are used. The first installation method is suitable for uneven substrates. The size and pitch of the sheathing beam depends on the thickness of the plywood and the unevenness of the base.
The installation process is so simple that it can be understood from the photo above:
- First, a timber sheathing is constructed on the floor. It needs to be leveled horizontally. The sheathing is attached to the base using screws and dowels.
- Next, to protect against condensation, the wooden sheathing is covered with glassine.
- Now you can lay down the plywood. All sheet joints must be on the sheathing beams. A gap of 1.5-2 mm is left between adjacent plates to protect against deformation. The plywood is attached with self-tapping screws to the sheathing.
- After this, you can lay the edged boards in the same way as described in the first laying method.
Installed parameters
Its application depends on the characteristics of the unedged board. Most often, these products are distinguished by length and thickness. The first parameter depends on the size of the sawn log and, generally, ranges from two to six and a half meters. However, it all depends on the height of the tree, and the board can be much longer.
The second ranges from 16 to 90 millimeters and depends on the type of wood being cut and the purpose of the board during construction. The width for this type of timber does not matter and is not a standard, since the edge when sawing it is not adjusted to the established dimensions.
Summarizing
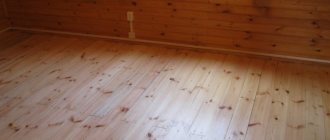
The finished wooden floor should be sanded and painted according to your wishes, although varnishing it would be much preferable: the natural, unique pattern of the wood will remain visible. Nowadays, you can choose a varnish of any shade you like.
Boards coated with clear varnish retain all the visual advantages of the structure of the wooden flooring
As you can see, the process of laying edged boards is not complicated and is quite feasible even for an inexperienced amateur craftsman. And the video in this article is ready to confirm all the information you read above!
Source
Preparing the base for a wooden floor
Edged boards must be laid only on a dry and clean base, preferably treated with a moisture-resistant agent. It also wouldn’t hurt to “protect” the material with a fire-resistant compound. Additionally, the product is coated with impregnation against fungal bacteria. It is recommended to use innovative compacted polyethylene as waterproofing, which has a number of advantages such as strength, resistance to aggressive acid-base environments and ease of installation.
Typically, edged boards are laid on a special device called logs. This design is able to minimize differences in roof heights. To create logs on your own, it is recommended to use timber with a section of 50 by 100 mm. The logs need to be constructed at a distance of eighty centimeters.
Economical wood flooring option
To reduce the cost of flooring in a gazebo, you need to use some tricks. As a foundation, it is worth using wooden chocks, which will need to be driven into the corners of the future building. Next, 2 planed boards are nailed to the posts, and boards for strapping are attached to the corners.
To save on the finishing coat, it is worth purchasing an unedged board, which is subsequently sanded with an electric plane and a sander.
The boards are screwed to the bottom frame with self-tapping screws, and their caps are deepened by 5 mm. After this, the flooring is covered with varnish or paint.
In conclusion, it is worth noting that arranging floors in a gazebo is a painstaking process and requires a special approach. Here it is important to choose the right materials, familiarize yourself with the stage of work, and have certain skills in the construction industry. If everything is done correctly, using the recommendations and advice of experts, the finish will be stylish and attractive, and will delight the owners for many years.
Source
Photo of an unedged board
Higher. Knots and other defects are mostly absent. It has a cost much higher than other types of material. It is often used in the manufacture of furniture and carpentry (doors, skirting boards, trim). However, due to its production for export purposes, it is very difficult to find for sale.
Another name for it: grade 0 board.
First. It is distinguished by the presence of only healthy dense knots, firmly fixed in the board. The presence of cracks in the edge is permissible within no more than 25%. Also, the surface should not have signs of rotting, traces of the presence of bugs, or visible fungal infections.
Second. There may be no more than two knots per linear meter. There may be resin pockets and spots of various shapes from fungal coloring.
There is uncut bark (wane), but it should occupy only 10% of the total area of the product. The presence of such a defect worsens the appearance, but does not have a noticeable effect on strength. The moisture content is assumed to be the same as that of the first grade.
Third. All the defects described in the second grade may be present in greater quantities, but the moisture content must be the same as the two described above.
Fourth. There are no wood moisture requirements. Rot occurs on the surface of up to 10% of the total area.
The fifth is very similar to timber waste. Most often used in the form of a fence board.
Varieties and areas of application
The radial sawing method involves placing the cut in the body of a round log in the direction of the radii of the growth rings of the wood. Tangential sawing - orientation of sawing trunks with the location of the cut along a tangent line to the annual layers of the tree.
Products are distinguished by sorting method :
- machine sorting is carried out by mechanisms focusing on the mutual dependence between indicators of elasticity, tensile strength, compression, and bending;
- visual rejection by external inspection, taking into account the number of defects, dimensions of lumber, location of knots.
There is a trimmed raw board , when the elements are cut to length to a certain size. The second type is not trimmed , when the material has the length of the barrel.
There are also unedged joinery boards and fence elements.
Products are used depending on the purpose, overall dimensions and raw wood species.
Wood species
Pine
For production, spruce and pine . Spruce contains less resin, but insulates the surface well, while pine is used in humid conditions. Untreated cedar elements are rare.
Features of coniferous boards:
- will serve as a fence or fence for a long time;
- do not shrink significantly;
- protects well from the cold;
- easy to process at home.
Boards are placed for formwork during concrete pouring and in the manufacture of scaffold panels on scaffolding. The interesting appearance allows the material to be used for the construction of walls of summerhouses and sun canopies.
The material is placed as a temporary ceiling , walkways between building structures. The fence looks beautiful in combination with brick, stone, and decorative elements in the form of natural elements.
The cost of production depends on the quality of sawing, species, and processing technology. When choosing, the percentage of humidity and color play a role.
Larch edged board
larch or oak boards on sale . Such materials are least susceptible to rotting. In terms of hardness, larch and oak have almost the same indicators.
Larch board:
- does not absorb water;
- acquires additional hardness;
- in humid conditions, fungus and mold do not form;
- the special composition of resins repels insects and rodents.
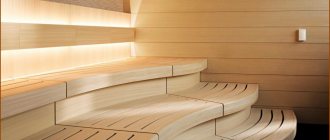
Unedged hardwood material on the roof of the house helps create a comfortable internal microclimate. Such wood allows vapor to pass through , so the thermos effect does not occur.
Unedged material from linden, aspen, alder, and birch is rare if there is an order for such a variety. Deciduous trees are used to build pavilions and sheds. The material is combined with a log house, lumber of a different color and shade.
In summer extensions , improvised picturesque tabletops are installed, and stylized platbands are made around window and door openings in log buildings and huts . Sandboxes are framed from planed layers of unedged boards .
Choosing a quality board when purchasing
Before you put a massive board in your apartment with your own hands, you need to choose it correctly. For small residential premises, the optimal installation material will be coniferous species such as spruce, larch, pine, fir or cedar. The distinctive features of such products are wear resistance, aesthetics and reasonable cost.
In addition, you can use coniferous wood without any health risks, since it does not cause any allergic reactions and also has unique antibacterial properties. Oak, alder and aspen are considered universal materials, which are best laid in children's or bedrooms. The presented breeds are odorless and do not lose their novelty even after several years of use.
Before choosing a tree species, you should consider a number of the following important factors:
- the degree of dryness of the board - the product should not be wet, which will shorten its service life;
- quality of the board - the product must not have visible defects or other damage;
- board length – as a rule, buy a solid board at least 2 m in length;
- processing - it is better to choose ready-made tongue-and-groove and sanded products.
If you decide to lay wooden flooring with your own hands, then you need to purchase the material with a margin of about 15-20%, since some of the boards will certainly have to be shortened during processing. Therefore, you should not save on material, because in the future you may not find the required products of a suitable color scheme or texture.
When purchasing wooden material, you need to pay attention to all factors that may affect its quality.
The fewer knots the better. Under the influence of loads, the board tends to stretch, and a large number of them can bend it, and over time make it quite fragile. In addition, due to their excessive numbers, the appearance of the material becomes unattractive.
Shape changes: warping and winging. They are very noticeable on a wide, unedged board. In the first case, its cross section changes in such a way that it takes on the shape of an arc along its entire length.
In the second, the material seems to “twist” in a spiral. The reason for this may be poor processing or improper drying of the wood. One way or another, this makes it of poor quality, interferes with its use and reduces its service life.
You can avoid purchasing bad lumber by contacting trusted companies, where experienced and conscientious specialists will help with this.
Tree
Wooden coating is the most popular due to two criteria - low price and ease of installation. Having installed the logs on the bottom trim, you can immediately begin installing the floor.
In the case of paving slabs or stone, the situation is much more complicated - you need a flat concrete platform and a lot of additional work.
Edged board
If your gazebo belongs to the “economy” class and you want to save money, then the cheapest option would be an edged board.
For the floor, it is better to use a board thickness of 40 mm (100 by 40 by 6000 mm), in one cube of which there will be 25 square meters (this is approximately 4 thousand rubles).
This volume is enough even for a 5 by 5 meter gazebo, and you will most likely need even less.
From stumps (wood cuts)
An original approach to flooring can be called transverse cuts of wood (in common parlance “hemp”), which are laid on the floor, filled with mortar and covered with a protective film - varnish.
This approach requires deep study, because there are a number of subtleties:
WPC decking (terrace, deck and garden boards)
Very often on the Internet you can hear about super high-quality flooring made from a material called WPC.
It consists of rectangular or square boards made of wood-polymer composite, which are connected according to the decking principle - with soft or hard fastening (like a laminate).
This material can be called really very cool, because its service life is more than 20 years.
The price of decking is noticeably higher than most floor coverings - from 1500-2000 rubles per square meter.
Installation is the final stage
Having nailed the first board to the joists, it is necessary to hammer staples into the edges of the beams, thereby forming a gap into which the safety rail is placed. If necessary, each subsequent board is compacted with a mallet, and only then secured with nails. Next, you need to eliminate unevenness at the joints of some boards, for example, you can put roofing felt under the bars.
Having finished installing the boards, you should move on to sanding and “voila” you become the owner of a beautiful wooden floor that exudes chic and style. In general, relying on a little knowledge and following a certain sequence, laying a wooden floor covering is not a troublesome and quick task.
Do you want to buy edged boards? Visit the website greenbud.kiev.ua
Tips for the home handyman. Laying and re-laying of plank floors.
Laying new plank floors.
It is best to lay plank floors at the end of the winter heating season to allow the planks to dry thoroughly before laying them. In summer, wood absorbs more moisture from the air; boards laid in summer will dry out during the winter and, possibly, dry out; even if they are tightly joined together, later gaps may form between the boards. If floors are laid in summer, then choose a time preceded by dry, hot weather (within 1-2 weeks).
Planed boards are laid out along the laid joists for marking, adjacent boards are selected so that the gaps between them are no more than 1 mm. If necessary, the boards are cut so that their joints are located on the joists, it is possible to attach the ends of the boards to them (Fig. 68 b), and the end edges of the boards do not touch the walls.
At the end of the laying, the joints of the boards are adjusted so that they are level and in the same plane as the level of the laid floor. To eliminate small differences in boards at the joint, cardboard, roofing felt, and roofing felt (but not wood chips) are placed under the joists.
Re-laying plank floors.
Re-floor the floors if the boards are worn out, cracked, gaps have appeared between the boards, or if some boards sag when walked on the floor.
When the boards “walk” (that is, sag when you walk on them), this means that the joists under them are laid too thin. To eliminate this defect, when re-laying the floor, new logs are added in one or more places (possibly over the entire floor area) (the old ones are left in place) or the old logs are moved, reducing the distance between them and adding the missing ones.
When cracks appear between the floor boards, it is necessary to either re-lay it again, holding the boards together more tightly, or to consolidate individual sections, and insert new boards of the required width between them, strengthening them with nails and aligning them flush with the old floor boards.
Severe wear and tear on the floor boards requires complete re-laying. At the same time, you can achieve a clean and even floor surface if you lay old boards with the back side facing outward (after planing them).
Complete or partial re-flooring begins by marking all the boards, then tearing off the baseboards and boards in order. Nails are removed from the boards, the boards are reattached, and the condition of the joists is checked. Rotten, badly dried out, shaky joists are best replaced with new ones.
It is not recommended to place wedges under the boards, as over time their fit will weaken and the floors will become unsteady again. As a last resort, wedges placed between the joists and boards are additionally secured with nails.
Sometimes, during the re-laying process, old boards are replaced with new ones that differ from the old ones in thickness. When replacing with thicker boards, their back side is cut down in the place where the logs fall, then after laying they will lie on the same level as the old ones.
On top of the corrected base (along leveled and reinforced joists) boards are laid without fastening, checked how tightly they fit together, and nailed, holding them together with staples.
Source
How to calculate quantity
All materials are sold in cubes. This means that you need to calculate the amount of material that will be suitable for your home per cubic meter. The first thing to do is calculate the volume of one board. To do this, you need to multiply the dimensions of the lumber among themselves: width by thickness and length.
For example, if the size 25 x 100 x 6000 mm is used. All this data is converted into meters: 0.025 m, 0.1 m and 6 m. The volume will be as follows: 0.025 * 0.1 * 6 = 0.015 cubic meters. m.
In one cubic meter of material there will be: 0.015 cubic meters - 47.61 pieces.
For any shipment, the number of boards is rounded down. When purchasing, it is better to buy 15-30 percent more material, as some will be rejected. It is better to initially stock up on a large quantity of products, since wood from another batch may not be suitable.