It is impossible to imagine an ideal apartment renovation without a smooth floor covering. If you are going to decorate an old house, then first of all you should pay attention to restoring the floor, because the boards could become warped over time and begin to collapse. In new buildings, unfortunately, the floor is also not pleasing with its appearance.
To achieve an impeccable result, you should use self-leveling floor technology. This process is not as labor-intensive as it seems at first glance, but no more problems with floor repair work are expected over the next forty years.
view album in new window
How to fill a self-leveling floor
Why should you use a self-leveling floor? It has significant advantages over other coatings:
- You won’t have to devote a lot of time to work – a day at most;
- Long service life;
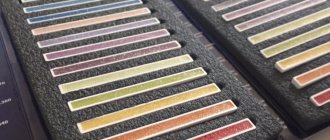
- You can choose the desired color scheme;
- The material is not afraid of moisture and does not require additional protection from chemical detergents;
- The self-leveling floor is not afraid of dirt and is easy to clean;
- This is an environmentally friendly coating that will not cause harm to health;
- The material is durable and not afraid of mechanical stress.
How to fill the self-leveling floor, what raw materials to use - the homeowner decides, depending on what goals are set.
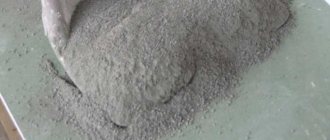
If you plan to simply level the floor, then cement will do. You can purchase a ready-made mixture for this in building materials stores. Having achieved an even coating, decorative materials are placed on top.
For bathrooms, it is advisable to use polyurethane coatings, they are moisture resistant.
In rooms where there is expected to be a lot of traffic, and therefore the impact on the floor will be significant, methyl methacrylate is better suited. This mixture hardens quickly, dries quickly, and has a non-slip surface, that is, safe.
Decorative finishing of an apartment involves introducing into the interior elements that decorate the home. The floor will become a work of art if you use epoxy coating. Interior designers recommend supplementing it with lighting or photo combinations to give the room individuality and a special style.
When choosing raw materials, you should not forget that the operational period of the self-leveling floor is influenced by:
- humidity;
- direct exposure to ultraviolet rays;
- high traffic flow of the room;
- exposure to chemicals.
Therefore, before thinking about how to fill a self-leveling floor, you need to clearly understand for what purpose the room is intended.
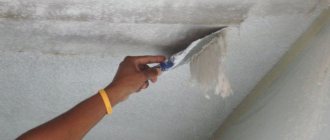
Before the main work with raw materials, it is important to carry out the dismantling work correctly.
- How to pour a self-leveling floor on a concrete surface? First remove the debris remaining after dismantling the decorative coating that was on top of the concrete and clean it from dust.
- How to pour self-leveling floor on ceramic slabs? No dismantling is required here. It is enough just to check the integrity of the slabs, replace the collapsing elements, and close the recesses.
- How to pour a self-leveling floor on a wooden floor? In this case, you will have to tinker. Floorboards can rot, lose shape, or develop cracks. It makes no sense to fill on such a chipped surface. First you need to strengthen the floorboards and close the cracks using sealant. Cement mortar will also work. Then all the unevenness is smoothed out, and only then, when the preparatory period is over, they proceed directly to pouring.
Professionals advise using edge tape before pouring, which is laid around the perimeter of the room. Whatever thickness the floor is supposed to be, such a tape should be selected.
How to fill a self-leveling floor: step-by-step instructions
1. Prime the surface twice. First, apply the first layer, wait at least four hours, then repeat the coating.
2. Level the level. Beacons are used for this. The gap between beacons must be at least a meter.
3. Prepare the mixture following the recommendations on the package. A good solution will have the consistency of sour cream.
4. The mixture is applied in even portions and leveled with a spatula.
5. Beacons are removed.
6. Use a roller to remove any air bubbles from the coating.
7. The coating should be left for 48 hours to dry completely.
8. When the coating has dried, it is necessary to carry out work to strengthen it and prevent cracks from appearing. Thin cuts are made, where the sealant is inserted and treated with sealant.
9. The coating must be allowed to dry again.
Cloudiness
The work is completed, the surface of the self-leveling floor is dry, but there is a haze in the form of a whitish tint. This deteriorates the decorative qualities of the mixture, dullness and poor clarity appear. Any pictures or drawings will not look natural. True, all operating characteristics remain at the same level. Elimination of such a defect occurs on polyurethane or epoxy floors. The following main reasons are identified:
- Drops of grease and other aggressive chemical compounds got onto the filling.
- The mixture used for the work was mixed poorly.
- Large amount of added water.
- The components are not mixed in proportions.
You will have to try very hard to carry out repairs to the self-leveling floor with high quality. The best option is to make another finishing layer. It is very important to pay attention to pouring technology. All proportions and recommendations will be reflected in the instructions.
Self-leveling floor screed
What is a self-leveling floor screed? This is a special layer that is poured between the topcoat and the floor base.
Why is it needed:
- Levels the surface;
- Increases strength;
- Allows you to create the desired slopes on the surface;
- Provides sound insulation;
- Keeps you warm;
- Closes possible communication systems located on the surface.
Self-leveling floor screed is considered a classic option. For many years, builders used this exact method to prepare the floor before finishing work. However, since the process is complex, and it takes at least thirty days to harden, self-leveling floor screed has not been so popular lately. In addition, less experienced builders may make mistakes that will cause gradual cracking of the surface. Therefore, such a method as self-leveling floor screed was gradually abandoned, replacing it with dry screed.
However, if you want to use classical technology, then you should perform the following actions:
- Purchase building materials: cement with large markings, sand, PVA glue. You can replace these materials with a ready-made mixture. The mixture is prepared immediately before work; if you wait, the solution will harden and become unusable.
- The floor surface is marked to make the floor level. It is necessary to determine the thickness of the layer.
- The flooring is cleaned and cracks are closed.
- Primed.
- Lay a thermal insulation layer.
- In the kitchen, sanitary rooms, and bathroom it is also necessary to lay a waterproofing layer. Polyethylene is suitable for these purposes.
- Self-leveling floor screed requires the installation of beacons, which will help you avoid mistakes in leveling the surface and creating the desired layer of screed.
- You will need guides that are attached every meter, and the gap between the wall and the guides must be at least twenty centimeters.
- Cement will help secure the strength of the guides.
- Mix cement, sand and water. You will need three times less sand than cement. The consistency of the solution is creamy. The mass should not have lumps. If you take a purchased ready-made mixture, then it is diluted as indicated in the instructions on the package.
- Screed work is carried out from the farthest corner. Carefully and little by little pour the mixture, leveling it so that no air bubbles form.
- Gradually cover the entire surface until it comes out and leave for 48 hours. In this case, the room should not be exposed to drafts.
- While the floor is drying, you should occasionally moisten the surface with a dampened roller. This is one of the rules of classical technology that allows you to achieve quality. A common mistake made by builders, which causes the self-leveling floor screed to become covered with cracks, is precisely failure to follow this rule.
- Beacons are removed on the dried floor.
- A primer is placed in the remaining holes and covered with a screed mixture.
- The final step is the sanding process to achieve a perfectly smooth surface.
Thus, self-leveling floor screed, if all requirements are met, allows you to restore youth to the old base and transform the floor surface in the room.
Wear and loss of quality
Over time, the self-leveling floor begins to lose its appearance and original qualities. In this case, you don’t need to spend a lot of money, but simply fill in a new finishing layer, choosing the appropriate option to combine with the design. Among the main reasons for the appearance of such a defect are constant loads. In addition, such areas may not appear throughout the entire area, but only in certain places. To get better quality, it would be better to completely remove the old layer of self-leveling floor and fill in a new one instead.
Before applying new polymers, the old base should be thoroughly cleaned of possible irregularities and defects. This will allow you to get the best result. This is how the surface is updated when the interior of a room is changed. The screed layer is insignificant and does not in any way affect the distance from the floor to the ceiling in the room.
Self-leveling self-leveling floor
A self-leveling self-leveling floor is a unique invention that allows you to achieve a flat and smooth surface due to a special leveling substance that is added to the mixture for liquid pouring.
Builders praise this technology for its ease of use, durability of the resulting coating, and environmental friendliness. Self-leveling self-leveling floor dries quickly and is not afraid of temperature changes and frost. However, the mixtures for preparing such solutions are not cheap. In addition, experienced repairmen advise beginners to first learn a little before starting work on large surfaces, since defects are very difficult to eliminate.
A self-leveling self-leveling floor can be single-layer or in several layers. By the way, a single-layer requires much less time to dry than a double-layer, but its strength is also less. As a rule, if the goal is to lay a self-leveling self-leveling floor in several layers, then, having covered the floor with one layer, it is allowed to dry, and only then they begin to apply the next layer. Such floors are good for decorative finishing work.
Self-leveling self-leveling floor differs from others:
- A composition that allows you to level the surface without the use of special guides. Great gravity is the secret of this technology.
- Finishing work is possible within five hours.
- The solution is capable of leveling even a damaged surface, densely filling possible cracks in the coating.
How to make a self-leveling self-leveling floor: step-by-step instructions
- Clear the room of interior items.
- Remove baseboards.
- Dismantle the old floor.
- Clean from dust and dirt.
- Check the composition of the liquid mixture for filling the floor. The ideal composition should be durable, not afraid of moisture, have a good ability to withstand weight, and withstand mechanical stress.
- To enhance the load-bearing capacity, it is advisable to lay a material such as fiberglass mesh on the base and fix it. Each step is twenty centimeters apart.
- The base is covered with a primer.
- All defects are eliminated and cleaned.
- Cover the perimeter of the room with tape.
- If a self-leveling self-leveling floor is placed in a room with high humidity, you will need to cover the base with waterproofing material.
- A self-leveling mixture is being prepared.
- The solution is applied to the floor. Builders recommend laying the first layer of half a centimeter.
- Carefully level the layer.
- Let dry.
- Repeat the process, add a second layer.
- Leave to dry.
- Next, you can carry out decorative work.
What materials will be needed for the work: a spatula, a primer, a moisture meter, a building level, a needle roller, a roller, buckets for the solution, a drill with an attachment for stirring the solution.
Rules for preparing the solution
1. The temperature of the liquid for filling the mixture is not higher than 30 degrees.
2. The amount of liquid is 300 milliliters per kilogram.
3. For the solution you will need river sand.
4. You will need two mixing containers. The volume of the containers is 30 liters. You also need to prepare a container for water in which you can rinse your tools.
5. For kneading, it is better to use a mixer with a spiral attachment, this way it is better to achieve homogeneity of the mass.
6. You cannot mix the entire mixture at once. Small portions are taken and used within a few minutes.
7. Work begins from the far corner of the room. Pour the mixture onto the floor and level it with quick movements.
8. Next, the next portion is poured out and leveled again, and so on until the entire coating has been processed.
9. Possible air bubbles are expelled from the coating with a needle roller.
10. Allow the coating to dry before continuing renovations in the apartment, in particular its decorative part.
Peeling
When such a process occurs, people say that the floors have lifted. Swelling can be in a specific place or over the entire area. There are main reasons for this:
- The base for pouring was not well prepared. There was no priming, no cleaning of dirt and dust. The adhesion of the mixture to the surface was low.
- Humidity of the base where the self-leveling floor is poured. You should wait until, for example, the concrete screed dries completely, and only then carry out installation.
Many people believe that a large amount of water only helps the finished solution to distribute over the area in the room. Some even perform pouring over puddles (water and primer). This subsequently leads to the appearance of defects.
- The surface to be filled has weak strength.
It is very easy to determine the places of peeling - knock on the self-leveling floor with a semi-solid object. A booming sound indicates the need for repairs. If you do not pay attention, over time the floor in these places will begin to crack. Minor damage is removed with a chisel or chipper, after which special repair solutions are used, as well as sanding. It would not be superfluous to run liquid glass along the edges (under the self-leveling floor layer). This will hold the new solution and the old one together well.
There are cases that the floor has such defects in almost the entire room. In this case, it will be easier to open the self-leveling floor to the base and carefully examine it for errors. After completing these activities, the filling is repeated from the very beginning.
Types of dry mixtures
Such compositions include mixtures that replace conventional cement screed. They are:
- Plastic, resembling a screed in its properties. They contain gypsum or cement components and sand. Using these mixtures, a rough coating is performed; it must be applied in a thick layer. The difference from a regular screed is that plastic mixtures consist of plasticizers and purified components. They must also be applied to beacons using the rule.
- Finishing, which includes the necessary polymer additives. Intended for making the final thin layer. Such compositions can level the surface themselves. They are used to make the final decorative layer. Usually two types are used in pairs. A thick layer is used for rough finishing, a thin layer for the final coating.
Video description
This video shows how to properly paint concrete floors with polyurethane paint:
Urethane-alkyd
Used only for those concrete floors that are subject to minor loads, both mechanical and chemical. Therefore, if you are faced with the problem of how to paint the concrete floor in the garage so as not to create dust, then this paint is not for your situation. Because the garage floor is subjected to quite serious loads of both types.
A composition of this type must be applied to the concrete base in two layers. In this case, the first of them should be diluted with white spirit, and after application, dry thoroughly. Drying may take 3-4 hours or more, it all depends on the air temperature. The second layer will also dry, but it is recommended to use it only a day after application.
Attention! If the concrete screed was constructed recently, then it can be painted with urethane-alkyd paint only after a month.
And a few more recommendations. This type of paint is flammable. They cause an allergic reaction in people. That is, when working with them, you need to wear respirators and protective gloves, and also ensure that the room is well ventilated.
Urethane-alkyd based concrete paint Source beton-house.com
What reasons lead to dust formation?
During the operation of a concrete floor covering, its top layer takes on various loads, chemical and mechanical influences, because of this, the destruction of concrete begins, resulting in the formation of cement dust.
- violation of concrete pouring technology.
- improperly prepared mixture.
- adding poor quality components to the solution.
Even if concrete has high strength properties, without proper processing and the use of reinforcing compounds it will be subject to the negative effects of abrasive substances, which will lead to surface abrasion, reduced strength and dust formation. If the concrete is of poor quality, it will be subject to corrosion processes, which also leads to dust formation.
There are other reasons why a concrete floor becomes dusty, but those described above are the most common. However, there is a solution to the problem - treating the surface of concrete floors using special compounds. But why to do this is another question, we will answer it below.
Special compositions for dust removal
Types of paints
Concrete flooring can be painted. The answer to the question of how to paint self-leveling floors is that there are several types available:
- Epoxy paints - these compositions are used for both interior and exterior painting of concrete floors. They are based on 2 parts, which must be mixed before application according to the instructions.
- Acrylic is a paint and varnish mixture that provides effective protection for self-leveling concrete floors. One of the main advantages is that it protects against water by creating a film on the area. Scratches, chips, cracks on the area covered with such paint occur in rare cases. Can dry in approximately 12 hours and can be applied using a wide roller.
- Polyurethane enamels. This mixture is also two-component. For concrete flooring it is an excellent option. In addition, such a coating turns out to be impervious to environmental influences; it is also environmentally friendly. The paintwork can create a glossy area after drying.
If you don’t know what paint to use to paint a self-leveling floor and also want to save a lot of money, you don’t need to do this with ordinary paints and varnishes for floor coverings. This will not provide the desired decorative result and can only spoil the concrete floor; it will most likely peel off. As a result, the surface will need to be dismantled, and this is labor-intensive work.
Results
When using impregnations, it is important to carefully study the instructions. Inspect the floor and repair small chips and gouges with epoxy putties. Dust the room using a vacuum cleaner. Pour the impregnation onto the floor in strips, distributing evenly with a brush or roller. Cover the concrete floor 2-3 times with organic impregnations so that it completely absorbs moisture.
Today we talked about the importance of dust removal from concrete floors. We told you why the floor is dusty and what harm cement dust does to humans. We have revealed ways to remove dust from a concrete floor. We hope that you will consider whether you should dedust your concrete screed and make the right decision.
Defect No. 5. Small inclusions, roughness
If dust or small particles of debris get onto a non-dried self-leveling floor, then pimples, roughness, and small irregularities form on its surface. In this case, it is impossible to achieve a mirror-like, absolutely smooth surface.
Causes of the defect:
- An insufficiently cleaned concrete base, dirt from which has entered the bulk mixture and is distributed over its surface.
- Dust floating in the air and settling on a pouring surface that has not yet hardened.
Elimination of small roughness:
- The floor surface is cleaned of dust.
- A thin finishing layer of coating is applied to cover the defects.
Impregnations for dust removal
In the fight against concrete dust, this is the simplest job.
There are mineral and polymer impregnations.
Mineral compounds create glassy compounds in the concrete screed, giving the surface additional strength and the impossibility of peeling off cement dust.
Organic ones also penetrate into the pores of concrete and strengthen it, increasing wear resistance.
Mineral impregnations , or fluates, are improved over time. If, when using sodium silicate, the impregnation interacted with the base for a very long time (up to 6 months) and required careful rubbing, then modern impregnations based on lithium polysilicate complete penetration into the base and hardening in half a month.
At the same time, such a dust-removing impregnation will last as long as the screed itself, and during its application it will not require either rubbing or dealing with excess liquid.
Organic impregnations are:
The first type of impregnation is best done where there will be a floor covering on top, or where the load on the surface is small.
Polyurethane is more durable. The downside is that they have a strong unpleasant odor when applied and dried.
Epoxy impregnation is the most durable, but also the most expensive.
When applying impregnations yourself, carefully read the instructions for use, since each type is prepared for use in a special way.
Use with concrete
Liquid glass can also be added to the concrete mixture when pouring the screed. This will make the base stronger and more reliable, and will also give it waterproofing properties. Such concrete is often used to create swimming pools, wells, stoves and fireplaces.
On a note! The heat resistance of concrete when adding liquid glass increases to 1000 degrees. For the standard composition it is approximately 200 degrees.
The material also increases the thermal insulation properties of concrete. By the way, it can only be added to cement grades M300 and M400. The maximum amount of liquid glass in a concrete mixture cannot exceed 10% of the total mass of the solution, while the optimal option is when only 7% of the composition is added to the concrete. The initial setting of the mixture at an air temperature of about 16-20 degrees occurs:
Mixing concrete with liquid glass
In any case, the screed must dry for at least 28 days before full use begins. But you need to use a composition prepared on the basis of cement and liquid glass very quickly - preferably within 10-12 minutes.
Important! Liquid glass is never added to ready-made cement mortar. First, it is diluted with water, and then dry cement powder is added to the resulting mixture. Then the mixture is thoroughly mixed.
Products of different brands
General information
“Why does dust accumulate on a concrete floor? Is cement dust harmful to human health? What methods of removing dust from a concrete floor exist and which one to choose? -questions, the answers to which concern every person faced with this problem. Today we will try to answer these questions.
Why does a concrete floor get dusty?
Before finding the causes of dust, let’s pay attention to the structure of concrete. Let's look at a cross-section of hardened concrete. It consists of many small and large pores filled with cement substance, air or water. The components of this building material also include sand, gravel, and chemicals. Chemically active elements cause erosion of the screed surface. In addition, during the maturation of concrete, cement laitance comes out onto the floor surface. The layer that forms when it hardens on the surface is unstable and susceptible to destruction. As a result of the disintegration of the layer, small dust particles are formed.
Therefore, getting rid of the source of dust formation and removing the fragile top layer will help prevent dust formation. But this layer can not only be removed, but also strengthened by combining with additional crystals or polymers.
Why is it necessary to remove dust from a concrete surface?
- The processes of destruction of a concrete surface do not stop on their own. If no measures are taken to eliminate erosion processes on the concrete surface, then the destruction of its structure will spread to other layers of the base, gradually sinking lower and lower. Not only dust will appear on the concrete surface, but also cracks that will grow, affecting more and more new areas of the screed. It may get to the point where the concrete base becomes unusable and a new screed will need to be poured.
- There will be more and more cement dust every day, which will adversely affect the health of those living in the apartment. Cement dust rises into the air, negatively affecting the skin, eyes, and breathing. Dust dries the skin, sucking moisture out of it. Dry skin cracks, wounds appear that begin to bleed. The eyes water under the influence of cement. This is a protective reaction of the body. The most serious consequences occur from exposure to cement dust on the lungs. The soft lung tissue becomes coarser, the structure of the lungs changes. Chronic bronchitis or asthma occurs.
- But cement has a negative effect not only on human health. Dust clogs the parts of household appliances, causing damage and disabling them.
- A dusty floor always looks untidy and interferes with quality cleaning.
- If a floor covering is laid on a concrete floor, the dust does not disappear. It accumulates underneath him. If you lay carpet, the dust is absorbed into it. Wooden floors will begin to creak after a while, disturbing the peace and sleep of the owners, and will soon become unusable.
All of the above confirms the need to remove dust from concrete floors.