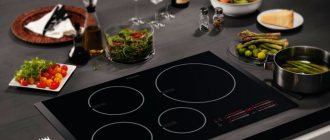
The most progressive development in the field of kitchen stoves can be considered a unit with an induction hob. This technology attracts buyers because it does not require the use of gas, as well as its novelty. But, despite high technology, malfunctions with induction cookers occur no less often than with other household appliances.
Operating principle of an induction cooker
An induction heating plate operates on a fairly simple principle of generating eddy currents in a magnetically and electrically conductive material. We are talking, first of all, about metals and their alloys with certain physical characteristics. In order for the induction heating element to work properly, the following conditions must be met.
- Use dishes made of special materials. Most often it is steel. It is this material that not only has good ferrimagnetic characteristics, but also the ability to generate eddy currents and actively absorb the energy generated during their passage.
- The heater power control system must ensure the creation of an alternating magnetic field. It is this that generates eddy currents in the cookware material. The field frequency ranges from 20 to 60 Hz and must be stable.
- The magnetic field of an induction heater is quite highly localized. This means that the item being heated must be placed as close as possible to achieve maximum efficiency of the process.
If we consider the induction cooker and the cookware installed on it from the point of view of physical processes, this system is a transformer. In this case, the heater coil acts as the primary winding. The magnetic field it generates causes eddy currents to appear in the dishes. It is the bottom of this object that acts as the secondary winding. There is no removal of electrical energy from it, so all of it is converted into heat. As a result, the pot or pan heats up.
Important! For normal and efficient operation of the induction panel, it is necessary that the area of the coil be as close as possible to that of the object installed on it. In this case, the energy is transferred almost completely.
If this condition is not met, the following unpleasant things happen:
- eddy currents do not form above an empty place on the stove that is not covered with dishes;
- the coil generated by energy in uncovered, empty places is not disposed of;
- As a result of incomplete energy removal, the coil overheats.
To neutralize this phenomenon, cooling radiators are installed in each induction panel. If they fail, the coil will have to be replaced. And in the most difficult cases, the output stages of the high-frequency power generation circuit will also require repairs.
Error codes
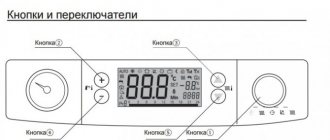
Modern induction cookers are equipped with information displays and self-diagnosis systems. If some problems are detected, the device itself will inform the user about what happened. Error codes for some manufacturers' slabs look like this:
| Manufacturer | Coil overheating | Overheating of the internal elements of the device | Incorrect supply voltage |
| Gorenye | F15 | F85 | F16 |
| Oursonn | E0, E10, EA, E3 | E6, E3 | E7 (E:07), E8 (E:08) |
| Electrolx | E4 | E1 | E5 |
| Miele | E | EF35 | ER |
| Bosch | E-22 | E-25 | ER-26 |
For users with repair skills and a sufficient level of knowledge, the error code will show exactly where to look for the problem. For others, this is an indication that they need to seek qualified help.
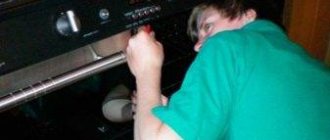
Disassembling the stove and diagnosing faults
If simple checks in the form of testing the supply voltage and examining possible places where contacts have broken have been passed and have not yielded results, there is only one thing left. The stove needs to be disassembled for a complete repair. It is recommended to do this only if you have appropriate knowledge in the field of electrical circuits.
Advice! Disassembly is done carefully and carefully. It is recommended to take a photo after each stage to make it easier to assemble the slab.
After removing the top decorative panel, the user will see the coils adjacent to it and their cooling system. At this stage you need to look around carefully. The locations of possible problems will be indicated by soot, changes in the color of the windings or individual components of the electrical circuit. Traces of melting are also important. It is from the points where such shortcomings are discovered that further research must begin.
If visually everything is in order, you will have to check everything without exception. Here it would be a good idea to have a schematic diagram of your stove on hand. It can usually be downloaded from the manufacturer’s website or found on thematic forums.
A typical check scheme looks like this.
- Power circuits are being examined. This is a fuse block; if they are found to be broken, they are replaced. Cables and wires are tested to ensure their integrity.
- The coils are inspected. Their spirals must have a uniform winding structure, without damaged conductors or traces of carbon deposits on the varnish.
- Temperature sensors are tested. This is done with a multimeter. When heated, the element changes conductivity. Therefore, a local heat source, such as a soldering iron, will come in handy.
- The connections from the coils to the high-frequency generator are being examined. Cables are connected, contact groups are inspected.
- In conditions of limited space inside the stove, the control board is subject to heating. It needs to be examined for possible cracks. Be sure to check the paths. If there are cracks on them, including due to corrosion processes after damage to the protective coating, they are eliminated.
- The non-functional burner is removed. It is removed together with the generator module. The board is being inspected. Parts that have failed are usually immediately visible by changes in the color of the housing or contact groups. This is where the schematic diagram of the stove comes in handy. Often it is simply impossible to read the markings on small parts due to the body being burned. They will learn what exactly to install from the circuit diagram.
Preparation for repair work
After all possible causes of problems have been checked, you have to move on to repairs. Preparation necessarily begins with the stove being disconnected from the power supply, in this case electric. By the way, before doing this, you should find out whether the outlet itself is working. This can be done using another, uniquely working device. Next, the surface is dismantled in order to be able to work with the induction system itself.
The first step is to visually assess whether everything is in order with the elements. For example, soot, changed shade and other traces should immediately alert you. Next, a full check of all components begins.
Contacts, cables and fuses are assessed using a multimeter - if resistance is detected in sections of the circuit, broken elements are replaced. The induction coil spirals are checked for cracks and contact between individual turns. Temperature sensors are again monitored using a multimeter. At the next stage, the wiring running from the induction coil to the generator is tested. Next, using an ordinary powerful light bulb and a magnifying glass, you will need to find out whether cracks have appeared on the control board. The latter can provoke a break in the paths carrying current.
Upon completion, the base of the non-working burner is inspected separately, if there is one.
Insufficient heating power
This malfunction of the stove can be caused by the incorrect placement of the pan on the stove: not in the center of the burner, but on the side, or the fact that the cookware itself is smaller in diameter than the cooking area itself. If everything is in order with the diameter of the cookware, then you should check the fit of the induction burner to the glass-ceramic panel. If it is not in tight contact with the panel, achieve a good fit using special pressing springs.
When the indicator flashes between the set power indicator and the reduced value, we can say that the control unit has automatically reduced the power of the cooking area due to overheating of the induction coil. In such a situation, the condition of the coil is checked.
How I fixed the induction cooker myself.
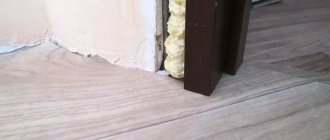
I purchased an induction cooker, but after three months it broke down. I turned it on, put the pan on it, added power to full (2 kW), the pan began to heat up, and after a few seconds the fuse burned out. I replaced the transistor under the radiator and replaced the fuse. The situation also repeated itself. And again exactly the same. Why do transistors burn out? I'll try to repair the induction cooker myself. The seal is broken. They dragged the stove, grabbed it with their hands and broke the sticker on the seal with their fingers.
There is a black spot in the photo, a blown fuse. Cooling transistor, replaced. When the fuse blows, the transistor body is cold.
I checked the rectifier for 570 Ohm phase and plus and phase with minus, except for where the probe is. The pan was set to a sufficient size. I found on the Internet that it is necessary to replace the driver transistors that are located near the field-effect transistor. Without an output transistor, the lamp does not light, the bridge is intact.
The photo shows the driver transistors in red:
I went to repair shops. Nowhere will they undertake to repair an induction cooker.
I did the following work:
- I replaced Lm339, but it was no use.
- I replaced 220 pF ceramic capacitors.
- Replaced transistors Q3, Q4.
- I installed a G4PH40UD transistor.
Now everything works. They never understood what the problem was.
Write comments, additions to the article, maybe I missed something. Take a look at the Electronshchik site map, I will be glad if you find anything else useful on my site. Share information on social networks, like it if you liked it - this will help the development of the channel
One of the burners is not working
At the very beginning, turning on the panel, the desired burner is selected using sensors. Only after selecting it can you set the power level. If the correct sequence has been followed, but it does not turn on, check what the cookware is made of. It must be either metal or cast iron, that is, it must have the property of being magnetized. Aluminum and copper cookware are not suitable for induction cookers. It is also impossible to cook on such a hob in glass containers.
If the cookware meets the required standards, but the problem remains, it is necessary to run test programs to check the burner temperature sensor. If it fails, it must be replaced. If the sensor is working properly, the tightness of the induction module to the glass-ceramic panel is checked. If necessary, the fit is adjusted using pressure springs.
Frequent malfunctions
Most often, the consumer is faced with the fact that one or more burners do not turn on, the stove makes strange sounds, does not heat up well, or stops working on its own. The essence of the most common situation is that the stove does not heat well. This cannot even be called a breakdown, because the problem arises if the bottom of the container being used has shifted relative to the center, or its diameter is much smaller than the hob.
If one or more burners stop working, you need to check whether their power is maintained, since overheating may cause several parts to fail. Insufficient heating can also occur due to an incorrect switching sequence.
As a rule, to start an induction cooker, you must first select the burner you are using using sensors, and then set the required power on it.
If the order is broken, then nothing will work. When the touch surface does not respond to touch, the problem may be simple contamination. After cleaning, you need to check again - if it doesn’t help, then you should inspect the connecting cables connecting the inductor circuit and the control panel.
When the temperature of the hob is no longer displayed, the problem may be a broken temperature sensor. Sometimes breakdowns occur in the fan, whose main task is cooling. The solution may be to repair the temperature sensor. If the ventilation system stopped working at all, then this could happen either because the motor was burned out, or because the control circuit was broken.
Sometimes the hob turns off on its own. This can happen if you use the wrong cookware - one made from a material that is not marked “for induction cookers”. It is worth mentioning that you should not use all containers made of non-magnetic materials, that is, aluminum, copper alloys, and stainless steel.
Heaters can turn off on their own for several reasons specified in the instructions. For example, by a timer signal or upon reaching a two-hour operating period. Also, the burners will stop working if no further action has occurred within 10 seconds after they were turned on.
An induction cooker makes noise when the heater power in the device is too high or when cooking is carried out in unsuitable containers. For example, noise occurs when the bottom of a pan is too thick or thin or has a diameter that is too small.
When the fuse burns out, the hob becomes impossible to activate at all. This happens either if it cannot cope with the load, or the transistors are short-circuited. Overheating of the hob can be caused either by contamination or excess liquid. The winding overheats when the entire structure is not placed on a hard surface, and the equipment begins to sag under the weight of the utensils used.
If the induction cooker clicks during cooking, then you should first study the instructions - for some models this “accompanying effect” is considered the norm. You should also not worry if the device hums, crackles or squeaks - these sounds are produced by induction coils when interacting with the dishes. When the surface of the induction hob, as well as what is underneath it, becomes very hot, it is worth checking whether metal objects, such as cutlery, are placed in the cabinets.
Finally, if the machine knocks out during startup, then first of all you should check its condition. Otherwise, the problem will be either in the connection or in the heating element.
The left pair of burners does not work
To find the reason why the block of hobs located on the left does not turn on, you need to check all the connections going from the coils to the control unit and to the power board. If you find that there are no connection problems, then you need to replace the control unit. If there are no positive results, the burner block must be replaced.
Error codes on the display can signal bad contacts in the wiring between the modules of the unit. In this case, the code “E8” appears.
The right pair of burners does not work
When looking for a malfunction in a Bosch induction hob or the same stove from another company, you should check the contacts located in the terminal box, as well as the condition of the coil block fuse. If a fuse blows, it must be replaced with a new one with the same marking. If there are no changes in a positive direction, check as described above for the left pair of cooking stations.
Also, the error code “E6” may appear on the LCD display. This error means that the induction hob is faulty. It is recommended to unplug the unit for 30 seconds and then turn it on again. If error codes reappear, the control panel will need to be replaced.
DIY repair
Please note that induction devices have a complex structure and require a competent approach. If you do not have experience or a specialized tool, you risk disrupting the quality of operation of adjacent elements in the device. For this reason, repairs may become unprofitable due to the high cost of restoration and spare parts. It is important to note that every fifth call from Remontano specialists is related to attempts at self-repair.
The stove does not turn on and there is no indication
First of all, you need to check the fuse, and then the mains switch. The next step is to check the connection between the control unit and the power board. Then between the control unit and the touch panel. If a failed module is detected, it must be replaced. If replacing the module does not help, the entire coil block is replaced.
Problems with the touch panel can be confirmed by the error code “E9” that appears on the LCD display of the device. Based on the list of error codes, it means that the touch control panel is faulty. It is recommended to disconnect the device from the network for 30 seconds. If the error reappears, the control panel changes.
Residual heat indicator does not work
You need to run a software test to check the temperature sensor. If it is working properly, the control unit is replaced. There are cases when the LCD display elements light up constantly or not all work. In the event of such a malfunction, the quality of the connections between the control unit and the touch panel is checked. You can try replacing the cable connecting the modules. If this does not help, the control unit must be replaced.
Cooling fan malfunction
The cooling fan may run continuously if you have set the heating power of the burners to maximum. It may also not turn off if the air temperature around it is more than 50°C. Otherwise, the malfunction may be caused by a faulty control unit that must be replaced.
In this case, the unit may also display error codes on the display. For a faulty fan, this will be error code “E7”.
The opposite situation also happens - the fan does not turn on. This behavior can be considered normal when the power level of the hob is minimal. It should turn on when the air temperature around it rises above 50°C. To check the fan, a test program is launched. If it shows that the mechanism is out of order, then it needs to be replaced.
High power burner does not turn on
There are situations when you want to turn on the most powerful burner, with a maximum power of 3 kW, but nothing happens. This is considered normal if other cooking stations are working and the temperature near the induction coil unit exceeds 780 degrees. To prevent overheating of the unit when the most powerful burner is turned on, it is blocked. When the cooking zones have cooled down, the lock will be released and the coil will turn on. But, if the burner does not turn on, you will have to change the control unit.
The stove switches off automatically
An induction cooker can turn off automatically in the following cases:
- if you turned on the unit and did not perform any actions on the touch panel within 10 seconds, for example, did not select a cooking place, did not set the power, and so on;
- the burners operate for more than 2 hours;
- if the electronic timer was triggered, on which the time to turn off the stove was set.
In other cases, when the stove may turn off spontaneously, it is impossible to do without the help of a qualified specialist, since it will be necessary to replace the control unit or the entire induction coil unit.
Troubleshooting
Immediately after purchase, you should carefully inspect the unit and find out whether all its visible elements (door, switches, grilles, etc.) are securely fastened in place. After this, you should connect the unit to the network and run some kind of gentle program “idle” - this way you can find out whether there is a manufacturing defect.
Most often, owners of electric stoves from the following manufacturers face the problem of extraneous sounds: Gorenje, Indesit, Gefest, Zanussi, Hansa, Kaiser and Electrolux.
The hob makes a humming sound when operating
An induction cooker can make various noises during operation, and they can occur for the following reasons:
- the device may hum if a pan with a thin bottom is placed on the cooking surface, or if the power is set to excessive;
- the stove often hums or whistles when placing a small saucepan on a large burner;
- vibrations can occur at the junction of different materials, when the bottom of the pan consists of several layers;
- The intensity of the noise depends on the amount of cookware on the hob.
If the sound signal is constantly sounding, it can be assumed that the reason that it does not turn off is in the control unit, which can only be repaired by replacing it with a new one.
Where to buy a new stove
You can resolve the issue as quickly as possible by visiting the nearest specialized store. The optimal option, in terms of price-quality ratio, remains purchasing from the AliExpress online store. Mandatory long waits for parcels from China are a thing of the past, because now many goods are in intermediate warehouses in destination countries: for example, when ordering, you can select the “Delivery from the Russian Federation” option:
| Induction electric stove Zigmund & Shtain ZIP-555 | DMWD Mini-stove electric, magnetic, induction | Induction hob Zigmund & Shtain CI 32.6 B |
| Induction hob Sakura SA-7152FS, 2000 W | Induction cooker, hob stove Bangdun AJ35 3500V | Portable Induction Cooker 2000W |
Useful tips for the master
For faster repairs in conditions of inaccurate identification of the malfunction (and not only), we can give some useful tips. Firstly, the generators on the burners are designed as an independent module. They are being removed. By swapping generators (from one burner to another), you can quickly understand what is broken, the coil or its high-frequency voltage blog.
The second tip will sometimes help you save a lot on repairs. In slabs that are not cheap or are rarely found due to their lack of popularity on the market, the burnt part can be unique and very expensive. And its rarity further increases the cost of replacement. But it is not at all necessary to install the element indicated on the circuit diagram of the slab. There is a compliance database of electronic components. It can be easily found on the Internet by searching Datasheet or on thematic forums. In it you will find a more inexpensive or commercially available analogue of the part that is needed for replacement in an induction cooker.
If the cause of the breakdown has not been determined, or difficulties arise about how to purchase and install failed modules, then it is better to contact professionals to repair the induction cooker. You should also remember about warranty service, the right to which you may lose if you open the unit yourself. An induction cooker is a “smart” appliance and requires careful adherence to operating rules.
Major breakdowns
There are several characteristic damages that can cause a loud clicking sound:
- The regulator relay is broken. The relay turns the current flow to the plate on and off. It is this part that turns on with a click when the burner operates in pulses. If the relay is damaged, worn out, or the contacts near it have oxidized due to water ingress, the device will click and not heat up. Or you will hear frequent loud bangs, and then the device will completely stop turning on. In both cases, the relay needs to be replaced, and at the same time the wiring nearby must be cleaned. To do this you need to contact the service. Self-repair of Hansa, Gorenje, Bosch and Zanussi equipment is prohibited by the manufacturers and is extremely dangerous.
- Fan. Another case where the induction cooker clicks louder than usual is related to the cooler. If one of the blades is deformed, dirt has stuck to it, or the cooler has moved off its normal axis, it will begin to rotate with a louder sound, it runs “heavier” and generally becomes more noticeable. Most often, this part cannot be repaired; the blades will definitely have to be replaced. The Ariston, Indesit and Kaiser brands recommend using only original spare parts.
- Thermal sensor. This is a sensor that monitors the temperature on the surface of the burner. In normal mode, it is this sensor that transmits information to the control module that the relay should turn the current on or off. If the temperature sensor is broken, it will constantly send random signals to the control unit. This failure can quickly lead to regulator failure and even serious damage to the copper coil. Most often this problem occurs in the Gefest technique.
Do not restore the stove's functionality yourself. Call a specialist so you can be sure that the repair will be successful. LenByt issues a guarantee for all types of services. To submit an application, call or use the online feedback form.