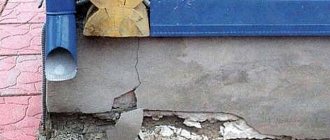
The back of the cabinet is designed not only to protect things from dust. It adds stability to the furniture, creates completeness, and also performs a decorative function, complementing the design of the room. It will be useful for home craftsmen to learn about the types of fasteners, materials and secrets of installing the back wall of a cabinet. Experts will express their opinions and answer readers' questions.
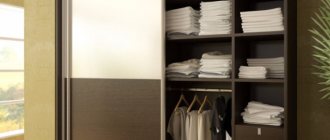
Example of fastening the rear wall of an OSB cabinet
Do you need a back wall in your closet?
This part rigidly connects the wardrobe structure, giving it the correct shape and additional stability. But this is not always required for a number of reasons:
- Built-in furniture may not have a back. Such a cabinet is mounted to the wall of the room or inside a niche, and does not require additional support.
- The absence of a back part in cabinet furniture will lead to loss of the original shape and distortions. The front end will also suffer. Swing doors will warp along with the body, and sliding doors will fall out of the guides and slide to one side. This happens because the things inside put an uneven load on the body. In addition, the niches in the walls and the shelves of the wardrobe have different shapes and sizes, which creates additional difficulties for the stability of the entire structure.
- If you buy a partition cabinet that will be used on both sides or as a shelving unit, it will not need an additional wall.
- For a kitchen cabinet, not only stability is important, but also adherence to the wall, so the back is attached using grooves.
Nuances of choice
To select the ideal plastic cabinet with the optimal price and high performance parameters, the selection rules are taken into account:
- high quality plastic;
- the presence of numerous storage systems;
- affordable price;
- optimal dimensions for the selected installation location;
- attractive colors;
- suitable design;
- ease of opening.
Thus, plastic cabinets are considered an excellent choice for a balcony. They have many advantages and are available in various models. They are easy to care for and multifunctional. If you can’t choose the right model, you can start the process of creating the structure yourself.
What material is it made from?
To dwell on a specific option, let's consider the positive and negative sides of each.
| What is the name of the material | Its advantages | Main disadvantages |
| Chipboard (chipboard) |
|
|
| Fiberboard (Fibreboard) |
|
|
| HDF (High Density Fiberboard) |
| high price |
| Plywood |
| cannot be processed with all types of materials |
| LDSP (Laminated chipboard) |
| high price |
| OSB or OSB (Oriented Strand Board) |
| some manufacturers add glue to the material that contains resins that are harmful to health |
Peculiarities
Plastic cabinets installed on the balcony perform several functions at once:
- the free space is filled, so a multifunctional piece of furniture is installed in the room;
- if you buy a spacious wardrobe, then it is used to store numerous objects and things, so they do not clutter up the space on the balcony, and are also hidden from view and laid out in optimal order in various compartments of the structure;
- plastic products can have different colors, so a model with the optimal shade is selected, which allows you to create a balcony in a unique color scheme.
Many people are put off from such a purchase by the material used to make the cabinet, as they believe that plastic does not have optimal strength and reliability, but modern high-quality products are made from special alloys that guarantee durable furniture that can withstand heavy impacts, constant exposure to sunlight, and temperature changes , exposure to moisture and other factors.
Plastic products are optimal for balconies, as their advantages include:
- UV resistance. The balcony usually has large windows, so it is not possible to hide various objects in this room from the sun's rays. Plastic structures will not fade or melt at high temperatures if truly high-quality models are selected;
- resistance to high and low temperatures. Typically, a balcony is an unheated room, so it is required that all items are resistant to low temperatures or changes in temperature;
- attractive appearance - due to the ease of processing the material, special technologies are used for the manufacture of various plastic products. This leads to the fact that numerous cabinet models may have different sizes, configurations, colors and other interesting characteristics;
- spacious and multifunctional - choose a cabinet for the balcony, equipped with many storage systems and additional elements. They allow you to really store a lot of things in this design, so you can free up various furnishings in your living space.
The above advantages apply exclusively to the most reliable and high-quality structures made from modern alloy. Cheap structures can melt under the sun's rays or be destroyed by minor mechanical shocks.
How to secure?
Let's look at the details of self-assembly of the rear part. There are several ways to do this, each of which is suitable in a specific case.
Overlap fastening
The most practical and inexpensive option for this method would be fibreboard (in common parlance “hardboard”). The thickness of the fiberboard should be 3-5 mm. This material is especially suitable for sliding wardrobes. You can also use plywood, OSB and other materials with a flexible structure. You should not use nails for fiberboard or chipboard - fastening with their help is unreliable, and the panel may fall off over time at the slightest impact.
Step-by-step installation instructions:
- Assemble the cabinet and open the back according to its size, but 2 mm less on each side. For example, for a structure measuring 1800x700, the fiberboard should be 1798x698 (the base is not taken into account).
- Secure the corners of the sheet to the body. Use screws measuring 3x16, 3.5x16 or 4x16 for this.
- Screw in the screws along the edges of the sheet. Their exact number depends on the size of the cabinet. For greater strength, the distance between the screws should not be more than 10-15 cm. At this stage, to save money, you can nail a small number of nails measuring 1.2×25 or 1.2×20.
Groove mount
Most often this method is used for kitchen wall units. In this case, the recessed wall does not prevent the cabinet from fitting tightly to the wall and is easily adjustable. This method is also suitable for furniture that is in plain sight. The back part inserted into the groove becomes invisible and the cabinet looks beautiful.
Installation in grooves with additional fixation with corners
Step-by-step instruction:
- Pre-make grooves 10 mm deep. in the walls, bottom and roof of the module.
- Now secure the back into the grooves. Assembly starts from the bottom and ends with the roof.
- If the width of the grooves is too small, you can slightly grind the edges of the back wall.
In the form of an internal insert
This method allows you to secure the back part from the inside without moving the cabinet. Most often used for large and heavy furniture. But a fiberboard sheet is not suitable for this. “Orgalite” demonstrates good strength during tensile deformation, but in this case the entire structure will compress the back wall, so it is better to choose laminated chipboard with a thickness of 6-10 mm, which will withstand such a load.
Step-by-step installation instructions:
- Cut the blanks a couple of millimeters smaller than the dimensions of the niches. The remaining clearance will be used for the seal. Do not forget to process the edges of the finished sheets so as not to scratch the inner sides of the walls and shelves;
- Before installing the panel, secure 4-8 metal corners in each niche so that the back side of the corner is flush with the end. This way you will place the wall evenly, and it will not fall out on the back side - the corners will hold it inside.
- After installing each sheet of chipboard, attach it from the inside. You can use rastex, canonical screed, plastic or metal corners. Read more about fastening methods.
The video below shows the homemade production of an inset back wall without the use of professional tools.
Butt-to-butt connection
This option is suitable when you need to install a back wall of several sheets on a two- or three-section cabinet or if the fiberboard sheets are narrow. In this case, the remaining edges of the sheets are screwed overlapping with self-tapping screws (see the first method).
How to install correctly:
- Attach the fiberboard sheets overlapping the edges of the cabinet.
- Use self-tapping screws at the joints. They are screwed between the fiberboard sheets on top of special plates that come with the cabinet, which will firmly press both sheets to the partition.
The plates can be replaced with ordinary metal washers or made independently. Stores also sell plastic connectors specifically for these purposes.
Connecting profile 2 meters long for the rear wall of the cabinet.
Branded fasteners
Furniture hardware companies often offer their own proprietary cabinet designs. They are easy to install, used in finished projects, and sold individually and in packages in hardware stores.
After installing the back wall of the cabinet, if it is placed in the center of the room, think about decor options.
Stages of work
First of all, you need to measure the width of the balcony and decide how much area the cabinet will occupy. If you plan to build a structure for the ceiling, you need to measure the distance from the floor of the balcony to the top slab (or canopy if the apartment is located on the top floor).
Next, a drawing is developed. It is not necessary to carry it out according to all the canons of engineering: it can take the form of a randomly executed drawing. But it must be detailed enough so that all the necessary blanks can be made from it and - most importantly - then assembled into a single structure without adjustments.
Universal sizes of balcony cabinets:
- width – 1.1-1.25 m;
- height – 2.4-2.5 m;
- depth – 0.45-0.6 m.
The cabinet assembly technology is as follows:
- Parts are made: timber is cut into racks, shelves are cut out of plywood, panels are prepared for cladding, etc.
- Mark the installation location of the frame. If you plan to build a cabinet to the full height of the balcony, first marking lines are drawn on the ceiling, and then they are transferred to the floor using a plumb line. The lower and upper contours are connected by vertical lines drawn along the wall.
- Fix the parts of the floor and ceiling frames of the frame.
- The resulting rectangles are connected by vertical posts. The beams adjacent to the wall are secured with self-tapping screws in increments of 35-40 cm.
- Additional horizontal bars are nailed, which will provide rigidity to the frame. At the same time, they will act as supports for the shelves. For fastening, metal corners are used, which are pre-installed on the lower surface of the horizontal parts.
- The frame is sheathed with plastic, and the back wall is installed from the inside of the cabinet, and all the rest are installed from the outside.
- The shelves are laid: they can be screwed with self-tapping screws to the supports or simply placed on them.
- The doors are made: frames are assembled from 12-15 mm boards and covered with sheet plastic. In tall cabinets, the doors can be divided vertically in two. In this case, the user will be able to open the zone that he currently needs.
- Doors are hung using “butterflies” or furniture hinges.
Experts' answers to readers' questions
In the “question-answer” section they often write about the back wall of the cabinet. Experts in the field of furniture production have selected the most popular ones and we publish them here.
There is an unpleasant smell from the back of the cabinet, what should I do?
In this situation, you can try 2 options:
- Treat the entire structure with Smelloff universal odor neutralizer. This product is safe for people and pets.
- If the first option does not help, you should replace the back panel with a new one.
Read about methods to get rid of unpleasant smell in the closet.
How to make a hole in a cabinet wall
Sometimes it becomes necessary to make a hole for an outlet or switch right inside the cabinet. In this case, the advice is:
- Depending on the shape and size of the cutout, you can make a hole using a jigsaw or a fine-toothed wood saw.
- The edges must be covered with a U-shaped edge made of plastic or PVC.
How to make a wall with your own hands?
Choose a material suitable for your design and cut a sheet of the desired shape (if the dimensions exceed the dimensions of the cabinet), or assemble a wall from several small sheets.
How to remove nails from the back wall?
- If the head of the nail sticks out on the surface, you can pull it out using side cutters or a small nail puller.
- If it is deep in the wall, first access the head using a wood punch, and then remove the nail with pliers. This method involves damage to the material and will have to be replaced in the future.
- When the hardboard back wall is overlapped, the best way to remove the nails is to carefully drive a flathead screwdriver between the fiberboard and the cabinet body, using light pressure to push the wall away. The nail heads will be visible and can be pulled out using the first method.
How to strengthen the back wall?
To strengthen the structure, it is enough to attach two narrow planks at the back crosswise, which will cross the entire surface of the cabinet.
There is mold in the closet, what should I do?
If the material is moisture resistant, you have 2 options:
- Use chemicals from the store: ALPA FONGIFLUID, Cillit Bang for black mold, DALI;
- Treat the surface with a folk remedy: brown soda or soda.
Antiseptics
If the material does not have moisture-resistant properties, it is better to replace it.
Features and Benefits
Plastic, like any material, has its own characteristics that affect the structure and functionality of the furniture.
Among the main advantages are:
- Cabinets of this type are quite compact. They are small in size and width, are spacious, but do not take up much space.
- Furniture made of plastic is highly durable.
- The products are not strongly influenced by humidity and room temperature.
- Artificial material, unlike wood, will never harbor parasites that affect its condition.
- Using plastic parts, wardrobes and small cabinets of various shapes are made, among which everyone will find a model to their taste.
The disadvantages of such products include the following:
- Plastic can be difficult to repair, especially on the front side of the wardrobe. Even if the damage is repaired, a trace of it will be visually noticeable.
- On colored materials, dirt and fingerprints are more visible.
The disadvantages of the products are insignificant, so you can safely choose a plastic cabinet for any room in your home.
Types of fasteners
To hang a cabinet on the wall you will need reliable fasteners; hardware stores offer several types of these. They make furniture installation and dismantling simple and convenient.
It is worth paying attention to:
- mounting strips;
- furniture corners;
- special fittings with adjustment.
Mounting strips
A fastening element in the form of a longitudinal metal strip with holes ranging from 5 cm to 3 m in length. Fastening cabinets to a mounting strip is easier to do than to other types of fasteners, since you do not need to hold the entire structure suspended in order to mark the places for drilling holes. First, a rail is attached to the wall, its position is leveled using a level, and then furniture is hung on it.
Mounting for a wall cabinet has the following advantages:
- One person can handle the installation;
- high precision of furniture placement;
- Possibility of adjustment after hanging;
- notches allow you to set the length;
- there is no need for a leveling border;
- simplifies installation and dismantling.
Flaws:
- high cost of the set;
- due to the loose fit of the cabinet to the wall, a visually noticeable gap is formed;
- small objects lying above may fall into the space behind the furniture;
- high requirement for evenness of walls.
Furniture corners
The simplest fastening element in its structure is a small metal strip, bent in half, with holes on both sides. It is used for installation, fastening of wall cabinets, connecting them together.
During installation, you will have to use the help of a second person to help hold the cabinet while marking. You can attach corners to uneven walls or drywall. The disadvantage of a furniture corner is that you cannot adjust the position of objects, so the accuracy of drilling holes is very important.
Special fittings with adjustment
Externally, this hardware is a small plastic box with the heads of adjusting screws protruding outward and several holes for fixing. Some models of fittings are completely metal, which increases their reliability. In metal products, there are metal inserts around the holes that strengthen the mechanism.
Antique restoration
This method is more labor-intensive than the one described above. To decorate an old antique cabinet, only natural wooden materials are suitable. There is no need to completely disassemble the cabinet. But you will have to move it outside.
Attention. The aging process of wood is accompanied by a large amount of waste wood shavings and dust.
Rust must be removed from metal parts. Large wood defects are covered with putty
Panels and frames are cleaned of old varnish and paint. Then they need to be carefully sanded. In the process you will need to use:
- sandpaper of different grain sizes or a sanding machine;
- metal brushes with thin wire, synthetic or abrasive-polymer brush, as well as a sisal finishing brush;
- tourist gas can with burner;
- stains, impregnations or natural oils for wood.
Conclusion
The door in the screen under the bathtub is very convenient. Making it with your own hands is not difficult, it will take a little time and materials. The whole process will take hardly more than a couple of hours.
Many owners of residential property do not use balconies for any purpose, but such a decision is considered irrational. If you properly insulate and decorate this room, it can replace a storage room, dressing room or other room. For storing various items and accessories, cabinets installed along a certain wall of the room are considered preferable. It’s quite easy to make a balcony cabinet with your own hands, for which you can use different materials.
Video
In apartments - both small and spacious - there will always be items that are rarely used, but it is not advisable to throw them away. They interfere in everyday life, so until the next use they are sent to the balcony or loggia. Gradually a disorderly pile of things forms here. It tends to spread over the entire area. As a result, finding the thing you need at the moment becomes so difficult that it becomes easier to buy a new one. Installing a plastic cabinet on the balcony will help reclaim space from these deposits.
Fiberboard
The back wall, made of wood-fiber boards, is installed on the assembled furniture body. Its thickness is most often 4 mm.
This “backdrop” is attached in a lying position with self-tapping screws or a construction stapler. If a wall made of this material is mounted vertically, then it is first divided into parts and assembled in stages.
Fiberboard is made from low-quality round wood or wood waste - sawdust and shavings. They are processed into fiber mass. Various chemicals are added to it in order to increase the water resistance and strength of the future material. Next, it is sent to casting machines to increase humidity, and then under a hot press.
Advantages
Fiberboard has only one advantage - relative cheapness.
Flaws
This material has much more disadvantages.
- The strength of fiberboard structures, especially high ones, is very limited.
- A limited range of colors - no more than 5 shades.
- The material does not withstand high humidity, as often only one side is painted or laminated.
- Installation requires a lot of free space, which is physically impossible in small rooms.
- Often the wall has a persistent unpleasant odor.
- Due to the overlapping installation, the material is visible from the end of the furniture, which spoils the aesthetic appearance. Attaching tall wardrobes to the wall becomes more difficult.
Preparing parts
It is necessary to carry out the process of creating a design step by step in order to avoid significant mistakes. It is recommended to carry out all work on creating the structure on the loggia, where the finishing has already been completely completed.
The design of a standard cabinet is considered simple, so you only need to prepare the parts correctly:
- parts of the future frame are being prepared, and we make them from wooden beams or metal profiles, and their dimensions must fully correspond to the pre-made diagram;
- the lining elements are cut out so that they have the required dimensions for fastening;
- fasteners are prepared for fixing parts of the sheathing to the frame.
If you do not have experience in this area, then it is recommended to first watch a video of creating a cabinet on a balcony with your own hands in order to take into account the main nuances and rules of this process.