When we talked about autonomous heating of an apartment, we drew your attention to the fact that electric convectors are one of the most suitable heaters. With the help of such devices, you can economically heat not only individual unheated rooms (for example, a balcony), but even the whole house. Next, we will briefly look at how to install an electric convector on a wall with your own hands, providing not only instructions, but also a visual video lesson.
Pros and cons of individual gas heating
Please note that the quality of the device, as well as the duration of its successful operation, directly depend on the price of the gas convector.
Is it possible to buy a cheap unit and connect it in the house? Yes, but keep in mind that an inexpensive model will last you no more than a year. At the same time, it is unlikely that it will be possible to repair such a convector if it fails. At the same time, it is unlikely that it will be possible to repair such a convector if it fails.
Let's consider the advantages of gas heating appliances, based on the fact that you did not save money when purchasing and purchased a high-quality unit.
Advantages of gas convectors:
- the room heats up quickly,
- economical use of fuel,
- The device can be easily installed indoors by yourself,
- reasonable price,
- a gas convector does not require installation of a heating system,
- does not destroy oxygen in the room,
- the heater can be mounted to a gas cylinder,
- the device operates in autonomous mode,
- If the convector operates on the principle of natural circulation, then it does not depend on the power supply.
Important: gas convectors with a closed combustion chamber can be installed safely in any room, including the bedroom. Disadvantages of gas convectors:. Disadvantages of gas convectors:
Disadvantages of gas convectors:
- in order to correctly install a gas convector connected to a centralized system, it is necessary to obtain permission from the relevant municipal authorities,
- the connection diagram for a gas convector requires punching a through hole in the external wall of the building, in the place where the device is planned to be installed,
- impressive size,
- if you plan to use several gas convectors for heating an apartment or house, then each of them will have to be individually supplied with gas from outside the building.
Important: experts insist on choosing models with a built-in fan. They are more efficient than similar devices with natural convection
Is the fan closer or farther from the window?
The position of the in-floor radiator fan in relation to the window opening depends on the intended purpose of the device . If the convector is installed only as a thermal curtain , the fan should be located closer to the room and direct the flow of warm air onto the glazing.
If the main function of a floor-standing convector is heating the room , then the fan must be installed closer to the window opening so that it directs cold air from the glazing through the heat exchanger into the room.
We recommend that you always install the fan closer to the glazing . Thanks to the increased power of these devices in this position, they will cope with both functions: heating and cutting off cold air.
General requirements
In some cases, the best way out of the situation will be to install a gas convector. This heating device is mounted on the wall and is powered by a gas cylinder. The possibility of power supply from the main line is also provided. If gas appears in your locality in the near future, purchase gas convectors. The following requirements apply to their installation:
- Mandatory maintenance of distances to the nearest objects and walls in accordance with the installation instructions;
- The gas pipe is supplied along the street;
- When installing in a household with wooden walls, it is necessary to consider thermal insulation;
- The convector should not be installed at a great distance from the floor, as this will reduce the efficiency and intensity of the convection process.
Let's see how to install such a convector on a wall.
Gas supply to the convector
Close the gas valve located in front of the meter.
This process requires special attention in any room, and even more so when it comes to a wooden house. The main thing here is to check whether all gas supply elements correspond to the description of the accompanying documentation.
Ball valves with yellow handle markings are screwed onto the convector. They must remain closed until start-up. It is necessary to screw a hose or sleeve to the gas cylinder or line; be sure to check the presence of a paranitic gasket in the union nut of the hose.
The next step is to connect the other end of the hose to the tap installed on the gas convector. Here you should also check whether there is a gasket. Then you need to crimp all connections using spanners.
Calculate the force; it is important not to overpress the gaskets, otherwise gas will pass through damaged parts of the system.
Now you can open the gas and taps on the convector. Using a shaving brush, apply the foam solution to all joints. After making sure that there are no leaks, you can proceed to the first start-up.
The first start-up in a wooden house is made with the windows open for ventilation.
Gas supply: main stages
The installation of the gas convector has been completed, now we need to get started with the gas supply. This stage is quite complex and responsible at the same time. To supply gas, do the following:
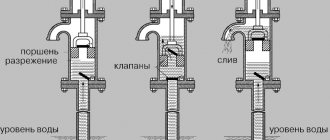
Scheme of operation of a gas convector.
- According to regulatory documents, the pipe leading to the convector must go along the street. There are two options here: the first is that the pipe has a pre-installed threaded connection, the second is that there is no such connection. If there is a thread, then you can screw on the gas valve yourself, which will shut off the gas supply to the convector. If there is no withdrawal, one must be made. To do this, call professional gas welders from your local Gorgaz or similar office.
- After installing the gas tap, it is necessary to run a metal-plastic pipe to the convector itself. Using a tape measure, calculate the length of the pipe, simultaneously determining the presence of fittings.
- You need to buy pipe and fittings. The principle of purchase is that the seller must clarify the availability of a certificate of conformity of these pipes and fittings for this type of work.
- Lay the pipe, secure it with clips every m. To install the clips, you need to drill holes in the wall.
- When installing the necessary fittings, carefully lubricate the pipe and the fitting itself with silicone, which will provide additional sealing. Silicone will also serve as a lubricant and will make pipe installation easier.
As a result of the work, you should receive a convector mounted on the wall with a gas pipe connected to it.
Now the last stage of installation remains. A test run is required.
Gas convector installation diagram.
Before starting, open the gas tap and go over all fitting joints and threaded connections with a brush moistened with a water solution of soap or shampoo. This way you will be able to notice inflated bubbles (if any), which indicate gas leaks. If this happens, immediately turn off the gas supply valve. After checking the joints, start the convector. To do this, hold down the gas button for one minute. This way the gas will have time to pass through the pipes and enter the combustion chamber. Press the piezo igniter, a spark should ignite the gas. A blue flame will flare up in the firebox.
Adjust the operation of the convector by setting a comfortable temperature. During the first few hours of operation, you may smell an unpleasant odor of burning oil. This is normal, since the convector is new and the combustion chamber burns out. If the smell lingers for a long time, then you should turn off the gas and check all joints and threaded connections again.
It is advisable that all work on the installation of gas convectors be carried out by a professional who has sufficient experience in performing such work. This is also due to the fact that installing a convector yourself may void your warranty on the device. The gas convector must be accepted into the balance sheet by Gorgaz. You must have a documented permit for the tie-in. In addition, all installation decisions, as well as the conclusions of the commission for acceptance of the device into operation, must be documented and signed in the appropriate manner.
How to maintain a trench convector?
Like any other heating equipment, trench heating convectors require periodic cleaning. This is done using a vacuum cleaner, after removing the protective grille. Clean the finned surface of the heat exchanger, using a brush if necessary, to remove dirt and dust. The grill itself can be washed with water.
During hydraulic tests, when the pressure in the heating system exceeds the nominal one, it is necessary to make sure that the convectors do not leak. To do this, just open the grille and inspect the box. If it is dry, it means that the convector has passed the test with honor.
Subject to the installation and maintenance rules, in-floor water heating convectors will bring warmth to your home without violating the overall design idea. A convector installed in front of the front door can trap up to 90% of cold air when it opens and create a thermal curtain. At the same time, they are silent, look stylish and, thanks to the variety of colors, fit perfectly into any interior, giving coziness and comfort.
With or without a fan?
Fans on in-floor water convectors significantly increase the power of the system as a whole, since they force air through the radiators. Using fans, you can absolutely precisely regulate the volume of air passing through and, accordingly, the air temperature in the room. Of course, such a system upgrade will take a little more money out of your pocket, but if you are ready to spend money for greater comfort, feel free to install it, you won’t go wrong!
What is a heat exchanger
This is a technical device made of a material with a high thermal conductivity, in which two environments with different temperatures come into contact through a partition. It is through the wall of the device that temperature is transferred from one medium to another.
There are two types of heat exchangers:
- Recuperators. That is, those in which temperature transfer occurs through a partition.
- Regenerators. In them, media with different temperatures come into contact with one single surface in turn.
The principle of operation of the heat exchanger There are several types of heat exchangers, differing from each other purely in design. These are the commonly used options:
- A coil is a tube wound onto a chimney pipe through which water moves.
- Pipe in pipe. This is a cylinder-shaped structure mounted on a chimney. Water flows inside it, which enters the structure through the lower pipe, and exits through the pipe installed at the top of the heat exchanger. The liquid is heated through the chimney wall.
- Spiral. They are rarely used in everyday life, because structurally it is a container in which a pipe is laid in a spiral (along the inner walls), with a hot medium moving inside. Unfortunately, the chimney will not work in this form.
- Shell and tube. This is not a household unit. Its design is a container in which a large number of tubes are inserted. A high-temperature medium moves through them, and water moves between the tubes.
- Plate ones, they are also called convectors. This model is the same as the previous one. Only instead of tubes, there are hollow panels installed in it, through which a high-temperature medium moves. And between them there is water. The efficiency of thermal energy transfer here depends on the direction in which the media move relative to each other. Optimally – towards each other.
Spiral type heat exchanger
There is another classification in which heat exchangers are divided into water and air. The first ones were written above. As for the latter, they are mainly used to organize additional heating of premises. A prominent representative of such units is corrugated heat exchangers.
To do this, they use corrugated steel pipes (they are flexible), which are wrapped around. It turns out that high-temperature carbon monoxide gases coming from the furnace firebox give off some of the heat to the air passing inside the corrugation. The latter is connected to the street; it is usually introduced into the room through an opening located close to the floor. Sometimes a low-power fan is installed to give the air a low speed. The opposite end of the corrugation is installed in the room where the temperature needs to be raised.
Materials for heat exchangers
Usually the chimney is assembled from metal pipes. Rarely, ceramic or glass chimneys are installed in the steam room of a bathhouse or other rooms other than the main house. Too expensive. Therefore, we can safely say that these structures have high thermal efficiency. Therefore, a heat exchanger can be mounted on them.
Copper pipe coil
The material for the heat exchanger itself is selected to withstand high thermal loads, because the temperature of carbon monoxide can reach +500C. Plus, it is necessary to take into account the negative impact of water on metal. Therefore, the coil tubes must be made of either copper alloy or stainless steel.
If you decide to build a pipe-in-pipe heat exchanger, then for its manufacture it is better to use a stainless steel or galvanized structure.
Convector heating, its features and operating principle
The operating principle of convector heating is based on the properties of air masses. Heated air is lighter than cold air, so it always rises. After cooling, the air masses descend to the lower part of the room and are heated again when passing through the convector.
The main advantage of convector heating is the rapid heating of the room and maintaining the desired temperature throughout the entire operating time of the device. Convectors are suitable for heating residential and commercial premises.
The operating principle of convector heating is as follows:
- Inside the heating device there are heating elements with a significant surface area. They heat up when using certain energy resources.
- When air comes into contact with the heater area, it warms up and becomes lighter.
- The heated air exits through the convection holes at the top of the radiator and rises.
- After cooling, the air masses descend to the lower part of the room and again enter the heating device through the slots in its lower part. This circulation continues while the device is operating.
Connection diagram
Water convectors are specialized equipment, so their installation is best left to professionals, especially when it comes to installing in-floor or basement types. You are only allowed to install wall-mounted water convectors yourself. In this case, it is necessary to follow a strict sequence of actions.
- It is necessary to mark the wall - using a level to determine the location of the convector itself, the place of water connection and, if necessary, electricity. Here you can either attach the radiator itself to the wall, or make markings with a ruler using the data in the product passport.
- Then the wall is drilled according to the applied markings and screwed into the dowel holes.
- Carry out the installation of pipes and electrical cables.
- The back of the convector is screwed to the wall with screws that are included in the kit. In this case, first they simply attach it to the screws, then measure the accuracy of fastening with a level, and only when they are convinced of this, screw the installation panel to the end.
- Now you need to secure the heat exchanger unit to the installation panel. For this purpose, it is allowed to use only those screws and fasteners supplied by the manufacturer.
- Now the electricity cable is connected to the terminal box. In this case, the main connection parameters are the manufacturer’s instructions and electronic circuit diagram. You must act strictly in accordance with it.
- Install the fan and, if necessary, adjust its position using a special device - a potentiometer.
- Now you can start connecting additional fittings. A thermostatic valve is installed at the inlet of the pipes, and a special threaded connection is installed at the outlet. It is imperative to check the tightness of the entire structure using an air compressor.
- Now you need to connect the pipes to the heating system. This must be done in strict accordance with the project.
- Finally, you can begin to assemble and install the water convector itself. To do this, in accordance with the diagram, install the frame, grille and thermostatic head, and attach the walls of the radiator.
- Using special adjusting screws, calibrate the location of the device on the wall, focusing on the level.
In principle, the installation of a built-in underfloor water convector is carried out in approximately the same way. Only first, when performing a rough screed, special built-in boxes are made in the floor, into which the radiator itself will later be placed.
Without any skills, it will be quite difficult to install such a water heating convector yourself for the first time. Therefore, here you either need to call a specialist, or be patient and act as carefully and slowly as possible.
Which convector is better to choose
The construction of a space heating system based on electric convectors is one of the main directions of development of public utilities in developed countries. These devices are produced at many large foreign and domestic enterprises, so the consumer can choose the type and brand of heater in accordance with their preferences and financial capabilities.
Many of the enterprises producing electric convectors produce other types of household appliances, so their brand is well known to domestic consumers and inspires confidence in them.
For those buyers who are not afraid of the relatively high cost, experts recommend products from the French company Noirot, which specializes in heating equipment, and are extremely reliable.
The Electrolux company, widely known in Russia, produces high-quality electric convectors at a price slightly above average.
The products of the concern for the production of climate control equipment Bally, which unites four main organizations, enjoy a good reputation:
- German companies Punker Gmbh and EBM PAPST;
- Izhevsk State Technical University named after. M.T. Kalashnikov;
- Milan Polytechnic University (Italy).
There are other domestic enterprises that produce these products or are mastering their production.
As with any serious purchase, when choosing a brand of electric convector, it is advisable to find out reviews from friends who already have such equipment, and, if possible, personally become familiar with its operation.
Installation of gas stove and convectors
It is prohibited to install the convector at a distance of less than 4 meters from open sources of fire, including a gas stove. The hose suitable for the convector must have a dielectric insert, this will prevent a fire in the event of a short circuit in the wiring in a wooden house.
An important factor is the grounding of sockets located near the gas stove and convectors, although in a wooden house they should be grounded a priori.
There are three types of supply hoses that are allowed for a gas stove in a wooden house, namely:
- Rubber-fabric - its advantage is that it does not conduct electric current, but it is more susceptible to mechanical damage compared to analogues;
- Metal sleeve - when using it, a dielectric insert must be inserted from the gas stove to the main line, but otherwise it has the best performance among analogues. In addition, it is recommended by the latest approved standards. Its only drawback is the price, it bites;
- Rubber with metal braiding - it is more capable of withstanding serious impacts, and also, thanks to the rubber core, does not conduct current.
When purchasing a metal hose, you should pay attention to its coating; some manufacturers focused on other markets, with other standards, use yellow insulation, which does not perform its main functions. Always ask for supporting documents when purchasing, and keep them in a safe place
Decorative frame
Many manufacturers offer convector framing , this is necessary primarily in order to close the joints; often tilers do not perfectly fit the tiles to the convector and gaps and cracks remain, and in such cases the framing is installed. It comes in two types: U-shaped and F-shaped. The U-shaped one is less noticeable because it does not lie on the floor covering. The F-shaped one lies on top and is 1-2 mm wide, thereby completely hiding the joint between the convector and the floor, but in this case the grille is slightly higher than the floor, that is, a slight rise is formed. If without a frame, then the floor, convector and grille are on the same level.
Choosing a water convector
To select a water convector, you need to decide on the installation location and type of construction, after which you can begin thermal calculations and selection of parameters
When choosing a model, it is important to consider the following characteristics
The thermal power of a convector is a parameter showing how much area the device can heat. For 1 m2 of area of an apartment or house with a standard ceiling height, 100 W of thermal power is required. Heat loss through windows is higher than through walls, so an additional 200 W must be added to each window.
Calculation example: for a room of 20 m2 with two windows, 20·100+2·200=2400 W, or 2.4 kW, is required. It is better to distribute this value evenly across several convectors, connecting them in parallel or in series. In this case, the temperature in the room will be more stable and uniform.
What you need to know about heating convectors
Overall dimensions are another important characteristic. The possibility of installing the convector in the chosen location depends on it
In this case, it is important to take into account not only the dimensions of the device itself, but also the required distances to the floor, walls and other structures (indicated in the passport for a specific convector model). For wall-mounted convectors, the distance from the floor must be at least 80 mm, to the window sill - 100 mm
Moisture protection is an important parameter when choosing convectors for installation in a bathroom, swimming pool, sauna washing area or greenhouse. Convectors can be designed for dry rooms with an average annual humidity of up to 85% or for wet rooms with a humidity above 85%. In the second case, corrosion-resistant materials and coatings are used, and in the case of in-floor convectors, drainage systems are used.
The type of circulation (natural (KBE marking) or forced (KVP)) is important to create the necessary microclimate. Convectors with a fan can create an effective thermal curtain near doors and windows, but at the same time they actively raise dust and cause drafts. The noise level of convectors with forced circulation is also higher. The fan in convectors runs on 12 V DC, for which you need to provide a power supply.
Floor convector with tangential fan
Working pressure is a characteristic that needs to be clarified when installing water convectors; in centralized heating systems according to SNiP 2.04.05-91 it is in the range of 8-9.5 bar, in autonomous systems it usually does not exceed 3 bar. Most models of water convectors are designed for an operating pressure of 1 MPa and a pressure test of 1.6-2.0 MPa, which is equal to 10 and 16-20 bar, respectively. If this condition is met, convectors can be installed in autonomous heating in an apartment building without restrictions.
The internal volume of the heat exchanger is the most important parameter for autonomous heating systems when calculating the volume of coolant. On average, it is 0.7-2 liters and depends on the number of pipes and the length of the device.
Convector circuit
The maximum temperature for water convectors is usually +120-130 degrees Celsius, which is much higher than the permissible temperature in heating systems. At the same time, for safety of use, the maximum temperature of the device body should not exceed +60 degrees according to the passport.
The weight of the convector is important when installing wall-mounted models on walls and partitions made of plasterboard or other material with low strength. Taking into account the coolant, the weight of water convectors usually does not exceed 14-24 kg.
The degree of automation is a characteristic that takes into account the possibility of precise temperature control. Regulation is carried out by means of a thermostat and a valve; with their help, the amount of coolant necessary to maintain a given microclimate is supplied to the heat exchanger.
Thermostat
What to look for when choosing
The key criterion when choosing a heating device is its thermal power. To accurately determine it, you will need to perform thermal-hydraulic calculations, take into account the area of the room, ceiling height, number of floors, quality of thermal insulation, and so on. This is done by heating specialists, whose services cost money.
Many private developers neglect this issue and rely on average statistical data. As a rule, to ensure thermal comfort, 1 kW of power per 10 m2 of area is sufficient. That is, if the room area is 25 m2, the convector should be 2.5 kW. In many ways, everything depends on the location of the room and the quality of the double-glazed windows (the required power can vary from 1.9 to 3.5 kW).
In addition, the final power of the convector depends on the thermal pressure - this is the difference between the surface temperatures of the device and the air in the room. Current sanitary standards state that the optimal value is 70 °C. In practice, there may be shifts, so the power must be adjusted. Many manufacturers take this feature into account and provide customers with calculation tables that indicate heat transfer levels at a certain temperature drop.
The next step in choosing is the type of convection. As noted earlier, devices can have natural or forced (with a cooler) circulation. Additional equipment increases the final cost, but increases thermal efficiency by 2–3 times.
Products with natural circulation are suitable for rooms with an area of no more than 15 m2 or in cases where several heating devices will be installed. Models with fans are optimal for larger rooms. It is important to note that their dimensions are the same, but their efficiency is different.
We decide on the overall dimensions:
- Length. If the window size is 2 m, it is necessary to install equipment with a length of 1.4 to 2 m (that is, from 70 to 100% of the length of the window itself).
- Width. It all depends on the manufacturer. As a rule, models with natural circulation have a width from 20 to 25 cm, and with forced circulation - from 27 to 32 cm.
- Depth. There are also different options here, depending on what the manufacturer decides. On average, the depth varies from 5.5 to 20 cm. For the most effective work, the following range is recommended: from 9 to 12 cm.
The power of the heating device can be adjusted.
This is done in the following ways:
- Manual. In this case, the system is supplemented with conventional ball valves, valves or thermostatic heads.
- Semi-automatic. At the entrance to the heat exchanger, a thermostatic valve is installed, connected to a remote regulator.
In order for the device to effectively perform its task - to heat the room, you need to be careful when choosing it, make all the calculations and take into account the features.
Installation of a water convector
The basic component of this convector is the heating battery. The main goal when using water heating is that it is necessary to make the correct calculation of heating convectors in order to create the most comfortable and optimal conditions in the room by choosing the correct power of the heating convector. A specialist, instructions and special formulas will help you calculate the power of a heating convector. When installing the battery, it is also necessary to take into account the fact that radiators are made of different materials.
When installing such convectors, it is necessary to use connecting components made of copper, and they are not cheap. Such radiators are used mainly to lighten the design of the heating system. Aluminum and bimetallic radiators are used much more often. However, such radiators will also require the purchase of expensive connecting components.
The cheapest is considered to be a heating convector made of steel. Such a battery can have two types of connection:
- Bottom connection;
- Lateral connection.
Installation of a water convector, first of all, begins with fixing the radiator to the wall. To do this, you will need to drill the necessary holes and secure the hooks with which the battery will be held on the wall. It will then be necessary to hang the convector sections on these hooks. After this, the heating convectors can be connected to the heating system using the pipes. For this purpose, a heating convector connection diagram is used.
If you are using steel pipes, you will need to call a specialist, but in the case of plastic pipes, you can make the connection yourself using an iron for welding plastic. However, if you are not sure, it is better to also invite a specialist.
Video description
To find out which is more economical - an inverter heating system or heating using an electric boiler and radiators, see the following video:
Stereotype: Only for small houses
And in conclusion, regarding the prevailing opinion that convectors are only for houses with a small area with the number of heating points no more than 6. The objective disadvantages of a heating system with an electric boiler are characteristic of both small houses of 80-100 sq.m., and houses of a larger area. This means that the disadvantages of one system and the advantages of another are scaled to houses with a larger area of 200-300 sq.m.
Installation of heating convectors, taking into account power calculations
The main purpose of household convectors is heating a living space. There is a division of this type of equipment in accordance with the characteristics of the installation, as well as based on the coolant used in the design.
Speaking about installation methods, you can find floor and wall models, and the use of one or another coolant divides these devices into mechanisms that operate using water, electricity and gas
It is important to remember that installation of gas-type heating convectors can only be carried out on walls in a vertical position, while water and electrical systems can be installed both on the wall and on the floor (read: “Household convector: principle of operation and installation”)
The main advantages of gas convectors for wooden houses
All the complex nuances that needed to be understood before choosing this equipment have been sorted out, all that remains is to list the advantages of gas convectors for wooden houses:
- Economical - if a wooden house is assembled in accordance with the rules and does not have shrinkage cracks, then a very small amount of gas will be required for its heating;
- The smallest boiler allows you to heat a room with a total area of up to 350 m3, which is the size of a huge house, but subject to ceilings of 2.5 meters;
- There are double-circuit boilers that will supply your wooden house not only with heat, but also with hot water; their price is slightly higher, but the advantages are obvious;
- To supply heat to the convector, you can use either automatic or manual ignition;
- Provided that ventilation standards are met, the natural outflow of gas occurs without difficulty, and there is no danger of their accumulation.
Work specifics
Today, heat exchangers of various types are produced. In general, the features of their operation, as well as the design characteristics, are similar. The structural properties of such an element:
- Full body available.
- Presence of outlet and outlet pipes.
- Braking mechanism for combustion products. Its role is played by valves with cutouts that are installed on the axles.
The flaps can be turned. A zigzag chimney of varying lengths is formed. The valves can be adjusted to ensure the ratio of draft and heat transfer is as efficient as possible. Safety standards are met.
In this video you will learn how to make a heat exchanger:
Expert advice
Convectors belong to the category of simple, promising heating devices. For those who want to purchase and install it correctly in a house, apartment, or office, a few tips from experts will be useful:
- Convectors are potentially dangerous electrical appliances. If you are not confident in your skills as an electrician, contact a professional. This especially applies to laying a dedicated power line to the device and installing in-floor models.
- Electricity can compete with gas. Plus - simplicity, freedom of installation of the convector - incomparably greater than when installing a gas boiler. You can reduce costs with a two-tariff meter (the night tariff is cheaper).
- You need to know exactly the required thermal power. You can install convectors at several points in the room.
General requirements
In some cases, the best way out of the situation will be to install a gas convector. This heating device is mounted on the wall and is powered by a gas cylinder. The possibility of power supply from the main line is also provided. If gas appears in your locality in the near future, purchase gas convectors. The following requirements apply to their installation:
- Mandatory maintenance of distances to the nearest objects and walls in accordance with the installation instructions;
- The gas pipe is supplied along the street;
- When installing in a household with wooden walls, it is necessary to consider thermal insulation;
- The convector should not be installed at a great distance from the floor, as this will reduce the efficiency and intensity of the convection process.
Let's see how to install such a convector on a wall.
Features of use
First of all, people are concerned about the issue of safety, because wood is a quickly flammable material, which means that when installing such equipment there are risks of fire, and the positive action coefficient of gas converters leaves much to be desired.
On the other hand, the installation process is much simpler than batteries filled with hot water, to supply which you will have to install a bulky heating system.
There are often cases when the original design of a wooden house did not provide for any heating at all, but during operation the owner changed his mind, and installation of heating devices is required after the fact. Many gas convectors can easily satisfy such needs, because they are able to operate on gas supplied from a cylinder, and not from the main line.
In order to obtain permission to install a gas convector in a wooden house, you need to make a visit to the gas or fire department, depending on the source of gas, but first things first.
Installation of electric convectors
Another option for such equipment is electric convectors
These models can be installed and connected by hand, but it is very important to correctly calculate the power of a convector of this type
The algorithm for installing this device should be as follows:
- the device must be removed from its packaging;
- then the protective film must be removed from the convector;
- Next, you need to decide where the mechanism will be installed.
When calculating the power of a heating convector operating using electricity, as well as connecting it, it is extremely important to follow a large number of recommendations, which, nevertheless, will allow for high-quality installation of the equipment. Here are some of them:
Here are some of them:
- the minimum distance from the floor to the convector is 20 – 25 cm;
- the device must be located at least 25 cm from nearby objects, from above and in front - at least 24 - 55 cm;
- the convector should be installed at a distance of 25 cm from the wall, and it should be located at least 35 cm from the ceiling;
- It is strictly not recommended to install the device behind curtains and doors, as well as under openings intended for ventilation.
The installation process for an electric convector is as follows:
- Having unscrewed the fastening bolts, you need to pull out the bracket;
- using a drill, you need to make pre-marked holes intended for fastening the mechanism;
- Next you need to fix the bracket;
- then you need to insert the electric convector into the clamp with its lower part;
- Guys should be placed on the equipment;
- it is necessary to place the upper part of the device into the mounted guy wires;
- after this, all the clamps must be tightly secured, and the fixing bolts must be screwed in;
- The convector operation regulator should be set to off mode and power should be supplied to the device;
- After the LED on the device lights up, the equipment can be switched to operating mode.
If the electric convector used is floor-standing, then its connection is as follows:
- The unit must be turned over and the mounting legs equipped with wheels must be secured to it. Standard bolts can serve as fastening elements;
- After this, the convector can be turned on and set to the desired operating mode.
It is important to remember that the power consumption of the convector is one of the factors that must be taken into account when selecting and installing equipment
Tips for care and use
Finally, I would like to give you, dear readers, some recommendations for caring for the electric heaters discussed in this material. It is very important to clean the devices from dust from time to time, because it reduces heat transfer and increases electricity consumption. The IR heater and oil radiator can be wiped periodically with a damp cloth. Caring for a fan heater is somewhat more complicated - you will have to disassemble it and blow it out with a vacuum cleaner or compressor.
Important: you cannot vacuum the fan heater in normal mode - the wires will be pulled inside and they will be damaged. The device must be purged from the inside. Some modern vacuum cleaner models are equipped with this function.
Do not forget to inspect the wiring and insulation, checking its integrity. Remember that exposed wires can cause electric shock and fire.
As you can see, assembling and connecting electric heaters with your own hands is not so difficult. Of course, working with wiring requires a certain amount of experience from the master, and also does not tolerate haste and negligence. However, the game is worth the candle - by taking the time to assemble a homemade heater, you will receive an effective and economical device created from improvised materials. With proper and careful operation, a self-assembled electric heater will work without failures and will be able to provide you with warmth for many years.
Troubleshooting
As you can see, there is nothing complicated in the design of a gas convector. Due to its simplicity, this equipment serves for a long time and with high quality. But sometimes it happens that incomprehensible interruptions arise in its work. If you notice that the flame burns unevenly or is difficult to ignite at all, the problem is often a clogged nozzle.
Simply put, the hole through which the gas escapes becomes clogged with soot or other contaminants. In this case, you can easily clean it yourself. All you need for this is a thin needle. Use it to carefully clean the hole.
Very important: before starting work, be sure to shut off the supply of blue fuel to the equipment. For this purpose, a special tap is provided on the supply pipe.
It is absolutely forbidden to work with the device when gas enters it!
It is absolutely forbidden to work with the device when gas enters it!
If after cleaning the problem does not disappear, then the most reasonable option for further action would be to call a specialist from a specialized organization. Remember that gas equipment has a high fire hazard. All more or less serious work with it should be carried out only by craftsmen who have the appropriate license.
If you decide to repair the gas convector yourself, but do something wrong, this is fraught not only with subsequent fines from the gas service, but also with the possibility of a fire. You should not take such responsibility upon yourself; be sure to invite specialists to troubleshoot serious problems. Good luck and a warm home!
Advantages, disadvantages
Advantages:
- Easy to install and operate. It comes down to three steps: remove the packaging, hang it on the wall, plug it into the socket. The controls are intuitive.
- Reliability, long service life - up to 15-20 years. Virtually no moving parts, proven designs.
- Safety - maximum heating temperature of the thermoelement is 80 degrees. Fire and serious burns are not possible. Location on the wall or ceiling reduces the risk to a minimum.
- Environmentally friendly - does not burn oxygen.
- Efficiency - up to 97%.
- You can fit the convector into any interior by placing it on the wall, ceiling, or floor.
The disadvantage is the cost of electricity needed to operate. But, due to rising prices for other energy sources, the disadvantage is less noticeable in comparison with the advantages.
Floor recessed design
Standard connection to heating pipes
The underfloor convector is connected to standard heating pipes using the supplied parts. Pipes can be located in specially prepared recesses to hide communications. It is technically possible to connect several devices in series, but if the sections are long, it is recommended to separate them for parallel supply of coolant. Convectors with index B (built-in fan) will require electrical wiring.
Installation work and connection should be carried out strictly according to the instructions for the device, observing the requirements of the standards. The technical characteristics and design of KZTO convection water heaters comply with the standards for heating systems of private and apartment buildings.