Recently, wooden houses made of timber are experiencing their rebirth. Their high popularity is determined by many factors, among which the most comfortable microclimate for humans and the very high environmental friendliness of these buildings predominate.
As a rule, lighting in a wooden house plays the role of a kind of magic wand, helping to significantly transform the interior with all its practical and decorative components.
How does LED lighting work and why is it so popular?
In LED lighting, the light source is an LED, a semiconductor device with an electron-hole junction that produces optical radiation when electric current passes through it in the forward direction. Different types of LEDs differ in brightness, power and other characteristics, but it is believed that using all of them is more profitable than classic Ilyich lamps. Let's compare:
- an incandescent lamp in total can burn no more than 1000 hours;
- LED up to 100,000 hours (11 years).
LED lamps are also valued for their high light output.
- The luminous efficiency of an incandescent lamp is 7-17 lumens per watt;
- LED lamp - 50-100 lumens per watt.
How to “make friends” with lamps and wood
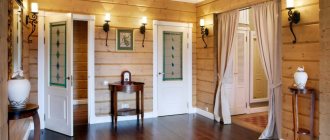
Lamps for the home are chosen based on the method of wood processing and the style of the interior. For wooden walls with a matte, minimally processed surface in the style of village huts, appliances made of ceramics, stained glass and frosted glass are suitable. will fit organically into such an interior . Plain, with floral, animal and plant prints - they can be different, but not cold glossy or metallic.
Useful: Do-it-yourself heated floor: water and electric
The geographic features of the interior style are often reflected on the lampshade. For the Provence style - sunflowers, lavender, roosters, for the Scandinavian style - snow-capped peaks, deer, pine trees.
If the wall decoration in a wooden house is made of polished wood, then it can be combined with light sources in a modern style . These are glossy lampshades, chrome-plated metal parts, abstract prints, restrained colors, clear geometric shapes.
Proper organization of lighting in a wooden house is the key not only to a cozy interior, but also to the health of your eyes and good mood.
What technical characteristics of LEDs should you pay special attention to when purchasing?
When it comes to diodes, slightly different parameters are important than in traditional types of electric lighting. The most important parameter is luminous flux (lm or lm). It shows how much light energy the lamp gives off. They also use the “luminous efficiency” (lm/W), which indicates how effective the light device is.
Luminous flux is inextricably linked to color temperature , which shows in what shade the lamp glows. Color temperature is measured in Kelvin. Experts recommend warm colors for residential premises, and neutral colors for the office, kitchen and bathrooms. If the lamp uses LEDs with TC≥5300°K, it is not suitable for home lighting.
Another important indicator is power . The power of a LED lamp is calculated using the formula:
Divide the desired wattage of a traditional incandescent lamp by eight.
But manufacturers usually mark the LED lamp with the power values of an incandescent lamp that correspond to it.
When choosing an LED lamp, the dispersion angle - this parameter shows how widely the light flux spreads in space. A lamp for general use must have an angle of at least ≥210°.
Dale85FORUMHOUSE user
And where directional light is needed, a lamp with a dispersion angle of 120 degrees is suitable.
Stages of installing lighting in the courtyard of a house
The preparatory stage includes indicating on the site plan the places where the lamps will be located, determining the length and type of cables required, how to connect them to the network and other points. Here is a video review that will help you figure out how to properly plan your yard lighting and do it yourself.
When arranging lighting in your yard, you can pursue any goal. However, two areas deserve special attention - the entrance to the site and the porch of the house. At night, for safety reasons, these two areas must be illuminated.
In order to save money, lamps with a motion detector are installed at the entrance to the site. They will turn on if someone approaches your gate. And this is doubly convenient, since you will always be aware of the presence of an outsider. In these areas, LED lamps will be the best solution - such lamps burn for a long time. In addition, this type of device will allow you to save on the constant replacement of elements and on consumed electricity.
You also need to decide how the wiring will be laid, over the air or underground. The first option is simple to implement and quite cheap, but there are also significant disadvantages. From an aesthetic point of view, this design does not look beautiful, and there is also a high probability of damage to the wire under the influence of external factors, for example, strong wind. Underground wiring is not burdened with these disadvantages, but its disadvantage lies in the complexity of execution and high cost. To lay the cable underground, you will need to dig a trench about a meter deep, and also ensure that it does not approach any buildings more than half a meter. The bottom of this trench is covered with sand or any other insulating mixture. The cable itself is placed in a metal protective sleeve.
By the way, when choosing a cable, be sure to calculate the current strength of your network. It is necessary to select a cable whose strength would be higher than the required calculated value by about a quarter. This will save you from problems in case of current surges.
The installation process for the lights themselves is varied, but most often they are placed on a concrete foundation.
- To do this, a cubic depression with a side of approximately half a meter is dug in the ground.
- The formwork with a hole for the corrugation is lowered here.
- For strength, several reinforcements are installed, and bolts are also secured.
- Then they fill everything with concrete and wait until it dries completely.
- Afterwards, the cable is inserted into the corrugation and the lights themselves are installed, which are fastened to bolts in the foundation.
- To level the lamps, you can use a set of metal washers, adding them to one or another mount and monitoring the verticality of the post using a level.
- The cables are connected to a panel, where they are divided into several toggle switches - each of them will turn on or off a specific area on the site.
- The connection itself is made only using terminals, since twisting wires that are located in the open air is unacceptable and quite dangerous.
Laying an electrical network for yard lighting
Laying a cable network is one of the most important stages when planning yard lighting, so we will cover the topic in more detail. The outdoor lighting is powered from the general distribution device, and it is from this that the new line should be drawn. A 30 mA differential protection should be installed ahead of the new circuit, and then multiple lines can be created to suit your needs. The lines themselves must be protected with fuses of 10 A for lamps and 16 mA for sockets. Also don't forget about grounding!
If your work on lighting the yard is carried out at the initial stage of development of the site, then it is best to lay the cable along with laying out the garden.
The lighting cable network must run at a sufficient depth of 50 cm. To do this, dig a 60-80 cm trench along the wiring line, into which a 10-centimeter layer of sand is poured. And it is on the sand bed that the cable lines should be laid. It is recommended to lay the cables themselves in polymer pipes that can protect the power line from damage, moisture and other aggressive factors.
Often, laid wires are covered with a protective layer of brick and mesh, and only then buried. The ends of the cable are brought to the surface directly to the installation site of the lighting equipment to the height of the future lantern. If you decide to provide lighting to an already landscaped yard, then there is no point in disfiguring the landscape with trenches, and such an idea will bring a lot of hassle. In this case, it is quite possible to limit ourselves to laying a low-voltage network (up to 24 V), which can run directly along the ground or in a slight recess.
The cable network for façade lighting is constructed from cables, the cross-section of which is calculated based on power and length parameters. Correct calculation of the wiring diameter is extremely important so that during operation the network can withstand the loads of all electrical appliances, does not overheat and does not fail. Facade wiring must have double polymer insulation. Façade network cables are laid along building structures in corrugated tubes or cable channels that can ensure their safe operation from adverse influence factors.
The street lighting control system in the private sector can be carried out either manually or automatically. Photo relays and motion sensors are among the most popular automatic light control systems. Such elements allow you to save energy and turn on the lamps at the moment of need (darkness, movement, etc. factors). Current technologies are also gaining popularity, especially the innovative “smart home” system. With its help, lighting control has become possible through personal gadgets.
Installation and connection of light sources
Installation of lanterns depends on the type of luminaire. Wall-mounted spotlights, lanterns and lamps usually require dowel mounting.
- Using a hammer drill, a through hole is drilled in the street wall through which the network power cable is passed. Having put on the mounting base for the lantern, mark the mounting points on the surface of the wall.
- Then holes are drilled in the wall according to the marks, into which dowels are then hammered.
- Next, attach the box to the wall, passing the wires through it, and connect the cords to the terminal.
- The wires from the lamp are also connected to the terminal and the lamp is fixed to the wall with dowels. Other spotlights and lanterns are mounted on supports and poles. To ensure good stability, the lanterns should be provided with a concrete foundation 30 cm deep into the soil.
- In the trench at the place where the cable is supplied, we pour a foundation 30 cm thick, through which we pass the corrugated cord. The height of the cable above the foundation must be at least 40 cm to ensure a reliable connection.
- We drill several holes in the foundation and drive in dowels to secure the base of the lamp post.
- Next, we install the base of the lantern on the foundation, passing the cable inside it, and fix it with fasteners in dowels.
- We pass the cable through the next element of the lamp post and connect both parts of the support with fasteners.
- We connect the upper part of the lantern to the cable with terminals, install it and fix it with bolts.
Installation of mini-lanterns and ground lamps
For small ground-based lanterns used to illuminate paths, a foundation is not required, however, for stability, the lantern platform should be sunk into the ground, leveled.
Ground lamps are usually mounted in a cylindrical housing, which is built into the ground. To do this, sprinkle some gravel in the trench where the cable exits to drain rainwater. Also, to fix the cylinder, you need to apply a little cement mortar on top of the gravel powder (cement should not be applied in an even layer, but in a circle, so as not to block the drainage) and install the ring itself level with the ground. Next, all that remains is to connect the lamp to the wire with terminals and insert it into the housing.
If you want to connect several lamps on the same line, for example, to illuminate a path, then use the parallel connection technique. Connect the lamp to the main cable through the terminal, connect another cable to the terminal and route it to the next lamp.
To connect a motion sensor, use a connection diagram that is practically no different from the standard one. You just need to pass the phase wire through the sensor, instead of the switch, as shown in the figure:
Quick tips for improving your lighting system
If you consider yourself to be in the category of people ignorant of electricity, and landscape lighting of your garden plot seems like an impossible task, don’t be discouraged. A well-drafted yard lighting plan, taking into account all the nuances and wishes, is already half the battle. To quickly illuminate your yard with a fabulous glow, use logic and rational ideas. Finally, let’s summarize how to improve your custom lighting project:
- When it comes to landscape lighting, you can’t say “you can’t spoil the porridge with oil.” Don't turn your yard into Las Vegas or something like a Christmas tree. When it comes to landscape lighting, you definitely need to use moderation.
- Lamps should be placed according to the principle “the closer to the house, the brighter.”
- You will achieve an interesting effect if you mark the contours of the site boundaries with small islands of light. For example, beautiful and original light wells are made for trees.
- You shouldn't drown paths in the darkness. For them, it is desirable to provide, if not daytime brightness, but sufficient visualization in the dark. For these purposes, low lamps located at an equal distance from each other are most suitable.
- Creating a fabulous oasis of light in your garden is not that difficult. This could be a gazebo originally decorated with lanterns, an alpine slide with a swing or a bench, or a pond (swimming pool) with a waterfall or fountain. If your yard is very large, then there may be two or three such oases.
- In your lighting system, try to include different types of light sources and place them at different levels. This way you will achieve expressiveness and uniqueness of your yard design at night and bring in enough light to move safely in the dark. For outbuildings, you can choose small spotlights or spotlights mounted in the ground. For stairs, paths and pools, it is best to install spotlights or LED strips.
- Overhead light is more suitable for the play of light and shadow, for example, in the design of trees, gazebos, and flower beds.
What types of LED lighting can be used in the home?
Three types of lighting fixtures are usually considered
- LED Strip Light
- LED ceiling light (chandelier)
- led panels
Each device solves specific problems.
An LED strip (a flexible board with diodes, each of which is enclosed in a housing and conductive copper tracks) located behind the cornice and directed at the white ceiling turns it into a lighting fixture that floods the room with white light, necessary for work, cleaning, etc. Most often used to illuminate interior items. If you mount the tape around the perimeter of the room, you can visually expand the room.
An LED chandelier gives an even, pleasant light without flickering and always decorates the interior.
Ice panels are installed in large rooms; they are thin, so they are great for low ceilings. They are divided into built-in and suspended.
Which form of LED lamps is better?
It depends on the purpose of the lighting device. Among the variety of LED models, three are the most popular: Pear. This is the most common type of LED light bulbs; it looks similar to a traditional incandescent lamp with a luminous flux distribution angle of 180 to 360 degrees. Suitable for almost any chandeliers, lamps and other devices. Corn . Reminiscent of a corn cob, with “grains” in the form of ice crystals. It glows brightly, but there is little illumination. Such models are used in spotlights.
Candle . Very compact, with low luminosity (500-600 lm), suitable for night lights, table lamps and other local lighting devices.
Decorative
Even the most beautiful area of the house loses its individuality in the evening. All sculptures, fountains, flower beds become invisible in the dark. To avoid such situations, it is necessary to competently organize the site design and emphasize all the advantages of the estate. The appearance of the landscape can be very diverse, it all depends on the preferences of the owner.
It has become modern and fashionable to install spotlights or mini-spotlights (mounted in recesses on the ground) near plants for illumination.
Decorative lighting of the local area
When designing lighting for a large estate, there is one rule - it is better to select lamps of simple shapes or hidden lighting for a multifaceted landscape design, with various patios, garden beds, fountains, and slides. If the decor of the area is simple and not intrusive, you can choose lighting of different colors and shapes to give the landscape elegance.
Is it possible to use LED lighting in a cottage as the main one?
Truly high-quality LED lighting is still very expensive, and if the goal is only savings, then there most likely won’t be much point in it.
Vop495
I have not yet seen lamps with normal color rendition that would pay for themselves in at least two years and cost reasonable money.
But from a design point of view, LEDs can be indispensable for a number of solutions (in profile structures, in eaves lighting). FORUMHOUSE users readily use LEDs in shower cabins, kitchen hoods, and bathrooms.
Tulipa1 Member FORUMHOUSE
I have two 12 W lamps (so-called corn) in the bathroom, a 12 W lamp (warm white) in the toilet, and three 16 W lamps (cool white) in the kitchen - my wife is very happy, there’s just a lot of light.
But I still want LED lighting, what are the rules for different rooms?
According to a user of our portal with the nickname Dale85, who is a professional in lighting, the basic rules for LEDs are the same as for other light sources:
- Avoid directional light in the house, which creates unnecessary shadows;
- In the living room, place the chandelier closer to the seating area and away from the passage;
- The kitchen must have a lamp above the table;
- A common mistake is sconces in the bathroom. There you need a full-fledged light source from the ceiling;
- The hallway and boiler room need a lot of light.
Tools and material required for the work
To carry out work on installing country electrical wiring, it is recommended to prepare the following tools in advance:
- CL cutting scissors;
- pliers;
- screwdrivers;
- screwdriver;
- grinder with diamond discs;
- hammer;
- mounting chisel;
- putty knife;
- roulette;
- knife.
Wiring Tools
It is best to purchase material after drawing up a full-fledged design of the planned electrical network. The following items will be required:
- circuit breakers;
- electric meter;
- wires;
- sockets;
- switches;
- distribution boxes;
- socket boxes;
- connection terminals;
- fastening hardware.