Excess humidity in the cellar occurs due to various factors. The root cause is usually an initially incorrectly designed and built storage facility for vegetables, fruits and canned goods. If the problem already exists, there are well-established, time-tested, budget ways to dry out the cellar. More convenient methods have also appeared, but they are quite energy-intensive and costly in monetary terms. But in any case, after drying the cellar, it is recommended to disinfect it.
Preventing moisture accumulation in the cellar
In order not to encounter the problem in the future of how to dry a cellar in a garage or private house from dampness, at the initial stages of construction it is necessary to take care of compliance with all the rules and regulations for ventilation and waterproofing (vapor barrier) of the room.
- It is best to fill the walls and floor with concrete based on high-quality cement (to save money, it is allowed to add low-quality substances to the solution to improve moisture repellency).
- If groundwater is close, external waterproofing will be required. It can be either in liquid form or rolled. Water protection is selected based on reliability and financial capabilities.
- If the cellar is designed on a slope, then drainage pipes will be a mandatory addition to combat the penetration of moisture into the storage.
- It is necessary to make a special blind area around the entrance to the cellar to prevent precipitation from entering it.
- In the basement, supply and exhaust ventilation are installed in different corners of the storage room (diagonally). A diameter of 12.5 cm is the optimal size for ventilation ducts or pipes. The first pipe is installed 10-15 cm short of the floor - it will be responsible for the supply of air from outside. The second, for exhaust, is mounted below the ceiling level within 10-2° cm. All ventilation is protected from direct ingress of precipitation and debris, but with a good gap. It makes sense to attach a device to the exhaust duct to stabilize draft and circulation. Ventilation pipes are installed vertically; do not tilt the pipe more than 30°. The length of a channel with a slope cannot exceed one meter.
- The storage room for fruits and vegetables in the garage or under the house is insulated with a vapor barrier to reduce the possible penetration of moisture into the lower (basement, subfloor, cellar) and upper levels of the premises (rooms of the house, garage, utility unit).
Equipment design
The cellar is constructed with monolith reinforcement using ribbed reinforcement with a diameter of 8 to 14 mm
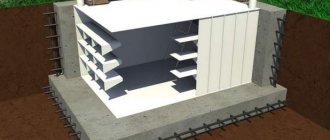
There are two options to build a foundation with a basement with your own hands - a pile and a monolithic strip type of device. It’s worth saying right away that the first option is quite difficult to implement, so in practice we most often encounter a monolithic foundation. In our article we will discuss the construction of the basement space in the second type of house foundation. For a monolithic structure, there are the following rules for its construction:
- In the case when the construction of a basement space is planned at the design stage of the house, its depth can be about 3 meters. The bookmark is made using special equipment. The work begins with preparing the pit and depends on the type of backfill.
- When we carry out actions to create a foundation with a basement floor, there are no restrictions on the depth of the building. For optimal functioning, it is enough to correctly calculate the wall thickness for various materials.
- To avoid the negative impact of the soil in winter, you need to fill the area around the walls with sand instead of earth. This is easy to do, because DIY construction is carried out in a foundation pit, around which there are sections of territory to be filled. This action must be performed immediately after waterproofing and insulation.
- The cellar is constructed with monolith reinforcement using ribbed reinforcement with a diameter of 8 to 14 mm. If this is a small building, then the horizontal load-bearing components of the frame have this value of 10-12 mm.
- In a conventional reinforcement frame there are usually four load-bearing members, but in some cases there are also five components. The ring with the jumper should be placed at a distance of up to 80 cm, and the entire structure should be connected to each other with wire.
- An important process is waterproofing the foundation with a basement, which will help protect the room from dampness. This can be done using mastic or cellophane film.
- Thermal insulation is also necessary, especially in the case of a basement, since cold easily penetrates the monolith. To solve this problem, foam is used, but there are cheaper ways.
It is best to start building a foundation with a basement with your own hands at the same time as planning your house. This will allow you to perform calculations taking into account the basement space, which will allow you to avoid unpleasant situations in the future.
Storage floor design
The main reason for waterlogging of the cellar is closely located groundwater. Initial proper floor installation will prevent the problem of excessive moisture in the basement. There are several ways to install a waterproofing floor.
- Most often the floor remains earthen. Water from the lower layers penetrates through capillaries to the floor surface. To prevent the need to dry out the cellar from dampness, the earthen floor is leveled, compacted and covered with a thick film or roofing felt. To protect the coating from tears or breakage, wooden boards are used (possible reasons for damage to the coating: foot pressure, installation of boxes with sharp corners, careless displacement of heavy objects).
- An earthen floor can be reinforced by packing clay, that is, covering the entire floor with a compacted mixture of clay and sand. This operation, which allows you to dry the basement by creating a natural barrier for moisture to escape, is carried out in four steps:
- One layer of crushed stone or broken brick is poured onto the previously leveled earthen floor of the cellar, and the space between the stones is filled with a thick mixture of clay with the addition of sand (clay is taken with a good percentage of fat content, and the floor level should rise by 15 cm after pouring).
- The clay is compacted very tightly.
- Sprinkle sand onto the compacted floor and rub it in. Remove excess with a broom and dustpan.
- The created clay floor must be thoroughly dried for two to four weeks.
- The most profitable way to improve the waterproofing of the floor and avoid regularly drying out the cellar is to make it concrete and with a good drainage system. True, this is the most expensive method, requiring special knowledge and skills.
If after all the manipulations with the floor the level of humidity in the basement or garage decreases significantly, then you will no longer need to worry every year about how to dry the cellar from moisture (especially during the spring rise of groundwater).
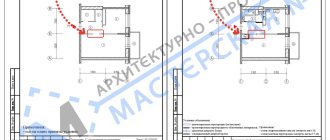
When you need a separate entrance
There are many situations when it is more convenient to place the entrance to the house through the basement. For example, if the first floor goes underground for a distance of about half a meter. It turns out that it will rise above the planning level of the ground by an average of 2 meters. The floor is actually above ground, and the parameters of its part above ground make it possible to install an entrance to the house from the basement.
On the other hand, the entrance to a high ground floor can be installed from the side of the stairs leading from the first floor.
The entrance from the ground floor on the slope of a mountain or hill looks most functional and stylish. This allows you to save on leveling the site and create a unique look for the house. In this case, the house, on one side, will be completely located on the surface of the ground, while on the other, the upper surface of the base will only rise slightly above the ground.
An interesting option would be to design a garage in the basement. This is especially a good solution if the space in the yard does not allow for the construction of a separate building. The advantages include constant warmth in the room, as well as an easy way to enter the house. Such projects are popular among developers.
In general, the difficulty for a design company is to make the entrance to the ground floor the most harmonious and aesthetic, as well as comfortable to use.
If there is a hill nearby, then this is an ideal option for entering the basement
Improving wall waterproofing
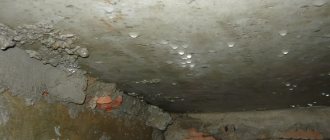
Poor moisture insulation of the walls of buildings is another reason for waterlogging in the basement of a garage or a separate cellar. Brick walls have many pores through which moisture penetrates and condenses out. The problem can be solved in several ways:
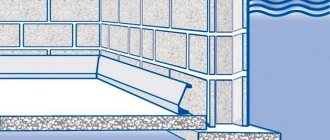
- Create external insulation from moisture. If possible, remove the soil from the walls and apply a two-layer bitumen mastic or resin.
- Make an internal waterproofing layer (use special impregnations with a penetration depth of up to 0.5 m to clog the pores of the cellar walls).
Good supply and exhaust ventilation and sufficient waterproofing of the floor and walls will be the key to a dry basement. But how to dry the cellar when water has already penetrated inside and begun its negative impact? The choice of method to combat dampness depends on the availability of ventilation in the cellar.
Structure of the external entrance block
Installation of the entrance to the ground floor should be started only after it has been decided which rooms will be located there. Agree, it matters whether this room has a garage or a playroom where noisy gatherings will take place. Moreover, if this is the main entrance to the house, then the work on its arrangement will be appropriate.
Entrance hatch: photo
This type of entrance to the basement is used if the purpose of the room is a warehouse or utility room. It is a kind of hatch that is closed using flaps or an inclined lid.
Dehumidification of a ventilated basement
In a basement of any type, a whole series of work will have to be carried out, but first it is necessary to remove from the cellar the supplies stored there, dismantled structures (shelves, racks, flooring), storage containers (boxes, crates, barrels). All wood structures must be dried in the sun and treated with a 5-10% solution of copper sulfate, regardless of whether they have been damaged by pathogenic microflora. The second step is to whitewash the walls with a double layer of lime.
- The lime is diluted so that the solution does not drain from the paint brush (you can add a 5-8% solution of copper sulfate).
- Divide the lime powder into two equal parts.
- The first part, using a paint brush, is to create gaps in the corners of the cellar and throw them with force onto the walls (you can also onto the ceiling), without trying to get a flat surface, but not forgetting about safety precautions.
- A day later, the second part of the solution is also smeared on the walls.
The end result is that on the third day, the internal surfaces of the cellar become porous and lumpy. Moisture in the form of condensation is not retained on them, since the lime takes water inside itself. As soon as the top layer of lime has dried, you should start drying the basement.
Scheme for drying a cellar with ventilation
1. Check whether the ventilation is properly arranged (if the shortcomings are not corrected, the cellar will have to be dried again, almost a couple of days after the drying procedure).
2. Check the cleanliness of ventilation ducts or pipes (remove all dirt, mold or moss growths).
3. Strengthen the air ventilation process:
- Installing a fan on the exhaust pipe. With the doors and hatches open, the cellar will dry out (depending on the amount of accumulated moisture and weather conditions) within 3 to 10 days.
- Organization of increased ventilation using a small heating device (candle, dry alcohol tablet, alcohol burner). To do this, extend the ventilation pipe above the ceiling so that a heating element on a non-flammable stand can be placed under it. Warm air will increase circulation and speed up drying of the basement.
4. Warm up the cellar if forced ventilation is unable to dry out the basement. The drying process using heating is carried out in stages:
- Take a metal bucket (preferably not new).
- We make many holes in it, both in the walls and at the bottom.
- Fill the charcoal almost to the top edge of the container.
- We light the contents of the bucket and wait for steady combustion.
- We lower a bucket of coal on a leash inside the cellar (the bucket should hang in close proximity to the bottom of the storage and a fire-resistant substrate must be placed under it).
- Close the cellar lid tightly (as tightly as possible so that the smoke escapes into the ventilation).
- We periodically open the hatch cover to allow oxygen to enter the room being dried or increase ventilation using a vacuum cleaner through the supply pipe.
- Remove the bucket of burnt coals.
- Seal the lid tightly for three to four days.
- We ventilate the dried and disinfected cellar.
Do not forget that the decision on how to dry the cellar must be safe both for those who warm it up and for the room itself. Combustion is always fire, smoke, carbon monoxide.
With this method of draining the basement, the bucket can be replaced with other heating devices. A small stove - a potbelly stove, a heat gun with good power (more than 3 kW), working kerosene gas, a gas burner (be careful - open fire) is quite suitable.
Drying the cellar without ventilation
A cellar that is not equipped with ventilation naturally accumulates dampness. Here the question arises: how to dry a cellar without ventilation and at the same time not cause harm to health from smoke or carbon monoxide? The answer is obvious - this cannot be done. You will have to install at least simple ventilation.
Before installing ventilation ducts, you can collect moisture in the basement in several simple ways. To do this, you will need materials with a high level of hygroscopicity:
- Sawdust - regularly change wet to dry.
- Calcium chloride - place around the perimeter and in the center of the cellar (you can calcinate it, not forgetting that it is caustic, and use it many times).
- Place slaked lime along the walls and on shelves.
- Ordinary thick cardboard from furniture packaging or boxes - lay out dry ones and change when wet.
In addition, there are high-tech ways to dry the cellar from dampness. For example, dehumidifiers, which are most often used for rooms where there is open water (swimming pool, jacuzzi, decorative pond). True, the cost of a dehumidifier ranges from 20 thousand rubles and more. But they will properly perform their function when draining a damp basement; you just need to drain the water they collect in a timely manner.
Ways to combat pathogenic microorganisms
Excess moisture that is not dried in the cellar in time leads to the massive development of harmful microorganisms. All kinds of mold and fungi multiply rapidly and cause harm both to all wooden structures and to products stored openly. Spores of harmful microflora have a very detrimental effect on a person in an infected basement. The following agents are available to combat pathogenic microorganisms:
- Quicklime (install a barrel of lime in a ratio of 3 kilograms of dry lime per 1 cubic meter of volume, fill with water, leave the room, seal the basement, ventilate after two days).
- Sulfur checker (you must first remove metal objects from the cellar or cover them with a layer of lubricant. Place the checker on a fireproof stand, light the wick, trying not to inhale the smoke, quickly leave the room being processed, tightly close the hatch and ventilation, ventilate for 24 hours every other day).
Preparatory stage
The appearance of moisture in a cellar or basement does not go away without leaving a trace. This usually leads to the formation of mold and its spread throughout the basement. Therefore, before starting to dry the basement, it is necessary to go through the preparatory stage. The basement or cellar room is carefully inspected and the general condition is assessed. After this, it is necessary to lift all the elements that are in the cellar. This applies not only to food supplies, but also to the various shelves that are also present there. If the frame is made of metal, then it will need high-quality maintenance. It is better to do this during the transition period - in the middle of summer. The air outside is warm, but the cellar is empty, because it is too early for new preparations. Wooden flooring from the shelves must be exposed to the sun so that the ultraviolet rays fulfill their role.
All mold in the cellar or basement will need to be removed with a brush. After this, the surface is treated with an antiseptic composition and, if desired, painted. Simultaneously with emptying the cellar, it is necessary to open its entrance and leave it in this position for several days. This is done for preliminary ventilation. The procedure should only be carried out if the weather is nice and warm outside. If the basement is equipped with forced ventilation, then the air will remove some of the moisture. It is advisable to inspect the ventilation ducts to make sure that they are not clogged.
How to deal with humidity after a flooded cellar
Flooding of the cellar can occur due to rising groundwater, penetration of precipitation, or accidental flooding. The reason is not important when it is necessary to decide how to drain the cellar from groundwater or how to dry the basement in the garage from excess moisture. The scheme is simple:
- Use a pump or drainage pump to pump out water from the storage floor.
- Clear out the basement.
- Dry for a couple of days with the hatch open and ventilation.
- Collect trash.
- Whiten with lime.
- Dry the cellar using one of the above methods.
There are settlements where flooding of the basements of private houses and cellars occurs regularly. In this case, it is necessary to strengthen the floor drainage.