When doing a major renovation, people often start with the wiring. With a large number of electrical appliances, the question often arises - how to connect a double outlet to create more comfortable conditions. Their installation helps to avoid unnecessary communications, as well as additional sources, connections: tees, extension cords and carriers.
It often happens that connecting a double socket can cause some difficulties. This happens when there are no minimum skills or mistakes made in a hurry. To prevent this from happening, you need to prepare everything in advance and make sure that all the parts are available and that the outlet itself is in working order. In addition, there are many nuances that can affect a malfunction or short service life.
What is a double socket?
A double socket is a device in the form of a plastic case of different designs with a working part. Inside the case there are all the terminals, springs for the plug, contacts, and grounding elements that allow you to remove voltage from the devices and ensure their safe use. Modern sockets are available in the following types:
- French with a third additional pin,
- American, with side slits,
- double socket with cover for installation outdoors or indoors with high humidity levels,
- German with grounding contacts (common in Russia).
The case on the front side in the center has two recesses with holes for the plug pins. A single socket has one recess, a triple socket has 3. On the sides of the recess there are protrusions in the form of metal plates, and on the reverse side there are working elements. The double socket can be installed independently. It is better to plan the installation of electrical accessories during repairs, so that the socket can be slightly recessed into the wall using a socket box, i.e., make it “hidden”. If replacement is required after repair, then you can choose special compact models that are easy to use.
Connecting a double socket is not very complicated; a plastic cup is used for installation, and the structure itself is secured with bolts. First, the socket must be disassembled; first, the frame with the working mechanism is attached, using the previously installed socket box. The top of the structure will be covered with a decorative overlay cover. Before starting work, you must turn off the power to the apartment and take care of your own safety.
Compliance with safety precautions when installing sockets
Compliance with basic safety standards will allow you to perform high-quality work on connecting and operating sockets.
Work with electricity is classified as dangerous. Even low voltage leads to burns, injuries and other unpleasant consequences. Compliance with safety precautions:
- de-energize the room in which the work is being carried out;
- check the area before starting with a special device (you can plug the device into the network);
- use rubber gloves and equipment with rubberized handles;
- when “increasing” the length, it is not enough to twist the wires; soldering is required;
- contact with connected bare cables is not allowed;
- the excess should not “stick out” - it is shortened and placed in the wall;
- check whether the devices are suitable for the current and voltage levels used.
Anyone can connect sockets using these methods. The circuits have advantages and disadvantages; before making the final choice, it is important to establish the power of the equipment and the method of branching the wiring.
Device installation features
A double socket has one socket box with two separated terminal blocks and one mounting part for wires.
A double socket is a monoblock consisting of two plug connectors, and therefore the diagram for connecting it to one socket box will be somewhat more complicated
If desired, the installation of an electrical point can be done on your own, without resorting to the services of a specialist.
The use of jumpers is allowed only if it is planned to connect not very powerful devices to the electrical points. When connecting powerful equipment, technicians recommend connecting two outlets in parallel, creating a branch of wires for each point.
But in any case, to prevent emergency situations, the total load on this type of outlet should be no more than 16A.
If it is necessary to install a socket with two different socket boxes, the niches for their installation will need to be pre-drilled with an electric drill, while maintaining the same distance between the holes.
Should I wire the socket from the socket or not?
The option of installing an additional outlet will help get rid of quarrels between family members who require electrical points to turn on various household appliances.
This problem arises especially acutely in the kitchen with the purchase of new equipment - a blender, mini-processor, yogurt maker, bread maker, multicooker and other appliances.
It turns out that the existing sockets can no longer cope with their responsibilities - their number is physically insufficient to meet the needs of all households.
Therefore, it would be advisable to decide to install an additional outlet from an existing one.
A technically equipped kitchen needs a sufficient number of electrical connection points. This should be remembered at the stage of drawing up an interior design project for the future premises.
But here you may encounter a real problem - it is not always possible to complete such a task. There are a number of restrictions when it is categorically impossible to carry out such a modernization of the existing electrical network:
- if you need an outlet for an electric stove;
- when you decided to connect a boiler with the washing machine;
- if the total power of the devices is more than 2.2 kW.
In houses or apartments where the owners purchased a new electric stove to replace the old gas stove, a new outlet will be required to connect it. In such a situation, it is impossible to wire another one from a regular outlet to turn on this powerful device.
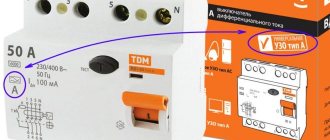
Here you will need to install a separate branch from the distribution box, or even better, from the panel. Yes, and a residual current device for powerful equipment needs to be installed.
Another unfortunate example is when the bathroom only has an outlet for the washing machine. But over time we purchased a boiler.
These devices cannot be plugged into one double socket at the same time - the wiring may burn out. It will always be problematic to control the order in which the boiler and washing machine are turned on.
The result of a network overvoltage can be disastrous - it’s good when the problem was discovered in time or the circuit breaker tripped and a fire was avoided
It is also necessary, even before starting work on installing another outlet, to calculate the expected power of the devices that will simultaneously be included in the new block of outlets.
Often they plan to upgrade the connection point to the electrical network, which is fed by a wire with a cross-section of 1.5-2.5 mm2. Therefore, the total power of the devices can be slightly more than 2 kW.
You cannot turn on a dishwasher, an oven and a heater, or a boiler and a washing machine at the same time in such neighboring sockets, powered from one core.
When it becomes necessary to install a double socket
In some cases, a 2-socket outlet is a necessary measure, especially for apartments built in the mid-to-late last century. Their peculiarity was an extremely inconvenient arrangement of electrical appliances. In most cases, one of them ended up behind cabinet or upholstered furniture, and the owners had one point at their disposal in the corner of the room. Installing long external pads in such places is neither practical nor aesthetically pleasing. This will lead to the fact that over time a trail of wires will stretch to them that do not fit into the interior. The best solution in such situations is to install double recessed sockets.
The advantages of this solution are the following:
- The products have one body. There is no need to make inserts and jumpers using twists. The cable retains its integrity after installation and connection of the device.
- Common cover for both sockets. This is not only aesthetically pleasing, but also practical. To install covers when installing dual outlets, you will need to widen the holes in the wall to increase the distance between the mounting blocks. In any case, there will be a gap between the outer linings, which will not decorate the wall in any way.
- There is no need to drill a hole for a double socket box. Double designs fit perfectly into standard glasses in the walls. Their mounting blocks correspond to the dimensions of single products.
- Easy to install. Connecting a two-socket outlet is as easy as connecting a device with one input. The caliper and spring-loaded feet ensure precise positioning and strong fixation of the mechanism.
If the cable has a grounding wire, it is recommended to purchase internal double electrical sockets that have the appropriate contact. It is recommended to ground electrical appliances not only for safety reasons. Connecting this wire will allow you to get rid of the background noise and crackling noise produced by the speakers of household appliances.
What is better to choose
As a result, the use of double and triple sockets is an excellent alternative to the need to connect into ordinary carriers, tees and other devices that allow several devices to operate from one point at once.
The only rule that you need to remember without bothering yourself with calculating kilowatts is not to plug several powerful devices, such as heaters, into one outlet or group of outlets. In everyday life it is very difficult to imagine a situation when this might be needed, but if such a need arises, then it is better to choose sockets on different, or better yet opposite, walls.
Rules for connecting a double socket
There are different options for connecting structures that include groups of sockets, switches or combined products. But the basis is always single devices for a single consumer, which can be anything, for example, a lamp, TV, iron or computer.
The most saturated room in a standard apartment in terms of the number of consumers is the kitchen. Especially if it is a small-sized “Khrushchev” or “Brezhnevka”. There is even room here for a washing machine, which does not fit in the combined sanitary unit. Nowadays the range of equipment used is so wide that 2-3 sockets cannot be used.
Modern kitchen sets hide behind their sparkling panels the most unique inventions that help make the housewife's work easier: • electronic or gas hobs; • dishwashers; • exhaust systems; • refrigerators, refrigeration complexes and chambers.
This is not counting microwaves, electric kettles, coffee makers and other small items. And they all require their own place of inclusion. The switching system has a two-story layout. The first plan is located at floor level, the second - at the height of a person of average height.
Important! Before you start connecting a double socket to one cable, you need to turn off the corresponding circuit breaker on the power panel, if there are several of them. If there is none, the general one is disabled.
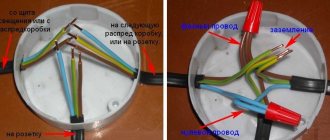
Connecting wires to a double socket is carried out as follows. To check whether they are phase or zero, you need a simple tester in the form of a screwdriver with an indicator on the handle. If the indicator lights up when you touch the wire with a screwdriver, then it is a phase; if not, the wire is neutral. According to the rules, different colors of wires indicate ownership. Typically, brown is phase, blue is zero, and yellow and green are ground. Another rule is wiring connection. The phase is connected to the right terminal, zero to the left, ground to the central one, with the bracket.
The note! Dual sockets have a common power terminal. Current is supplied to each device through a distribution strip. At the same network voltage (220 V), the current strength for each device will depend on the power of the connected equipment. Although the socket is double, the load power will not double. It is imperative that the cable suitable for the outlet has a cross-section no less than that common throughout the house (the best option is the same). The core material must also match. If all the wiring is copper, then a copper cable is supplied to the device.
Dual Socket Installation Tools
To install a double socket you will need the following set of tools:
- A screwdriver that matches the screws that secure the socket
- Screwdriver coated with dielectric
- Cable (if you are installing an outlet and not replacing it)
- Hammer (also - if you need to install the socket in a new location)
Basic rules for wiring sockets
The rules for installing sockets and the tools that may be needed in the process are regulated by SNiP (building codes and regulations) and GOST.
When installing electrical wiring and working with sockets, you must familiarize yourself with the Electrical Installation Rules (RUE):
- wiring elements (distribution box, meter, sockets, switches) must be easily accessible;
- sockets are installed at a distance of 50-80 centimeters from the floor. The rule is taken for safety purposes when the premises are flooded;
- if there are gas or electric stoves in the room, as well as heating radiators and pipes, sockets are installed at a distance of 50 centimeters or more from grounded equipment;
- wires to devices are laid from bottom to top;
- sockets in the room are installed at a rate of no more than 1 per 6 square meters. You can connect more sockets only in the kitchen;
- equipment cannot be installed in the toilet;
- The wiring is laid at a distance of 10-15 centimeters from pipes, floor beams and ceilings. The height of the wiring from the floor should be 15-20 cm;
- wiring and connection of wires are carried out inside the distribution box;
- “Ground” and “Zero” are connected to the devices with a bolted connection.
This is all the information you may need when connecting a double socket yourself. Having mastered the necessary rules, anyone can connect a new device with their own hands. Experts recommend that beginners pay special attention to following safety rules, since they will have to work with contacts that conduct current.
You can once again familiarize yourself with the features of the double socket installation process by watching the video:
Types of double sockets
In addition to double sockets, there are also single and multi-socket ones. The type of equipment depends on the number of plug connectors included in it. Regarding the modification of the device, there can be two types:
- Closed - devices that have shutters covering the contact part. Suitable for apartments where children live.
- Open – standard type sockets.
Types of Dual Outlets
The product may or may not have a ground connection. Grounded outlets have grounding pins that protect electronics from power outages.
Equipment without grounding is installed in premises where it is not provided (offices, old residential buildings). In such buildings, connecting a structure with a grounding contact will not make sense, because there will be nothing to connect it to.
In modern houses and high-rise buildings, where grounding is provided, sockets with grounding are installed.
These types of devices are easy to distinguish.
Double sockets with and without grounding
There are designs protected from moisture, as well as dust and dirt.
Other types of structures:
- external;
- hidden (internal);
- standard;
- polar.
Triple socket design
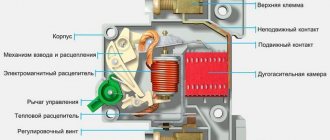
The products are made on the basis of a housing and a working part - terminals with springs for the plug and contacts, a grounding device. Modern European sockets can withstand currents of up to 16 A, standard ones - up to 6 A. Sockets in one housing are distinguished by a large diameter of round holes for plug rods. The device cover is made of heat-resistant plastic, the core is made of ceramic. For installation, a special horizontal and vertical panel is used.
The modules are located on a common frame or on 3 autonomous ones connected by a common panel. Today, two modifications of the triple socket block are used:
- C5. Design without grounding in a square housing. It is placed under old Soviet devices and connected to a 220 V network.
- C6. Euro socket that can withstand voltage of 230-380 V. Compatible with equipment with Euro connectors and plugs.
Depending on the manufacturer, the triple module has a width from 212 to 220 mm, a height from 72 to 80 mm. The size of the device together with the overhead frame is 160 mm in height.
Preparing the wall
Installing a double socket is a little more complicated than a single socket and depends on the type of equipment:
- To attach a double socket of a non-recessed (open) type, you only need to screw the housing to the wall with screws.
- To attach the housing of a double socket of a recessed or internal type with distribution strips (described above as the first type of socket), you should drill one hole in the wall with a hammer drill with a special attachment (slightly larger than the socket box). If the wall is concrete, you need to use the hammer drilling mode. If the wall is made of brick or plasterboard, then only drilling. It is attached in the same way as a single one in one socket box.
- To attach a double socket with parallel connection (described above as the second type), you must first drill one hole for the first socket. Then attach the device to the wall and mark the drilling location for the second socket using a level. Make a second hole. Next, you need to take a drill with a diameter slightly larger than the diameter of the corrugation for the jumper wires, and drill a hole between the two socket boxes.
Preparation before installing a new outlet
Punch a groove (channel) to route the wire to the socket. For this, a hammer drill or wall chaser is used. Place the wire in the groove. It is advisable to use a corrugated pipe; this will allow, if necessary, to replace the wire without removing the plaster.
- Purpose and principle of operation of a differential machine: selection rules, design and installation features of the device
- Types and connection diagrams of TV sockets: selection, installation, connection and placement of TV sockets
- Why do you need heat shrink tube: types, description, application, marking and principle of operation
After laying the wire, seal the groove with mortar. Connect the wire to the junction box only after installing the socket. Next, you need to prepare a seat for the outlet.
A double rosette may have 1 or 2 internal cups. Accordingly, the required number of holes will need to be prepared. To create seats, a special attachment for a hammer drill is usually used - a crown.
Measure the size of the inside of the rosette and make a hole of the appropriate diameter, choosing the appropriate hole saw. In this case, the hole should be 2-3 mm larger than the diameter of the socket. The depth of the recess should allow the inside of the socket to be completely hidden in the wall.
How to choose a good double socket
When choosing a product, you should pay attention to the following criteria:
- The size of the mounting box corresponds to standard holes in the walls. It is advisable to install a double socket in one socket box without carrying out additional drilling work to expand or deepen it.
- Degree of protection. For a family with no children, conventional models with an IP22 rating are sufficient. Products with degrees of protection IP33 and IP43 are equipped with curtains that protect the contacts from splashes and penetration of solid objects. For the bathroom and kitchen, it is better to take IP44 sockets, which are not afraid of splashes and streams of water flowing along the wall.
- Contact standard. You should stop at F or C. Products of this type are adapted for all types of plugs and are equipped with a contact for grounding.
The color of the product matters. It is not necessary to take standard white sockets. To decorate the interior in an original way, you can buy products in blue, red, yellow or any other color.
Preparatory work
In order for the 220V socket to be installed correctly, a number of preparatory work is necessary. For closed or open wiring it is similar, the differences are only in a few stages. To work you will need a set of the following tools:
- a screwdriver (it is better to take an indicator screwdriver to check the absence of voltage in the network),
- socket box (if it is missing or needs replacing),
- connection cable (if a complete installation is required, rather than replacing an old outlet with a new one),
- hammer drill (also necessary for complete installation of equipment),
- selected two-socket socket,
- knife with replaceable blades,
- screws,
- multimeter,
- wire cutters with insulated handles.
The work is performed in the following sequence:
- When choosing a point for open wiring (or closed), it is necessary to comply with the currently accepted rules for installing such electrical equipment. You cannot place sockets directly near the floor, and maintain distances from heating appliances and gas stoves.
- The power supply at the input panel to the apartment is turned off, and the absence of voltage must be checked using a multimeter or an indicator screwdriver. This is a mandatory condition necessary to comply with safety measures.
- The old socket is dismantled, leaving wire outlets sufficient for a new connection. To do this, you need to remove the outer decorative cover, press out the tabs, pull out the working part and carefully disconnect the wiring.
- The wires protruding from the socket box (if there is one) must be cleaned by removing approximately 20 cm of the insulating layer, then tucked back into the socket box.
Existing connection methods
Sockets with more than two pieces are connected in three ways: in series, in parallel and mixed. Electricians use other terms - star (for the first option), loop (for the second). Before choosing one of the methods, you need to find out the pros and cons of each, and choose the one that is suitable for a particular apartment.
If the room has electrical wiring, it is important to consider the way the cables are routed and the total power available. New ones may exceed the limit; the wire will have to be pulled from the shield.
Parallel connection
The essence of the method is to connect sockets in one distribution block, which bears the entire load when the electrical equipment is turned on. A cable is pulled from the common house panel to the distribution box, and wiring is pulled from it to each power point (separate wires).
The advantage of this method is the independent operation of each power point and switch. If one device burns out, the others will continue to work. But if the main wire becomes unusable, the voltage will disappear completely. In such a situation, it is easier to find the gap and fix the problem.
Serial connection
A daisy chain connection means a sequential transition from the first outlet to the next. Instead of twisting wires, device contacts are used. The phase and neutral cables are connected to the first mechanism, then to the next and sequentially to the last.
The “pure form” method is rarely used. For example, if you need to install an additional socket or switch or move one of the devices some distance. In the second situation, they leave the old access point and lead from it to a new location - this way there will be less need to scratch the walls.
It is forbidden to connect devices with high power to sockets connected by a cable. Air conditioners, microwave and conventional ovens, washing machines and other similar devices must be powered from other access points. In a daisy-chain system, many outlets are connected to the same circuit, so the load falls on each one.
Mixed connection and grounding in series connection
If you decide to use a series connection of sockets, you can strengthen the overall design by using a mixed method. The essence of the method is as follows:
- A central cable is connected to the distribution box from the common panel board.
- In the preliminary wiring plan, the most distant point of access to power is selected.
- The selected outlet is connected from the distribution box cable.
- The rest are powered from this device.
Advantages and disadvantages
The final version of the wiring diagram
To determine the optimal wiring diagram for sockets and switches, it is necessary to prepare a wiring plan, calculate the number of devices and the possible maximum power. At the same time, in newly built buildings it is necessary to plan future possibilities without unnecessary modesty: an additional TV, the purchase of a separate freezer, and the like.
Based on the data received, the connection type is selected. The advantages of the sequential method include:
- simple connection system and circuit assembly;
- the ability to adjust the voltage level, make it less;
- You can use one fuse per circuit.
The disadvantage becomes obvious after a malfunction occurs - if one socket breaks, the rest will not work.
How to Install a Dual Indoor Grounding Receptacle
In many ways, the comfort of living in an apartment or house depends on the type and quantity of household appliances and electrical appliances installed in it. The lack of sockets is becoming a common phenomenon, causing the use of many extension cords and tees. These actions help solve the problem, but have side effects - wires get tangled under your feet, additional pads spoil the interior of the room. In some cases, a double socket will help solve the problem of a lack of connection points. Modern products are compact, sufficiently powerful and presentable in appearance. There is no need to invite specialists to carry out the re-equipment of electrical equipment. You can do the work yourself after familiarizing yourself with the safety precautions and the rules for selecting and installing electrical appliances.
Double socket in one socket
Since in most cases replacing single sockets is part of a minor repair, we will consider an example of how to connect a double socket using an old socket box or the space remaining after it, there will be no need to lay new wiring and restore the damaged interior. Although some cosmetic repairs may be required.
Removing the old socket
Before you start working with electrical wiring, you need to take care of your safety. First of all, turn off the power supply circuit breakers in the apartment panel. Then check that there is no voltage at the socket being replaced - use an indicator screwdriver for this.
If you do it yourself, the old socket is immediately dismantled. To do this, unscrew its mounting screws and remove the top cover. Next, the wires are disconnected and the fastening tabs of the product itself in the box are unscrewed.
The socket to be installed is disassembled in the same way: its front panel is carefully separated from the working part.
Installing a new socket box
I have a new Schneider Electric socket box pre-installed for indoor installation with a diameter of 68 mm. I have been using them for quite a long time, I can only say good things about them - very reliable and high quality.
In addition, on the front part there are mounting screws for fixing the socket support. If you have an old style electrical outlet or none at all, then it is better to install a new one. A normal socket box is the key to a securely fixed and non-falling socket.
In order for the socket itself to be securely fixed in the wall, it must be secured to alabaster or putty mixture.
Preparing to connect
Let's start cutting the cable. To remove the outer insulation, I use a knife with a heel from the STOCK. Some beginners may think that the more wire stock, the better (will be left for the future).
We don’t need long wires in the box, otherwise when installing the socket mechanism it simply won’t fit there. Therefore, we leave a wire reserve of approximately 10 - 12 cm.
If the wires from the old wiring are still short, you can try to extend them. By the way, there is a separate article on this topic on how to lengthen the wires in a socket.
Next, we strip the insulation from the conductive cores by about 10 mm.
Connecting wires
When the wires are prepared, we connect them to our contacts. According to the color marking, the wiring in the junction box is made in such a way that the phase wire is brown, the neutral wire is blue, and the ground wire is yellow-green.
Loosen the screws on the connection terminals, insert the wires into the contact and tighten the screws thoroughly using a screwdriver.
There is not much difference to which terminal to connect phase or neutral. It can be on the left, it can be on the right. I always connect the phase wire to the right contact of the socket. The main thing is not to connect them to one contact (bus), otherwise a short circuit will occur.
The ground wire is connected to the central contact located on the bracket. There is a "GROUND" icon next to this pin.
Installing a double socket in a socket box
When the wires are connected, you can begin laying the entire mechanism in the socket box. When installing a double socket in one socket box, it is important to carefully lay the wires in the box.
Do not allow them to get under the fastening tabs (otherwise the insulation will be damaged when they are tightened). Before installation, I bend the wires like an accordion and they fit perfectly.
Then the socket is carefully buried inside and fixed with self-tapping screws or fastening tabs that rest against the walls of the socket box. I'm using the first option.
Then, using a level, we set the socket’s level position in relation to the corners of the wall and the floor. Finally, its caliper is connected with self-tapping screws to the body of the installation box.
When the caliper frame is securely fastened, a decorative trim is installed. If the socket is installed correctly, it will lie flush against the wall, without a gap.
| Please do not forget that the socket, although its load capacity is doubled, does NOT double in size. The power cable and the socket itself are designed for an operating current of 16 Amps. When connecting electrical appliances, this must be taken into account. |
Step-by-step process for installing a socket yourself
Removing the old structure
- We de-energize the outlet by turning off all switches in the electrical panel. To make sure that there is no current in the outlet, use a multimeter - an electrical measuring device.
- When starting to disassemble the old structure, the first thing you need to do is unscrew the screws and remove the upper part of the body. The device cover is made of plastic and is usually secured with two screws.
- Under the cover there is an internal socket mechanism, with which further work is carried out.
- The working part of the product is also removed by unscrewing the screws. In this case, you should carefully hold part of the old socket.
- Using a knife, you need to expose the wires by 10 mm.
- The new device also needs to be divided into 2 parts - the base and the cover.
Replacing the socket box
Sometimes it is necessary not only to install the structure, but also to replace the socket box at the point. The need to replace equipment may arise for a number of reasons: the electrical outlet has become cracked, broken, or it turns out that it did not perform its functions properly.
Types of socket boxes
Installing a new device will not cause any particular difficulties. After removing old equipment, a certain procedure must be followed:
- You can remove the old device by unscrewing the screws that secure it to the wall.
- To pull it out of the wall, you need to pry it with a knife (when installing a socket box in a plasterboard wall). If the room has concrete and brick walls, you can remove the mechanism using pliers or a screwdriver.
- Wires are inserted into the new socket box. It is important before purchasing a new device to measure the diameter of the hole or the old design, since the dimensions of the socket boxes may vary.
- To fix the device in the wall, use a gypsum solution, which is prepared according to the instructions included with the product.
- After the solution has dried, you can begin installing the socket.
Installing a new outlet
When working with a double socket, actions are performed by connecting both structural elements to the same wiring line. 6 wires are fed into one of them, and a loop of 3 main wires into the second.
This means that one element of the socket will receive current and subsequently transmit it to another.
Connection diagram
Socket connection diagram
- Before installing a new device, experts advise cutting the ends of the wires again. Using wire cutters, they need to be shortened by about a centimeter, and then the ends should be cleared of insulation.
- If the wire is stranded, it must be twisted more tightly.
- The inside of the new product must be carefully inserted into the socket box so that the socket fits evenly into the hole.
- Pressing the part firmly against the wall, you need to tighten the screws and fix the device in the socket.
Video - How to install a double socket
Connecting wires to the socket block
Please note that the wires are connected in a special way (as shown in the diagram below). Failure to follow instructions may result in a short circuit.
Connecting wires to the socket block
When installing the equipment, a neatly rolled wire is first placed in the socket box. It should not come into contact with the spacer legs of the box, otherwise the socket will not work properly.
Important! To ensure safety, the grounding wire must be unbroken, i.e. connect to the elements through a branch wire.
When installing a socket at a new point, it is recommended to check the length of the wire. It should not exceed 20 cm, otherwise it may not fit into the socket box.
In two sockets
If there are two holes in the wall, in each of which wires are laid, the following solutions are available for this case:
- Insert two devices into them with one socket each. You need to choose them so that the lids do not overlap one another or there is an opportunity to grind them off along the edges.
- Purchase an internal socket with a long cover. Connect two holes into one. After this, you can plug the extra line and insert the mechanism in the middle of the created opening.
The choice depends on the residents' needs for electrical outlets. One option would be to install an outer horizontal block with 4-5 slots on top of the holes.
Output of a new branch
This method requires more time and effort, but allows for the safest transfer of an electrical outlet.
The method, which involves installing a new line, is often used in panel houses, where the wires are literally walled up in a concrete wall, and therefore it is not possible to remove them. In this situation, they are simply de-energized and left in place, and a separate groove is laid to power the new outlet.
With the help of a new branch you can move the connection point not only to the opposite wall, but even to the next room
Grilling the wall and installing the “glass”
To install a new line, the first step is to turn off the electricity in the room where the work will be carried out. On the wall, using a ruler and pencil, mark the route along which the new groove will be laid.
Using a hammer drill or grinder, a groove is cut out in the wall along the intended route. The depth of the groove is made such that the wire laid in its cavity does not protrude above the surface after installation is completed.
To install a new connection point in the intended location, using a hammer drill equipped with a crown, hollow out a “nest” 50 mm deep. The walls of the niche are thoroughly cleaned of construction chips and dust.
To secure the plastic “glass”, the inner walls of the made niche are covered with a layer of gypsum mortar, and the outer edges of the socket box are treated with the same composition
The installed “glass” should not protrude above the surface. If the depth of the niche is not enough, you can carefully cut off the back wall of the socket box.
Open and closed wiring
The difference between the methods is noticeable to the naked eye. The closed wiring is located inside the wall, for which grooves (grooves) are punched or cut into it, in which the connecting wire is hidden under a layer of putty. Open wiring is laid along the surface of the wall, on which it is held in special fasteners or laid in plastic guides - cable channels.
Accordingly, if you can see the wires that fit into the outlet, then the wiring is of an open type. Otherwise, closed wiring is used, for the installation of which the walls were cut.
These two methods of connecting an outlet can be combined with each other - if the old points are connected in a closed way, then nothing prevents you from connecting a new one in an open way. There is only one choice - in wooden houses the socket can be connected exclusively in an open way, just like all other electrical wiring.
Open wiring - advantages and disadvantages
An analogy with the most common extension cord (surge protector), which is essentially an additional branch of the electrical network, but is connected not to a junction box, but to an outlet, will help you understand why open wiring is good.
- You don't have to cut the wall to install a new outlet. This is especially true for those premises that have already been renovated.
- Installation does not require tools such as a wall chaser or a hammer drill.
- In the event of a breakdown, you don’t have to open the wall - all the wiring is in front of your eyes.
- Installation speed. Even after all the work has been completed, adding another point to the existing wiring is a matter of several minutes.
- If desired, you can quickly completely change the wiring - ideal for temporary connection schemes.
- There is a high probability of external influence on the wiring - children, pets, you can simply accidentally hook it. This disadvantage is mitigated by laying wires in cable channels.
- Exposed wires spoil the entire interior of the room. True, it all depends on the design abilities of the owner of the room - cable channels will fit perfectly into modern design solutions, and if the room is made in a retro style, then special wires and other accessories are produced for this.
- The need to purchase special fasteners, even if cable ducts are not used - in wooden houses, open wiring should be laid at a distance of 0.5-1 cm from the wall surface. Wires are often laid inside iron pipes - all these requirements are aimed at increasing the safety of using open electrical wiring.
As a result, this connection method justifies itself if for some reason there is no point in laying the wires to the outlet inside the wall. Besides the fact that the wiring will be visible, there will be no differences in the operation of the outlet.
Hidden wiring - pros and cons
Despite some significant disadvantages, it is used almost everywhere - the advantages of its use still outweigh.
- The wires to the socket fit into the wall, so wallpaper or other finishing can be done freely on the outside.
- Meets all fire safety requirements (in concrete buildings) - even if a short circuit occurs, there is no fear of a fire from the wires in the wall.
- There is a very low probability of damage to the wiring - it can only be damaged when drilling walls.
- For installation you need to cut the walls.
- It is difficult to carry out repair work.
- If the walls are finished, then after installing an additional outlet you will have to redo it.
The disadvantages are leveled out by preliminary calculations - if you plan in advance where and which block of sockets should be installed, then problems usually do not arise in the future.
How to Use One Twisted Pair Cable for a Dual Link Connection
Computer technologies have become quite firmly entrenched in our everyday life. It is already quite difficult to imagine the operation of technology separately, without an Internet connection.
Many residential buildings have Ethernet networks installed inside them, which craftsmen create with their own hands. When installing them, the technician must take into account the characteristics and features of the cable layout.
Our advice will explain to the apartment owner how to wire one twisted pair cable so that it can be connected to two computers or other network devices.
This method allows you to avoid additional costs and preserve the already created room design. But it requires compliance with certain technical rules, which we will discuss below.
- Features of home connection of computer devices
- Technical limitations Cable design
- Features of notation
- Connection bandwidth
Features of home connection of computer devices
Often a situation may arise when adjustments need to be made to the computer network already installed inside the apartment with wired and wireless connection methods.
It’s good when all you need to do is simply connect the equipment via Wi-Fi and register the security keys. But an option is possible when you need to connect home computer devices only via twisted pair, and all the existing wires are already connected and hidden.
In offices, twisted pair cables are usually laid in special boxes that have a reserve space. It's easy to add another cable to them.
But the home network can lie above a suspended ceiling, under the floor covering, or in other hard-to-reach places. And even if it is mounted in a plinth with a cable channel specially equipped for this purpose, then there is a high probability that it is impossible to add anything else to it for connection.
Technically, it is correct to install an additional switch by connecting an existing cable to it to connect to two network devices. Here, an ordinary 4-port network concentrator (hub) or its more modern counterpart - a switch (switch) would be sufficient. Moreover, we would have one nest left in stock.
We will consider a method that will eliminate the laying of an additional cable, using one already in use as if there were two of them.
When using the described connection technology, it is important to understand how and in what situation this method can be implemented in practice without creating subsequent problems.
Technical limitations
Let's take a closer look at why and under what conditions this option is possible.
Cable design
Many people know that a twisted pair is a network cable in which four pairs of wires of different colors are twisted together. It is usually used to connect computers wired to a local network.
In fact, there are much more varieties of such network cables. Depending on the purpose of the twisted pair:
- has from one to four pairs of wires;
- Additional interference protection may be used in the form of aluminum foil or copper braided wire;
- All cores can be shielded entirely or each pair separately.
Features of notation
What exactly the twisted pair cable you have is can be understood by the markings, which, among other information, will include the category of the cable. To connect your home network, use a Category 5 cable (labeled CAT 5 or slightly higher specifications CAT 5e).
We will not discuss the twisted pair cable categories in detail. We’ll just point out that those with lower characteristics will not suit the characteristics, and higher ones are used for other purposes.
The twisted pair marking will contain a designation like xx/xTP , or a shorter version - xTP , where instead of x one of the Latin letters can be indicated: U, S or F.
How to connect several outlets in a row
Connecting several sockets to one cable is called a “daisy chain” connection. This connection involves connecting several elements of one group (in our case, sockets) into one block. It is worth considering that connecting sockets with a “daisy chain” is suitable for powering electrical appliances and low-power equipment. This type of connection allows you to connect two or more outlets.
According to the location of the power cable, we drill niches in the wall for socket boxes and first level them. After installing the socket boxes, prepare the connecting jumpers (use a cable of the same cross-section as the supply cable). We connect the phase and neutral wires to the terminals of the first socket, as well as similar wires of the “loop” going to the next socket.
It is important to know! When connecting sockets with a “loop,” it is unacceptable to violate the integrity of the ground loop. The connection is made not with a “loop,” but with a separate wire for each outlet.
We fix the connected bases of the sockets in the socket boxes and install the front part, separately for each socket, and in the form of one frame for the entire block.
When you can’t, but really want to
There are quite a few ways to install a grounded outlet, bypassing the provisions of the PUE. All of them are, to a greater or lesser extent, a violation - to use them or not - this decision is made at your own peril and risk, but in any case you need to be aware of the possible consequences. The fact is that many of these methods are used happily ever after, but sooner or later something happens that is why they were banned. As a result, neglect of electrical safety rules endangers the life or health of not only the owner of such wiring, but also other people living with him in the same house.
Zeroing
This is one of the most common ways to ground an outlet if there is no separate PEN conductor. To make a grounding, you need to connect the working zero to the grounding contact - this is done by installing a jumper in the socket itself. The connection diagram for this method of “protection” is based on the fact that even in old wiring, the working neutral conductor is grounded in the distribution transformer. After short-circuiting the zero and grounding, if a phase appears on the device body, a short circuit will occur and the input circuit breaker will turn off the electricity.
- When a phase “breaks through” the housing, the device, although not for long, is still energized and if at that moment a person touches it, he will receive an electric shock.
- If on the way to the socket the neutral wire in the wiring burns out (a fairly common fault in electrical wiring), then in most cases there will be a phase on the body of the devices. To do this, a single light bulb or power supply of any device that is not turned off is enough. In this case, the circuit breaker does not operate.
Connection to a lightning rod
If there is a lightning rod installed on the roof of the house, and the metal strip that connects it to the grounding passes close to the apartment window, then in this case you can connect to the grounding loop and conduct grounding to all sockets.
An excellent way to solve the problem, as a result of which the apartment will be connected to high-quality grounding. This method has only one drawback - grounding works well until the lightning rod is used for its intended purpose, or more precisely, until lightning strikes it. It is better not to know and not experience from personal experience what voltage will appear on the housings of devices connected to ground.
Grounding through heating pipes or water supply
Another common way to ground an outlet yourself is to strip a piece of water pipe and connect a grounding wire to it. On the one hand, it would seem a logical solution - the pipes in any case have contact with the ground. On the other hand, it is unknown to what extent this contact meets the grounding requirements, and if voltage appears on them, then there is a possibility that the current will not go into the ground, but will hit the person who is holding onto the pipe (washing his face or drawing water from the tap).
An additional disadvantage of this solution is the plastic water supply, which is often laid instead of rusted iron pipes. If the pipes on the fifth floor are metal, and on the third floor they are already plastic, then instead of grounding the pipes will simply be energized.
Brief overview of characteristics and prices
Legrand Valena
The domestic electrical goods market offers a wide selection of socket models with two inputs. Products vary in design, technical specifications and prices.
Most popular products:
- Legrand Valena - grounding, screw terminals, 16 A, IP20, 375 RUR;
- Legrand Valena Allure - grounding, spring terminals, protective curtains, 16 A, IP21, 650 rubles;
- Legrand Etika - grounding, screw terminals, 16 A, IP20, 185 RUR;
- Legrand Quteo - grounding, spring terminals, protective curtains, 16 A, IP21, 220 rubles;
- Legrand Quteo - grounding, screw terminals, water protection, 16 A, IP44, 525 rubles;
Schneider Electric DUET WDE000124 - Schneider Electric Duet WDE000120 - without grounding, screw terminals, 16 A, IP20, 110 rubles;
- Schneider Electric Duet WDE000226 - grounding, spring terminals, protective curtains, 16 A, IP20, 130 rubles;
- Schneider Electric W59 - without grounding, screw terminals, 16 A, IP21, 100 rubles;
- Schneider Electric Rondo RA16 - grounding, screw terminals, water protection, 16 A, IP44, 250 rubles;
- Viko Yasemin - grounding, screw terminals, 16 A, IP20, 85 rub.
The product range consists of mechanisms with white and colored covers.