A shallow columnar foundation can be used as a foundation for such a structure. The load is minimal, so the structure will feel very good on it. The walls are made of profiled timber with a stylized log look. The corners of the houses can be made simpler, without these wild west extensions. The project is American, that's why the angles are like this.
Let's go inside the house
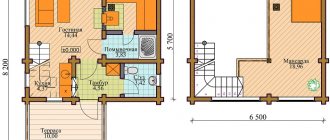
At the entrance, on the left, there is a kitchen front. Everything is neat, compact, thoughtful. There are cupboards on the walls for dishes, a window near the sink, a large work surface, and many sockets for connecting household appliances. Lighting on ceiling beams.
By the way, the ceiling in the houses under the roof visually increases the space, making it simply huge.
Now we turn around and see a seating area and a small wardrobe on the right. There are a lot of beds, three in all, so you can put the whole family going to the dacha to sleep. To sleep softly, you can install a mattress on wooden bases. Or you can just lay down a few blankets and sleep on a hard one - it’s good for your back! There is a ladder leading to the second tier bed.
Next house
And this house seems more impressive due to the veranda, it is not included in the dimensions, that is, the house is 3 by 7 meters somewhere. You can additionally install railings up to half of the front front. Pay attention to the glass under the roof - this is an additional source of lighting for the interior space.
Inside the house we are also greeted by a kitchen corner by the window, only here it is simpler, in my opinion, since there is only one wall cabinet... However, there are more lower cabinets, this just compensates for the lack of a second upper one. By the window on the right there is a wooden dining table and two massive chairs.
The sleeping and resting area is implemented in a similar way as in the first house. The only difference is that doors appeared on the wardrobe.
The inside of the houses is lined with clapboard. By the way, a single space can be divided by a partition if desired, but, in my opinion, this is unnecessary. As a last resort, you can hang a screen over the beds.
More and more people, tired of the frantic pace of life in a modern city, are trying to spend as much time as possible in nature, purchasing their own plots of land for this purpose. Some build luxurious country houses on them, but many cannot afford such a scale. Therefore, recently projects of country houses of 6x9 meters or even smaller are gaining more and more popularity. Let's look at the process of building such a structure with your own hands in more detail.
Material selection
It should be noted right away that the cheapest option is country houses made from block containers, which, among other things, provide a fairly high level of comfort.
The instructions given below are necessary for those who care not only about convenience, but also about the appearance of the structure.
The exterior, first of all, depends on the material chosen for construction. Both natural (wood) and artificial (brick, gas blocks, and so on) are available for sale.
When choosing, you need to consider the following parameters:
- comfort;
- safety;
- durability;
- efficiency.
The most popular materials are summarized in the table.
| Material | Description |
| Tree | The most environmentally friendly material. Projects of country houses 6x7 meters or less, made of wood, amaze with their original appearance and are inexpensive to manufacture. However, such a building requires increased attention and care from the owners. The most popular are round timber (sanded logs) and timber (planed, unplaned, laminated). |
| Brick | Such a building looks more durable and solid. It is reliable and better protected from fire. Unlike wood, brick can be used to construct a house of more complex shape. For example, 6x9 country houses in the form of complex geometric shapes (polygons) fit perfectly into the natural landscape. |
| Concrete blocks | These are the most modern, economical and practical materials. They are distinguished by clear geometric dimensions, good thermal insulation properties, light weight, frost resistance, strength, and so on. Thanks to its size, you can quickly build yourself a comfortable home. A 5x6 meter country house project can be implemented within one summer season. |
Advice! When choosing a material, you should clarify what your dacha neighbors usually build their houses from. Perhaps natural stone, shell rock, and so on are more common in your area. Their price may be slightly lower, which will help you save a lot.
Advantages and disadvantages of frame construction
The 6x3 building can be used as a country house for summer pastime or as full-fledged housing, having previously arranged comfortable living conditions.
Frame technology allows for the construction of such buildings quite quickly. Even when building a large two-story residential building for year-round use, one season is enough to complete all installation work from the foundation to the finishing cladding of the building. An experienced construction team will need no more than 4 months for this.
Frame structures, regardless of size, are lightweight and therefore do not require heavy foundations. And this, as a rule, means significant savings on building materials, a reduction in time spent on building construction, and most importantly, the financial costs of the future owners of the house.
Frame houses practically do not shrink during operation, so immediately after the construction of the frame and roof, the structure can be sheathed and the facade cladding and finishing of the premises can be done inside.
One of the disadvantages is that lumber requires additional treatment with protective agents: against fire, moisture, the formation of fungus and mold, rodents and other harmful insects. And also the period of their operation is much shorter than similar structures made of brick and concrete blocks. But the extreme disadvantage is completely covered by the low cost of the finished structure.
Self-building house
Construction of the foundation
Even country cabins 6x3 meters require the construction of an appropriate foundation. Creating a foundation, although a labor-intensive process, does not require any complex construction skills.
Let's look at it step by step.
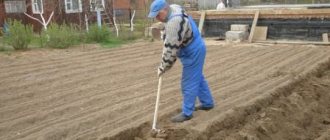
- First, the site chosen for the house is leveled and cleared of vegetation and various debris.
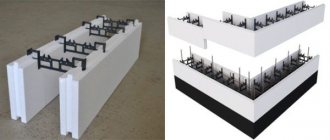
- It is better to make the foundation for a small house columnar. To do this, holes are dug in the right places with dimensions of 30x30 cm and a depth of at least 70 cm.
- Blocks can be cast from concrete yourself, but it is better to purchase ready-made ones. They are installed in pits on a previously filled and compacted sand cushion (its thickness should be 20-25 cm).
- If the house is large enough, then the blocks need to be installed not only in the corners, but also along the walls. The distance between them is approximately 2 meters.
- Make sure that the top edge of all blocks is located at the same level, otherwise the house placed on them may become deformed.
Advice! Wood can also be used instead of concrete. In this case, measures should be taken to waterproof it. It is best to treat the wood with an antiseptic and cover it with bitumen. will serve you for many years.
Making the floor
Its surface should retain heat well, so you should take care of high-quality thermal insulation.
The work is carried out in the following sequence:
- Logs are installed as supports for the floor.
- Between them are laid sheets of polystyrene foam cut to size.
- This material is covered with a vapor barrier film on top, which is secured using a construction stapler. The joints of the film are taped with adhesive tape.
- The floor covering is made of tongue and groove boards, which eliminates the occurrence of cracks. They are secured using self-tapping screws and a screwdriver.
Advice! If there is no electricity at your dacha, which is necessary for the operation of various power tools, renting a diesel generator for your dacha can help you out.
Wall installation
If the house is small, the best option for the walls would be to use wood. A beam with a cross-section of 12x6 cm is recommended as the basis for the frame. Thinner lumber cannot be used, as they will not be able to reliably support the weight of the sheathing. In addition, this thickness of the timber allows you to place mineral or glass wool in the inner cavity of the wall.
The walls of the house consist of the following layers:
- frame with filler;
- vapor barrier film;
- internal lining.
The film must be placed on the inside, otherwise the so-called greenhouse effect will occur, which will cause an unhealthy microclimate in the room.
Wall panels can be made in advance and then assembled into a finished structure. This will significantly reduce construction time.
The maximum deviation from the vertical and horizontal, as well as the gaps between parts, should not exceed 1-2 mm. The thickness of the finished wall after installing the decorative cladding will be about 9 cm.
Making a roof
The simplest design is a pitched roof, the rafters of which rest on the back and front walls of the house. The material for it can be profiled sheets, metal tiles or slate.
Some people plant moss or turf on top. In this case, the structure must be more massive to support the additional weight.
The optimal thickness of timber for rafters is 16 mm. If you are using smaller pieces, reduce the distance between adjacent rafters to avoid sagging.
Forum member Demoncheg and his wife have long dreamed of getting out of the dusty city and settling near a river and forest so that their child, and they themselves, could breathe clean air. The family settled on the golden mean: the plot they liked was located 100 km from the city - not too far, but not so close either. They were captivated by the beauty of the spruce forest, which is located not far from their future place of residence. There they decided to purchase 10 acres of land. Initially, the family wanted to buy a ready-made 6x2.3 m change house, but they had to abandon this idea, since the desired quality did not correspond to the asking price. Therefore, it was decided to build a guest house with our own hands. Drawings of the future house 6x3 m were independently developed and an estimate was drawn up. They built the house in 15 days, the costs according to the estimate amounted to 120 thousand rubles.
Advice:
Before starting construction of the foundation, it is necessary to select high-quality concrete blocks, since the strength of the future building will depend on them. When choosing blocks, you need to pay attention to the following characteristics: boundary load, frost resistance of the blocks, the presence of granite crushed stone and the size of the blocks.
First, we marked the soil using metal pegs, rope and a construction meter, that is, we outlined the boundaries of the future building and foundation.
Note:
During marking, it is necessary to take into account that the width of the foundation should a priori be greater than the width of the wall.
After completing the work on marking the territory, we began to prepare the soil for the construction of the foundation. For a columnar foundation, it is necessary to make holes in the ground for supports. Their depth should be approximately 1.5-3 cm, this depends on the unevenness of the area. That is, the recesses must be made so that after installing the blocks, their level matches.
You should definitely make cushions in the holes: pour sand and gravel at a level of 10-15 cm, fill with water and compact thoroughly. Next, the support platforms were installed and the blocks were placed.
Note:
Support platforms make it possible to increase the load-bearing capacity of the soil, and accordingly, a large weight of the structure is possible. It is not recommended to use paving slabs as support due to their fragility. The most reliable option is to fill the reinforced support platform in one row with road mesh or reinforcement.
Bottom frame frame
We made the bottom trim from 150x100 mm timber. The bottom trim is the first layer of timber; it is necessary to fix the future structure on the foundation. Also, the strapping acts as a reference point for the walls and floor.
Advice:
Traditionally, the bottom frame is made from softwood. The builder can choose from a timber, a board or a bunch of boards and a log. If a bunch of boards is used, then it should be secured with screws or nails of different lengths and in a checkerboard pattern.
The size of the bottom trim should be 5-7 cm smaller than the foundation in order to install the ebb and make the outer cladding of the house. We laid out the prepared timber with the quarters cut out on the foundation, checked the dimensions, compared the diagonals and the horizontal level. You can assemble the harness using self-tapping screws or wood glue-sealant.
Advice:
In order for the connection of the lower trim to be sufficiently strong and rigid, it is recommended to make it in a “quarter”
The gaps between the lower beams and the foundation were sealed using a gasket made of polystyrene foam. As expected, the entire timber was treated with Senezh antiseptic.
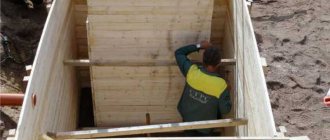
At first it was planned to build the building according to the “platform” principle, but during the construction process they decided to build it according to a different principle.
We attached the logs made of antiseptic timber “in a quarter” to the bottom trim with self-tapping screws and glue-sealant. We also made the basis for the future floor: along the lower edge of the floor joists, bars were attached, on which a subfloor made from edged boards was laid. The entire structure must be antecepted.
Interactive for guests
You can also tell your guests a story or involve them in an interactive activity using a seating plan. Have them solve riddles or interact with objects to find out their table number. This is what the MHoliday agency team did when creating a wedding for a creative couple - Alena and Sergei. Guests had to rotate the table number tiles to find their name on the lists. And from velvet slits nearby, waiters in white gloves offered everyone a glass of sparkling wine.
Photos: Artem Kondratenkov, Olga Kochetova, Fedor Borodin
Even more useful information about preparing for a wedding and wedding trends can be found in our guides.
Wall installation
After the logs were laid, we began installing the walls. The distance was made a multiple of the insulation; the material chosen was 100x50 mm timber. The assembly of the house frame proceeded as follows. At the corners of the frame building and between them, load-bearing frame posts were installed, which were aligned and secured with temporary jibs from the outside.
We installed the top trim on the frame racks. Here you need to once again carefully check the horizontal and vertical positions of the supporting structure of the frame mini-house. Now you can install the remaining wall posts, focusing on the distance of the floor joists. Secure the entire structure with corners and screws.
Advice:
Fastening with nails is cheaper, but it is unreliable because the wood often cracks. It is recommended to select metal corners and fasten them using self-tapping screws and a screwdriver.
We started installing the upper floor joists. They were laid in grooves in the same way as the floor joists, the only difference being that the floor joists were longer. This is provided in order to later attach the roof rafters. The frame racks were strengthened with jibs.
At this stage, construction was suspended for 10 days due to the drilling of a well. Upon completion of the work, construction continued.
Roof installation
After a short break we moved on to installing the roof. First they made the overlap. It is important to lay the timber strictly on the wall posts of the frame house to ensure the strength of the structure. The ceiling is laid with a projection of more than 40 cm from the outer wall - this will protect the walls of the mini-house from rain.
Six farms were assembled right on the ground. The trusses were built from the same timber from which they were made, and were guided by the standard size of metal tiles. The trusses were fastened with metal plates.
Advice:
To add rigidity to the structure, it is recommended to additionally secure the rafters with metal plates. You can purchase them or make them yourself from a sheet of galvanized iron using a jigsaw.
After installing the truss, we moved on to roofing work: waterproofing and sheathing. Waterproofing material was placed over the entire roof area and secured with bars. These bars are assigned several tasks: to maintain waterproofing, create a ventilation gap above the roof and serve as the basis for the counter-lattice.
The sheathing must be done staggered to avoid ruptures of the roofing material in the event of shrinkage and warping of the lumber. To create a cornice, the lathing should be laid with an extension of 30-40 cm. Next, a counter-lattice was installed for laying the metal tiles.
It was time to lay the metal tiles, and here we encountered some difficulties. The installation of metal tiles should begin by placing the first sheet in the lower corner of the rectangular slope directly onto the sheathing and fastening it with a self-tapping screw.
Note:
It is important to remember that metal tiles should be laid parallel to the eaves.
When installing the next sheet, you need to pay attention to the line that the edges form. It must be perfectly level, otherwise there is a possibility that the structure will collapse. All other sheets are attached in the same way. And finally, we sewed up the gables with sheet moisture-resistant material.
Do-it-yourself cladding of frame walls and exterior finishing of a frame house
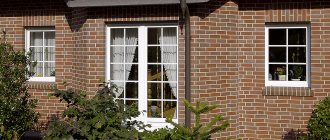
First, the walls were covered with windproofing film from IZOVEK, after which we moved on to covering the back wall. It was decided to cover the facade of the frame house with imitation timber measuring 185x21x6 mm. We made this choice because the material imitating timber has a number of advantages:
- Does not deform;
- Does not change its appearance over time;
- Does not rot or wood fungus;
- Easy to install.
To minimize the ingress of moisture, the lining panels were fastened in a horizontal plane.
We installed Chinese doors and plastic windows purchased in advance.
The walls of the house were painted with white Dufatexaqua antiseptic. The impregnation was applied in two layers, trying to ensure that the wood texture remained visible.
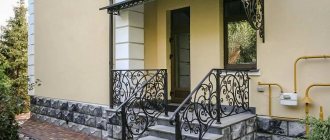
We made trims for the windows, painted the corners and trims dark with PinatexUltra paint in rosewood color.
Finally, we installed the drainage system and screwed in the lanterns.
Interior decoration of the house
First of all, we insulated the walls with 100 mm thick Rockwool, made a vapor barrier on top, sheathing and sheathed the walls with PVC panels. The panels were fastened with a stapler, we also built a sheathing on the ceiling and installed corners. To begin with, we covered only one wall to connect electricity, and then all the others.
The next stage of finishing is laying the floor. They did it on the same principle as the walls. From the very beginning it was planned to insulate the floor with a material 50mm thick, but during the process it was decided that this would not be enough. Since the floor joists were already lying down, we decided to get out of the situation in the following way. We wove a web from synthetic twine, laid down a wind barrier, laid 100 ml of insulation on top, and at the end - a vapor barrier and plywood.
The doors were installed and linoleum was laid. The kitchen was also covered with panels, shelves and a coffee table were assembled. We can assume that we have successfully completed the task of how to build a guest house with our own hands.
Installation
It was also planned to install 90 meters of a two-meter fence made of corrugated board. We ordered the following material: for the pillars a six-meter profile 60x60, it was cut into 2 parts, for the veins we used a 40x20 profile, for gates and wickets 3.5 m in size 80x80. We sanded the iron and painted it with Hammerite metal paint. They decided to drive in the pillars because the soil was clay. They were hammered with a sledgehammer from a stepladder to a depth of approximately 1-1.2 m, the tops were cut off. Before driving in, they dug holes the depth of a spade bayonet, then filled them with crushed stone. The posts were completely driven in on both sides of the site.
Many people dream of owning their own home on their own plot of land. Whether it will be a small shed or a spacious home depends primarily on the financial capabilities of the owners. However, today becoming the owner of a comfortable country house has still become much easier than before. Now there is no longer any need to start a multi-year construction project. You can simply call and order a house with the configuration you need. It will be delivered ready-made or assembled right at your site.
What is attractive about a 6 by 3 meter garden house?
A garden house 6 by 3 meters is a popular option for construction on a summer cottage. Due to the increased width of the building, such a garden house is only available for assembly on the site. Another feature of the structure is the presence of a forward cornice. Those. the lower part of the roof slope protrudes beyond the plane of the building wall. This technique allows you to make the building visually lower. And in practical terms, the wide slope of the roof allows precipitation to be diverted from the walls and windows of the house, which in itself is an advantage. The outside of the house is trimmed with a block house on three sides (the back side of the house is lined with clapboard).
Many people dream of owning their own home, therefore, when purchasing a plot of several hundred square meters outside the city, everyone wants to build a house there. For a small family, a country house measuring 6 x 6 meters is quite suitable. By carefully thinking through the layout of your home, you can create a cozy space that will be pleasant to be in at any time of the year.
Drawings of frame structures 6x3 meters
Before the start of full-fledged construction, a detailed drawing is developed with all the details and layout of a frame country house measuring 6x3. It indicates the relative placement of all internal premises with specific parameters, quantities of consumables, etc.
The standard layout for a typical project of a 6x3 meter residential building includes 3 separate rooms separated by internal partitions, for example:
- Living room – 3x4.5 m;
- Hallway – 1.5x1.5 m;
- Pantry – 1.5x1.5 m;
- Bathroom (storage room) – the remaining area of the building.
The project must indicate the location of communication systems (water supply, sewerage, electricity). The estimate for installation work is calculated in advance.
Tip 1 – choose the right building materials for building a house
A small house measuring 6 by 6 meters can be built from a variety of materials. The most suitable building materials will be:
Foam blocks;
Glued or solid timber;
Rounded logs;
Frame system.
Each of these materials has its own advantages and features.
Foam blocks provide good thermal insulation and sound insulation, they are not subject to combustion and are durable. You can quickly build a two-story house from foam blocks, spending about a month on construction. However, then, you will still need to carry out high-quality treatment of the walls (plastering, wallpapering), since inside the house the walls made of foam blocks do not look very aesthetically pleasing.
Wooden building materials are beautiful and environmentally friendly, but, unfortunately, they are susceptible to burning and rotting. Therefore, wood must first be treated with special compounds to avoid rapid combustion and resist the process of decay. The walls of a house built of wood look beautiful in the interior; you don’t have to plaster them, but leave them as they are.
House planning is the most important stage in building a house. Since a house measuring 6 by 6 meters turns out to be small, it is necessary to carefully consider the location of rooms and office spaces in order to use the area to maximum benefit.
There are many layout options for a small home. You just need to choose the most suitable one. First of all, it is advisable to abandon corridors or reduce their area to a minimum. It is better to make a combined bathroom, again to save space.
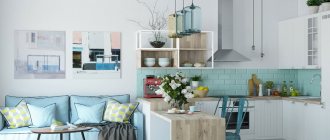
The living room can be combined with the kitchen - this way the room will look much more spacious without losing its functionality. To separate the kitchen and living room space, you can install a wooden bar counter or an elongated island table. Window sills can be turned into comfortable benches and sofas. Light folding furniture that can be laid out as needed fits well into the interior of a small house.
Classic scheme
This is the easiest and most elegant option. Order cards with the names of guests from the designer who creates invitations for you. So that no one gets confused, everything should be extremely simple and clear: one table - one card, it is better to choose a font so that even older guests can read everything without difficulty. You can place these “postcards” at the entrance to the banquet hall on a wooden easel or in a beautiful frame.
Photographer: Roman Ivanov
Tip 3 – the attic almost doubles the living space
A house with an attic can significantly increase the living space. On the attic floor you can equip one or two bedrooms. If there are children in the family, they will love the children's room on the second floor. In addition, you can place an additional bathroom on the second floor; it needs to be installed above the bathroom located on the first floor - then it will be much easier to install the plumbing.
The attic with a balcony looks very nice. If you place a small table and wicker chairs on the balcony, you will create an additional cozy corner.
Purpose
Personalized seating cards are beautifully designed cards indicating a seat at the table for a specific person. They are placed next to the plate or attached to the stem of the glass.
Such original accessories have already become an indispensable attribute of any wedding. Place cards at a wedding celebration perform several important functions:
- save time: finding your place at the table is much easier with their help;
- emphasize the newlyweds’ concern for the comfort of their guests;
- complement the festive table setting.
Idea! Name signs often act as a gift for guests, which they take home as a souvenir of the celebration.
Tip 5. The interior of a 6 by 6 house should be as comfortable and practical as possible
The interior of a small house needs a special design. To decorate small rooms, it is better to use light shades, this rule applies to both curtains and furniture, and larger windows allow you to let a lot of light into the room.
The living room in a small house can be spacious if it is combined with a kitchen. Then there are more possibilities for color solutions - you can use dark colors and contrasting combinations in the interior.
A country house cannot do without a fireplace, especially if you plan to use the house all year round. The fireplace can be either wood-burning or electric; in any case, it will perform two functions at once - heating the house and decorating the interior.
A kitchen in a small house should be compact and practical - a minimum of cabinets, built-in appliances, a folding table for a different number of guests. Furniture made from natural wood looks harmonious in the interior of a wooden house.
Bedrooms are most often located in the attic. Despite the sloping ceiling, the interior on the attic floor can be very cozy and stylish. True, standard furniture most likely will not fit here; you will have to order cabinets based on individual sketches.
Photos of guests
Place the table number on the back of your guests' photos. The main thing is to secure them so that you can take the photo without tearing it, and take it with you as a souvenir after the wedding. By writing a small wish or gratitude next to it, you will show how dear each of the invitees is to you. You can also put names on the photos and turn the search for a place into an opportunity for guests to get to know each other without a formal introduction.
Photographer: Maxim Koliberdin