Many of us have encountered such a dubious pleasure as the failure of household appliances. Such troubles are often associated not only with discomfort and labor costs, but also with additional financial costs. And such a problem will be twice as unpleasant if the boiler is leaking, since it is impossible to postpone the repair of such a useful device - everything must be resolved immediately. And, of course, you need to start by looking for “vulnerabilities,” that is, the causes of the leak.
Today we will look at all the possible causes and solutions to a leaking water heater. According to tradition, we begin work by preparing everything that may be required in the future.
What to do if your boiler leaks
Reasons for leaks
A cylinder water heater is a fairly simple device.
Its basis is a steel container, coated on the inside with a protective layer, which prevents premature corrosion of the walls of the container and, accordingly, extends its service life. The coating of the internal surface can be made of enamel, glass enamel, glass ceramics, a protective layer of titanium, a layer of stainless steel, etc. Usually this coating is developed by the manufacturer itself and is kept strictly secret.
At the bottom of the boiler there is a cover in which a heating element, thermostat and magnesium anode are mounted. There is also a thermometer in the tank. An inlet pipe from the water supply is connected to the boiler from below and a hot water pipe leads to the shower mixers and kitchen sinks.
The outside of the water heater tank is covered with a layer of thermal insulation made of polyurethane foam and a decorative metal casing. The main reasons that contribute to the premature failure of the boiler tank are the following:
- if the pressure in the water supply system is more than 2 atmospheres, it is necessary to install a reduction reducer in front of the boiler, since when heated, the pressure will rise even higher and unacceptable deformation of the walls will occur, compromising the integrity of the protective coating;
- there is no safety valve installed immediately before the entrance to the boiler, which relieves excess pressure when heating water in the water heater;
- If boiler maintenance is not carried out once a year, then scale forms on the walls and heating element, which impairs the operation of the heating element and leads to premature wear of the boiler itself. It is also necessary to change the magnesium anode once a year, which prevents wall corrosion
; - heating the boiler to a high temperature above 70 degrees Celsius. The best option would be to operate the water heater at temperatures up to 50 degrees;
- Do not drain the water from the boiler for a long time - this leads to premature corrosion of the metal.
By applying all of the above precautions in practice, you can significantly increase the service life of your storage water heater and thereby provide yourself with comfortable conditions for many years.
Diagnostics
What to do if an electrical appliance that was working yesterday shows no signs of life?
First of all, you need to check the input electrical circuits.
- sounds trivial - but look to see if the electricity in the house is turned off (after turning on the boiler);
- we check the circuit breaker on the line to which the water heater is connected;
- in 90% of cases (especially if you have an instantaneous water heater), the connection is made through an RCD: we also check this circuit breaker;
- We look at what temperature the thermostat is set to (sometimes in a hurry the user forgets to set the required mode);
- inspect the plug and socket of the storage water heater (under high loads, the contacts may “burn out”).
If there are no external causes or have been eliminated (you turned on the machine, etc.), and the water heater still does not work, we will deal with the electrical appliance. Of course, you can call a specialist or take the equipment to a workshop. However, this will incur additional costs. Despite the apparent complexity of the design, repairing a water heater with your own hands is possible, even in the absence of special equipment. You will need a set of wrenches, a good screwdriver, pliers and a multimeter, and you may need a soldering iron. If you have one and you know how to use it, your chances of repairing the boiler yourself are significantly greater.
There are no fundamental differences in the design of electric heaters. The Polaris water heater has the same heating element and control element as Ariston. Moreover, many brands are united by large corporations (costs of globalization), so the design of household appliances can be absolutely the same. The only exceptions are little-known Chinese brands, or Japanese models imported unofficially. They contain design solutions that cannot be found on the Thermex or Electrolux water heater.
Although the repair of such electrical appliances follows a general logic, it would still be better to find branded electrical circuits.
How to troubleshoot
If the cause of the leak is a faulty valve, then it is replaced with a working part adjusted to the same operating pressure. When replacing, or better yet, while installing a water heater, try not to use cheap Chinese products. Remember that the safety of your family directly depends on the valve. Good Italian safety valves with the same non-separable design, although they cost several times more, are purchased once. As practice shows, there are no problems with them in the future. Connect a flexible transparent hose to the drain outlet of the device. This will help you visually evaluate the performance of the part. Lead the end of the hose into the sewer or a suitable container.
Products from well-known manufacturers are reliable and durable
To remove the valve for replacement or cleaning, you will need a plumber's wrench and an adjustable wrench. The work is performed in this order:
- Disconnect the boiler from the network;
- Turn off the cold water supply tap to the water heater;
- Open the hot water taps and completely drain it from the container;
- Press the lever on the safety valve and remove any remaining liquid from the tank;
- Disconnect the cold water pipeline from the safety valve;
- Remove the valve.
After cleaning or replacement, the part is put back in place in the reverse order.
If the input pressure of your water supply system exceeds the nominal pressure for which the storage water heater is designed (this can be found in the technical data sheet for the device), a pressure reducer is installed at the water inlet to the apartment.
A filter for pre-purification of water must be installed in front of the gearbox, and its installation is carried out in strict accordance with the direction of liquid flow. Approximately half of the pressure reducers have a pressure gauge in their design, which greatly facilitates their setup and control of the parameters of the water supply system.
Storage tanks capable of heating water to a certain temperature (in common parlance - water heaters or boilers) are most often installed in those rooms where there is no centralized supply of hot water, or there is a high probability of its shutdown. This device has not lost its relevance from ancient times to the present day. Thus, the ancient Greek mechanic Heron of Alexandria (second half of the 1st century AD) is rightfully considered the inventor of the boiler. The unit he created heated cold water with steam. Then they forgot about it, and therefore at the end of the 17th - beginning of the 18th centuries they were forced to reinvent the device. But, like any other household electrical appliance, even an advanced water heater can break down as a result of exposure to internal or external factors, as well as due to simple wear and tear of parts. All the reasons why hot water does not come from the boiler, as well as ways to eliminate them, will be described in this material.
Fixing a leaking storage tank
In the first 3 cases, we repeat, repairing the boiler will no longer help and there are several reasons for this.
- A water heater with a tank is an almost monolithic element, so we are unlikely to be able to disassemble it without damaging the outer shell.
- In some cases, the inner lining of these tanks is plastic or stainless steel. Unfortunately, we won’t be able to do anything with this kind of material, especially since we won’t even be able to check a stainless steel container.
- The inner surface of most modern boilers is covered with glass enamel - a material that may well be destroyed if welding is carried out. And such destruction can no longer be restored (at least, with one’s own hands).
It turns out that the only way to correct this situation is to completely replace the storage boiler. Of course, if the boiler is leaking, then you can try to find the same model of storage tank, try to install it yourself, although in nine out of ten cases all these attempts will not bring results for the reasons that we have just described.
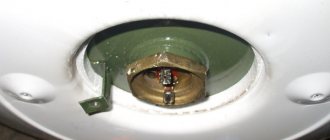
Go ahead. If the plastic cover (or rather, the inspection hole on it) leaks, there are two possible options for further developments. And in order to find out which option is more suitable, we must disconnect the boiler from the electrical network and dismantle the bottom cover on it. We determine where exactly the water is flowing from.
If we are talking about the hatch inside the water heater, it means that the flange has depressurized. You can fix this problem yourself, and with a significant probability of success. There are two possible reasons for depressurization:
- the sealing gasket, made of rubber and located on the flange, is no longer able to fulfill its direct “responsibilities” and needs to be replaced;
- There is a manufacturing defect: during the manufacturing process the device was incorrectly aligned.
And to determine what the condition of the gasket is, we do the following: turn off the device, drain all the liquid from it, remove this gasket and examine it for defects or wear. Next, when going to a plumbing store, we take the gasket with us so that the new product is identical. After this, we replace the gasket, replace the cover and resume the operation of the water heater.
Video - How to properly clean and change heating elements
How to fix a leak yourself
How to identify a breakdown and deal with it yourself.
Installation problems
Soon after connecting, you may notice water dripping from the tank. In this case, the shell of the housing may be inflated or deformed.
When installing it yourself, you forgot about the safety valve, or it was connected incorrectly. As a result, the container overflows with water and swells, after which it leaks. The valve needs to be installed. It protects the system from overpressure.
- If the valve is installed incorrectly or is broken, the tank is deformed when water is drained from the system.
- You turned off the boiler and turned off the water. At this time, the hot water inside cools down and the body contracts.
- The product is filled to capacity with water. When heated, it expands and the tank swells.
If deformed, repair is impossible; a new device will have to be installed.
Impact of corrosion
Has it been a while since you replaced the magnesium anode? Then don't be surprised that the boiler is leaking. Magnesium attracts salts contained in water. As a result, impurities settle on the anode and destroy it, but the tank and heating element remain intact. If the anode has long been destroyed, corrosion of the metal casing begins.
Poor quality pipes or incorrect connections
Is water dripping from pipes or connections? Sealing the connections will help fix and eliminate the problem: you need to replace the gasket or fum tape. It is recommended to use metal-plastic pipes, because the body suffers as a result of water hammer.
Flange (gasket) worn out
The heating element and magnesium anode are mounted on the flange, and a gasket is installed for tightness. If it is worn out, it will leak from below. Replace it with a new one or tighten the fastening nuts.
The heater housing is rusty
A dry heating element has a shell made of steel and enamel - wear leads to corrosion. How to repair a leaking element? Only replacement will help.
Lack of grounding
Why is it necessary to ground the device? When a current breaks down on the housing, the latter will be subject to electrocorrosion. In addition, this is life-threatening: the water from the tap or the surface of the tank can become electric.
If the problem is not worn water heater parts that can be replaced, then the tank cannot be repaired. When the case itself breaks, you have to buy new equipment.
How to avoid malfunction? Only by correct use:
- Make sure that the pressure in the line does not exceed 3 Atm. Otherwise, you need to install a reduction gear.
- Once every six months, inspect the equipment, clean the tank and heater from scale, and change the anode.
- Install a water filter if the water in your area is hard.
It is always better to prevent a breakdown than to repair it. Follow the instructions.
A separate procedure is replacing the heating element
This is necessary when a malfunction of the heater is clearly established, or if its mounting flange has leaked. In any case, it won’t hurt to inspect the internal space of the boiler. At the same time, you can clean the heating element from scale.
Of course, this situation is only possible with very calcined water. However, even normal water hardness, as well as ignoring maintenance, will turn your heater into a useless piece of iron.
Tip: if you get to the heater, it’s a good idea to check the condition of the magnesium anode. It is located next to the heating element.
Types of leaks
There are several options for malfunctions and leaks:
If the boiler leaks from above or below
It is necessary to disconnect it from the power supply, substitute a basin and perform a thorough visual inspection. Water leaks can be different: water can simply drip, or it can flow in a stream under pressure. In most cases, water leaks from the bottom of the water heater. Use a flashlight to find the source of the leak.
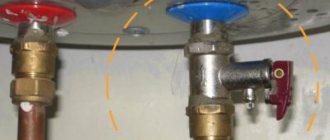
The simplest case is when the leak occurs from the safety valve. It is adjusted at the factory so that excess pressure when heating water is released through a small fitting.
A simple solution to this issue is to drain this water into the sewer using a plastic flexible tube with a diameter of approximately 8 mm. In this case, you need to think about where to connect the other end of the tube. If the boiler hangs in the toilet, you can lead this tube into the flush tank;
Leakage from connections
The source of the leak may be from loose connections of the inlet and outlet pipes in the boiler itself. This can be easily resolved by repacking all threaded connections;
Leakage from under the cover
A more serious option is when a leak is detected from under a plastic decorative cover that covers all electrical components of the boiler from below. In this case, it is necessary to unscrew the bolts and remove the bottom cover.
Next, use a flashlight to determine the place where the water is flowing from. If leaks are detected from under the cap, this is one of the best options. Since the cover is pressed against the boiler body through a gasket, you can try to eliminate the leak by tightening the nuts of the bolts on the cover.
If this does not work, you need to drain the water from the boiler, remove the lid and change the gasket. Before doing this, you need to disconnect all electrical wires.
Advice:
To avoid confusion in the future, you can first photograph all the connections with a digital camera or smartphone and display them on the laptop screen.
These are, perhaps, all the options in which you can eliminate boiler leaks without replacing it. However, in most cases, about 80 percent, the leak comes from the top or bottom of the boiler body.
It is important to know: often the location of the fistula in the body is almost impossible to determine, since it is covered with heat-insulating material and an outer casing. Water may flow down under the insulation or leak around the thermometer
There are special holes in the lower part of the boiler; if water leaks, you can accurately determine that it is the water heating tank that is leaking.
These are the most difficult and unprofitable options. All of the listed leak options refer to the most common brands on the market, such as Ariston and Termex.
Preliminary inspection of the device
If you notice that your boiler is leaking, you first need to disconnect it from the power supply. Then conduct a thorough inspection of the device, during which you need to find out the location and cause of the leak.
First you need to inspect the boiler
Important! If the boiler is leaking from above, there can only be one explanation for this - a hole has appeared in the tank.
There are several reasons why such holes appear.
- First of all, this is a banal manufacturing defect.
- You have been using the device for several years, but during this time you have not carried out any preventive maintenance.
- The magnesium rod was not installed in the tank.
- The water coming from the pipeline is of poor quality.
- You did not take care to ground the heater tank.
Whatever the reason for the tank leak, the boiler must be dismantled for repair work, or a new one must be purchased. If liquid is oozing from under the plastic cap, then the problem is serious and the equipment is most likely completely damaged. When the seal of the tank is broken, water flows out from under the plugs, moving through the water supply/discharge hoses. Such a breakdown also requires replacing the boiler.
Boiler connection diagram
The most common “headache” for owners of storage water heaters is the heating element - the element that heats the water . It breaks down very often, so it, as well as the tank, should be descaled regularly.
Prices for heating elements for water heaters
Mixer dirty
The liquid will flow in a weak stream if the mixer spout
a traffic jam has formed. The pressure will be equally bad for both cold and hot water. To fix the problem, it is necessary to carry out a number of procedures.
- Close the riser to turn off the water.
- Carefully remove the mixer.
- Unscrew the spout from the general body.
- Remove the mesh and rinse it under running water. If salt deposits or heavy dirt forms, let it soak in a special cleaning solution.
- Rinse the faucet spout thoroughly and clean the insides of dirt using a brush.
- Reassemble the mixer in reverse order and install it in place. Don't forget to open the riser.
This procedure may take some time; alternatively, you can simply replace the clogged faucet with a new one. Experts recommend replacing worn parts every few years to avoid serious damage in the future.
What's under the lid
When the cover is removed, the wiring of the heating element is visible, which needs to be disconnected. Before doing this, you need to sketch or photograph the original position of the wires. This will come in handy during the reverse assembly stage. After photographing, you can unscrew the bolts of the wires.
Wires under the removed housing cover
Many models have a thermostat under the cover. To remove the device, you need to grab it firmly and pull it down. It is better to do this with a sharp but precise movement. You can watch the video in detail:
Some Ariston models have a thermometer on the body. To remove it, after disassembling the electrical circuit, the device is pryed off from both sides with flat screwdrivers. This allows it to pop out of the nest with a click. Next, carefully pull out the wires disconnected from the thermostat.
Some boilers are designed in such a way that a non-return valve may prevent the removal of the lid. Then you need to unscrew it. A temperature sensor is sometimes attached to the back of the cover. It must be removed by disconnecting the contacts from the heating element.
In Termex boilers, an electronic control board (power unit) is located under the lid. It is secured with self-tapping screws and is also easy to remove. The control board and the external sensor board are connected by connectors that need to be unscrewed. The grounding attached to the nuts is also disconnected.
The main causes of leaks and methods for eliminating them
In the process of leaking the device, it is first necessary to establish the source of the negative factor. They can differ significantly in characteristics, so they can be identified quickly and without professional skills. It is best to study the water heater according to the instructions included with the unit. Most models have a warranty card designed for such situations. To avoid aggravating the problem, the device must not be opened.
Hull deformation
The outer shell of the equipment may become deformed after installation. The cause of the unfavorable behavior of the device is considered to be incorrect installation of the unit. Often the consumer forgets to connect the safety valve. The product is located on the main liquid supply between the shut-off valve and the valve element. This part is designed to protect the tank from overfilling; it is during this process that deformation occurs.
If the valve is installed, but water also flows through the supply pipe, this fuse should be removed and a new one installed. Repairs will not take much time and do not require professional knowledge of the device.
Another reason for deformation is the use of low-quality pipes during installation. Powerful hydraulic shock with pressure changes slowly destroys the structure of the product.
Healthy! If the body is deformed, the boiler cannot be repaired; it must be replaced with a new model, while observing the correct connection technology.
Manufacturing defects
The leakage may be from the top of the housing; if in this situation there are no visual deformations of the unit, and the magnesium rod was mounted during connection, then a manufacturing defect of the equipment is possible. During warranty service, it can be returned back to the supplier.
Modern models are designed with designs in which the tank cannot be repaired. The container cannot be welded, because during the welding process, a layer of enamel breaks off, after which corrosion forms, spreading over the entire surface of the device.
Poor installation of the device
Another reason that occurs quite often is a loose connection to the cold water inlet and hot water outlet pipes. Such signs may appear when installing the device yourself, when low-quality fittings or incorrect materials for seals are used.
Gasket wear
A leak in the inspection hole located in the plastic cover at the bottom of the equipment indicates a loss of elasticity of the rubber gasket on the flange. An accurate determination of this cause can be carried out after turning off the equipment: the lower cap is removed and the problem area is visually examined.
Replacement of the sealing gasket must be carried out strictly in accordance with the boiler model number, so that the product fits tightly to the working parts.
Removing the Housing Cover
Inexpensive heaters without adjustment devices usually have two screws on the bottom cover of the housing. They need to be twisted with a Phillips screwdriver and the cover removed. If the cover is too tight, you can pry it off with flat-head screwdrivers.
A special place is occupied by models with oval flanges. They are dismantled directly on the wall; it is not advisable to turn them upside down with the fittings. Near the fittings (they are marked in blue and red) there are two bolts, unscrewing which you can remove the cover.
On some models it is not immediately possible to immediately find the screws to remove the cover. They are hidden under stickers. After removing the stickers, you can unscrew the housing cover. Sometimes, before removing the cover, you need to remove the plastic shields and plugs from the screws.
Valve leakage during water heater operation
If the water heater is connected to the network and heats water for a long time without significant water intake, then the cause of the constant leakage is most likely a faulty safety valve. The fact is that during the initial heating of cold water, its volume in the boiler will increase by about 2-3%. This excess liquid will be discharged from the tank. In the future, the boiler simply maintains the temperature of the hot water, so there should be no leaks, so the cause should be sought either in a breakdown or in a clogged safety valve.
A completely different picture should be observed with increased water consumption, for example, while taking a shower: the constantly leaving volume of hot liquid will be continuously replaced by cold water. But when it heats up, the excesses indicated above will begin to appear. Therefore, the flow of a certain amount of water from the drainage hole in this case is quite logical.
Safety valve device for water heater
And the third option is for a small, extended water withdrawal. For example, washing dishes or cooking. With such a flow rate of hot water, there should not be a constant leak from the drainage tube, but the periodic leakage of liquid drops will indicate the correct operation of the water heater.
Preparing everything you need
Before starting work, we prepare everything that may be required. Mandatory equipment includes:
- an adjustable wrench (it is important that it is larger than the largest nut in the water heater);
- knife;
- electrical tester;
- screwdriver;
- tubular wrenches (full set if possible);
- socket wrenches;
- a rubber hose with which we will drain the remaining water from the tank.
If any of the items are missing, be sure to buy this, because this tool will definitely be useful to you in the future. There is an opinion among some “masters” that, supposedly, with minimal knowledge about the operating principle of a water heater, they can easily install the device or, even worse, carry out repairs. In reality this is not the case, since minimal knowledge is clearly not enough; therefore, full-fledged repair work should be carried out exclusively by professionals. But such a trivial problem as a boiler leak can be fixed on your own. Let's look at how to do this.
Leaking when the boiler is off
Let's simulate the following situation: the water heater is disconnected from the network, the water supply from the water supply is turned on (the tap on the pressure line is open). Water is flowing from the boiler drain hole. The cause of this phenomenon may be either a malfunction of the safety valve or increased pressure in the line.
To find the cause of a leaking safety valve, you need to know the water pressure in the water supply
To determine the culprit of the leak, you need to measure the cold water pressure in the water supply. The fact is that if the main pressure exceeds the accepted SNiP, the valve will open and perform its functions of discharging excess water into the sewer. Most water heater safety valves that manufacturers equip their products with are set to a pressure of 6 to 8 atmospheres. The maximum pressure allowed by SNiP in main water pipelines should not exceed 6 atmospheres. In fact, it often happens that actual indicators exceed standard values by 1 - 2 atmospheres. Naturally, the safety mechanism will work.
The second cause of leaks may be the valve itself. Wear of its plate or seat, weakening of the spring - these are the factors that can lead to leaks. Cheap Chinese products are often susceptible to such malfunctions.
The possibility of particles of scale or debris getting under the locking mechanism plate, which can happen during an emergency pressure release or after draining water from the boiler during maintenance or repair work, cannot be discounted.
What you might need
- Adjustable wrench - for disconnecting pipes.
- Wrench – for unscrewing the bolts securing the unit to the wall (not required if the mounting is on hooks).
- A hose to the return valve or to the water inlet - for draining (not required if you use containers to collect water).
- Phillips screwdriver for unscrewing the protective cap.
- Two flathead screwdrivers: needed to lift a protective cap that is too tight.
- Gas wrench number two or hub wrench 55. Sometimes a socket wrench is preferable for tightening nuts.
- A thin screwdriver for unscrewing and removing power cables.
The dismantling of boilers is preceded by the following preparatory stages:
- de-energizing the installation;
- draining;
- removal from the wall.
First, the device is disconnected from the outlet. Then you need to lighten it as much as possible by removing the water. An eighty-liter heater weighs about twenty kilograms. With water its weight approaches a hundredweight.
Device and principle of operation
In general, we can talk about three types of devices capable of storing and heating water:
- electric water heaters;
- indirect heating boilers;
- gas water storage tanks.
All of these devices have a similar design and operate on the same principle. They differ only in the heat sources used to heat the water. In this case, the role of a heater can be performed by: a heating element, a coil with a coolant supplied to it (for example, a boiler), or a gas burner. Structurally, all boilers have the form of a wall-mounted tank, the internal surfaces of which are covered with heat-insulating material. Cold water enters it through a pipe located in the lower part, and the heated liquid is taken from the upper part.
The heaters in all boilers are located in the lower part. The water in the tank is heated to the required temperature and then used by the owner for its intended purpose. To maintain and, if necessary, adjust the required temperature regime, a special thermostat is built
. In addition, the boiler is equipped with a temperature meter, with which the user can control the degree of water heating, and a safety valve that prevents the unnecessary leakage of liquid.
Disconnecting from the electrical network
Start of disassembling the Ariston water heater
Before any work involving electrical appliances, you must first de-energize them.
If the water heater is powered by a separate cable from the electric meter, then it is connected through a two-pole circuit breaker and must be turned off.
If the water heater is connected to a regular outlet, you simply need to remove the plug from the outlet.
After this, you can safely begin disassembling the Ariston water heater:
- First, the lid is unscrewed; it is secured with several screws.
- Further, if there is a danger that something could be mixed up during subsequent assembly, it is advisable to photograph the existing position of the parts from several angles.
- The next stage: disconnecting 3 electrical cables, 1 – phase, 2 – neutral, 3 – ground. This is easy to do with a screwdriver. Since we disconnected the first two wires from the thermostat and freed it, we can now pull it out of the tube with a little effort.
- This completes all electrical procedures. You can start draining the water.
The water in the boiler is going rancid. There is a solution.
The easiest way to appreciate and enjoy the benefits of a boiler is during the period of pipeline replacement and repair, when a single icy stream of water flows from the tap. For owners of private houses with an autonomous water supply, a water heater is of particular importance, since its operation directly provides the supply of hot water.
However, you still have to pay for convenience - spending time on caring for the container, removing scale and fighting unpleasant odors. The first sign that the water in the boiler is rotting will be a characteristic change in the smell and taste of the water.
The water in the boiler is rotting - reasons and myths
Before judging the degree of freshness and purity of the water, it is necessary to find out in what cases the water acquires such a strange smell, the main reasons are:
1. The presence of hydrogen sulfide in water. Water treatment at a treatment plant does not always provide the proper water quality; many systems are outdated and do not function at full capacity.
Often, the smell of hydrogen sulfide is not noticed when opening a water tap, since to clearly differentiate it is necessary to carry out a simple test - fill the bottle halfway with cold tap water, close the lid, and shake thoroughly. After that, unscrew the cap and smell it. If a specific odor is felt, this means that the water initially contains hydrogen sulfide.
In this case, both cold and hot water contain a source of odor while remaining fresh. At the same time, the idea that the water in the boiler is rotting disappears. This problem is solved by installing a water treatment system to remove hydrogen sulfide.
Predisposing factors for water spoilage are prolonged stagnation of water in the container with infrequent use of the boiler and insufficiently high heating temperatures.
Bacteria that form the so-called biofilm quietly maintain their vital activity at a temperature of 60°, tenaciously attaching themselves to the walls of the container.
3. The culprit for a similar situation, in which hot water changes its quality, but cold water remains quite suitable, is considered to be insufficient saturation of water with oxygen. For anaerobic bacteria, it is impossible to imagine a better habitat - there is a small amount of oxygen, the water temperature is optimal for life and rapid reproduction.
4. As mentioned above, the tank and working elements of the boiler require care and periodic inspection. An important part of the water heater is the magnesium alloy anode. It is designed to prevent corrosion of the tank walls and scale deposits.
The service life varies depending on the composition of the water and the intensity of work
When replacing an anode, it is very important to purchase a quality part
If the anode contains cheap technical magnesium, which contains a lot of sulfide, then this will affect the quality of the boiler water - its properties, and especially the smell, will deteriorate.
If the water in the boiler is rotting, there is no need to hesitate
It is necessary to drain the old water and rinse the container with sodium hypochloride to kill bacteria.
The main task for eliminating and preventing the subsequent proliferation of microorganisms is to eliminate predisposing factors. First of all, water of appropriate quality must flow into the boiler; for this it is necessary to install water purification filters.
You should set the maximum heating temperature and actively use the boiler. There is no need for the water heater to stand idle and store water for a long time, which will lead to stagnation and inevitable pollution. Remember, home water purification and preparation is the key to a healthy life.
Tools required for the operation
All water heaters are similar to each other, so they have the same drainage system and to carry out this procedure you will need an adjustable wrench, a rubber hose and access to the bathtub into which the water will flow. If the water does not drain into the bathtub, then you need to prepare several large containers so as not to flood your neighbors and simply avoid any tricky situations.
Emptying the boiler
In the case of an Ariston water heater, you will need various screwdrivers, a hexagon and adjustable wrenches of different sizes.
A person who reads the instructions and adheres to a clear algorithm will not have any difficulty emptying the boiler correctly.
The most common causes of leakage
There are several reasons why a boiler leaks. The ability to make repairs yourself depends on how quickly and correctly they are identified.
Deformation of the outer shell
This problem can arise if the rules for installing the boiler are violated, and not through the fault of the manufacturer. Dripping water on the outer shell of a water heating device can be noticed almost immediately after its installation. The whole point is that there is no safety valve or it is broken.
When water cools, its volume decreases and the tank of the device contracts. After all the liquid has been drained from the system, a vacuum occurs inside the tank. If at this time the safety valve is broken or missing, the container will become deformed. Further, when the boiler is filled and turned on, the water expands, heating up, and the pressure increases, which leads to expansion of the tank. Such malfunctions explain why the boiler is dripping.
Storage tank leaking
If liquid flows through the liner, it is the storage tank that is leaking. This problem may arise due to gross violations of installation or connection rules. When connecting a water heating device, it is highly undesirable to use plastic pipes. If pipes of this type are nevertheless used because they look more attractive, the hydraulic shock will be transmitted to the tank, which will gradually destroy it.
Heating element leaking
Not all models have a special hole through which water flows when the heating element begins to leak. You need to check its availability when purchasing a boiler.
Safety valve leaking
This boiler element is a small tap with a hole in it. The problem can be easily fixed by replacing the part with a new one.
Storage tank lid leaking
If such a problem is observed, it may be a leaking heating element, which can be caused by the accumulation of a large amount of scale.
After replacing the heating element, the problem will be resolved.
Leakage from under the heating element seal or under its bolts
If water flows from under the seal, you just need to slightly tighten the nuts that secure it. In the second case, the heating element needs to be replaced.
Supply channels are not tightly connected
This is the most common reason why a boiler leaks. It is not difficult to fix, you just need to check all connections.
Inlet connections
Leakage at the top without visual damage
If leakage appears in the upper part of the water heater, and no deformations were detected during visual inspection, installation and connection were performed correctly, the magnesium rod was checked and replaced, it is better to return such a device to the store before the warranty period expires. A leak can only be repaired if the tank is made of stainless steel.
Lack of preventive maintenance
Too hard water or the presence of a large amount of impurities in it affects the quality of the boiler. During its operation, it is necessary to periodically carry out preventive maintenance, cleaning from contamination and replacing worn out elements.
Defective device or violation of installation and connection rules
In the first case, the leaking equipment must be returned to the store before the warranty period expires. There is no need to try to fix the leak yourself, because after this you will not be able to return the defective boiler under warranty. In the second case, you need to double-check that all points of the installation and connection instructions have been followed.
Is repair possible?
In some cases, it is possible to repair the water heater yourself. However, the process is not as easy as it might initially seem.
The first step is to understand the cause of the problem. To do this, you should prepare and take tools that may be useful during the inspection:
- hoses (needed to drain liquid);
- screwdriver;
- wrenches (socket, tubular, adjustable);
- multimeter
Afterwards, be sure to disconnect the device from the power supply and drain the liquid. The device tank must be empty. Only after these manipulations do they proceed to inspection, identifying the causes of breakdown or leakage.
In some cases, the problem can be solved with minor repairs. In others, you will need to completely replace the water heater with a new one. It is advisable to do this before the warranty expires.
Here's what to look for during your inspection:
- Water leaks appear in the joint areas of the pipes. The cause of the malfunction is a leak in the water heater tank. Repair is not possible. The boiler will have to be replaced.
- Leakage is observed in the upper part. If the device has been properly maintained on a regular basis, the magnesium rod has been replaced on time, but there is still a leak, repairs will not help. You'll have to buy a new boiler. Also, the entire water heater must be replaced if it has an old magnesium rod that has not been replaced during prolonged use. This provokes rotting of the tank (in the case of a non-enamelled inner surface).
- The tank cap is leaking. In these circumstances, a new heater is installed.
- Leaking directly in the tank. The most unpleasant situation is that the leak comes from the bottom of the tank. The most likely scenario is that sediment builds up and eats away at the bottom of the tank. Repair is not possible. The fact is that the water heater is a complete device with a single body and enameled internal walls. Once the enamel surface is damaged, it cannot be repaired.
The first place a plumber will check is the drain valve. It is located at the bottom of the tank. Responsible for draining sediment from the water heater. The valve is easily replaceable, so this situation is the simplest.
It is important to remember that not every small puddle of water found at the base of a water heater is due to a leak. Condensation can form on the pipes and fixtures that surround the water heater. As condensation accumulates, liquid will begin to drip, accumulating on the floor. This is especially true in basements or in damp weather.
Boiler design and operating system are more complex than one might think. For this reason, the best way is to order repairs from specialists or purchase a new device.
Preventing the life of the boiler
You can extend the service life of the device and ensure proper maintenance of the equipment by following the following recommendations:
- the internal water pressure must be below 3 atmospheres, otherwise a reduction reducer should be installed, which will be placed between the supply pipe and the inlet branch of the device. The optimal gearbox setting corresponds to 2 atmospheres;
- The tank located inside and the heating element must be cleaned frequently to remove scale and salt deposits. This will increase the service life of the unit;
There are many reasons that influence the leakage of the device, however, if any of them occurs, you should immediately disconnect the device from the electrical network, and then carry out a visual inspection. Without accurately determining the cause of the problem, it is prohibited to open the equipment so as not to aggravate the situation, which could get out of control.
Only compliance with the rules of use and proper maintenance of the water heater will help extend its service life. If problems arise with self-inspection of the unit, you should seek the help of professional specialists. They will quickly determine the cause of the failure and notify you about the possibility of repairing the boiler.
A boiler is an indispensable device for apartments and country houses. But sometimes technology fails and breaks down. What to do if your water heater is leaking? After reading our article, you will learn: the causes of tank leaks, how to fix them yourself, and how to avoid such problems.
About the brand
In the mid-40s of the last century, Aristide Merloni launched the production of electric water heaters under the Ariston (Successful) brand. The name fully justified itself, and after some time all the sons of the entrepreneur successfully entered into a similar business, and the youngest, Vittorio, inherited his father’s company.
The Ariston company today is one of the top three in terms of global sales of household appliances, and Ariston brand kitchens are sold with already built-in basic household appliances from the refrigerator to the dishwasher. In Russia, this company became famous in the late 90s of the last century, and now almost every major city has its service center.