Some boiler malfunctions may be caused by incorrect parameters in the service menu settings. This can happen, for example, after unqualified intervention or... as once happened in my practice, after flooding the boiler board with water.
Of course, first of all, the service menu serves to configure, adjust and diagnose the operation of the boiler. In this article I will share how to enter the service menu of the Ariston Class 24 FF boiler and how to change the parameters, as well as give the values that were set in my boiler from the factory.
Before you begin any settings, it is important to carefully consider the menu structure, as well as understand whether you need to intervene and change any parameters. Incorrect intervention can lead to serious problems. For example, there is a parameter that is set depending on the boiler version and is used by specialists when replacing the board.
Considering all of the above, you should understand that some of the parameters I have given as “Factory settings” may differ from those you need specifically, and therefore you carry out all these movements and settings at your own peril and risk.
Wall mount
Initially, I installed a coaxial angle on the boiler and measured the distance from the edge of the boiler to the center of the corner - it, as indicated in the instructions, was 105 mm.
The distance from the center of the corner to the top of the boiler is 105 mm
You can immediately fasten the narrow clamp, not forgetting to put the sealing gasket.
Before tightening the clamp, it is necessary to insert a sealing gasket
My house is sheathed on the outside with vinyl siding, so I immediately decided to mark it so that the hole for the pipe would fit entirely on one strip of siding.
Some sites suggest first making a hole for the chimney, and then screwing in the mounting strip. I decided to screw the bar first. As mentioned above, the kit includes two dowel nails. They are designed for mounting the boiler to a brick or concrete wall. Since the house was built from sandwich panels, I fastened the plank with roofing wood screws.
The bar is set horizontally and secured with five galvanized screws
Further in the wall, a through hole with a diameter of 10 mm was drilled. The center of the hole corresponded to the center of the coaxial pipe. I cut out the hole for the pipes on both sides using an electric jigsaw.
After cutting the hole and hanging the boiler, you can install a coaxial chimney
It is better to install the chimney together - one pushes the pipe from the outside, the other puts on the internal insulating gasket (made of hard plastic) and the clamp (it is more convenient to immediately screw the screws into the clamp).
The pipe is installed, the clamps are tightened
Due to the fact that the outer insulating gasket is quite elastic, it fits quite tightly to the siding.
Coaxial pipe after installation
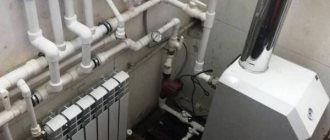
I'll end this for now. Next comes the soldering of polypropylene pipes, the connection of polypropylene pipes with metal-plastic ones and the installation of additional taps on the heating system. Only after this can Ariston be launched.
To be continued…
- https://sovet-ingenera.com/gaz/equip/kak-podklyuchit-gazovyy-kotel-ariston.html
- https://starsb.ru/shop/folder/skhemi-podklyucheniya-kotlov-ariston
- https://xn--80ayehece2h.xn--p1ai/installation-of-boiler-ariston/
Operating instructions for Ariston gas boilers
Before purchasing an Ariston gas boiler, you need to understand that if the buyer does not understand its installation, it is better to contact experienced specialists and entrust all the work to them. After all, even with the most detailed instructions, it is not a fact that the matter will end successfully. In this case, there is every chance of damaging the equipment, after which you will have to call repairmen, and this will result in additional costs.
It is very important to keep children away from the equipment. To do this, after, you need to have a conversation with them and explain in accessible language that you cannot twist or place anything on the unit, this should only be done by an adult
If the family leaves, for example, on vacation, after the boiler is turned off, it is also necessary to shut off all gas and water supply pipes. Only after this is the equipment disconnected from the network.
If any model has a display, all indicators that it displays must be strictly monitored. It may display any problems or deviations from normal operation that occurred during the heating process.
One of the most important points in the instructions for gas equipment is safety precautions. Before connecting the boiler, you need to familiarize yourself with it first.
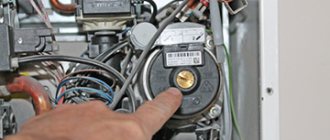
Boiler service menu
For all manipulations with switching modes, only 4 buttons are used - Plus, Minus, Ok/Menu, ESC.
It is important to understand that not all boiler menu items will be available to you; some of them will only become available when additional devices are connected to the boiler, such as external sensors or a solar collector.
And most menu items are accessible only by service code, I’ll talk about this below, but for now let’s “practice on cats”
Control buttons and service menu settings
Our cats will have meanings that are open to free access. But first, read how to work with the menu.
How to properly install a wall-mounted boiler
Before installation, unpack the heat generator and check the completeness of the device. Make sure the stock fasteners will fit your walls. For example, special fastenings are required for aerated concrete; ordinary dowels are not suitable.
We follow the following order of work:
- Mark the outline of the heating unit on the wall. Make sure that the technological distances from building structures or other surfaces are observed: 0.5 m from the ceiling, below - 0.3 m, on the sides - 0.2 m. Usually the manufacturer provides a diagram with dimensions in the operating instructions.
- For a turbo boiler with a closed chamber, we prepare a hole for a coaxial chimney. We drill it at a slope of 2-3° towards the street so that the resulting condensate flows out. The process of installing such a pipe is described in detail separately.
- The heat generator comes with a paper installation template with marked holes. Attach the sketch to the wall, level it using a building level, and secure the diagram with tape.
- It is better to mark the drilling points immediately. Remove the template and make holes 50–80 mm deep. Make sure that the drill does not go to the side, this happens on brick partitions.
- Install plastic plugs into the holes, screw in the hanging hooks to the maximum depth using pliers. Together with an assistant, carefully hang the device.
When marking holes in a wooden log wall, make sure that the fastening is on the crest of the log. Screw the hooks directly into the wood, without plastic plugs.
Turning on the gas boiler
A prerequisite for warranty service of a gas boiler is that the first switch-on must be carried out exclusively by a specialist from the gas service. If the user follows all instructions and safety precautions when starting up independently, then you can also count on the reliability and durability of the heating system.
The initial start-up of a wall-mounted boiler is carried out strictly after checking the following points.
The first thing you need to do is make sure that the gas pipes are tight when the gas valve is closed and open. If gas flow is not recorded within 10 minutes after connecting all pipes, then it can be stated that the system is sealed.
The gas supplied from the main pipeline must meet the requirements specified in the instructions for the boiler. When transferring the unit to process a liquefied mixture, you need to change the nozzles in advance.
You also need to check the pressure level in the system. It should be as recommended. The air intake and carbon dioxide exhaust pipes should be checked for blockages.
Sometimes users encounter the problem of poor circulation of the pump. Often the cause is low mains voltage. This problem is solved by installing a stabilizer
It is necessary to make sure that the room with the boiler has a working ventilation system. Additionally, the smoke pressure safety switch is checked.
After carrying out the preliminary work, the procedure for starting the boiler follows:
- The gas boiler is connected to the network, the gas supply to the device is opened;
- Check that all valves at the inlet and outlet of the coolant into the unit are open;
- Press the button or turn the switch on the boiler dashboard depending on the switching method specified in the instructions.
You can adjust the temperature using the corresponding buttons. Working in automatic mode, the boiler independently turns on the burner if it is necessary to heat the water in the system. If the boiler is double-circuit, then when hot water is turned on, the burner automatically turns on for heating.
On the boiler display, after the initial start-up, it is recommended to configure all boiler parameters. The instructions usually indicate the sequence of necessary actions.
The interlock system cuts off the gas supply if the burner does not ignite within approximately ten seconds. When starting for the first time, it may be necessary to remove the ignition lock due to the presence of air in the gas line. You need to wait until the air is replaced by gas. The lock is removed when the device is restarted.
To start a floor-standing gas boiler, you need to carry out the same preparatory procedures as for a wall-mounted one. Before starting up, you need to ventilate the boiler room, make sure that all heating pipe taps are open and that there is draft in the chimney. You can check the traction using a piece of paper.
There are two options for turning off a floor-standing gas boiler. You can turn off only the main burner or the main burner together with the pilot
Switching on the floor-standing boiler:
- The door of the device is opened, the position of the boiler control knob is checked in the off position.
- The gas supply valve opens.
- The control knob is set to the piezo ignition position.
- Next, press the handle for 5 - 10 seconds so that the gas passes through the pipes and displaces the air. The piezo ignition button is pressed.
- Then the presence of a flame in the burner is checked. If the burner does not light, the procedure is repeated.
After igniting the main burner, you can use the control knob to adjust the heating temperature.
What to do
Checking that the parameters are set correctly
If the electronic board has been replaced, you need to make sure that it is “adapted” to this Ariston boiler model. Otherwise, errors cannot be avoided.
Checking connections
Code 105 is evidence of a lack of information exchange (or a failure in the GP-GIU chain). By inspecting the inside of the Ariston boiler, the signal lines are assessed. Breaks, short circuits (insulation melting) are the causes of error 105. The condition of the contact groups is checked for the absence of mechanical defects, oxides, contamination, and the quality of fixation.
Power check
- A low voltage value causes error 105, which is noted on thematic forums. Raise it and the fault code will disappear.
- Incorrect electrical connection. Error Ariston 105 is often displayed when a powerful consumer is turned on simultaneously with the boiler (with the “Comfort” mode set). By removing “COMFORT”, you can get rid of the 105th fault code by restarting the heating unit.
Grounding check
Illiterate organization, a violation of contact in the boiler-ground circuit initiates the appearance of error 105. It is also caused by interference, leading to malfunctions of the electronic board.
Advice
To eliminate the influence of stray currents on the operation of the Ariston boiler and the risk of errors, you need to install a dielectric coupling on the gas pipe. It's inexpensive and solves a lot of problems.
Connecting a dialectical coupling
Checking boards
- For dampness. Typical for Ariston boilers installed in rooms without heating. Condensation on the board causes various errors to appear. The problem is eliminated by blowing a stream of warm air.
- No damage. Panel curvature, breaks in conductive paths, burnt (melted) radio components are the probable causes of error 105.
- Diagnosis of nodes cannot be done at home - you need a special stand. But according to user experience, boiler error 105 can be removed by replacing the capacitors. They are located in the stabilizer circuit; loss of capacity leads to the appearance of a fault code (shown in the photo).
Display of capacitors on the Ariston boiler control board
If the operation of the boiler is not restored, you need to contact a service organization. And it must be certified by the manufacturer. Professionals interpret code 105 not as an error, but as information that the heating unit is in parameter setting mode. Their recommendations:
- install the display board on a working heating unit and check its operation;
- flash the electronic board.
It cannot be done at home, only in a hospital. The decision is justified - repairing the unit will cost several times less than purchasing a new one.
First start-up and setup of the boiler
When the installation work and connections are completed, you can proceed to setting up and testing the equipment.
Performing the first run
The initial action that accompanies the first start-up of an Ariston brand gas boiler is to fill the heating circuit with water. In this case, it is necessary to set the radiator air valves to working (open) condition.
The same actions aimed at bleeding air from the system apply to the boiler circulation pump. As the circuit fills with water, air is removed from the system, and the water pressure on the pressure gauge reaches 1 - 1.5 atmospheres, the tap on the make-up line is closed.
The first start-up of a gas boiler is usually accompanied by preparatory operations related to filling the system with water, bleeding air, and checking the tightness of gas lines
At the next stage of commissioning of a gas boiler, actions related to the gas supply are performed.
The procedure is approximately as follows:
- open the doors and windows of the workroom;
- exclude the presence of sources of open fire;
- check the burner circuit and control system for leaks.
Testing the control unit and burner for leaks is performed by briefly opening (no more than 10 minutes) the main shut-off valve of the gas line. In this case, the solenoid valve and manual boiler damper are set to the closed position. With this position of the system, the gas flow meter should show a zero result (no leakage).
Setting manipulations with the control panel
Modern gas heating equipment is equipped with a control panel where the user can set the desired operating parameters of the unit. Next, we’ll take a closer look at how to set up an Ariston brand household gas boiler.
Control during operation of the boiler, as well as control in the first start-up mode with the necessary settings, is carried out through the Ariston user control panel
Actually, the user’s actions on the control panel are obvious here:
- Turn on the device by activating the ON/OFF button.
- Mark the operating mode parameters on the display.
- Mark the service mode functions on the display.
Next, the gas parameters are checked, for which the front panel of the boiler is dismantled, the control panel plate is lowered and test manipulations are performed by connecting the measuring pressure gauge to the pressure tap pipes.
These operations are the prerogative of gas service specialists. Doing it yourself is not recommended, as you need to clearly know the functionality of the equipment.
Ariston remote control keyboard layout: 1 – information screen; 2 – DHW temperature regulation; 3 – mode selection key (Mode); 4 – “Comfort” function; 5 – ON/OFF key; 6 – “Auto” mode; 7 – reset key “Reset”; 8 – heating circuit temperature regulation
Then the boiler is started in test mode through the “Chimney Sweep” system function. To enter test mode, activate the Reset button and hold it pressed for at least 5 seconds. The test mode is exited by re-activating the reset key.
Maximum/Minimum Power Testing
This type of test also involves control sampling of pressure at specialized points of the equipment, followed by measurement of parameters on a pressure gauge. It is necessary to disconnect the combustion chamber compensation tube. Again, the “Chimney Sweep” mode is used, activated through the control panel.
The boiler is tested for the minimum power level in the same way. True, the modulator adjusting screw is additionally used if it is necessary to adjust the minimum operating pressure of the boiler. In this regard, there is a video below, where for some reason the modulator is called a motor.
Putting equipment into operation
The process of starting the device involves the following user actions:
- Activate the ON/OFF button.
- Select standby mode.
- Hold down the Mode button for 3-10 seconds.
- Wait for the air removal cycle to complete (about 7 minutes).
- Open the linear gas valve.
- Switch on the DHW operating mode using the “Mode” button.
If all the actions were performed by a specialist from a specialized company, then he checks the compliance of the gas pressure during operation of the unit and draws up an appropriate report.
He also provides instructions on the safe operation of gas equipment and puts the boiler under warranty.
Restart the unit
Press and hold the Reset button for 5–6 seconds. If error 303 is caused by power instability, it will be removed.
Press the Reset button to reset error 303 on the Ariston boiler control panel
Check signal circuits
Inspection reveals defects: breaks, melted insulation, short circuits, unreliable contacts. Anyone causes an Ariston boiler error. There is no need to interfere with its design - you just need to fold back the front panel.
Check the integrity of the wires in the Ariston boiler
Assess the condition of the boards
In addition to the electronic (“brain”), a unit with navigation buttons and a display is subject to visual testing. The cause of malfunctions and errors 303 is dampness. Even if there are no visible droplets of moisture (condensation), dust settled on the boards, when wet, turns into a conductive layer. Hence the short circuit and the fault code. Typical for Ariston boilers installed in rooms with excess humidity (kitchens, cold utility rooms). Gently clean with a soft swab and code 303 will disappear.
Ariston boiler control board
On a note!
If the steps taken do not resolve the 303 error, contact service. But only certified by the boiler manufacturer Ariston. It’s not worth contacting a “general profile” workshop for repairing household appliances: the lack of diagrams, methodological documentation, equipment, spare parts, and trained specialists will take a long time to solve the problem, and will be expensive in terms of money.
- Error 303 does not indicate a specific system, an Ariston boiler unit, it is internal to the ECU. The probable cause is a discrepancy between the secondary voltages and the required values, which leads to malfunctions of the board. To understand it, you need a detailed diagram and tables.
- User tips found on forums are vague. In addition, different boards are installed in Ariston boilers: it depends on the model, series of the unit, and year of manufacture. Therefore, the reasons for the 303 error are different.
When contacting the service, you must indicate the designation of the ECU (in numbers, letters on the panel). The technician will replace it with a working unit from the repair stock, and take the problematic unit for testing in a hospital setting. It will cost no more than 1000 rubles, while a new EPU for an Ariston boiler costs from 7200 to 10800. This solution is the most rational.
Specifications
Almost all gas boilers from the Ariston brand have a power of 15 to 30 kW. Thus, each client will be able to select the necessary indicators for the size of their apartment or house. It is also worth noting other distinctive characteristics of such gas equipment:
at maximum efficiency, boilers have a high level of efficiency; all wall-mounted boilers have Russian instructions and symbols on the equipment itself, so citizens do not have problems with operating the unit; most models from this manufacturer are able to cope perfectly with water in the system and low pressure; Particular attention to this equipment should be given to those people in whose homes voltage surges often occur. Ariston boilers cope with such network surges without any problems; all models are very easy to operate
To start using the boiler, you don’t need to study the instructions for a long time; all operating features are intuitive and accessible even to those who are installing such a unit for the first time.
In some cases, the boiler cannot simultaneously heat water and provide sufficient heating of the room; this applies to budget models. In this case, a person needs to think about installing an additional boiler.
Features of replacing a faulty heating element
If the boiler stops heating the water to the required temperatures, then the heating element should be replaced. To do this, you need to perform the following procedure:
- Disconnect the device from the electrical network.
- Stop supplying water to the container.
- Connect a hose to the drain valve and drain all the water into the sewer.
- Remove the protective box by removing 2 screws.
- Remove the return valve from the pipe.
- Drain the remaining water from the tank.
- Using a wrench, unscrew the nut that secures the flange.
- Carefully remove the old heating element without damaging the flange.
- Clean the walls of the container from accumulated dirt. If the inside walls have a special protective enamel, then there is no need to remove scale. You may simply damage the protective film. This layer of scale will protect the walls of the vessel from rust formation.
- The magnesium anode is removed and repaired if required.
- A new heating element is being installed. You need to do exactly the opposite of all the work.
- Checking operation after final assembly of all parts. The tank should not leak. Otherwise, you need to put in new gaskets.
Ariston water heater repair
Removing air pockets in the system
It's better to start with batteries. To remove air pockets, a Mayevsky tap is usually installed on them. We open it and wait for the water to run. Did you run? Let's close. Such manipulations must be done with each heating device separately.
How to start a boiler with your own hands photo
After the air is removed from the batteries, the pressure in the system will decrease and the pressure gauge needle will drop. At this stage of work, the solution to the question of how to start the boiler involves re-filling the system with liquid.
Now, the most difficult thing is that starting gas boilers requires bleeding air from the circulation pump. To do this, the boiler needs to be disassembled a little. We remove the front cover and look for a cylindrical object with a shiny lid in the middle, which has a slot for a screwdriver. After we have found it, we put the boiler into operation - we supply it with electrical power and set the water heating controls to the operating position.
Relieving air from the circulation pump when starting the boiler photo
The circulation pump will immediately turn on - you will hear a faint hum and loud gurgling and many incomprehensible sounds. This is fine. As long as the pump is aired, it will be so. Take a screwdriver and slowly unscrew the cap in the middle of the pump - as soon as water starts seeping out from under it, screw it back. After two or three such manipulations, the air will come out completely, the strange sounds will subside, the electric ignition will work and start working. Check the pressure again and add water to the system if necessary.
Basically, that's it. While the system is warming up, you can begin to study the instructions in detail (if, of course, you have not already done so) and start debugging the system that involves starting the boiler. Everything is simple here - the batteries closest to the boiler need to be screwed on, and the ones farther away need to be turned on to their full potential. This debugging is carried out using control valves installed on the supply connection pipe to the heating radiator.
First start of the boiler: beginning
The initial startup allows you to assess the condition of the heating system.
Important! In case of problems when switching on independently, the service center may refuse warranty. Perhaps the best solution would be to contact a specialist.
In any case, a specialist must make the connection to the gas pipeline. Installation and wiring of equipment is carried out strictly according to the scheme. It is important to comply with the requirements for the room for wall-mounted and floor-standing boilers, the distance from the wall and the floor. If all installation work has been successfully completed, proceed to the next step.
Filling the system with water
In order for liquid to enter the system, the water valve must be opened. It is located at the bottom of the body. More precisely, you can look in the instruction manual for your model “Ariston”, “Proterm”, “Navien”.
Unscrew the valve gradually; water should not flow in abruptly, otherwise an air lock will occur. As a result, heating problems will begin. Monitor the pressure gauge while filling. As soon as the values reach 2-2.5 Atm, close the tap.
Work with water must be carried out in the warm season, otherwise the liquid will form plugs. If the temperature outside is sub-zero, warm the room to 20 degrees.
After installing and filling a double-circuit or single-circuit heating boiler, proceed to remove the remaining air in the pipes.
Bleeding air from the system
Automatically switched on equipment may have an air release function. But it’s more effective to do the work yourself. If you want the room to maintain a stable temperature, then eliminate the possibility of blockages in the pipeline. This is true for old and new models.
Start the process with radiators. Open the Mayevsky taps located on them.
Place the containers first, because water will flow with the air. As soon as the whistling and hissing stops, you can close the taps.
Bleeding begins with the battery, which is located above the rest.
Before starting the boiler, remove air from the pump. Can you do it yourself? It is better to carry out the first bleeding manually, despite the automation. How to proceed:
- Remove the case by unscrewing the screws;
- Connect the Visman, Kiturami, Aton boiler or the one you have at your disposal to the outlet;
- As soon as the device is started, the pump will turn on and you will hear a gurgling sound;
- Using a slotted screwdriver, unscrew the pump nut;
- As soon as water flows, tighten the nut back. Repeat the procedure until the gurgling stops.
Monitor your pressure gauge readings. If the pressure has dropped, add fluid to the circuit.
An important point is setting up the batteries. Far radiators are turned on at maximum, and near ones at minimum. As soon as a comfortable indicator is reached, proceed to the next stage.
Crimping the circuit
During startup, this step is often ignored by users. But in vain! The procedure allows you to immediately find out how reliable and tight the system is. Judge for yourself: if a leak occurs at the height of the heating season and you are left without heat, the costs could be much higher. All you need is a pressure pump at hand.
Blow out the system with a powerful air stream. The interval between starts is 10 minutes. During this time, keep an eye on the pressure gauge. Has your blood pressure started to drop? This means there is a leak that needs to be found and fixed.
Cleansing by rinsing
To ensure that nothing interferes with water circulation in the future, open all the taps on the radiators. Now supply the liquid under pressure of 4 bar, having previously placed the containers. The stream will clean the pipes of rust and sediment. Then clean the filters from dirt.
How to turn on a gas boiler?
The system is prepared, proceed to start the independent boiler. Is it possible to turn it on without gas? No, you need to follow the sequence.
For mounted units “Bosch”, “Vailant”, “Beretta”, “Ferroli” (Ferroli), Protherm, Celtic and other models:
- Plug the device into a power outlet;
- Unscrew the gas valve;
- Press the “Start” button (depending on the model there may be a different key. See the instructions);
- Using the “+” or “-” buttons on the control panel, set the desired temperature;
- The burner with electronic ignition will light up automatically when switching to hot water supply (DHW) or heating. For piezo ignition, hold down the flame control for a few seconds, then press the piezo button.
Important! During the initial start-up, air may have accumulated inside the gas line, so ignition may be blocked. To remove the lock, press the Restart button.
For parapet boilers of the Aton type, switching on is carried out in a similar way. If there is a remote control, then you can set the mode using the remote control.
How to properly turn on the floor-standing units “Buderus” (Buderus), “Baxi” (Baxi), “Lemax”, “AOGV”, “Conord”, “Danko”, “Siberia” and others:
- Ventilate the room;
- Make sure there is draft in the chimney;
- Open the appliance door;
- The control and temperature selector must be in the “Off” position;
- Open the gas valve;
- Set the selector to the piezo ignition position;
- Press the selector for 5 seconds and simultaneously press the piezo button. The burner should light up;
- Use the same knob to adjust the temperature values.
Is it possible to leave the boiler on while away? If you're leaving home for an extended period of time, simply set your settings to minimum. Low temperatures and frosts will lead to freezing of the entire system and other equipment. Metal pipes can burst under pressure, then you will have to completely change the heating circuit.
The last stage of installation of almost any heating system is its first trial run, debugging and commissioning. By and large, if boiler equipment is started up for the first time, then this work is a priority for service centers. During the first start-up, service center specialists check the correct connection of the boiler, perform its debugging and put this equipment under warranty. If you carry out the first launch yourself, then you can’t count on a warranty service center. Starting and debugging the heating system can also be done while the system is in operation - you won’t have to turn to specialists every time. Owners of individual heating simply need to know this process. We will study it with you in this master class with step-by-step photos, in which, together with the website, we will study in detail the issues of how to start the boiler and how to debug the heating system with your own hands.
Heat exchanger clogged, reduced throughput
Often the fouling of the internal walls of the heat exchanger with scale or mud deposits is the cause of problems with hot water. If tap water does not undergo pre-filtration (rough cleaning) and the temperature of the hot water is too high, the walls of the heat exchanger become overgrown with scale and dirt over time, reducing their thermal conductivity and flow area. Each time the user increases the DHW temperature on the boiler more and more in order to obtain the desired result on the mixer. As the temperature rises, scale forms even faster and, as a result, the temperature of the boiler's hot water supply is at its maximum, and the water does not heat up enough. This process has a particularly negative effect on a boiler with a bithermic heat exchanger. Plate heat exchangers are easy to clean.
Recommendations for turning on a Baxi gas boiler
If you are wondering how to turn on a Baxi brand floor-standing gas boiler, you need to follow a certain technology. At the first stage you must open the gas valve, usually it is located under the equipment itself
It is important to make sure that the system has the required pressure, only then can power be supplied to the device. Then press the “Start” button and set the device to “Winter” or “Summer” mode
The panel has special buttons with which you can set the desired temperature values in the boiler and hot water supply circuits. This will allow the main burner to turn on. If you purchased a gas boiler, you need to ask how to turn it on before unpacking the product. After you have completed all the above steps, you need to make sure that the boiler is working, this will be indicated by a special burning flame symbol on the display.
How to work with the menu
By pressing the “OK” button once, the number 2 will blink on the digital indicator - this will be the first digit of the future three-digit code (Menu Group Number)
Using the plus and minus buttons you can change this value from group number 2 to any other group. To fix the selected group for further entering the code number, you need to press “OK” again - after this the second digit of the future three-digit code begins to blink (Submenu)
Having selected a submenu, fix it by pressing the “OK” button again and similarly select and fix the third digit (Parameter)
All! Now the screen will no longer display the three-digit code itself, but the set value of this parameter, which can be changed by pressing “plus” or “minus”. Having made the necessary changes, do not forget to commit them by clicking “Ok”.
Please note that after selecting the desired menu, after a few seconds of inactivity, a three-digit code will begin to be alternately displayed (to remind you where you are) and the parameter corresponding to this menu.
The ESC button is used to exit the settings menu and return to the previous step. The exit is carried out step by step, one press is equal to one step back.
Let's practice
Now, if you want, practice to better understand the switching order. For example, enter menu code 701; this will turn on the forced air removal mode, essentially turning on the pump in the boiler for 6 minutes.
When this mode is turned on, the “P I -” symbol will light up on the display. You can exit the “Anti-Air” mode without waiting 6 minutes by pressing ESC.
Then, using ESC, try to go back and switch to mode 300, which means (Set water temperature in the boiler) in the values you can see the temperature that is currently set by your DHW regulator.
Basic models of Ariston boilers
Below are popular products that are positively rated by experts and owners.
For ease of assessment, the main characteristics are given in standard tabular form. For each gas double-circuit wall-mounted boiler "Ariston 24", the manufacturer's instructions and accompanying documentation contain extended information about the product.
BCS 24FF
| Options | Values | Notes |
| Type, power | gas | Convection boiler "Ariston" 24 kW double-circuit. |
| Efficiency, % | 93,7 | Consumption per hour – 1.59 kg (2 cubic meters) of liquefied (natural) gas. |
| Productivity, l/min | 13,5 (9,6) | At a temperature of +25 °C (+35 °C). |
| Equipment | — | Electronic control, automatic diagnostic system, combustion control, shutdown when overheating. |
Uno 24 FF
| Options | Values | Notes |
| Type | gas | Convection, double-circuit, 24 kW. |
| Efficiency, % | 92,5 | — |
| Productivity, l/min | 13,9 (10) | At a temperature of +25 °C (+35 °C). |
| Equipment | — | Electronic control without display, combustion control, shutdown when overheating. |
Genus
| Options | Values | Notes |
| Type | gas | Closed chamber, dual-circuit, from 23.7 to 30 kW of power in different modes. |
| Efficiency, % | 94,5 | Consumption per hour – 1.59 kg (2 cubic meters) of liquefied (natural) gas. |
| Productivity, l/min | 14,5 (11,6) | At a temperature of +25 °C (+35 °C). |
| Equipment | — | Electronic control, circulation pump, automatic diagnostic system, expansion tank. |
Egis Plus
| Options | Values | Notes |
| Type | gas | Convection, double-circuit with a closed chamber, up to 28.7 kW. |
| Efficiency, % | 94,5 | Consumption per hour – 1.59 kg (2 cubic meters) of liquefied (natural) gas. |
| Productivity, l/min | 13,6 (9,7) | At a temperature of +25 °C (+35 °C). |
| Equipment | — | Electronic control, expansion tank, overheat shutdown. |
Distinctive abilities
According to reviews of Ariston gas wall-mounted double-circuit boilers, they have 4 distinctive features that are useful for their owners:
- All models of this company are equipped with automatic protection systems.
- The presence of a water pump, which is necessary for constant circulation of water through the pipes.
- Possibility to choose a model with an expansion tank. With its help, pressure will be automatically adjusted inside the heating system.
- Ariston equips its equipment with various types of ignition. It can be automatic, which will make life much easier for the owner of a particular boiler. Otherwise, every time the unit starts, the person will need to press a special button.
Self-installation of wall-mounted gas heating boilers
Installing a gas boiler with your own hands - we do it right However, not all manufacturers of gas heating equipment allow the installation of their heating units independently:
- Ariston, Viessmann, Bosch and a number of others oblige buyers to install a wall-mounted gas boiler exclusively by employees of certified centers;
- Some manufacturers, such as BAXI, Ferroli, Electrolux, are more loyal to this issue and do not prohibit unauthorized installation of wall-mounted devices. But in any case, for commissioning activities when arranging a heating structure, services will be needed from specialists who have permission to connect gas and electrical equipment.
Ariston CLAS 24 FF
The second variation of the popular boiler, the main difference of which is the presence of a closed combustion chamber. This equipment will delight you with the same advantages that are inherent in CF class equipment. The presence of a closed combustion chamber allows you to install the boiler anywhere. The forced smoke removal system makes this design the most acceptable engineering solution for small apartments and private houses that do not have a special room for installing gas boilers.
The Ariston CLAS 24 FF model will delight the user with high efficiency and amazing endurance when used in Russian conditions. The equipment is designed to work in aggressive climatic conditions, which makes it very popular in the northern regions of Russia.
Ariston provides high-quality service for gas burner equipment. This ensures that if any malfunction occurs, you will not have to wait long for the problem to be fixed. Any problem will be solved as quickly as possible and for relatively little money.
Filling the heating system with water
Starting a gas boiler begins with filling the heating system with water. Everything is simple here - modern double-circuit boilers do not require the installation of a special system feeding unit. It is already built into the boiler and equipped with a special tap, which, as a rule, is located at the bottom of the boiler in close proximity to the cold water connection pipe. Open the feed tap and slowly fill the system with water.
Starting the boiler - how to fill the system with water
A very important point in the operation of any boiler equipment is fluid pressure. To control this parameter of the heating system, almost all boilers are equipped with a pressure gauge. During the process of filling systems with water, it is necessary to monitor the pressure and after it reaches 1.5-2 atm, filling the system will need to be stopped. In principle, the operating pressure of a boiler may vary depending on the manufacturer and model - therefore, see the instructions for the boiler for the exact operating pressure.
Do-it-yourself first start-up of a gas boiler
Other breakdowns
In addition to those described above, the following codes may appear:
- 608 - the system generates this error when the fan starts, but the pressure switch does not work.
- H45 - the last two digits may change.
The reason lies in the NTSc sensor, there is no hot water at the outlet, the safety valve is leaking. If there is no hot water, but the heating system is working, most likely the water flow sensor is faulty or clogged with debris. Another reason may be that the turbine blades have worked too hard, stuck to the housing, this can interfere with rotation, replace the blades or the turbine itself.
The second reason in this situation may be the NTC sensor; to check its functionality, measure the resistance at its contacts with a multimeter; if it is unstable, replace the sensor with a new one. If the safety valve is leaking, the gaskets may be worn out, replace them.
NTC sensor
How to determine the error code if the device does not have a display or does not have a dial, such as on the Ariston BS II 24FF model? This device is equipped with indicator lights, thanks to which you can determine the breakdown. So, for example, if the 90 indicator and the crossed out water drop icon are on, this means that the boiler has overheated and is blocked. To eliminate this, you need to check the pressure switch and its connection to the board.
Specifications
Almost all gas boilers from the Ariston brand have a power of 15 to 30 kW. Thus, each client will be able to select the necessary indicators for the size of their apartment or house. It is also worth noting other distinctive characteristics of such gas equipment:
at maximum efficiency, boilers have a high level of efficiency; all wall-mounted boilers have Russian instructions and symbols on the equipment itself, so citizens do not have problems with operating the unit; most models from this manufacturer are able to cope perfectly with water in the system and low pressure; Particular attention to this equipment should be given to those people in whose homes voltage surges often occur. Ariston boilers cope with such network surges without any problems; All models are very easy to operate. To start using the boiler, you don’t need to study the instructions for a long time; all operating features are intuitive and accessible even to those who are installing such a unit for the first time.
To start using the boiler, you don’t need to study the instructions for a long time; all operating features are intuitive and accessible even to those who are installing such a unit for the first time.
In some cases, the boiler cannot simultaneously heat water and provide sufficient heating of the room; this applies to budget models. In this case, a person needs to think about installing an additional boiler.
Check what
The traditionally practiced reset for error 607 of the Ariston boiler will not help. This is also stated in the fault table (User Manual).
Fan
- Performance is assessed in dynamics (~220 per terminal). Remove the casing of the Ariston boiler, unplug the wires, and apply voltage from the outlet. If the impeller rotates, there are no complaints about the device.
- The presence of U coming from the ED is checked. If error 607 of the Ariston EGIS PLUS model occurs, the multimeter will show zero - no fan control.
Boiler pressure switch
Controls the operation of the fan. If the device turns on, it sends a signal to the electronic board that the Ariston boiler is ready to ignite. There is a microswitch under the cover of the pneumatic relay; a movable membrane is responsible for its operation. It shifts with air pressure flowing through the capillary tubes from the fan. The pressure switch is checked by closing the contacts: if the Ariston boiler ignites, there is a malfunction in the sensor.
Pressostat and boiler fan Ariston clean
Causes
- Clogged tubes. A common problem. Blocking of the channel is caused by the ingress of condensate and tiny dust fractions. Blow and the 607 error will disappear.
- Membrane deformation. Over time, solid particles accumulate on rubber goods, elasticity is lost, and when pressing on the microswitch, the contact group does not work. The solution is simple: the sensor body is non-separable, you just need to shake it a little and tap on the cover. But the service life after such actions is low, and the risk of error 607 appearing again for the same reason remains - the pressure switch will have to be changed.
- Microswitch failure: contacts sticking. The processor regards this as normal fan operation and does not give a command to turn it on. Unrecoverable, the pneumatic relay is rejected.
First start-up and setup of the boiler
When the installation work and connections are completed, you can proceed to setting up and testing the equipment.
Performing the first run
The initial action accompanying the first start-up of an Ariston brand gas boiler is water. In this case, it is necessary to set the radiator air valves to working (open) condition.
The same actions aimed at bleeding air from the system apply to the boiler circulation pump. As the circuit fills with water, air is removed from the system, and the water pressure on the pressure gauge reaches 1 - 1.5 atmospheres, the tap on the make-up line is closed.
Weaknesses of the water heater
The Ariston brand is considered one of the most reliable. But despite this, these boilers have their drawbacks. Very quickly after purchasing the device and starting its operation, the display indicating the main parameters of the boiler’s operation breaks down. However, it is intended for the convenience of the user. A broken display does not affect the operation of the boiler in any way.
Although the manufacturer indicates that the device is frost-resistant, the water from it must be completely drained during downtime. Frozen residues may damage the device.
The temperature maximum of the Ariston boiler is 80 degrees. But it is not recommended to use it. The boiler will fail very quickly in this case. It is best to heat up to 60 degrees.
If all these disadvantages are taken into account during operation of the device, then it will last for many years.
Do-it-yourself Ariston water heater repair in the video below:
Some of the existing breakdowns can be easily fixed on your own; for some, the equipment will have to be taken to a service center.
General characteristics of Ariston boilers
The description of Ariston gas units must begin with the characteristics of their main part - the burner. This element is used to burn fuel and release thermal energy into the heating system.
Types of boiler burner:
- regular
- modulation
The modulation burner is more convenient to use. It provides automatic power control depending on the temperature of the device.
According to the type of exhaust of combustion products, burners are divided into:
- closed type
- open type
Units with a closed burner are safer to use. In this case, natural gas combustion products do not enter the room. No use required. A coaxial pipe is simply connected to the device and taken out.
The design of the coaxial pipe provides for the presence of two layers, which ensures the simultaneous removal of waste and the flow of air from the street into the burner.
Equipment with an open burner requires the use of a chimney to remove combustion products.
Correct maintenance of the device
The fact that problems have arisen in the operation of the device may be indicated by some changes in its operating mode. For example:
- increasing the time for heating water to a given temperature;
- the appearance of unusual sounds accompanying the operation of the device;
- the appearance of foreign impurities in tap water, changes in its color, smell or taste.
If at least one of these signs is observed, you should immediately clean the water heater. To do this you will have to perform the following operations:
- Disconnect the device from the power supply.
- Remove the protective cover.
- Disconnect the contacts of the electrical wires.
- Shut off the cold water supply.
- Use a hose to remove any remaining water from the tank.
- Unscrew the bolts that hold the heating element.
- Remove the heating element and descale it.
- Clean the inside of the drive from dirt and scale particles.
- Rinse the device thoroughly.
- Check the serviceability of the magnesium anode.
- If necessary, replace this element immediately.
- Wait for the cleaned tank to dry completely.
- Reinstall the heating element.
- Reassemble the device.
- Check the reliability of all fastenings.
- Connect the water heater to the power supply.
- Check for grounding.
The heating element should be removed from the tank carefully; the bolts may be too stubborn; sometimes the heating element is difficult to remove due to too much scale. The heating element is cleaned by mechanical or chemical means, as is the removal of contaminants from the tank. If a large amount of scale is found inside the device, you should consider reviewing the operating mode of the water heater.
This phenomenon is often observed when the device operates at maximum power for a long time. It is recommended to set the maximum heating temperature no higher than 60 degrees to increase the life of the device and reduce the number of breakdowns. If the body of the heating device receives an electric current, the heating element may be deformed and ruptured, or there may be a breakdown in the control system.
What are the advantages of Ariston gas boilers
Recently, the popularity of the Ariston brand has increased significantly due to high-quality gas boilers, and this is not in vain. operates silently and consumes fuel in the smallest quantities possible. This will allow the owners of the unit to save on utility bills and, at the same time, provide comfort and warmth to the home.
The client will receive a high-quality device that provides round-the-clock water supply and heating to the house, even with a large area of up to 500 square meters. Also, do not forget about the longevity of each boiler. The periods specified in the guarantee are much more modest than they actually turn out to be. The dimensions of the equipment are much more compact than those of other brands, which means that it can be installed absolutely anywhere, even in a small apartment with limited space.
How to enter closed menu sections using an access code
So, if you understand how to work in the menu, then it’s time to move on to more serious things. The vast majority of all settings are protected from accidental intervention by an access code. Therefore, to begin setting up the boiler, we perform the following steps.
Press “Ok” several times until the indicator shows the value 222 - Then hold down “Plus” until the value becomes 234 - then “OK” again - Everything is ready!
Now we have one number 2 constantly glowing and another 2 blinking - Which, as you understand, means the following - Menu 2 is turned on and you can select a submenu, and then a parameter. Having set the required three-digit code and clicking “OK”, we will see the parameter value that can be changed.
Use the ESC button to go back and move on to select other menu items and submenus.
General characteristics of Ariston boilers
The description of Ariston gas units must begin with the characteristics of their main part - the burner. This element is used to burn fuel and release thermal energy into the heating system.
Types of boiler burner:
- regular
- modulation
The modulation burner is more convenient to use. It provides automatic power control depending on the temperature of the device.
According to the type of exhaust of combustion products, burners are divided into:
- closed type
- open type
Units with a closed burner are safer to use. In this case, natural gas combustion products do not enter the room. No use required. A coaxial pipe is simply connected to the device and taken out.
The design of the coaxial pipe provides for the presence of two layers, which ensures the simultaneous removal of waste and the flow of air from the street into the burner.
Equipment with an open burner requires the use of a chimney to remove combustion products.
Peculiarities
Gas boilers made in Italy by Ariston are presented in a wide variety of models, however, regardless of the modification, the equipment of this brand is aimed at installing heating systems on an area of no more than 500 m2. Some boiler options only work for heating, while others are used not only to supply heat to the house, but also to supply hot water.
Speaking about the essential options for gas boilers from this manufacturer, we can highlight the following characteristics.
- The presence of a multilingual menu - this allows users to choose a language familiar to them to effectively control the operation of the boiler.
- The “auto” function makes it possible to configure the required power parameters in autonomous mode based on monitoring the actual temperature in the room, as well as inside the boiler.
- Heat and noise insulation - ensures silent operation of the equipment, and in addition helps to maintain the coolant at a given temperature for a long time even after stopping work.
- The warranty on all of our equipment is 2 years for standard boilers, and longer for condensing models - for 3 years.
- Ease and ease of use - the menu is thought out very competently, thanks to which even beginners who have not yet dealt with gas installations can effectively operate the boiler.
- A safety system that prevents breakdowns caused by power outages.
- Built-in electrified elements that maintain the operation and performance of the unit even in conditions of low water or fuel pressure.
A characteristic feature of all Ariston models is a well-thought-out and highly technological protection system, which ensures long-term and uninterrupted operation of the gas installation.
It includes:
- mechanisms for replenishing the boiler with water;
- built-in system for timely pumping out accumulated air;
- blocking the circulation pump;
- anti-scale and anti-freeze protection mechanism.
Common parameters of all Ariston models include small dimensions and the ability to supply hot water. The basic package includes: a double-type heat exchanger, a burner control module, a carbon monoxide control system, a mechanism for maintaining a normal indoor microclimate, and a device responsible for controlling the freezing of water inside the heating system.
Tables with three-digit codes, descriptions and set values
The values added in the white fields are the values used in my boiler. If there are no corrections, then I have the same values as those printed in the table. To enlarge, click on the photo of the table.
Double-circuit gas appliances make our lives more comfortable and enjoyable. They are quite practical to use, suitable for heating country houses and small apartments. They are used for heating industrial or warehouse buildings with an area of no more than 500 sq.m.
The advantages of Ariston boilers are that in addition to heating buildings in winter, they heat water used in everyday life all year round. This is quite convenient and does not require the installation of additional equipment.