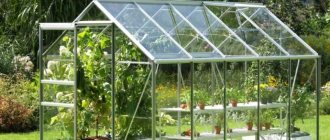
Regular ventilation of greenhouses normalizes the temperature and humidity in the room. Automation of the process greatly simplifies the life of a summer resident and allows him to go away for several days, leaving the greenhouse unattended. Making a thermal drive for a greenhouse with your own hands following step-by-step recommendations is not difficult.
The automatic ventilation device is based on a hydraulic system
Design and principle of operation of thermal drive and electric drive
Manufacturers produce devices of various modifications. The basis of any thermal drive is the hydraulic system. The inner flask is filled with a mixture, which expands as the temperature rises and pushes out a piston that opens the greenhouse window damper. When the temperature drops, the liquid returns to its original state and the ventilation hatch closes.
The electric drive for opening the greenhouse window works on a similar principle. The temperature rise sensor moves the pusher, which loosens the clamps. He then operates the lever to open the window.
Attention! If the temperature rises sharply, the sensor may not work. In this case, open the window with your hands or wait for the delayed reaction of the temperature sensor.
Why is a thermal drive better than an electric drive?
In most cases, the liquid used to fill the internal drive flask is oil. Many summer residents have noticed that the system does not respond to rising temperatures for too long; this deficiency has a detrimental effect on the development of plants.
The ability to make a thermal drive for a greenhouse yourself is a good way out of this situation for many owners of summer cottages. The automatic ventilation device responds to temperature changes within five minutes, and the plants are always in a microclimate that is comfortable for them.
Where can I buy
You can purchase equipment for smart greenhouses either in a specialized store or online in an online store. In the second case, the budget option for purchasing products on the Aliexpress website deserves special attention. For some products there is an option for shipment from a warehouse in the Russian Federation; they can be received as quickly as possible; to do this, when ordering, select “Delivery from the Russian Federation”:
| Automatic drive for opening Tuya window | Irrigation system with timer | Automatic watering kit for greenhouses with timer |
| Universal smart solution for remote monitoring of a greenhouse | LED grow light 1000/1500W | Smart lamp for plants with remote control |
How to make a thermal drive for greenhouses from a shock absorber with your own hands
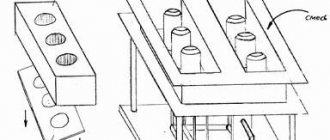
It’s not difficult to make automatic equipment for thermal drive of greenhouses with your own hands from old car parts. For operation, a pneumatic cylinder for the rear doors and a hydraulic tank are used. Before starting work, carefully study the diagram of the automatic ventilation device and prepare the necessary tools and material.
The hydraulic cylinder from a car shock absorber opens not only the greenhouse window, but also heavy window frames
For work, prepare metalworking tools, epoxy glue, a container and a rod for the hydraulic cylinder.
Step-by-step recommendations for making a thermal drive:
- A 9 mm hole is drilled at the bottom of the pneumatic cylinder using a drill and a metal drill.
- Remove the piston. The cavity is degreased with industrial alcohol.
- The piston is dipped in oil to seat it in the cylinder. Set it at 350 mm from the bottom.
- The resulting part is clamped with a vice so that the bottom is placed upward. Epoxy glue diluted according to the manufacturer's instructions is poured through the hole. The resin creates a plug. The piston will not be able to stick because lubricant has been pre-applied.
- After 1-2 days, when the resin has hardened, the piston is removed. The epoxy plug is drilled 9 mm in the same place as the bottom. Use an M 10 bolt to cut the thread.
- Screw in the nut using the above bolt.
- A hydraulic cylinder is placed in the upper part. Check how it moves inside.
- The finished thermal drive is fixed under the window of the greenhouse. Set the length of the rod so that the opening is maximum.
- If necessary, the length of the rod is shortened. The lower part of the part is attached to the frame of the greenhouse.
The pipe tank is attached above the garden bed, and then gardeners tie a cord to it to hold the plant
Software part
Everything is clear with the equipment. It remains to deal with the programs that manage it and control the state of the entire system. Since the complex contains two highly intelligent devices - ESS8266 and Arduino itself. Accordingly, both need their own programs. Placing them in the device memory, in both cases, is done through the Arduino IDE.
Monitoring
A sketch that needs to be uploaded to the ESP8266 LoLin NodeMCU to ensure its communication with the Arduino and WiFi router.
Control
And finally, a large sketch of controlling the greenhouse itself, which is uploaded to Arduino.
Design Notes
It is advisable to replace the DN11 sensor with a DN22, which, although more expensive, is more accurate and functions without the problems inherent in its younger namesake. To power the control circuits, you can use a computer power supply, preferably an AT form factor.
We recommend reading: follow the link if you want to learn how to connect a soil moisture sensor to Arduino.
How to make a thermal drive from an office chair
There is a computer chair in almost every home. But such furniture constantly breaks down, so there may be a broken chair lying around the household. The lifting mechanism is removed from the leg. Make a homemade thermal drive for a greenhouse with your own hands from a gas lift chair.
The gas lift is disassembled, the fitting is welded and filled with oil.
To operate, you will need a cylinder with a metal rod on one end and a plastic valve on the other side.
Stages of work:
- The plastic rod is clamped with a vice and pulled out with force. Next, a rod with a diameter of 8 mm is placed in a vice so that 6 mm remains outside. A cylinder is placed on the element and pressed. The pressure inside drops.
- Using a grinder, cut off the conical section of the cylinder. Remove the steel rod. All fixing elements are carefully preserved. If necessary, parts are replaced with new ones.
- The rod is placed in a vice. In order not to damage the polished surface, it is wrapped in tarpaulin mittens or other thick rags. At the end, a thread is made for an M 8 bolt. The cuffs are cut using a grinder.
- All parts are removed from the cylinder except the liner. The rubber bands are removed from the aluminum piston.
- All parts are degreased in technical alcohol or gasoline. A rod is attached to the sleeve and one end is carefully removed. An M8 nut is screwed onto the thread and secured with a bolt.
- The aluminum piston is placed in place.
- A threaded pipe is welded to the cut side of the cylinder. Attach a fork to attach to a window or transom.
- The cylinder is filled with used engine oil and air is removed from the flask.
One end of the pipe is plugged, and an L-shaped tap is attached to the other, and a plastic bottle is screwed in like an expansion tank
A linear actuator makes the greenhouse more comfortable (satellite technology in the country)
I promised to tell you how I automated the greenhouse, I keep my promise. This product was purchased for automatic and manual ventilation of the greenhouse. I took the old course in the fall. To everyone who is not indifferent to the dacha theme, please follow the cat. I’ll tell you about the device itself and its use in the context of a greenhouse (Arduino, routers, etc.). Be careful, there are a lot of photos Let's start with the device itself, I will say right away that we will not open it, I have previously opened a similar device - it is sealed with silicone and then you need to clean everything off and re-glue it. This type of actuator is usually used for positioning satellite dishes. By applying forward and reverse voltage, the rod can be extended or retracted. Due to its design, the actuator is capable of moving quite heavy objects with low power. The device came in a box, packed many times with bubble wrap, it went through Finland for about a month, the track number was tracked. Photo of the device:
The device gives the impression of a very high-quality product, everything is done quite neatly. Dimensions: Weight (I apologize, I currently live in the country and I don’t have more precise instruments here, however, in this case it’s not critical)
Length of cable
As usual, the first thing we do is check the functionality by taking a standard 12V 2A power supply, the actuator quickly extended the rod, and pushed it back when the polarity was changed. The time to completely change the position of the rod was: 18 s.
Electrical measurements: current consumption without load (at start 0.7 A)
current consumption with a load (I used my hands as a load - I actively prevented its movement with force) I must say that I was not able to block its movement - the stress test passed 1.5 A (there will be no photo - my hands were busy ) We try a reduced voltage - the battery is 9V, the actuator moves, although noticeably slower, the position change cycle took 29 s.
I can’t talk about the reliability of the device at this stage - until it has proven itself in operation.
Well, now the most interesting part: practice of application. At the dacha there is a greenhouse and the routine processes of watering and ventilation took a lot of time and required presence. I laid plastic pipes around the site, the greenhouse was no exception. You can water by opening the tap on the shed, but you need to open it and then close it. And for ventilation it was generally necessary to open the door and window with your hands. These actuators were designed to solve this problem.
An actuator was required to set the ventilation mechanisms in motion. Usually we ventilated the greenhouse by opening the front door and/or window. The greenhouse has two doors, and each door has a built-in window. We used only one as the entrance door; on the second door we only opened the window. Thinking through the upcoming auto-ventilation system, I decided to do the opposite. We will open the unused door with the device, and use the window on the front door - this will allow the greenhouse to be used as usual.
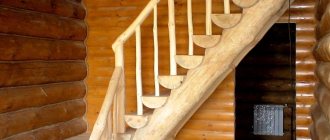
The actuator is certainly good, but it needs a body kit to influence the moving parts. I decided to make the body kit from what was at hand. I had a square tube at hand, 2 mm thick, 2 cm on a side - it is very similar to the tubes from which the greenhouse is made. To maintain the mobility of the door and minimize the inconvenience from the new mechanisms, it was decided to place the actuator fastener in the very right corner of the door (where the hinges are). The pipe was cut to the required size, plates were welded onto it for attaching the door to the pipe and an angle for creating the hinge of the door. Here we recently discussed a good mask for welding, everything is simpler for me - I welded with a chameleon as a gift, in general, here is my entire welding equipment (an old mask, a unit, gloves made of thick suede and a new mask (the friend who gave it apparently chose the brightest one):
It is convenient to cut metal with an angle grinder (grinder) using a bed (I bought it at Leroy Merlin - the cost is about 1300 rubles).
Stage result
The paw of an unknown predator was caught in the frame. In fact, this is my assistant - he shows me how and what to do.
Let's make the movable joints of the actuator themselves a little more complex than just tubes. We need the connection to be removable, which means we take a rod with a 5mm thread, it will secure the entire hinge using two washers and nuts. It will not be comfortable for the actuator to rotate along the thread, so we will put a bushing on it. And to set the height of the actuator suspension, we use pieces of bushings of larger diameter. The result is a sandwich made of metals.
In this way we will fix both the moving and stationary parts of the actuator. Unfortunately, I don’t have a vice at my dacha, so I bent the corner as best I could to attach the window. Well, we assemble the whole thing and fasten it to the greenhouse door with self-tapping screws. Of course, it could be welded, but I’m not sure about the correct location of the acutuator, and I don’t yet have operating experience (in this case, the place can be corrected), the second important argument for self-tapping screws (with all due respect to the local welding community): the need to remove part of the polycarbonate from greenhouses and protect the rest with wet rags (more laziness here ). The final assembled design looks like this:
Not a masterpiece of engineering, but it should perform its functions and absolutely does not interfere with the passage. We take the battery, check the design, and hear a loud cracking sound when the polycarbonate is disconnected. I wrote earlier that I decided to automate those mechanisms that had not been used before; in general, everything closes and opens very tightly, although the actuator has fulfilled its function. We corrected the tight joint with a utility knife, it became much better.
I stepped back about 12 cm from the edge of the door
This allowed the door to open 107.5 degrees
Which is quite enough
At this stage, the actuator is ready (conditionally, of course: there is no experience of real long-term operation, it still needs to be painted, etc.). But we didn’t gather here for the opportunity to open a window using the chemical energy of a battery... We need to manage this matter.
I already wrote about the crane control system and network modules, there were options for using controllers. But here everything is a little different... However, we proceed in order.
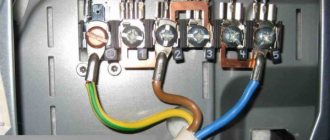
We lay a protective pipe for the cable from the barn to the greenhouse. We cut metal plates and broadcast an ip54 box to the greenhouse, extend 220 and ethernet into the box. I decided to hang the box outside, since it is not afraid of rain, but the high humidity of the greenhouse and high temperature can negatively affect the contents. I installed a differential circuit breaker and a socket inside; I use Legrand machines in the house and bathhouse. But then I came across Chinese IEK, I decided that there would be no crime and installed them. Result in the photo:
Since the twisted pair runs along with 220 V, we use a shielded cable of category 5E. I already wrote that I use Passive Poe to deliver power over twisted pair devices, but this is a different case, the consumers are powerful, the distance is decent... In general, we’ll deliver 220 and get the ones we need on the spot. In the greenhouse we will need a lot of controller pins and a decent amount of memory; the option with Arduino Pro mini and enc28j60 from my previous reviews will not suit us. I wanted to install a mega with a network module, but after thinking I abandoned this decision.
So, my choice: install Arduino Nano (has a USB connector) and a TP-link MR3020 router, connect them together, and you get a tasty device. And of course, we make our own printed circuit board for everything that will happen...
Since the actuators consume quite a lot (especially with active resistance), I decided to use 2 relays for each, this allows you to change the polarity. The connection diagram that I used for the relay (perhaps not everyone understands how to change the polarity of two relays):
If you apply 0 and 1 there will be one polarity, 1 and 0 will be the other, (1 and 1, 0 and 0 will stop the actuator)
In the comments to the review about the faucet, there were opinions that relays are simpler than microcircuits - I wrote that this is not so, and this is clearly visible here. The relay cannot be directly connected to the controller - more current is required, we install the NPN transistor in switching mode, and install a diode to protect against reverse current. Bottom line: each relay requires: 1 resistor, 1 diode and 1 transistor
I used a42 transistors, 1 kOhm resistors, 1n4007 diodes. It is quite possible to use other elements.
The task of our device is not only to ventilate the greenhouse, but also to: control the temperature, water, control humidity, control the direction of water intake, measure illumination and illuminate the greenhouse if necessary. In general, the combination of all this requires a more complex scarf than in previous reviews; I decided to make it two-level. There is also the l293 microcircuit described in the review about the faucet, the necessary connectors and 4 relays + pull-up resistors where needed. Board from Sprint Layout (or rather both):
Made using LUT, intermediate stage: Result
Of course, we call and test everything, making sure we haven’t messed anything up, we move forward.
The TP-Link MR3020 router is loved by DIYers for its compact size, good on-board characteristics, ease of installation of OpenWrt, etc. I’m no exception here, we remove the creations of TP-Link programmers from the router, install OpenWrt, mount the root partition on a flash drive and, in fact, we get a small computer with full-fledged Linux (I like this OS for its flexibility and openness). But let's put philosophy aside. There are quite a few articles on how to install OpenWrt, but I won’t repeat them. Install the necessary drivers and packages for connecting arduino. The built-in minihttpd will suit us quite well, let’s add muddy php (some will say that this is not fashionable, etc., but we are solving specific problems, let the holivars pass by). You also need the ser2net package for convenient interaction between php and arduinio. By the way, to prevent the arduino from rebooting when accessing it via serial, you need to solder an electrolytic capacitor between gnd and rst arduino (5-10 uF), my board has this. A small digression - it is better to take an Arduino Nano with an FT232 (FTDI) chip for usb, it is slightly more expensive than the most common one with a ch340 chip, but it works more stable, and the number of dances with a tambourine is reduced.
We connect our monster (board) to the router and start writing and debugging. To load the program, the capacitor should be removed, or (many people are used to this from working with programmers without DTR and Arduino Pro mini) press reset at the time of loading. After debugging, we have this (clumsy pre-alpha) interface for communicating with the greenhouse.
I took the screenshot at night, after the cold snap, in fact, things are not so bad here)
By the way, the ball valve also works here:
He supplies water to two dripping hoses purchased from Leroy.
We collect everything in a heap, stuff it into a box in the greenhouse, pull the wires and enjoy, we begin to debug the whole thing in combat conditions. For actuators, ball valves and lighting, I used a 2×0.5 ball screw laid in HDPE corrugation. The only thing here is a complete mess, I’ll debug and do everything neatly.
The temperature is measured by ds18b20, there were several reviews on this topic. I used the waterproof version, the standard connection is red +5, black ground, blue (or green) signal to the controller, the signal must be connected to the power supply with a 4.7 kOhm resistor. Of course, the humidity in the greenhouse can be measured by setting dht22, but I decided that I don’t need it yet. There are plenty of free pins on the board, so the system is expandable. Now you can go from work or from home, or even from your phone, to see how the greenhouse is doing and, if necessary, intervene in the process.
The beauty of using a router is that you can easily plug in a USB camera and sound card and use them in your business. I don’t really trust my automation yet - I hung the camera in the greenhouse and I can see all the processes, and with sound I can warn about some actions. Here's a photo from my camera. Oops... I'll post it later; it's dark and you can't see anything there...
and the camera itself
I live in Siberia and strong winds are not uncommon. Such wind can damage the structure, so in windy weather it is better not to open the greenhouse, and if it is opened, it will be on the wrong side where the wind is. I'm working on this with a wind direction sensor and a wind force sensor, but that's another topic.
Well, here’s a video of the actuator working:
the video is not from the beginning, because I needed to press the control button on the phone, and then switch to the camera
I'll end here, thank you all. I didn’t write in detail, otherwise people would fall asleep halfway through the review, but I tried to tell the key points. As always, I hope that someone will find the material useful (all or some parts). For me, for example, having such an overview, it would be much easier to implement what I had in mind.
Nobody gave anything - they bought what they needed for specific purposes.
If it’s interesting, I’ll continue to write about my dacha automation)
UPD: Posted the missing photo from the camera
UPD: And this is what the greenhouse looks like at night with the phytolamps turned on, tough)
UPD: Updated and some more photos
During operation, I discovered a number of shortcomings, the first and most important: I used a single-sided printed circuit board for the second floor of the device, relying on soldering on the terminal side (where the 2nd floor connects to the first, but during assembly and disassembly the contacts began to come off, I decided that this would not work and made a double-sided board - now everything is fine with this matter:
I also identified a couple of software defects, which I eliminated - look further... I painted the actuators:
This is what phytolamps look like (contain red and blue LEDs)
Added sensors, now: soil moisture, light in the greenhouse, temperature in the greenhouse, temperature outside the greenhouse
The wire without corrugation goes to the camera - I hope that I will debug everything and remove the camera from there.
Photo of the predator who helped with the device
How to make a thermal drive from a rubber ball and cylinders
You can make an automatic ventilation device from scrap materials. The thermal drive is made from a chamber from a game ball and a cylinder. Before starting work, carefully study the diagram of the device and collect the necessary material.
You will need bendable sheet metal, a plastic pipe, plexiglass, a football or basketball bladder
The work is carried out in two stages: a cylinder with a piston is manufactured and all elements are connected into a single automatic ventilation device.
Instructions for manufacturing a thermal drive:
- A cylinder is made from a metal sheet.
- Two parts are cut out of plexiglass: the bottom and the lid. Holes are made in the elements for the rod and supply tube. The diameter of the holes must match.
- The piston is made of metal. Sand the surface thoroughly. Attach the rod.
- A ball chamber is placed at the bottom of the cylinder. A hose is inserted into the inflation hole and attached to an air receiver (a tightly closed plastic bottle or other sealed container).
Important! The walls of the receiver heat up, which leads to expansion. The chamber from the ball will fill with air and then push the greenhouse window.
General information about control systems
The intelligence of modern equipment is provided by microcontrollers. These are small and resource-constrained full-format computers, often located on a single board or chip. Despite their small size, their power is quite sufficient to control various equipment. Such microcomputers obtain the information necessary to perform their functions through various specialized sensors. The general location of devices in a single network is ensured through additional modules attached to the microcontroller.
Carrying out their program, intelligent devices issue control pulses to executing circuits including motors, pumps, heaters or any other devices to control which the entire system is created.
The basis of many of these complexes are controllers of the Arduino, STM, Ti MSP430, Netduino, Teensy, Particle Photon, ESP8266 series or other common boards of this type in the world. In addition, some specialists create their own versions of micro-computers that control equipment based on outdated PCs or some 8-bit processors, for example, the Z80.
How to make a thermal drive for a greenhouse from bottles with your own hands
So that the summer resident has the opportunity to leave the plot unattended for several days and not lose the harvest, automatic ventilation of the greenhouse is made. You can make a thermal actuator yourself using video or photo instructions.
Be sure to study the drawing of the automatic ventilation device and prepare consumables.
The economical device can work in a greenhouse with 2-3 windows
To make an automatic ventilation device, you will need a five-liter plastic container and a liter bottle. Before use, the material is checked for leaks. You will also need black plastic film, two 1 m pipes, and a board.
Stages of work on the manufacture of a thermal drive:
- Prepare the containers. Carefully remove dirt and dry.
- A hole is made at the bottom. Screw the pipe into it. Using a plastic tube 1 m long, the element is connected.
- To ensure that the automatic ventilation device is airtight, all joints are glued with thermal paste or filled with epoxy glue. The device is wrapped in black film or painted.
- The tube from a five-liter container is attached in a similar way to a liter bottle.
- A wooden beam is attached at one end to the transom, and the other is placed above a liter container so that it crumples a little under its weight.
- A five-liter bottle is mounted under the ceiling of the greenhouse.
When a 5 liter bottle is heated, the air expands, pumps up the liter container and sets the turning mechanism in motion.
Construction portal No. 1
12/18/2018 admin Comments No comments
Creating a comfortable atmosphere in the greenhouse provides its owner with an excellent result in the form of a healthy and abundant harvest. An important factor in this process is ventilation of the greenhouse. By setting it up correctly, the process can be reduced to maximum automation. However, you should not neglect the natural methods of ventilating this room.
How to make an electric drive for automatically opening the door and vents of a greenhouse with your own hands
The inertia of the electric drive is the main characteristic of the device. A long period of response to changes in air temperature negatively affects the development of plants.
To complete the work you will need tools and materials:
- thermostat;
- commutator motor with gearbox;
- hairpin M 8 30 cm long;
- metal profile sheet;
- screw;
- metal tube;
- 12 volt power supply;
- welding machine;
- drill;
- metal drills;
- screwdriver, pliers.
After preparing all the necessary tools and materials, they begin to manufacture the device. Instructions for assembling the electrical part of the automatic device for opening greenhouse vents:
- A 220 V relay is installed to a selected thermostat (from an old refrigerator or other household items) with a range of 15-40 0C.
- A pair of contacts is connected to the output of the temperature controller. A voltage of 12 V is required.
- Select a power supply from any electrical appliance that has failed.
- The harness is assembled according to the diagram in the photo.
Attach the mechanism to the transom and connect the temperature sensor - The relays are switched by changing polarity. Connect the power source and check the functionality of the device.
- They make a mount for the engine and attach the automatic ventilation device to the window. The relay is adjusted to the set temperature.
Check the functionality of the mechanism by heating the temperature sensor using a gas burner. They also check that the window does not interfere with the opening and closing of elements of the automatic ventilation device.
Arduino controller
Many people who do such work often do not have enough time and energy for the work process. Gardeners simply dream of a smart greenhouse where everything would be done automatically. These greenhouses will be in demand by those who do not plan to spend time working with greenhouses or simply do not have the opportunity to do so due to vacations or business trips.
So let's look at the process of creating a smart greenhouse. The Arduino controller will help with this. The system of this smart greenhouse will allow you to obtain the required information about the climate parameters of the greenhouse, its humidity and air temperature, illumination, humidity and air temperature. In general, the parameters of a climate-controlled greenhouse are monitored.
Italian Arduino developers have created a truly popular project. It lies in the simplicity and ability to create an automated device without knowledge of electrical engineering and without the use of a soldering iron. The base board significantly expands its functionality by installing special shields. Using one Arduino-based system will provide control of all greenhouse processes.
Forced ventilation
If the greenhouse is large, small windows are not enough. Forced ventilation of greenhouses is not a problem if there are fans. They come in various designs.
To independently install a fan in a greenhouse, you need to take its productivity in cubic meters as a basis for calculations. at one o'clock.
Among other things, you should keep in mind that the fan operating conditions in a greenhouse are by no means “greenhouse conditions”. Therefore, you should select fans specifically designed for greenhouses.
How to make forced ventilation in greenhouses effective? Forced ventilation in a greenhouse requires automatic control. To do this, you need to buy a thermostat and connect it to the fan.
Thermostat
Vegetable growers have always been interested in the question: how to make ventilation in a greenhouse automatic?
In order to automate turning the fan on and off, there is a thermostat. Thermostats are well suited for these purposes. They are easy to set up and regulate and do not require complex control circuits.
Thermostats are:
- Single channel
- Dual channel
- Three-channel
Accordingly, one, two or three fans can be connected to them.
Single-channel thermostat
Adviсe:
- When choosing a thermostat, you need to familiarize yourself with its technical characteristics
- You should not choose thermostats with too wide a temperature control range. A greenhouse requires a thermostat with a range from 25 to 30 degrees.
- The thermostat must be waterproof
The connection diagram is so simple that it is not worth discussing. It is necessary to apply voltage to the thermostat and connect two wires from the fan to it.
By setting the thermostat to a certain temperature range, you don’t have to worry about your green pets. Automation (see How to make an automatic ventilation system) will do everything itself. Do-it-yourself greenhouse ventilation can be done with a minimum amount of plumbing tools.
Fans
Greenhouses with forced ventilation are large complexes with a system for automatically maintaining temperature and humidity. Fans in large greenhouses are used to ensure equal air temperature throughout the entire volume of the greenhouse and eliminate air stagnation in certain zones.
For small greenhouses in individual households, several window fans are sufficient. It should be taken into account that the volume of supply air must be equal to the volume of exhaust air.
Forced ventilation of the greenhouse can be supply or exhaust. Supply ventilation, accordingly, ensures the flow of cold air inside, and exhaust ventilation provides the outflow of warm and humid air outside. For efficient operation, it is necessary to have supply and exhaust fans.
Such ventilation in a greenhouse will work more efficiently if the supply and exhaust fans are placed opposite each other. Both of them must be equipped with a thermostat. The fan must be selected according to its performance, which is set in m3/hour.
In addition to the functions of air supply and exhaust, the fan can perform the function of air recovery. That is, mixing the air inside the greenhouse. When purchasing a fan, you must choose a waterproof option.
Greenhouse fan