A tiled shower is an interesting option for bathroom design. Built instead of a standard polycarbonate shower cabin, this structure allows you to visually expand the small space of the bathroom. When installed without a tray on the floor, the shower corner does not stand out above the general plane of the floor.
A shower made from tiles is an interesting design idea.
Types and features of pallets
The main purpose of the design at the bottom of the shower stall is to protect against water getting onto the bathroom floor. Among the standard options are the following types of pallets:
- acrylic - inexpensive and lightweight, but scratchy and quickly turn yellow;
- steel structures are durable, affordable, but noisy and slippery, and sometimes even covered with rust;
- ceramic or made from natural stone - durable and beautiful, but heavy, expensive and practically impossible to repair.
Metal shower tray Source gidroguru.com
Ready-made kits are chosen for their high level of tightness, short installation time, and minimum “wet” work. But a homemade shower cabin without a tray is becoming increasingly popular. The reasons for choosing a tiled floor over an acrylic, ceramic or metal structure are the many advantages of the latter option.
Insulation
To insulate the shower tray, a layer of polystyrene foam insulation, 50 mm (5 cm) thick, is placed on its bottom.
Generally speaking, a brick shower tray is made to save money, and laying insulation significantly complicates the work. And it's not about laying insulation. To lay tiles on the insulation, it must be covered with a screed. To make a screed over the insulation, you need to lay rolled waterproofing, and the screed itself may need to be reinforced with mesh if you use a simple “wet” DSP mixture. It makes more sense to insulate the shower floor by making a concrete tray rather than a brick one.
Therefore, they often do not do insulation, but simply raise the bottom of the brick pan with two layers of laid brick, with channels for sewerage.
Advantages of tiles
Shower stalls with tiled floors provide homeowners with the following options:
- creating pallets of any size and shape - large and compact, square, rectangular and corner;
- reducing costs and saving time on installation;
- choosing tiles in accordance with other details of the bathroom interior - including tiles on the walls;
- increasing the service life of the structure, the strength of which is higher than that of acrylic and ceramic sanitary ware;
- changing the height of the shower fence in accordance with the preferences of homeowners - or eliminating the sides;
Tile tray without threshold Source stroypomochnik.ru
- manufacturing not only a tray, but also a shower cabin from tiles, characterized by the same durability and aesthetics;
- easy maintenance - ceramics are easy to clean using ordinary household chemicals.
One of the disadvantages is that it is very labor intensive. When taking into account the time required to complete the work, it is worth taking into account several tens of hours for the drying of first the screed, and then the glue on which the tile is installed. And when installing a shower tray, you should take a responsible approach to the choice of materials, the quality of which determines the service life and ease of use of the shower stall.
Design style
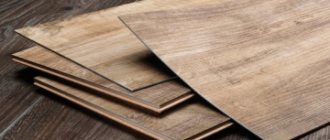
There are two main types of tiles, differing in design style:
- Mosaic. With the help of such tiles it will be possible to create a special atmosphere in the booth. Most often it is used for flooring.
- Porcelain stoneware. This material is very slippery and therefore is used only for wall cladding. Can be combined with mosaic tiles.
When creating a booth, it is not necessary to use tiles. Glass can be used instead. It should be durable, no thinner than 5-7 mm.
Dimensions and shape
Tile pallets can have almost any shape - in the form of a circle, oval, square, rectangle, sector or complex figure. The length and width of the structure are usually selected according to the size of the bathroom and start from 70 cm. When choosing, you can focus on a ready-made booth - or vice versa, buy or order plumbing fixtures that are suitable for a tiled tray.
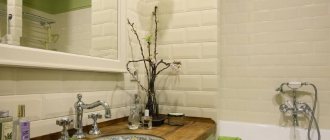
One of the popular options for a small bathroom is a corner shape and large tiles. The tiles are selected in the same color scheme as those used for finishing the walls and floors. The color of the pallet makes the interior of the room more harmonious, and the design allows you to save space.
Corner design with tile trim Source ligastroygroup.ru
The depth of the pan can be small - only sufficient to drain liquid with a slope of 0.03-0.05. If there is a side around it, the design performs almost the same functions as a shallow bathtub. The pallet is laid out with small tiles (mosaics), and the walls with large tiles, preferably made in a similar color scheme. The same material can be used to decorate shower partitions.
Pallet design
Before you make a shower without a tray with a drain in the floor, you should decide on the appearance of its base. The easiest way is to plaster and prime the surface, painting it with moisture-resistant paint. But the best option would still be a tile shower tray. The choice of tiles is so large that you can choose it to suit any interior - or, if the walls are also decorated with ceramics, you can decorate the floor of the booth in a similar style.
Different types of shower tray designs Source gidpoplitke.ru
The tiles can be matte or glossy, plain or patterned. Design with a combination of different colors is allowed. Mosaic could be an interesting option - especially if it is already present in the decoration of other interior elements. Small details allow you to lay out a complex-shaped pallet - round, oval or in the form of a sector.
Which tile is best for a shower stall?
Ceramic tiles are simply the ideal facing material for a shower. Depending on the surface, it can be:
Options with a glossy finish will look great on the walls. They shine very effectively and shimmer in the light. Tile with various relief designs (depicting animals, flowers, butterflies, fish, birds, etc.) can be an excellent decoration for walls. The drawings can be either small or in the form of large bright panels consisting of several elements.
You can opt for a mosaic. It is very often used in combination with regular tiles. Using mosaics, they lay out unusual colorful panels or bright floral patterns that will help turn an ordinary shower into a unique masterpiece.
To cover the pallet, it is better to use tiles with a matte and rough surface. It will help prevent slipping on wet floors.
The choice of colors, prints and textures is purely a matter of personal taste.
When purchasing tiles, special attention should be paid to moisture absorption and wear resistance. It’s better not to save money and choose high wear resistance. Another very important addition: it is better to cover the shower tray with tiles with the least moisture absorption. All information about the product is indicated on the packaging.
Other Features
When choosing a shower without a tray with a tiled base, you should pay attention to the degree of wear resistance of the materials. It determines how long such a tile will last and what it will look like some time after use. Therefore, even in a shower in a country house, for which a small budget is usually allocated, it is not recommended to skimp on finishing. The cost of tiles will be recouped due to the increased service life. Water absorption of tiles for the cabin should be minimal - class BI or BII (up to 3% or 3-6% of weight gain due to water absorption, respectively).
The “warm floor” system allows you to increase the comfort of using the shower. When choosing this option, pay special attention to safety. For heating, you should choose not a water floor, but a cable floor with good insulation and a protective screen. The moisture resistance class of the heating element must be at least IP44. The system controls are placed outside the room to avoid the influence of water and humid air.
“Warm” floors under the base of a tile shower stall Source moydomik.net
See also: Construction companies that specialize in heating, water supply, sewerage and gasification
25 glass shower doors – new offers from leading companies for the modern bathroom
Designing a home can be a difficult task in itself, not only for those who have not been specifically trained in such work, but also for architects and designers themselves, and this often arises from the abundance of choice that leaves us confused and overwhelmed at times.
While we pay a lot of attention to designing both the living room and bedroom, the bathroom is quickly becoming as important as any other feature of the home thanks to the amazing variations we show visitors. Both creative thinking and technological feasibility are successfully bringing our dream bathroom into our own home.
Cherry wood vanity and large glass shower with classic elements
Glass shower doors are quickly becoming a very popular choice when it comes to designing a smart, stylish and functional modern bathroom that will fit seamlessly into the modern theme of the rest of the home.
Here are 25 bathroom designs for your inspiration that incorporate this glassy and remarkable ergonomic feature, evoking a new sense of obvious beauty and offering a refreshing shower every day.
A sparkling glass-door shower steals the show in this sparkling bathroom (Whitten Architects)
Beautiful modern bath that combines shower and tub behind glass doors (Globus Builder)
The bedroom and bathroom use a combination of glass that fills the bathroom space to ensure ample ventilation (Elad Gonen & Zeev Beech)
A shiny glass shower door gives this bathroom an airy feel despite the small space offered (designed by Designs Northwest Architects)
Clean and well defined lines along with the overall design of this striking bathroom with glass shower
Transparent and shiny
Elegant space in a compact bathroom with shower enclosed in glass (Claudia Leccacorvi)
The biggest advantage of glass shower doors and glass shower enclosures is obviously the form factor they bring to the room.
Adding sleek and stylish glass doors brings a sense of modern minimalism to every bathroom, while still allowing for the use of both wood and stone throughout the rest of the design, and creating the perfect balance of multiple textures.
This subtle sense of modern design seems to be only possible with the judicious use of glass and shower doors, which provide the perfect opportunity for this.
Contemporary bathroom in warm tones with glass shower door (Mark Brand Architecture)
Dramatic bathroom with beautiful rainforest lighting on acrylic panels and glass doors
Frameless shower looks stunning with clear glass look (Divine Kitchens LLC)
Sliding shower door system saves space
Frosted glass shower panel and door give this bathroom a tranquil ambiance (Patrick J. Baglino)
Flowing space without visual boundaries
Glass shower areas create a relaxing environment, great design (Amoroso Design)
In most modern apartments and houses that occupy an entire plot of land, it makes sense to check that all living space is fully utilized.
Beyond the goal of simply making the most of an existing room, glass shower doors bring a visual connection to the rest of the bathroom.
This beautiful and unusual method creates the impression of a larger space, something that actually exists, as the use of glass ensures that there are far fewer opaque surfaces. The result is a flowing and chic bathroom with plenty of elegance.
Shaped translucent glass body creates a bright look in a cool blue kids bathroom
Beautiful modern bathroom uses natural tones and glass shower space to create a refreshing feeling (Streamline Design Ltd)
Master bathroom with glass doors offers visual connection to bedroom (Michael Abrams Limited)
Mid-Century Modern in a Mid-Range Bathroom
Contemporary yellow and gray bathroom with spacious glass shower (Sullivan Design Studio)
Lighting to perfection
Pristine white bathtub with gorgeous glass shower door frame (Tobi Fairley Interior Design)
Unlike the case with a shower curtain, the transparent nature of a glass door means that there will always be unobstructed ventilation and light flow from an external source.
Stages of work
If you have a concrete covering, which is usually found in modern apartment buildings, or a ready-made concrete screed, the work is simplified. In this case, you can immediately erect the sides of the pallet and waterproof the previously cleaned surface. But, if the base is uneven or wooden, you should screed before making a shower stall.
Preparatory work
A rough screed is often made using a regular mortar made from M400 cement and mixed with sand in a 2:1 ratio. You can immediately buy a ready-made building mixture such as M200 or M150, which will take several times less time to dry.
The process looks like this:
- A diversion is made for drainage into the sewerage system. It is recommended to complete the work in advance to avoid crumbling the concrete due to installation errors.
- The formwork is placed in the form of a pallet. When marking, take into account the height of the side, the width of the brick, the thickness of the tile and the adhesive. You can do without formwork if the screed is poured for the entire bathroom (for example, when installing a “warm floor” or major renovation).
- When the base height is up to 70 mm, the structure is reinforced using a metal mesh installed at a height of 30 mm above the floor level. If the height is more than 100 mm, it is not necessary to strengthen the structure.
Reinforcement of the shower tray screed Source userapi.com
- The solution is mixed using a drill with a special attachment. To reduce the weight of the structure, it is worth diluting the screed with expanded clay.
- Marks are placed on the walls of the formwork according to the height of the screed.
- The solution is poured and leveled using a rule or trowel.
The main part of the work on preparing the floor for installation of the pallet takes no more than one working day. It will take a few more days for the screed to dry. You can proceed to the next stage of work only after the solution has completely hardened.
Waterproofing and drain installation
To waterproof a shower cabin without a tray, two types of materials are usually used - polyethylene film and roofing felt. Bitumen or special fill is used less often. All options provide fairly effective protection, so you can choose any one.
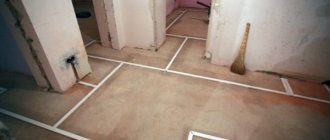
. Waterproofing of rough screed Source izoler.ru
The process of installing a ladder requires the following steps:
- Drain installation . The drain funnel should be located high enough to ensure a pipe slope of 0.03 to 0.05.
- Insulation of the base for the pallet . The recommended option is rigid polystyrene foam, laid on top of the rough screed along the perimeter of the side.
- Assembly and installation of the ladder . When using insulation, the drainage device can be immersed in polystyrene foam.
- Adjusting the edges of the ladder funnel according to the level and securing it to the alabaster to avoid accidental movement in the future.
Leveling the ladder Source ytimg.com
The ladder should be assembled carefully, without making mistakes. After completing the installation of a floor shower drain without a tray, the problem can only be solved by disassembling the entire structure. A damaged drain device usually has to be replaced with a new one.
Creating sides
Tiled shower thresholds, which protect bathroom floors from flooding and limit heat and waterproofing, are made immediately after installing the screed and drain. Before installation, it is worth determining the height above the top of the pallet. For one brick it will be approximately 5 cm - taking into account the immersion of 8 cm, the thickness of the glue, mortar and tiles. The threshold can be increased by adding a new layer of the desired height. These can be whole bricks or parts cut with a grinder.
Brick thresholds for shower tray Source stroy-okey.ru
Prevention of installation errors
Modern shower boxes without a tray differ from other models in that the water drains directly through a drain installed on the floor of the structure. The main task when installing a shower without a tray is to correctly set the floor slope and properly waterproof the base.
If the technology is violated during the installation of the floor and shower drain, the consequences can be serious. There is a possibility of flooding of neighbors, and if a “warm floor” system is installed in the bathroom, a short circuit is possible.
Therefore, laying the floor and other work on installing a shower cabin without a tray must be carried out in compliance with the technology and installation rules.
If the siphon is installed incorrectly, an unpleasant odor may appear, which usually comes from the sewer system. Therefore, it is recommended to choose a high-quality drain made by a popular manufacturer.
When assembling the structure, you must strictly follow the instructions supplied with the product.
Video description
Watch the video on how to make a shower tray in a bathroom from tiles:
To increase the accuracy of constructing the side, it is worth making preliminary markings by drawing vertical and horizontal lines on the floor and walls. Bricks must be moisture resistant - for example, M-125. For installation, a mixture of water, cement and sand with a ratio of 1 to 1 to 3 is used; a special mesh is needed to reinforce the structure.
When constructing a reinforced concrete threshold in a shower room without a tray, it is advisable to follow these recommendations:
- it is worthwhile to provide for the installation of the side at the stage of pouring the rough screed - the formwork for the mortar is immediately made high so that it can also be used for the threshold;
- a round-shaped reinforced concrete threshold increases the safety of using the booth, makes it more compact and more aesthetically pleasing;
Semicircular reinforced concrete side Source sovety-vannoy.ru
- Along the perimeter of the sides it is worth laying 4-5 pieces of reinforcement with a cross-section of 10 square meters. mm, which will act as stiffening ribs - it is recommended to immediately cut them below the side;
- after the screed has hardened, new rods with a cross-section of 8 square meters are attached to the already installed reinforcement with knitting wire. mm, curved around the circumference;
- The formwork material for a reinforced concrete threshold can be fiberboard, which bends well, and when reinforced with spacers (corners made of bars), it is no less durable than boards.
After installing the formwork and pouring the cement-sand mixture, you will have to wait for it to completely harden for at least 2 days. After this, you can proceed to the installation of the top layer - the screed on which the tiles will be glued.
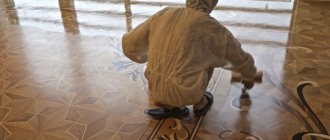
Filling the screed
When installing a shower from tiles, it is worth considering that the funnel of the drainage device should be higher than the tray by the thickness of the layer of glue and tiles. The result of leaving such a reserve is that the top of the drain coincides with the floor of the shower stall. The top of the drain grate may be slightly lower than the tiles after finishing the pallet, but it will still rise above the screed.
Finishing screed Source izhevsk.ru
Markings on the sides will help to fill the solution correctly, ensuring the required slope. The beacons along which the finishing screed will be aligned should tilt towards the drain. No formwork is required - its role is played by the already installed sides of the pallet. The average drying time, depending on the chosen material, is from 2 to 3-4 days.
Re-waterproofing
The hardened finishing screed should be re-waterproofed and leveled. To do this you need to do the following:
- Treat the surface of the screed with a waterproofing compound - a polymer-cement composition, bitumen-rubber or bitumen-polymer mastic.
- Lubricate the inside of the thresholds with the same waterproofing material.
- Wait for the coating insulation to dry.
- Apply self-leveling mixture to the dry surface.
- Round off the drainage area by increasing the flow rate of water.
Re-waterproofing a tile shower stall with a floor drain will increase the time it takes to complete the job. But due to its design, the risk of leaks is reduced - an important advantage for bathrooms that are not on the ground floor. Properly performed waterproofing allows you to avoid the accumulation of moisture, which causes fungus and mold to appear in the bathroom.
Video description
In this video you will see how to make a drainage channel for a pallet:
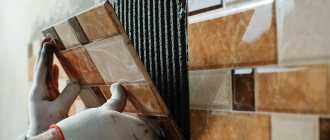
The adhesive can be applied to the inner surface of the tile or to the pallet. The first method allows you to reduce the number of possible errors, the second increases productivity. There should be enough glue so that there is no empty space left under the tile.
Many designers choose mosaic for finishing cheap pallets, which improves the decorative properties of the booth and is quite simple to install due to its increased flexibility. The standard size of elements is 5x5 cm, sheets are 30x30 cm. Installation is almost no different from finishing with ordinary tiles, however, glue is applied only to the surface of the material, and not to the pallet. After installing the mosaic, smooth it out, leveling it in one plane, and after 24-48 hours, grout the joints.
Shower tray finished with mosaic tiles Source remontspravka.com
Final stage
The shower enclosure is installed after all work is completed and the finish has completely hardened. This process can be accelerated by ensuring the room temperature is 25-30 degrees, effective ventilation and acceptable humidity (about 60%). Bathroom doors must remain open throughout the drying period.
If these conditions are met, the fence can be installed just 2 days after installing the pallet. The cabin frame can be assembled from metal profiles and moisture-resistant plywood, and finished with tiles or mosaics. The last step is the installation of swing doors, instead of which it is possible to install a plastic screen or curtain.
Shower, completely decorated with tiles Source stroyka-ug.ru