A garage with a terrace is a solution that is as popular as it is problematic. On the one hand, this is the simplest solution that allows you to equip the roof of a garage next to a residential building. On the other hand, this simplicity only applies to design and conceptual issues.
garage with terrace
Already at the construction stage the first problems begin. To begin with, this large piece of flat roof needs to be effectively insulated. Both thermally (which is easier in general) and from water (which is definitely more difficult). In addition, the surface of a garage deck insulated in this way must be treated according to the requirements of use. This, in turn, carries the risk of damage to the insulated moisture barrier. And the circle (at least in the traditional approach, with a tiled terrace) is closed.
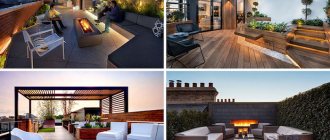
TOP 6 interesting and practical projects for garages with a terrace
#1 Location
It is better if the structure is not overlooking the road, but hidden from prying eyes. If possible, car owners try to choose the southwest or south side of the garage to get maximum sunlight. Roof terraces on motorhomes are very popular.
No. 2 Dimensions
The dimensions of the site must be correct in relation to the dimensions of the main building. A disproportionately large terrace with a large number of additional elements can relegate the garage to the “background” as an unaesthetic element. While a very small one will look awkward and it is better to equip it in another place or just put a bench for relaxation near the wall.
Regardless of the location of the structure, it is necessary to provide partial (zonal) or complete protection of the area from bright sunlight, rain, and other bad weather. This could be an awning canopy, a light roof, or one roof with a garage, made of the same materials in the same style.
#4 Gender
One of the most significant aspects, since the floor covering must be resistant to temperature changes and other atmospheric influences, withstand high mechanical loads, and be easy to clean: wet, with detergents or chemicals, etc. The modern construction market offers various types of floor coverings for garages and extensions to them.
№5 Design
When deciding to add a terrace to the garage building, the owners expect to receive a comfortable, practical and, at the same time, stylish structure. Quite often, the entire suburban (private) complex is united by a single design, supported by structural finishing materials, colors, etc. Often there are original solutions combining different styles. For example, a garage built with a neighboring house in a cottage style, and an attached open terrace in a high-tech style with elements of minimalism.
Today, garage projects with a terrace are far from uncommon. This is an original and successful solution to the issue of organizing a vacation. The popularity of such extended buildings is growing every day. Further in the article we will consider the most concise and interesting options.
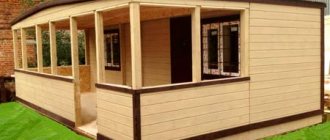
The project is simple, but has a number of advantages:
- The garage area is small, which means it will not take up much space on the site.
- The dimensions of the box allow it to be equipped according to the owner’s wishes, to accommodate everything necessary for the proper maintenance of the machine, its care or minor repairs.
- The terrace, although small in size, organically complements the main building and has enough space for installing garden furniture. The covered area can be used for relaxation, lunch, and a picnic.
- It will be easy to create such a garage tandem in the same style as the house.
When everything is simple, you don't have to put in much effort to make any changes or adjustments. Thus, the proposed project can be supplemented with an outdoor fireplace, which will be placed on the terrace.
Organizing an entrance to the terrace not only from the street, but also through a room combined with a garage is a good and relevant solution. An additional room will allow:
- Do not clutter the garage space with barbecue equipment, dishes or bags of firewood.
- Do not get wet in the rain in bad weather, but go straight from the garage to the terrace through the internal doors.
In addition, if the size of the territory and the building allow, many owners also include a bathroom in the project (if possible with a separate entrance). As a result, the owners and their guests feel comfortable and happy.
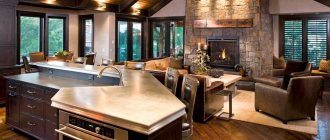
Quite a stylish and practical solution. Under one roof there is a garage part and a recreation area. The project provides for two parking spaces, and the terrace located along the side wall is of considerable size.
- This option is convenient if the family has two cars or guests often stop by.
- With this layout, you can maximize the placement of important internal parts (tools, inspection hole, etc.)
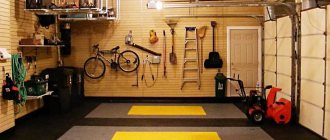
Maximum use of usable space. The width of the garage can easily accommodate two cars. The construction plan includes a corridor and a storage room, which will help keep the motorhome free of clutter.
- The most practical use of space with a minimum building area is an excellent option for small areas.
- A convenient option for large families and frequent visits from guests or relatives who prefer isolation. If you equip the attic with a cozy living room with a nice sofa and a bathroom, then it can easily pass for a small but cozy guest room.
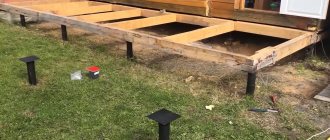
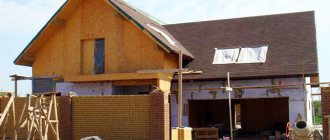
As a rule, the future terrace is planned during the design of the facility. This takes into account the strength characteristics of the roof and its design features. However, if the garage has already been built, but the roof meets all the necessary requirements, organizing a terrace on it is quite possible (as, for example, at the site in the photo below).
Mandatory conditions for arranging a structure on the roof are:
- Taking into account the capabilities of load-bearing elements of the building. They must support the additional weight. If “no,” then you’ll have to think about a rafter version with additional reinforcing elements.
- Laying steam and waterproofing materials with subsequent installation of floor coverings. Thermal wood is popular among owners of garages with terraces because it can withstand significant temperature changes and is resistant to rotting. High-strength wood-polymer composite boards are also suitable.
- .
- The presence of a parapet. Suitable: profile metal pipes, wooden railings and balusters, forged elements, etc.
- A carefully considered issue of the presence/absence of a roof for the terrace. Its most acceptable variations are retractable models with electric drive or simpler removable awnings made of various rolled moisture-resistant materials.
Advantages:
- Comfortable location.
- Additional space for relaxation.
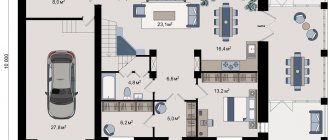
In this case, the location of the summer additional structure is provided in the garage. Based on the results of construction, the owner receives:
- A two-story house connected by a reinforced concrete belt with a one-story garage.
- An open terrace with an entrance to the house at its own level (porch and a small staircase of several steps).
- Economical use of territory.
- A reasonable investment of capital in complex construction, which will be cheaper than the construction of separate buildings.
Direct access from the living quarters to a terrace flooded with sunlight - what could be better: a cup of morning coffee in the fresh air, a family lunch or a pleasant evening with friends. The recreation area can be landscaped, which will make it more comfortable.
https://www.youtube.com/watch?v=Yg5Oa8roSwA
To install a terrace over a garage, you need a reliable and durable floor. Therefore, we will consider the arrangement of a terrace on a floor made of reinforced concrete slabs. The terrace will greatly expand the operational capabilities of the roof, especially if the garage is adjacent to the house. In the warm season, you can organize a complete vacation here for the whole family.
In our case, we have a garage with vapor barrier laid on the floor slabs, insulation - polystyrene foam, roofing - PVC membrane. A parapet 0.5 m high runs along the perimeter of the garage, except for the place where there is an organized drain.
We invite you to familiarize yourself with 8 simple recipes for making clear jam from paradise apples with ponytails for the winter
It is on this garage that has already been built that we will build an open terrace. According to the project, the floor on the terrace will be made of paving slabs. Membrane roofing does a good job of removing precipitation, and we need to make a floor so that its design does not damage the membrane. In this case, paving slabs will not be laid on dry mortar.
1. First of all, install the drainage membrane. This material has an ordered corrugated structure, which will help drain water from the roof. In addition, the membrane sheets are tightly attached to each other, thereby forming a continuous waterproofing carpet, which does not even need to be attached to the base.
2. We arrange a culvert layer of crushed stone. Its thickness will be only 5 cm. Thanks to this layer, water that leaks through the floor of the terrace will fall on the drainage membrane and be drained from the roof along it.
3. The next layer will be geotextile. Due to its properties of allowing water to pass through and retaining soil particles, it will protect the crushed stone layer from siltation with sand. This way the crushed stone will not lose its ability to pass water.
4. Lay paving slabs. We will lay the tiles on sand. The layer thickness is 5 cm. Laying is carried out using standard technology, without any special features. At the end, the seams are filled with seeded sand.
The most problematic unit when installing a terrace over a garage will be the unit for draining water from the roof. The efficiency of water removal will depend on the quality of its implementation. Below I present a structural unit for a garage roof.
1 – brickwork; 2 – floor slab; 3 – vapor barrier; 4 – foam plastic; 5 – PVC membrane; 6 – plumb line; 7 – channel; 8 – holes in the channel; 9 – drainage membrane; 10 – crushed stone; 11 – geotextiles; 12 – sand cushion; 13 – paving slabs; 14 – gutter.
The first step is to insulate the end of the ceiling to protect it from freezing. We will use polystyrene foam 5 cm thick (4). Under the PVC membrane (5) an overhang profile (6) made of galvanized steel is inserted, which has a PVC coating, which will allow it to be reliably welded to the membrane. There is no parapet on this section of the roof, so to fix the terrace floor we will use a channel (7) made of galvanized steel.
In the lower part of it you need to make holes (8) through which water will flow from the drainage membrane (9). The diameter of the holes should be smaller than the size of the crushed stone fraction (10) so as not to cause sagging of the tiles in this place. When laying geotextile (11), you need to make sure that its edge is wrapped onto the vertical wall of the channel. Then we lay the paving slabs (13) on the sand cushion (12). The water will be drained to the gutter (14).
Basic design and landscaping techniques
Roof gardens have always attracted a lot of attention. If only you had the desire, time and money, you could make a green terrace at your dacha with your own hands.
Having decided on its location, the weight load that the roof can withstand, and having organized the entrance and exit to it, you can begin planning the future design. That's right, first you need to display the plan on paper. This will allow you to assess your capabilities in advance and avoid mistakes in the process of constructing a terrace.
What can be done? An element such as a lawn can occupy the entire area of the terrace, or part of it, or be completely absent. For example, it could be a green lawn where you can sunbathe and have picnics. Ask yourself right away whether you can take care of such a lawn, because it also needs to be cut, watered, fertilized and other activities carried out.
If space allows, you can create a real garden. For this purpose, raised flower beds, paths made of wood, tiles or decorative fills (brick, gravel), and a lawn are arranged. You can provide a barbecue area, the main thing is away from the walls of the house, because this is a source of fire. Accordingly, you should be careful and attentive when preparing barbecue and other dishes and under no circumstances leave them unattended.
Installed garden furniture should be light (mostly wooden). Portable flower bowls will also serve as decoration.
You can also make the floor of the terrace wooden, and arrange raised flower beds along the outer perimeter, around which benches are installed. A small table with chairs will take its place in the center. As a result, you will get a wonderful structure for summer relaxation in the fresh air, where it is so pleasant to drink a cup of coffee or tea.
When selecting plants, you should pay attention to those that will feel good at altitude, these are the so-called “balcony plants”. With herbaceous species everything is simple, just choose them in accordance with climatic conditions. If the terrace is located on the roof of the extension, then in any case it will be shaded on at least one side. Therefore, give preference to shade-tolerant and drought-resistant species.
Also, due to the impossibility of creating a large thickness of the fertile layer (high weight), choose plants with a shallow root system. These are mainly annuals, low-growing perennials.
Feel free to use climbing plants that will beautifully weave around the terrace fence. When choosing shrubs and trees, also focus on low-growing, dwarf forms. These are all kinds of low-growing thujas, junipers, spirea, chaenomeles and others. Can be used as an option for plants in tubs. This will also make it easy to change the look of the terrace just by rearranging them.
Material selection
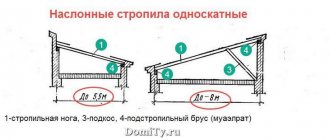
When the type of roof with which the building will be equipped is determined, you can start selecting the material. Traditionally, the single-slope structure considered is a set of wooden beams connected to each other, covered with a roofing material similar to that on the general building.
For installation you will need the following materials:
- insulation and waterproofing;
- beams for beams, rafters and supports with a section of 120×120 or 150×150 mm, depending on the weight of the roofing;
- board for sheathing, as well as cladding of ends and side sections with dimensions 50×120 or 50×150 mm;
- roofing material.
Designing the roof structure of an extension
One of the new trends in modern architecture of both high-rise and low-rise buildings is exploitable roofs. There are all kinds of projects for using the upper part of buildings that appear these days - these are outdoor or indoor swimming pools, courts, natural or artificial lawns, summer verandas.
You can make a usable roof not only in a private house, but also instead of the roof of a garage, bathhouse, or utility block. Thus, buildings for utilitarian purposes receive greater opportunities for operation and increase in usable area. Regardless of its location, a roof terrace requires special attention already at the design stage.
The peculiarity of the summer veranda, made instead of the usual roof for many, lies in the special design of the uppermost ceiling. It bears the maximum load from precipitation from above and from the evaporation of moisture from inside the premises of a house or other building. Making a waterproofing pie and veranda flooring for ease of use of the roof in use can even affect the calculation of foundation parameters.
To prevent moisture accumulation, the floor of the veranda should have a slight slope in one direction or the other. As a rule, its value does not exceed 1-3 o and is practically unnoticeable to those who will be resting at the top of the selected structure.
The direction of slope of the terrace floor should assume the presence of a drainage system and drains on the lower side. Sometimes, for this purpose, they provide for the installation of drainage funnels directly in the floor of the veranda.
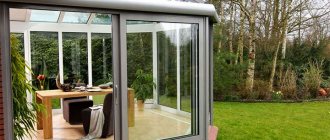
The next aspect that you should pay attention to at the stage of drawing up a terrace project is the presence and method of organizing a canopy that protects visitors to the veranda on the roof of the house or garage from excess heat or rain. There are many options for installing a light roof over the upper floor and its design. Conventionally, they can be divided into the following types:
- frame structures with glazing;
- a simple stationary canopy over the terrace made of moisture-resistant fabrics and other rolled materials;
- a sliding canopy with an electric drive that extends over a certain part of the summer veranda area as needed.
Particular attention should be paid to the safety of vacationers on the terrace. This is relevant not only if there are children and pets in the house, but also to protect adults. The main task when drawing up a project and arranging an open terrace is to create a durable fence that prevents falls. For this purpose, you can use the following methods:
- build up the walls of a house or other building an additional 1-1.5 meters above the floor level of the summer veranda;
- install additional veranda fencing in the form of a steel, wooden or concrete parapet;
- install racks in the form of round or rectangular steel pipes, wooden or reinforced concrete columns and cover them with durable metal or nylon mesh according to the overall design of the space;
- make transparent veranda walls from glazed frames.
If the design of your house includes a roof terrace, we will consider the main stages of its manufacture in more detail. The description of the manufacturing technology should begin with the organization of the upper floor of the house, limiting the space of the second floor and separating the roof terrace. It can be made in two versions depending on the material of the walls of the house.
Calculations are carried out when designing any type of roof. If the work will be carried out independently, then it is necessary to make a drawing by hand, or better yet, a neat one or a drawing of the main structure with a future extension on a certain scale. Using this diagram, it will be possible to accurately calculate the possible slope angle of the slope, as well as the height of the racks and the size of the power plate. Moreover, when making calculations, it is necessary to remember that the strength and durability of the structure depends on each of these parameters.
We invite you to familiarize yourself with Chicken roll - 13 recipes at home
Prices for profiled sheets
profiled sheet
To make calculations more accurate, they are carried out using special programs. They necessarily take into account the characteristics of the main building and the possibility of attaching elements of the extension to its wall.
When calculating the roof of an extension, the following parameters are taken into account:
- The slope of the roof slope, which is most often selected in the range from 15 to 45 degrees. In many ways, the slope will depend on the choice of roofing material.
- Length of rafter legs taking into account the size of the overhang.
- The length of the elements and the location of the reinforcement elements installed under the rafter legs of the system.
- The area of one or more roof slopes.
In addition, these parameters will determine the amount of material required to construct the roof of the extension. However, it must be remembered that when purchasing wood for the rafter system, 15÷20% must be added to the quantity found. And when buying a roofing covering, it is necessary to ensure that the sheets overlap each other. In this case, for calculations, not the total, but the useful area of the sheet is taken.
Below are several calculators that may help you determine some of the important parameters of the extension rafter system being created.
If you decide to extend the main room by adding a veranda, then even when using the simplest design, the first thing you should do is draw up a drawing. The drawing should show the main building on a certain scale. Then the veranda and roof.
When designing a roof, it is important to determine the slope angle. This parameter directly affects the time frame of operation and the efficiency of the structure, as well as the amount of materials. The higher the angle, the larger the volume of elements required for construction. The parameter is adjusted depending on the weather conditions of a particular region and the type of roofing material.
| Material | Tilt angle in degrees, ° |
| tile/slate | 22 |
| single-layer/two- and three-layer roofing felt | 5/15 |
| corrugated sheet | 12 |
| metal tiles | 16 |
| ondulin | 6 |
| soft tiles | 11 |
| polycarbonate | 16 |
And another factor according to which this parameter is selected is aesthetics.
Important! When purchasing wood for a rafter system, you should add 20% to the calculated parameters for trim and joints, and for the roofing, take into account the allowance for overlaps.
Further, when designing, the following parameters should be taken into account:
- the length of the rafter legs based on the weight of the roofing material;
- the same indicator for reinforcement elements;
- roof slope area.
The easiest way to make calculations is in special programs, of which there are quite a lot on the Internet. Some provide a special calculator into which you only need to enter the values and the result is ready.
Peculiarities
A terrace attached to a country house or originally designed together with it is gaining popularity among people who prefer to spend weekends in their own home outside the city. The terrace is a unique space that allows you to spend time there not only in the warm season, because today special heating appliances are placed on them and even real stoves and fireplaces are built.
Designers believe that a house with a terrace is an excellent solution that allows you to increase the total space of the house and gives even a modest country house a special charm and comfort. Most often, the terrace is placed under a roof, but there are options without a roof, consisting only of flooring and fencing made of wood or stone.
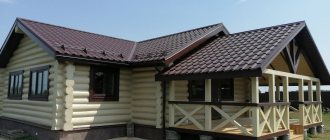
The terrace can have a different area and have either one or more common walls with the house. They are built from different materials, combining wood and metal, metal and plastic. Built-in terraces in houses made of timber look very stylish. Despite the fact that this space will be open to snow and rain, the timber and wooden parts will retain their impressive appearance for a long time, as they are impregnated with special products.
If you are concerned about the impact of weather conditions on your terrace, then experts recommend choosing the brick option. The main thing is to carefully consider the foundation of the extension, since it must be made the same in depth and width as the foundation under the entire house. This is the only way you can avoid future distortions, breaks and cracks. If the same color brick was used during the construction of the house, then it is best to use the same color for the new extension. But if your house is wooden, then bricks of different colors, for example, beige and brown, will help make the terrace original.
A house with a terrace has certain criteria, compliance with which will make your home beautiful and comfortable:
- The terrace looks best from the facade or end of the house;
- there must be a direct exit from the house to the terrace, even if it will be used exclusively for relaxation;
- the optimal width of the terrace is 2.5 meters;
- The design style of the terrace must correspond to the style of the entire house;
- if the terrace has its own roof, then its roof should match the architectural style of the roof of the entire house and preferably be made of similar materials.
Required Tools
Carrying out such work is impossible without the presence of certain tools. When the project has been drawn up and materials have been selected, it’s time to resolve this issue.
To install the roof on the extension you will need:
- a saw (can be manual or electric) or a grinder with a circle for wood;
- drill;
- screwdriver;
- level;
- roulette;
- screws or nails;
- stapler for furniture;
- axe;
- hammer;
- metal corners.
Well, don’t forget about protective equipment for yourself. It is better to work with gloves so as not to drive a splinter or get irritated when attaching thermal materials, which are usually used as mineral wool or similar ones. When using an angle grinder, you should stock up on a protective mask for the eyes and respiratory tract.
Step-by-step instructions for building a roof
If the option is chosen to cover terrace roofs with the same structure as the house, then there are practically no problems with the tightness of the structure. The main thing is to competently carry out the entire installation process from installing the Mauerlat to covering it with roofing material.
If the roof of the veranda is a separate structure from the roof of the house, then the structure contains a line of connection to the wall. And this place is very vulnerable to the formation of leaks. Therefore, this joint has to be sealed or closed. More often, two processes are carried out at once for reliability. What they do:
- The joint is sealed with bitumen mastic and a roll of bitumen material is laid onto the wall of the house and onto the roof of the extension.
- The flashing is installed - this is an element made of galvanized sheet in the form of a corner, painted in the color of the roofing material. One shelf is attached to the wall with screws on plastic dowels, the second to the roof with roofing screws.
And at the end, we suggest watching a video of how the roof of a terrace extension is erected according to one of the proposed options:
The single-pitch option is not difficult to perform. When starting construction, it’s worth enlisting the help of a friend or relative for backup. First you will need to assemble the rafter system. After this, installation of the roof can begin. The easiest way is to assemble the structure on the ground and then attach it to the frame.
Three types of rafter systems are classified. The choice will be based on the style and dimensions of the building that should be covered.
Types of rafter systems:
- Hanging - organized quite rarely. Suitable for buildings that do not have a permanent partition. An auxiliary layer is first created from crossbars, which are placed on roof beams lying on parallel walls with a similar height. The entire truss truss is concentrated on such a frame.
- Layered - designed for buildings with partitions inside, made of brick or stone. The walls provide additional rigidity and support the beams. In this design, the supporting legs are firmly fixed to the pediment partition with a Mauerlat pre-fixed to it. The lower edge can be equipped with rigid or sliding parts.
- Sliding - used for log buildings. It allows you to control and minimize roof deformation during shrinkage. In this option, the rafters are rigidly fixed to a mauerlat laid on the end wall. The bottom edge is attached only by moving parts, which is a distinctive feature of the design.
When the project is in hand and all the materials and tools are prepared, you can start working. You should also familiarize yourself with the weather forecast in advance so that no tricks of nature interfere with the installation.
Did you know? The largest metal roof covers Ferrari World, located in the UAE. Its dimensions are comparable to fifty football fields.
Step-by-step instructions for constructing a rafter system:
- Cover the building with beams for safety, placing them at intervals of 500–800 mm. To extend the life of the material, roofing material should first be placed on the partition.
- Place the Mauerlat on top of the beams. It should be placed on the back wall of the extension.
- Make a temporary deck of planks over the floor beams to allow free movement on the structure.
- Erect a gable partition from the same material as the main building.
- Cover the floor beams with waterproofing and embed them into the wall.
- Fix the second Mauerlat on the pediment.
- Apply markings to the lower and gable walls. According to it, the rafter legs will be fixed. Next, you need to make grooves in the marked places.
- Fix the rafter legs to the designated points - they should fit neatly into the joint. To secure it more firmly, screw the corners. The ribs need to be attached more rigidly to the pediment, and in the lower part, depending on the type of structure chosen, a sliding connection can be made.
- Each rafter must be fastened in a certain sequence - first the outer ribs are mounted, then a rope is stretched between them, which will serve as a kind of level. Already installed elements are fastened to beams using racks, struts, and other parts that are designed to give stability to the structure.
We invite you to read: Making tool holders in the garage
Roof installation
Next, insulation work is carried out, then the roofing equipment is installed and the roof can be covered.
Step-by-step execution of actions:
- Place mineral wool or other similar material between the rafters as insulating material. It can be fixed using metal brackets.
- Make a counter-lattice for ventilation.
- Lay waterproofing on top of the previous layer. This approach will protect the insulation from excess moisture.
- Make a sheathing on which the roofing material will be attached. The type of construction will depend on it. If the roof is soft, then the sheathing is made continuous. You can even use sheets of plywood rather than individual boards. If the roof is made of hard, heavy materials, then the structure will have the appearance of a lattice. The pitch between the squares will depend entirely on the size of the pieces of roofing material.
- Cover the roof with decking.
In order for the attached structure to have a finished, harmonious appearance, all the work must be done correctly. First, build a frame and a wall. Only after this can the roof be made, connected to the main building and covered with roofing material.
Did you know? Previously in Rus', instead of bitumen tiles, a ploughshare was used. It was a wooden plate made from pine, which was at least 45 years old.
If the additional structure is not planned to be embedded into the wall or roof of the main one, then the joints will need to be covered with waterproofing to ensure protection against moisture getting into the cracks. It is also worth considering that it is better to place the ribs of the rafters behind the frame for better drainage of precipitation.
When it is planned that a terrace will be added to a residential building, it is necessary to take care in advance of planning the roof drawings. A lean-to option is best suited for construction. It will be easier to build up and will not require a large amount of materials.
installation of a roof terrace » Renovation for every home
Traditional methods for making slab terraces entail implementation difficulties and associated errors. There are, however, technologies that have been known and used for many years - like inverted flat roofing and ventilated terraces - which, if done correctly, guarantee success.
Using a ceiling over a garage is often the only opportunity to have your own terrace or garden in dense urban areas.
the proverbial staircase. This large piece of flat roof needs to be extremely effectively insulated both thermally (which is generally easier) and water-insulated (which is much more difficult). In addition, the insulated surface must still be finished to meet utility requirements.
Style and design
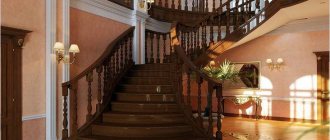
The style of the terrace can be very different, the main thing is that it is in harmony with the overall style of the whole house. The surrounding landscape also plays an important role; for example, a wooden house among pine trees on the shore of a lake will be effectively complemented by a Scandinavian-style recreation area. But a building in the Provence style will look great in a green garden among rose bushes and fruit trees.
Let's talk a little more about the interior details that make the style of your home recognizable.
- Scandinavian style. The simplicity and brevity of the design of Finnish cottages is popular far beyond Finland. A Scandinavian-style terrace is most often made of wood, the floor is painted light gray, light brown or left unpainted. The style is eclectic and allows you to mix furniture from grandma’s closet and modern things, for example, a glass tabletop can easily be placed on driftwood from the nearest forest, and elk antlers will perfectly replace a traditional hanger. All these dissimilar objects are united by a single color scheme and the common idea of harmony between man and nature. The combination of white and brown fills any room with light, and natural elements make the interior cozy.