Polyurethane foam took its place in the construction market relatively recently, but quickly gained popularity. It is sealed, has good adhesion, does not allow electric current to pass through, penetrates into hard-to-reach places, does not rot, and has good sound, water and heat insulation properties. This is why polyurethane foam is often used when installing PVC windows. So, how can you determine whether polyurethane foam for PVC windows is better?
What is this
Polyurethane foam is a chemical sealant made from polyurethane foam. It belongs to the class of household chemicals.
The product appeared on the market at the same time as plastic structures. This is due to the fact that their installation is impossible without this material. The mass is a two-component chemical substance in an aerosol package.
To ensure the quality of installation of window structures, it is necessary to choose the right consumables and follow the technology for its use. The material must comply with the characteristics stated on the label.
The advantages of polyurethane foam for cracks include its rapid hardening. 12 hours after application the material is easy to process. It is adjusted to the required dimensions using a construction knife.
Craftsmen note high levels of heat and noise insulation. The frozen mass has air bubbles. They ensure heat retention in the room. The polyurethane seal softens sound vibrations, which further protects the house from extraneous noise.
The disadvantages of foam for installation include its instability when exposed to direct sunlight. The frozen mass begins to oxidize, and the entire protective layer is rapidly destroyed. The substance crumbles and its insulating properties decrease.
Soundproofing foam MaxForte
Unlike conventional polyurethane foam, which is an excellent conductor of noise, since it is light, hard, and has a closed cellular structure, which facilitates the unhindered passage of sound waves. Foam MaxForte
Therefore, when installing windows or doors, it is necessary to use special soundproofing foam, which, unlike conventional polyurethane foam, has properties important for sound insulation:
- High density to reflect sound wave;
- Elasticity to reduce vibration transmission;
- High-quality filling of cavities and cracks to prevent sound from leaking into the room
MAXFORTE SaundFLEX foam has these characteristics.
Compared to conventional construction foams, the use of MAXFORTE SoundFLEX foam adds more than 10 dB to sound insulation, which is equivalent to a noise reduction of 2-3 times.
The difference between regular mounting foam and soundproofing foam can be seen in the video:
If you squeeze a piece of polyurethane foam in your hand, it will simply collapse, unlike specialized soundproofing foam; it, like a “sponge,” will take back its shape, it does not harden and thus does not become a sound bridge.
Compound
Most of the consumables used contain substances to impart elasticity (plasticizers) and surfactants. To activate the polymerization process, a reaction of 2 components is needed.
- Prepolymer diisocyanate. The substance is in a liquid aggregate state. When sprayed, it absorbs moisture from the air, forming a polyurethane mass.
- The propellant responsible for the aerosol properties is propane. The gas is inside the cylinder and is involved in the atomization of the diisocyanate.
After spraying the balloon in the open air, polymerization occurs. Under the influence of air and a humid environment, the mass hardens. A porous material is formed that fills all the cracks.
How to cover foam on plastic windows from the street
To close the hardened protection from the street, it is recommended to use a waterproofing agent. A multifunctional sealant or waterproofing tape with a vapor permeability effect is suitable. Using this material will allow you to neatly close the seams on the front side without overlapping.
After installing the ebb, a vapor-permeable material is installed under it. It is important to measure correctly, then cut along the length of the window frame, taking into account the margin for installation under the external slope. If the existing width is not enough, then an additional piece of tape is cut off.
Classification
Before purchasing, the consumer needs to know how to choose foam for installing plastic windows.
If you pay attention to the design of the cylinder and the properties of the active substance, the sealant is divided into professional and household. At first glance, the difference between them may seem insignificant, but there is one.
The design of any cylinder includes a spray mechanism (adapter tube). Also, when working with polymer, a special gun is used.
It allows you to deliver material in portions to all recesses, crevices, and cracks. In this way, the master controls the amount of sealant supplied and reduces its consumption.
Professional
The first option is used in places where there is a need to fill large spaces. This foam for installation of plastic windows is packaged in cylinders with an internal partition. It separates the components. They mix only at the outlet of the sprayer.
This cylinder cannot be used all at once. When reusing, just shake the packaging and blow out the outlet nozzle.
Domestic
A cylinder of mounting polymer for domestic use does not differ in appearance from a professional one. The difference lies in the internal design of the packaging. There are no partitions inside, all substances are mixed.
This makes it impossible to reuse if you leave the already started cylinder for later uses.
Such consumables are cheaper than professional ones, but are not inferior to them in quality and characteristics.
Seasonal
The manufacturer produces several types of polymer sealant.
- Summer. It is used in the warm season, when the temperature is from +5 to +35°C.
- Winter. This foam for installing plastic windows is adapted for use in the cold autumn and winter periods. The minimum permissible temperature threshold is -18°C. This versatility is explained by the presence of special impurities.
- All-season. Its composition combines the improved qualities of previous options. It has a high coefficient of expansion and also foams quickly at low temperatures.
The choice of sealant must be approached very carefully. The quality of installation and operation of window and other structures depend on this.
Polyurethane foam for PVC windows: which is better?
So, now it’s clear how to choose foam. But what kind of polyurethane foam is better to use for PVC windows?
- Professional is much more reliable and convenient. In addition, professional foam has low shrinkage, that is, a decrease in volume after hardening. Low shrinkage prevents damage to the integrity of the seams, and for pistol foam it is only five to seven percent.
- Consider the ambient temperature: warmer than +5 Celsius - use summer foam, if colder -10 Celsius - winter foam. See the cans for the specific temperature range.
- Use foam from trusted and reputable manufacturers - this way you can be relatively confident in the result.
Application
When working with foam, you should follow some rules:
- Before application, the slopes are moistened, which will accelerate the expansion of the sealant;
- In winter, the work surface is cleared of ice;
- shake the container thoroughly before use;
- holding the container with the bottom up will ensure that the contents are completely blown out;
- The gap is filled from bottom to top.
Elimination of excess mass is carried out after hardening. To do this, use a construction knife.
Adhesive foam PENOSIL Premium Fix&Go Montage
Ready-to-use, one-component polyurethane adhesive in an aerosol can. Designed for quick and durable gluing of various building materials.
- Economical
- Quick drying
- Has high adhesive strength for various materials, including unprimed ones
- Can be used at sub-zero temperatures
- Resistant to mold and mildew
- Replaces most adhesives (foam, liquid nails, adhesives for ceiling tiles and plasterboard, mounting adhesives for blocks, slabs and MDF panels)
- Comfortable in using
SPECIFICATIONS: Color:
white
t° Use:
from –5°С to +30°C
t° Operation:
from –50°С to +90°C
Surface drying time:
10 – 12 min.
Complete drying time:
60 min.
Volume:
750 ml
Shelf life:
10 months.
Packing:
12 pcs.
in a box Availability: IN STOCK
Please check with our managers for the price for your volume.
For more information on the use of Penosil adhesive foam, see the training video
News
- Happy New Year 2021! Schedule. 12/23/2020
- Arrival of window sills “Stained glass” economy 08/26/2020
- May holidays 2021, work schedule 04/30/2020
- Opening hours from March 30 to April 30, 2021 03/30/2020
Catalog
- Professional mounting foam
- Household
- Fireproof
- Silicone For aquarium
- For foam
- Contact glue
- laminated VIP-VPL
- Sealing
- Professional rubber seal (ARTI)
- Seam inserts
- Laminated F, P and N PVC profile
- Window handles Roto, HOPA, HERMO
- Cosmofen (Cosmofen)
- Anchor plates
- HB gloves
Label cloud
GC Hermetik-Center 603058 Nizhny Novgorod, st. Shakespeare, 1 "B", building 4. Tel. +7 831 218-7000, Cell. Cell.
Manufacturers
The construction segment offers a large selection of installation products. Among them, it is worth highlighting several brands.
- Moment-assembly is a common model, available in different types of cylinders, which allows you to choose foam for specific work;
- Makroflex – adheres well to various surfaces (with the exception of silicone, oily and Teflon coatings);
- Soudal – among the advantages, it is worth highlighting accessibility, a minimal amount of toxic substances, and the absence of an unpleasant odor;
- Penosil - this brand of sealant is less common, but has a low final expansion coefficient;
- Titan - products are distinguished by quality and low price.
When installing plastic windows in a wooden house, the installation foam must be chosen carefully. A good spray sealant will keep the room warm. When working with it, you should remember the rules of use.
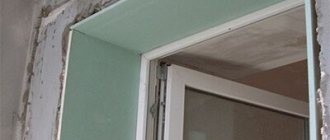
installation of the upper plastic slope
Work on installing plastic slopes should begin from the top of the window. This order of work is due to a number of reasons. Firstly, the side (vertical plastic slopes) will serve as additional support for the top (horizontal) panel. Secondly, you won’t have to step on the newly installed plastic window sill.
Let's start taking measurements. It's worth being more careful here. The fact is that the length of the slope near the window is less than the length of the side facing the apartment (from the side of the apartment the opening is wider than the same opening near the window). We measured the panel and cut it. Before you begin installation, it would be a good idea to try on the cut piece. Tried it on. Fits. Let's start the installation.
With a given slope width (430 mm when unfolded), foaming is carried out in several stages. The fact is that when the polyurethane foam hardens, it expands, and when applying a continuous foam layer between the wall and the PVC panel, there is a risk of deformation of the panel.
The first step is to apply a continuous layer of polyurethane foam at the junction of the plastic slope and the window. Temporarily secure the plastic panel to the wallpaper with masking tape (the wallpaper should not be paper). After some time, depending on the amount of foam applied in the first layer, we tear off the paper tape, carefully bend the panel, and apply the next layer of foam. We repeat the operation with molar tape. The number of layers of foam is individual in each case.
What are the benefits?
Repair is not an easy task, so many people prefer to turn to professionals for help. Yes, installing a new double-glazed window is difficult and too responsible, but any man can foam the slopes.
Attention
Doing the slopes yourself will allow you to save on workers’ salaries and do everything according to your own wishes.
Thanks to the foam, the seams between the window and the wall are hermetically sealed and in the future will not let in either cold air or noise from the street. People often encounter a situation where the master did not fill the space well enough, voids were formed, which then led to heat leakage.
It is impossible to see these errors visually, so experts advise checking the quality of the work performed with matches. You need to bring the flame to the seam: it should not tremble or even tremble slightly. If deficiencies are nevertheless found, the foam is re-filled so that the seams become completely sealed. On the second or third day, the excess foam is cut off and finishing of the slope begins.
The design of slopes is carried out both from the outside and from the inside . Without completing the exterior finishing, you should not move on to the interior.
Properties
This material is characterized by:
- the volume of foam, which indicates the size of the cylinder;
- adhesion, that is, the force of adhesion to the surface;
- foaming, which means the transformation of the composition from a liquid state to foam;
- expansion, which tells how much the volume of the foam increases during the hardening process. This indicator is important if sealing of deep seams and joints is required;
- secondary expansion.
The coefficient of expansion of foam is especially taken into account when working with deep gaps.
The indicator of secondary expansion has a negative effect and can play a cruel joke if this property of polyurethane foam is ignored. For example, when installing metal-plastic structures in the form of windows and doors, as a result of the secondary expansion of the foam, additional pressure occurs on the structural elements with their subsequent deformation. To prevent this, spacers must be installed during window installation.
Spacers prevent window deformation
Foam cannot be used for installation purposes on icy, polyethylene, Teflon, silicone and oily surfaces.
Positive qualities of polyurethane foam:
- non-passage of electric current;
- multifunctionality of use - as insulation, sealant, adhesive and soundproofing composition;
- water-repellent properties;
- fire safety class B1;
- due to its ability to significantly increase in volume, the foam effectively fills the most inaccessible places: seams, cracks, recesses, quickly hardening;
- the applied composition does not rot and is not afraid of mold;
- has high thermal insulation qualities;
- can be used for fixing water supply and heating pipes, electrical wiring;
- used as a sealant with insulating properties when installing roofing materials;
- polyurethane foam when installing windows, due to its high adhesive properties, ensures reliable fixation of window and door blocks without the use of nails and screws;
- Soundproofing qualities allow you to dampen noise from vibrations. When installing plastic windows, this property complements the quality of the design and enhances the effect of soundproof rubber seals installed in the window.
Polyurethane foam reliably fixes window or door structures
. Disadvantages:
- despite the fact that the material repels water from its surface, moisture can accumulate in its porous structure, which over time destroys the structure of the foam and reduces its performance properties;
- destroyed by direct solar radiation;
- the presence of strict requirements for the storage of cylinders - vertical position and ambient temperature from not lower than 5 and not higher than 25 degrees;
- After contact with human skin, it is very difficult to wipe off and only with the help of solvents, so it is important to use gloves when working with foam.
Selection rules
The modern construction market offers a huge selection of these products from both well-known manufacturers and new companies. To make the right choice, it is important to pay attention to the following points.
Taking the cylinder in your hands, check it for underfilling, comparing the actual weight with the declared volume. A 750 milliliter cylinder should weigh from 850 to 920 grams. If there is not enough foam in the cylinder, the internal pressure will drop low enough and some of the foam will remain inside.
When purchasing a foam canister, you need to pay attention to the expiration date.
The percentage of secondary expansion, which occurs after a certain period of time - up to several days, is very important. It should not exceed the primary value by more than 20 percent, otherwise deformation of structures will occur due to additional load. .
The foam should adhere well to the surface, not flow off it, and have low shrinkage and elasticity. You need to purchase a bottle with a fresh expiration date.
Winter or summer?
Foam is divided according to the seasonality of its use. It happens:
- Summer, suitable for work at temperatures above +5 ˚С.
- Winter, allowing you to seal cracks at temperatures down to -18˚ C.
- All-season. Seen and used less frequently. Professionals advise using it during transition periods in autumn and winter or getting by with the first two varieties.
Marking
Of course, before you install the window sill, you need to mark it. We measure the width of the window block, let it be 140 cm. We will buy a window sill 15-20 centimeters longer, since it should extend beyond the plane of the slopes by 7-10 cm (this is a matter of taste). So, we bought a 155 cm one. Let's put it aside for now.
Let's take a close look at our window opening:
Everything is fine with us, the foam layer will be about 2-3 cm. If you get more, it would be better to raise the lower “slope”, for example, with a self-leveling floor. This way the structure will be stronger (my personal opinion). Shortly before installation, the surface will need to be primed, do not forget.
Next, we must find the exact middle of the window (we have 70 cm from the edges) and, accordingly, the exact middle of the window sill (77.5 cm). In addition, we draw their central axes with a pencil. It is from them that we will set aside all dimensions so that the final result is symmetrical. As the article progresses, you will understand what I mean.
Now let's take measurements. There are four of them to remove in total, I labeled them A, B, C and D.
- A - approximately equal to the width of the window block, perhaps a little more if space allows; but no less.
- B – distance between the corners of rough slopes. As a rule, it is several centimeters larger than A.
- B is the distance between the far edge of our hero and the plane of the wall.
Under the window block there is a special groove about 2 cm deep, where it goes. You need to measure from the groove, and not from the plane of the window, be careful. Here it is also highly desirable that the wall with the window is already plastered. Let's hollow out some plaster under the “ears” and measure B so that they start “inside” the plane of the wall.
All the cut edges will then simply be covered with slopes and a wall.
- G is the total width of the window sill.
It is selected in such a way that it covers vertically no more than half the thickness of the radiator under the window.
Otherwise, in cold weather, condensation will form on the windows, since warm air from the radiator will not reach the glass. Usually the protrusion is 5-7 cm; it is not advisable to do more. Installers very often make this mistake.
This is what our window sill will look like after marking:
And after cutting it like this:
We try it on in place, insert it into the groove, manually set it approximately level, and inspect it for jambs:
Everything is in order here, you can adjust the height of the window sill. Since ancient times, wooden wedges have been used for this, but in general, anything can be used as supports. This time I conducted an experiment and used not wedges, but ordinary self-tapping screws, which I aligned with the laser.
It must be said that the experiment was only partially successful. The near edge was aligned easily and quickly, but difficulties arose with the far edge (the one that fits into the groove). After all, who installs windows in our country? That's right, Uncle Vasya. And I didn’t take into account that the windows, in fact, may not be strictly horizontal and may even bend!
I had to put improvised materials under the far edge, namely Penoplex insulation. It is necessary to ensure that there is no noticeable gap between the window sill and the window, that is, it must be pressed tightly against the window block from below.
It may be that the window goes in an arc. In this case, you need to choose the least evil. In my opinion, the main thing is the absence of a gap, and the unevenness of the surface is not particularly noticeable to the eye.
There are two requirements for the near edge: it must be strictly horizontal, and it must be lower than the far edge, that is, the window sills are placed at a slope.
The slope is usually 5-10 mm per meter. That is, for a window sill with a thickness of 60 cm, the near edge should be located 3-6 mm lower than the far one. This bias is invisible to the eye.
And it is done in order to prevent puddles, for example, when watering flowers. The water will flow down. Basically, if you don’t want to do the slope, don’t do it. I'm just describing a general case. If you use wedges, push them behind the plane of the wall so that later they are out of the way and you don’t have to tear them out.
When setting the slope, it is more convenient to use not our product itself, but cuttings from it. Insert one end into the groove, place a level on the cut and evaluate the slope. Once everything is set, we once again insert the “patient” into place and see if there are any cracks and if the required slope is ensured:
By the way, the photo shows that, firstly, I partially tore off the film from the far edge. I think it's clear why. Secondly, I aligned the central axes of the window and the sill. We see that there are no cracks. If you use wedges, there is a possibility that they may become dislodged.
To prevent this from happening, you can coat them with gypsum mortar, for example, alabaster. Then they definitely won’t go anywhere.
We can start installation.
Basic rules for installing a window sill
- In accordance with the window sill profile, a strip is selected that must fit freely into the installation position. If necessary, remove interfering plaster.
- Install the window sill using a level. The inserted edges must be treated with a sealant before installation.
- Treat the concrete surface of the window base with water.
- To prevent the hardening foam from pushing out the window sill, place a heavy object on top.
- Fill the resulting empty space with building material.
- After hardening, remove excess with a special tool.
Failure to comply with one of the conditions can cause damage to all the work done. It is important that the foam adheres well to the surface, and that the niches are completely filled and have no gaps.
For those who have never dealt with this business, it is important to know that there are several components of success: accuracy, attentiveness, and the availability of the necessary tools for the job.
Adviсe
Since the bottom surface of the window sill is smooth, the plaster does not particularly stick to it. Therefore, a crack almost always forms under it over time. Usually everyone turns a blind eye to this, but I prefer to process it. After gluing the wallpaper, I glue it horizontally with masking tape with an indentation of about 2 mm; I take acrylic or any other elastic white sealant and apply it to the corner, immediately removing the excess with a wet sponge. The end result will look like this:
Whether to do this operation is, of course, up to you. I'm just suggesting. I can also recommend foaming the side cracks - near the rough slopes. And sometimes it happens that it blows from these places. You should also seal the window/window sill joint with liquid plastic or, at worst, acrylic.
Now that the window sill is installed correctly, you can either sit or stand on it. Nothing will happen to him.
Good luck with the renovation, new articles are coming! Subscribe to the site so you don't miss them!
When installing window sills, unfortunately, many people make a number of irreparable mistakes. To prevent them, we will consider the installation details in detail. After installing the window, all the resulting cracks must be filled with foam.
The main feature of the product is that it greatly increases in size. Foam is used for reliable sealing and thermal insulation. Thus, your living space will be isolated from noise and air from outside. But not everyone knows how to achieve the desired result.
From plasterboard
Drywall is a panel made of gypsum, covered with cardboard on both sides. This material makes the cladding strong and durable. The main advantage of drywall is its low price, which makes it very popular among craftsmen and even beginners.
For plasterboard slopes, experts use moisture-resistant plasterboards, since this is the place that is most affected by temperature changes and condensation forms. Gluing slopes from plasterboard is not difficult, but there are still differences from working with the plastic version.
Algorithm for working with drywall:
- Make all the necessary measurements: width, depth and height. Measure the latter twice - near the window and wall.
- Taking into account the results obtained, cut out the necessary parts from the drywall with a construction knife.
- Apply polyurethane foam to the slope and press the drywall for a couple of seconds. Separate the part and wait for the foam to fully expand a second time.
- Reattach the part and secure it. Can be strengthened with self-tapping screws.
- Attach metal perforated corners to the corners of the drywall.
- Finish the corners with putty. Wait until completely dry.
- Paint the slopes.
Advantages of plasterboard slopes:
- Low price.
- Long service life.
- Small amount of waste.
- Obtaining a smooth surface.
- No additional tools required.
- Versatility.
- Does not require additional use of putty or plaster.
- Protects well from environmental influences.
- Mold and mildew do not grow on it.
- Environmentally friendly.
- Easy to use.
Flaws:
- Fragility.
- Instability to sunlight.
- Inability to replace the damaged area if it is partially damaged.
- Reduces light opening.
How to use the product?
Before starting work, any surface must be prepared. Dirt needs to be removed; since the foam interacts with moisture, it is advisable to moisten the surfaces with water, but this can only be done at positive temperatures. In other cases, this action is undesirable. If work takes place outside, at sub-zero temperatures, it is necessary to remove ice and snow from the surface.
In order for the foam to readily leave the container and gain sufficient density, it should be kept in a warm room for about a day before starting work. It is prohibited to artificially heat the cylinder using an open flame. It may explode because it is under pressure.
Foam output in different cylinders
Polyurethane foam is the best idea for attaching a door frame, but when using it, you need to firmly fix the frame with supports and leave enough space for the foam to expand, otherwise you may end up with a deformed structure. You need to use the cylinder while holding it upside down. The foam must be shaken well before use.
The decision which polyurethane foam to choose for window installation remains with the buyer; the main criterion is a careful study of the packaging. Cylinders that are too light should be avoided.
Home → Windows and doors → Polyurethane foam for sealing windows: types, features
Window sill installation
If your particular sample is protected by film on the bottom, remove it, otherwise anything can happen. We begin the installation itself with a groove in the window block. We foam its bottom shelf, barely pressing the trigger of the gun:
How much foam do you need?
This way we will ensure guaranteed sealing of the connection. The next step is to apply the foam under the far edge of the future window sill in a wide, solid strip. It will have to effectively support the edge, thereby eliminating the appearance of a gap under the window. After this, we foam the entire lower “slope” with a dense “snake”:
Before applying foam, I advise you to wet the surface under the window block and the window sill itself from below. This will significantly speed up its hardening and adhesion. The height of the foam layer should correspond to the thickness of the wedges/screws; you can apply a little more, but do not overdo it. After application, it gains approximately 100% more volume (by eye), and can easily spread out our window sill, causing it to hump. It is important not to get it dirty yet; when you insert it into the groove, be careful.
After you lay the window sill on the wedges/screws, you will need to additionally foam the gap on the wall side. Do this approximately flush with its plane. In an hour you will see that she will already be performing.
Load on the windowsill
Immediately after all the foam is in place, you will need to place something heavy on the “patient”: boxes of tiles, bags of plaster, dumbbells... At the same time, we place the load closer to the inner edge - the outer one will rest against the window block. It is highly advisable to place something flat under the load, like this de rule, so that the weight is distributed evenly over the area and there are no holes or humps:
Let's see what the level says
This is also what installers often do - they frothed it and put bags in it. When we do everything ourselves, we can periodically check the level and plane during the first hour - you never know what can happen. In our case everything was fine:
If something is warped somewhere, or a hole has formed, it’s not too late to fix everything. In the pits you just need to remove the load. If after a few minutes it is not opened with foam, you can put another wedge or piece of foam plastic, for example, under this place. In case of slight misalignment, it is simply enough to move the load, or add/remove it from one side.
Now I’ll explain, if anyone hasn’t guessed yet, why we marked the axis. When we make slopes, we, of course, will try to maintain the same angle of their opening. And when we make these same slopes, our “ears” of the window sill will be the same distance from them. That's the whole secret. Complete symmetry. Everything is correct, everything is beautiful.
In the end, all that remains is to put plastic plugs on the ends of our hero, but this is best done at the very end of the repair, after the wallpaper.
A couple of hours after installing the window sill with our own hands, we can cut off the foam and seal the holes around it. It’s most convenient to do this under it not with a rule (it won’t fit through), but with a 27x28mm guide profile.