Today, many homeowners choose a pile-screw foundation for their buildings. After all, the technology for constructing such a foundation is quite simple. In addition, it is quite easy to choose or even make screw piles yourself.
Of course, it is worth keeping in mind that the decision to make such products with your own hands can only be justified in the case of lightweight buildings. In the case of constructing heavy residential buildings, it is more prudent to opt for prefabricated products.
So, let’s take a closer look at the design of this popular product, as well as directly at the technology, how to make screw piles yourself if such a desire arises.
Pile screw foundation (diagram)
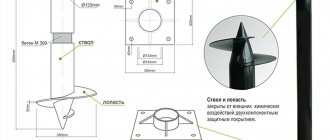
Screw pile design
The screw pile device includes:
- The trunk is presented in the form of pipes with a round cross-section and a wall thickness of 4 mm;
- A cone-shaped tip, which is located at the lower end of the pile;
- A blade that looks like a coil of a spiral welded onto the conical part of the existing pile;
- The head, presented in the form of a square plate, which is welded to the upper end of the barrel.
IMPORTANT! The head takes place when the above-ground part of the building is made of wood. In order to give it additional strength, it is reinforced using stiffeners. In this case, 4 holes with the required diameter of 25 mm are drilled in the corners of the head.
Screw pile design
How to build it yourself?
This instruction is advisory in nature and is not a direct indication of the exact implementation of its points. It reflects the basic rules for constructing a pile foundation from PVC sewer pipes - these are:
- Preparing the construction site.
- Procurement of building materials and selection of tools.
- Drilling and preparation of wells.
- Installation of pipes.
- Reinforcement of piles.
- Preparation and pouring of concrete.
- Backfilling of wells.
Construction site preparation
Debris is removed from the construction site and the fertile layer of soil along with vegetation is removed. Use a cord and pegs to mark the location of the centers of the piles. The correct construction of marking rectangles is checked by the equality of the diagonals between opposite corners.
Procurement of building materials and selection of tools
You will need the following materials:
- PVC sewer pipes;
- crushed stone, sand, cement and water;
- periodic profile reinforcement ø 8 – 10 mm;
- smooth reinforcement ø6 mm;
- knitting wire.
To carry out the construction process you will need the following tools:
- bayonet and shovel shovels;
- wheelbarrow;
- garden auger;
- laser level;
- concrete mixer or container for mixing the solution manually;
- hacksaw, construction knife;
- buckets.
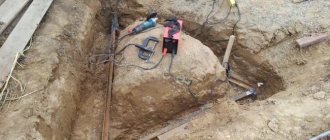
Drilling and preparation of wells
Before drilling the soil, the drill axis is set strictly vertically . During the drilling process, the verticality of the tool is strictly controlled.
In case of distortion, the installed pipe will lose part of its load-bearing capacity. The bottom of the well should be 200 - 300 mm below the design mark of the bottom of the pile. This is necessary to widen the base of the foundation.
It is not necessary to expand the supporting area of the pile. However, if there are doubts about the insufficient load-bearing capacity of the supports, then the bottom of the well is expanded with a special device.
It consists of an axis with a movable blade attached to it with a cutting blade and a storage hopper. Using a cable, the blade is gradually raised from below to the horizon, cutting off the soil in a circle of rotation of the device. The mining goes into a hopper, which is then removed along with the blade to the top.
Sand is poured onto the bottom and compacted thoroughly . The excavation is filled with concrete and the well is left alone for 14 days.
Pipe installation
To avoid distortions, wells are drilled 50 - 70 mm larger than the diameter of the pipes. This makes it possible to adjust the vertical of the pile and fix its position with spacers made of timber.
Reinforcement
One or several reinforcing rods of a periodic profile connected by wire with transverse smooth reinforcement are lowered vertically inside the supports. To connect the piles to the grillage, reinforcement outlets are left to a height of 200–300 mm .
Preparation and pouring of concrete
The pipes are filled with concrete M 300. For its preparation I use cement M 400–500.
Cement, sand and crushed stone are poured into a concrete mixer. As the drum rotates, water is gradually added to it until a thick liquid solution is obtained.
The solution is loaded into a wheelbarrow and taken to the next pipe. Concrete is poured into buckets, constantly tamping it with improvised rods .
Backfilling of wells
After pouring is completed, the cavities around the piles are filled with soil or a sand-gravel mixture. The backfill is compacted layer by layer. After 30 days, installation of the grillage begins.
Beginning of work
Before you begin the process of making manual screw piles, you need to make a drawing. It can be made in the form of the simplest and most uncomplicated sketch. However, it must indicate:
- Diameter of the required trunk;
- Required length of the pile (including the cone);
- The height of the cone, as well as its angle;
- The distance between the bottom edge of the blade as well as the top of the cone.
If you need to make and install a screw pile with your own hands, you must also pay attention to the stiffeners and the head.
The most difficult part may be determining the required length of the pile. To do this, you need to accurately and competently find out at what depth of the construction site the dense soil is located.
The most seemingly correct, and at the same time, expensive way to clarify this important parameter is to order the necessary geological studies. Based on their results, the calculation of screw piles for the foundation is carried out.
But, since we have decided that no major buildings are erected on self-made stilts, such costs will not be entirely feasible.
In the case of a do-it-yourself approach, most homeowners seek the necessary information from experienced practitioners who have a proper understanding of the composition of the soil in the field of construction.
In general, the length of the pile should be 300-500 mm greater than the depth of the load-bearing layer. This is exactly the amount it should protrude above ground level.
Advantages and disadvantages of the foundation
Plastic is a universal, inexpensive, chemically inactive building material. A columnar foundation made of PVC pipes can be easily erected independently if you have minimal knowledge and skills on this issue. The advantages and disadvantages of this design are given in the table below.
| № | Advantages of using plastic pipes | Disadvantages of the created design |
| 1 | the material is easy to cut into fragments of the required length, the pipes protect the concrete from soil water | a columnar type base eliminates the possibility of constructing a basement, cellar, or utility room under the building |
| 2 | the work does not require the use of lifting equipment | pipes can burst when the temperature drops below -15 degrees, for this reason their parts located above the surface of the earth are insulated and lined |
| 3 | the use of pipes allows you to build a foundation in the shortest possible time and quickly begin building a house or other building | the permissible load on one pillar is approximately 4 tons, so relatively light structures are built on this basis |
| 4 | reduced costs for constructing a foundation due to the lower cost of working materials and savings on builders’ services and excavation work: compared to the monolithic type, they are almost 3 times less | the layout plan for the foundation supports must be drawn up with maximum accuracy, because when any of them settles, the entire structure is deformed, up to the complete destruction of the erected structure |
| 5 | a building erected on supports elevated above the ground is protected from flooding that can occur during rains and floods; also in this case, it is easier and faster to install and maintain communications in the future | Compared to a strip or slab base, a columnar base is relatively short-lived: its service life ranges from 50 to 80 years, and for a monolith – 100-150 years |
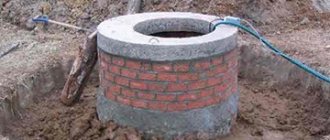
Grouted sewer pipe support
Blade manufacturing process
To make a blade you will need:
- Sheet steel with a thickness of 5 mm;
- Plasma cutter and vice;
- Templates that are necessary for competent marking of the outer and inner diameter of the workpiece;
- A lever that will be used to stretch the screw spiral (in this case, a simple crowbar can be used).
Blade for screw pile
Brief description of installation technology
The procedure is as follows:
- Site preparation. Excess plants and objects are removed, the site is planned, if necessary.
- Marking. Using pegs, the centers of the wells are marked. It is necessary to maintain the accuracy and precision of measurements and check the correspondence of the diagonals.
- Drilling of the wells. Wells are drilled to a given (or possible) depth, and if necessary, an expansion is made - the heel.
- Sleeves are lowered into the cavity - sections of plastic pipes, roofing felt rolled into a tube. They will serve as a kind of formwork that prevents water from leaving the concrete into the surrounding soil.
- Reinforcing cages are assembled and lowered into the wells. Their length should be such that there is enough left for subsequent connection with the armored belt of the grillage.
- Concrete is poured into the wells. It is carefully bayoneted, removing air bubbles. After this, the piles are kept until completely hardened (28 days).
- While the concrete dries, the formwork and reinforcement cage for the grillage are assembled. The procedure is almost the same as the method for constructing a strip foundation.
- When the opportunity arises, the grillage is poured. The concrete is bayoneted, removing air, then covered with polyethylene and kept for 28 days. The formwork can be removed 10 days after pouring.
After the tape has completely hardened, you can proceed to further construction.
Stages of performing the required work
Due to the fact that quite a lot of piles are required to build a foundation, it would be impractical to mark each of them using a compass. It is prudent to spend some time making the required templates.
You need to create 2 templates:
- A large circle that will have a diameter equal to the outer diameter of the screw;
- A small circle with a diameter equal to the outer diameter of the pipe.
It is advisable to mark the central axes on the templates. This will make it easier for you to orient them on the steel strip during the marking process.
After completing the templates, you can proceed to the next stage.
Areas of use
Plastic pipes are superior to their metal counterparts in many respects that are important for any application.
Main areas of use:
- Transportation of aggressive chemical liquids. Plastic does not react with many chemicals.
- In monolithic construction, PVC pipes are used for formwork in order to protect the sheet ties from the penetration of concrete during the pouring of the foundation.
- Use in compressed air transportation channels up to 30 atm.
- During the installation of wiring, plastic products are used to protect communications from possible mechanical deformations.
- In reclamation, irrigation and drainage systems.
- Poles for billboards are made from smooth pipe taking into account the customer’s sketches.
- Heating systems and plumbing installation.
- Plastic pipes are often used in the manufacture of furniture.
- Corrugated electrical pipes are used to protect cable and conductor products during installation by any means.
Cut the stripes
With the help of competent design of steel strip cutting, the amount of waste can be significantly reduced.
The width and length of the strip must be a multiple of the outer diameter of the blade blank:
- It is necessary to lay a large template along the width without any allowances. For example, in the case where we have a diameter of 200 mm, the strip width should be 200 mm;
- The strip must correspond in length to the diameter of the template multiplied by the number of blanks (and without any allowances for the gaps between the blanks).
In order for all the blades to be the same size, it is necessary to correctly draw the strip: for this you need to draw the horizontal axis along its length, and the vertical axis, in turn, with a step that will be equal to the diameter of the blade. Moreover, the first vertical must be marked from the short side of the strip at a distance that will be half the diameter of the workpiece.
Using templates, circles are marked. Moreover, these operations can be performed in any order - first large (external), then small (internal) or vice versa.
In the event that you decide not to apply axes to the strip, you need to start marking from the outer contour of the workpiece.
How to lay sewer pipes - a step-by-step guide with examples
Waste water and human waste are first transported to mains located outside the building, and then end up in storage tanks or septic tanks.
To do this, you can use pipe products made from different raw materials. More recently, cast iron pipelines were used to create an external sewer line in one's own home. Today, everything has changed, and the external laying of sewerage pipes is made from polymer pipe products.
The reason was the fragility of cast iron compared to plastic, and in addition, products made from this alloy are heavy and require special equipment for installation.
Helix manufacturing process
Using a plasma cutter, it is necessary to sequentially cut out the required workpieces. First of all, it is necessary to make a cut along the vertical axis - up to the inner circle, and after that - along the internal markings. At the final stage, the outer contour of the blade is cut out.
The rings obtained as a result of these manipulations are secured one by one in a vice using a vertical cut upwards and their ends are separated using a lever - first you need to bend 1 end, after which the workpiece is freed from the vice, and also turned over and secured - after which the second end is bent.
In this case, it is worth adhering to a certain distance between them - 130-140 mm (in the case when the blade diameter is 200 mm). The lower end of the blade (which is twisted into the ground) should bend at a smaller angle than the upper one.
In the process of making screw piles with your own hands, this moment is the most labor-intensive. Indeed, if the angle is incorrectly selected, it will be difficult or impossible to screw into the ground.
Spiral screw pile
Foundation structure
To screw the screw support into the ground, two holes are cut opposite each other in its upper part by welding. A crowbar or a pipe of suitable diameter is inserted into them, forming levers for rotation on both sides of the pile.
When screwing in, it is necessary to constantly monitor the vertical position of the support in the ground. After screwing in all the piles, they are cut at the same level so that the ends protruding above the ground lie in the same horizontal plane. Then a concrete solution is prepared and poured into the pipe cavity.
Template making process
The process again begins with making a template. It has the shape of a triangle, which is cut out of thin sheet metal or from another (soft) material (for example, plastic or cardboard).
The height of the template should be equal to two pipe diameters.
To determine the size of the template base, you need to perform some calculations:
- Carefully calculate the circumference of the trunk section - for this purpose, the outer diameter is multiplied by 3.14;
- The result obtained must be divided by the number of sectors from which the cone will be formed. For example, for a pipe with a diameter of 76 mm, 4 will be sufficient.
Based on the results of these simple calculations, we obtain the length of the base of the required triangle - our template.
Possible errors during construction, ways to correct them
Violation of the technological process is the cause of the consequences:
- if the calculation of the mass of the capital structure was carried out incorrectly, or an insufficient number of supporting elements were installed, the foundation will not withstand the load. The integrity of the walls will be damaged. The solution is to strengthen the existing pile supports;
- if the supports have failed, you need to dig under them. Construct a strip foundation. It is possible to fasten piles to each other with reinforcement. The supports are first raised to the required height.
Making the base of the house with your own hands will significantly reduce investments. There are a lot of building materials and other raw materials to lay a high-quality foundation quickly and efficiently. But achieving the result requires the implementation of the technological process. The slightest error or deviation from the technology can cause deformation and destruction of the structure.
Correct cone design
In the construction of screw piles, the design of the cone is important.
Using the template, you need to mark 4 sectors. After this, you need to cut them out from the body of the pipe using a grinder.
The triangles that remain on the pipe must be carefully knocked down using a sledgehammer, and in the direction of the center of the cross section until they are completely closed. Then you need to carefully weld the joint lines using a continuous seam. The quality of the weld is of great importance. In this case, the number of sectors can be increased.
Areas of use
Plastic pipes are superior to their metal counterparts in many respects that are important for any application.
Main areas of use:
- Transportation of aggressive chemical liquids. Plastic does not react with many chemicals.
- In monolithic construction, PVC pipes are used for formwork in order to protect the sheet ties from the penetration of concrete during the pouring of the foundation.
- Use in compressed air transportation channels up to 30 atm.
- During the installation of wiring, plastic products are used to protect communications from possible mechanical deformations.
- In reclamation, irrigation and drainage systems.
- Poles for billboards are made from smooth pipe taking into account the customer’s sketches.
- Heating systems and plumbing installation.
- Plastic pipes are often used in the manufacture of furniture.
- Corrugated electrical pipes are used to protect cable and conductor products during installation by any means.
Final assembly of the screw pile
When deciding to assemble screw piles yourself, you need to pay utmost attention to the following points:
- When installing the blade on the cone, there should be no gaps between them at all. If they appear, it is imperative to adjust the angle of the spiral;
- The distance between the top of the cone and the bottom corner should be 50 mm;
- Once complete abutment has been achieved, the joint must be welded using a continuous seam. Moreover, an intermittent seam cannot be used in this case. After all, during the tightening process the screw will be subject to heavy loads.
- The last step is to weld the head of the stiffener. They are right-angled triangles (side length – 50 mm). The legs of the ribs must be welded to the lower plane of the head, as well as to the surface of the pipe.
So, we have revealed to you the tricks and all the stages of making screw piles with your own hands. Remember - the more correctly and carefully you approach the implementation of each stage, the more reliable and stable foundation you will receive as a result of your work.
Dependence of the choice of foundation on soil characteristics and groundwater characteristics
Let's consider the possibility of building a foundation from pipes. It should be borne in mind that this is by no means a universal foundation (excluding pile foundation with screw piles). In the case of complex soils and a large weight of the building, such a foundation will not be suitable; it is necessary to build more complex varieties - monolithic slab, monolithic strip, strip of blocks, monolithic pile. Therefore, in order to have absolute confidence in the correct choice of pipe foundation, you need to order a geodetic survey of your site. It will include a conclusion about the soils, their layered arrangement, the depth of groundwater, the depth of soil freezing and the presence of water “lenses” inside the soil.
Geodetic research must certainly precede the design of the future structure and accompany it as it progresses
Soils and their combinations
The classification of soils is presented in reference books; for example, in the textbook “Soils. Foundations. Soil characteristics. Choosing the optimal foundation":
- Rocky soils are, rather, crystalline rock, rock rather than earth, and sedimentary rock (dolomite, compressed sandstone, shale, shell rock, limestone). Any foundation is acceptable except a pile foundation (it is difficult to drill into rock).
- Conglomerates are fragments of varieties of rocky soils; do not erode or change in volume when freezing; Any foundation is acceptable.
- Non-rocky soils:
- bound - clayey and loamy; freeze deeply; capable of “floating” and moving, only heavy types of foundations are suitable;
- unbound - sandy and sandy loam soils; when wet they tend to move and freeze shallowly; Any type of foundation is suitable.
Different soils that may be found on your site
Knowing this list, you can approximately determine the type of your soil yourself: drill a hole with a garden drill and study soil samples from different depths.
As a result of geodetic work, you will receive complete information about the condition of your site
If a soil sample moistened with water can be kneaded like dough, then your soil is loam. If the earth dissolves in water, it contains a large percentage of loamy component. If sediment falls, there will be clay at the bottom and sand above it.
To determine the type of soil, you need to place the sample in a glass of water
If you have good, stable soil on your site - a mass of rock, untouched sandstone, or sedimentary rocks, or sand, or dense loamy soils, then a foundation made of pipes is quite suitable for any light building such as a frame house, veranda, gazebo, barn. A foundation made of screw piles is suitable for any construction on any soil.
Soil freezing depth
The freezing depth in central Russia is about one meter, but deviations are possible. The lowest point of the base of any buried foundation must be below the freezing point of the soil. This most often does not apply to pipes (except for screw piles).
Freezing depth is a factor influencing the foundation depth
Ground water level
This is the most important characteristic of soils, and the required type of foundation also directly depends on it.
The groundwater level at the site has a huge influence on the choice of foundation type
Pipe foundations (excluding screw pile foundations) are applicable only when the groundwater level is low. If this level is high, then other types of foundations need to be considered
However, it is important to take into account the water level indicator along with the freezing depth. If the water in the cold season is located at a depth below two meters relative to the freezing point of the soil (the freezing depth can be designated as Z), and the soil is quite dense (clay, sand), then the freezing depth can be ignored
Grillage calculation
The pile foundation can be made with or without a grillage. Often the structure is installed on piles with a bottom frame. A grillage is a horizontal reinforced concrete beam, which is necessary to distribute the load between all elements of the base. It can be either prefabricated or in the form of a monolithic tape. The grade of concrete used for their manufacture should not be lower than 150.
Before you start creating a grillage, you need to accurately calculate its dimensions. Most often, the width is 40 cm and the height is 30. To make the structure sufficiently rigid, it is reinforced with steel rods, the diameter of which ranges from 10 to 12 mm. They are connected to each other using knitting wire. There should be at least 2.5 cm between the reinforcement elements.
Price
The price of a rod 108/300, 1650 mm long, with a welded tip is 1550 rubles. 3000 mm – 2050 rubles. A similar 3-meter pile, but with a cast tip, will cost 3,200 rubles. Also, to connect the supports, they use a head that costs 300 rubles.
The price of the work depends on the characteristics of the piles, soil and other factors. Approximately:
- installation of a rod 108/300/1650 mm – 1500 rubles;
- 108/300/3000 mm – 1900 rubles;
- 133/350/1650 mm – 1650 rubles;
- 133/350/3000 mm – 2400 rubles.
It is also worth adding to the work:
- strapping (500 – 1000 rubles per linear meter);
- drilling holes (from 300 rubles);
- trial twisting (2000 rubles);
- rental of a generator (if there is no electricity on the site or the existing network is not capable of providing a power of 5 kW).