To grow vegetables year-round, heating is required in a greenhouse.
Heating a greenhouse can be done in several different ways. Let's talk about each of them in more detail.
Boilers for heating greenhouses
When choosing a boiler, you should listen to the recommendations:
- electric _ The most accessible and practical are heating elements. Electrode ones are cheaper, but place high demands on the coolant. Induction is unreasonably expensive;
- gas . A model with a closed combustion chamber (air for the firebox is taken from the street) would be preferable. It can be installed in a greenhouse rather than in a vestibule, which eliminates heat loss. Condensing boilers have the highest efficiency. But they only work with low-temperature systems, so you will have to arrange heating according to the “warm floor” scheme (pipes are laid in a “snake” in the ground);
- solid fuel. It is advisable to purchase units that operate for a long time on one load of fuel.
Solid fuel boilers are:
- pyrolysis. Other advantages: high efficiency and clean exhaust;
- top combustion boilers;
- boilers with forced air supply (able to operate in start-stop mode without user intervention);
- pellet boilers. They work on granules pressed from cake or sawdust. They are fed into the firebox automatically by a screw feeder, so the user only needs to fill the hopper from time to time.
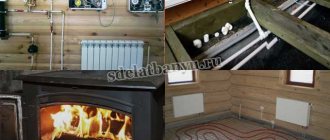
Stove for greenhouse
It is not recommended to purchase boilers designed for operation in smoldering mode (Buleryan, etc.), although they also operate on one charge for a relatively long time. Such heaters have extremely low efficiency. And in addition, a large amount of very toxic condensate forms in their chimney.
If it accidentally gets into the soil, it will make the vegetables poisonous. Such boilers can only be used in greenhouses where ornamental plants are grown, not edible ones.
Step-by-step instructions for assembling a potbelly stove
We take measurements of the greenhouse in order to install a potbelly stove and calculate the length of the chimney. Be sure to leave room for brick cladding. We will place the combustion hole outside the greenhouse, and the stove itself will be located inside. We are building a drawing of the future structure.
We will assemble the firebox from welded iron sheets. This will make the volume of the furnace large enough, which will lead to an increase in heat transfer and will allow you to load fuel less often.
We make markings on the sheet metal and use a grinder to cut out the walls and bottom of the future rectangular potbelly stove.
We weld together the bottom and three side walls of the oven. Then we weld inside limiters from metal corners , on which we will lay the grate.
the grate itself from longitudinal and transverse metal rods connected by welding. Another option is wire bent in a zigzag shape. The grate must reliably hold the fuel and ensure unhindered penetration of combustion products into the ash collection box.
We cut a hole on the stove roof for installing the chimney, and attach the stove roof .
On the front side of the potbelly stove there should be a firebox door and a ash door, through which the stove will be simultaneously cleaned of combustion products. Using the markings, we cut out the doors and the wall of the oven, then weld strong metal hinges and handles to the doors. It is not advisable to use awnings on old furniture; high temperatures will quickly damage them.
We weld a short section of pipe onto the stove roof. We will connect the entire chimney to it. The prefabricated design will facilitate the maintenance and repair of the furnace.
To complete the work, we attach legs made from pieces of metal corners to the bottom or ends of the furnace, connected by jumpers for greater stability of the structure.
We fasten the legs from pieces of metal corner
Foundation
The foundation is necessary to prevent possible distortion of the stove, the collapse of the legs of the structure into the ground and to protect the greenhouse from fire.
The foundation for a potbelly stove is similar to the foundation for other stoves and fireplaces. And in the same way, it should not interact with the base of the greenhouse. If they are very close, then be sure to create a sand layer at least five centimeters wide. All stages of work are carried out by checking the horizontal position with a building level.
Stages of foundation construction:
- Preparing a pit about half a meter deep;
- Filling the pit with rubble (a mixture of small broken bricks, crushed stone, sand);
- Installing formwork from wooden boards and pouring cement mortar (sand is poured between the formwork and the ground);
- Laying roofing felt over dried cement mortar;
Laying roofing felt over dried cement mortar - Laying two rows of baked bricks.
Chimney
The chimney does not have to consist of a solid pipe. Segments of equal diameter, fastened together, are quite suitable.
It is best to use steel, cast iron or ceramic pipes. Asbestos-cement ones are cheap, but very fragile, require frequent cleaning and can cause fire and smoke in the room.
Chimney from a pipe
The connection to the furnace and pipe sections to each other is carried out using welding or couplings. A coupling is a small rectangular sheet of metal that is used to wrap a pipe joint and tighten it with wire or bolts. Under the coupling, the joints are coated with oven clay (or a layer of heat-insulating material is laid).
Connection to the furnace using a coupling
To prevent the structure from deforming, the chimney is installed on supports made of metal corners stuck into the ground.
The chimney must be covered with lime or chalk. White surfaces better reflect the sunlight necessary for plants, and in the event of pipe deformation and smoke, the damage site immediately becomes noticeable.
Potbelly stove for greenhouse (chimney)
Chimney
The chimney passing through the top floor of the greenhouse must be wrapped with heat-insulating material. A spark arrester and a cone are placed on top of the pipe, protecting it from dirt and precipitation. A spark arrestor can be easily made from an ordinary tin can of suitable diameter by drilling many holes in it. A protective cone is made from an ordinary tin lid, secured to the pipe with wire. However, you can purchase a finished part.
Tip for chimney
For the convenience of regulating draft, heating pipes and cleaning, a hole is cut out in the chimney - a view. This hole is closed with a small door, and a damper is installed inside the pipe, which is cut out of a piece of sheet metal and welded to a piece of thick wire. The ends of the wire are brought out transversely from the pipe, and the damper is attached by welding. Thus, when the wire is turned, the damper also changes position, increasing or decreasing the gap in the chimney.
View in the chimney
If the chimney has a rectangular or square cross-section, the view is made in the form of a retractable sheet of iron.
View in a square chimney
Water tank for country stove
The last important detail for a country potbelly stove is a water tank. It can be installed on top of the stove or made removable, installing it near the heating walls of the stove if necessary. In this way, sufficient humidity will be maintained in the greenhouse, and in cool weather there will always be warm water for watering the plants.
To increase heat accumulation, better heat transfer and additional fire safety, all heated parts of the stove must be coated with stove clay or brickwork placed at a short distance from the firebox. Fireproof bricks are used and they are held together with clay. This avoids cracks.
Any fuel is suitable for a country stove. Regular firewood, homemade fuel briquettes, packaging materials, and old rags will do. However, it is worth monitoring the moisture content of the fuel, otherwise plaque and condensation will form on the pipes, which will require cleaning the structure due to reduced heat transfer and increased fuel consumption for heating the greenhouse.
Can I use infrared heating?
IR radiation does not pose any danger. Such rays come from any heated body - the sun, stove, heating radiator. The advantage of IR heating is the absence of an intermediary, which is air in other systems: plants receive heat directly.
Heat loss, accordingly, is reduced (in other systems, heat is carried away by air to the ceiling), so IR heating can be considered the most economical.
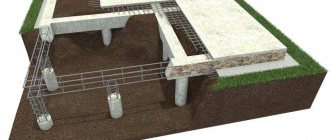
How to make a water heated floor with your own hands
The work of constructing a water floor in a greenhouse is labor-intensive, but almost anyone can do it with their own hands.
The process looks like this:
- You should start by removing the soil - 50 cm.
- Then you need to compact the base, it is better to do this with a roller.
- Lay thermal insulation - 100 mm polystyrene foam.
- Cover the insulation with plastic film.
- Cover the film with sand - a layer of 50 mm.
- Watering the sand will make it denser.
- Install the mounting grid - it is needed to fix the pipeline.
- Lay out the pipes - recommended diameter 2 cm, distance between loops 200 - 300 mm. It is better to take metal ones, they conduct heat well. When using plastic products, you need to place a protective mounting mesh over the pipes.
- Cover the pipeline with another layer of sand.
- Place the removed soil on top of the sand.
After this, the return and water floor supply pipes are connected to the heat source. This is done in the following ways:
- It is necessary to install a mixing and distribution unit with a three-way valve and an additional pump. According to this scheme, part of the coolant from the boiler goes into the batteries. This is an expensive option and is not suitable for everyone.
- Directing water from the radiator return into the heated floor is a cheap and complete heating option.
The most economical option would be to connect heated floors in a greenhouse to a home boiler.
62/18 Greenhouse affairs as of 08/31/2018 / heated floor, cucumbers, onions
And in the summer, you can use water heated by a solar collector, which is located near the greenhouse and connected to the system using a pump.
Types of IR heaters
All IR heaters for greenhouses operate on electricity. However, using the same energy carrier, they can have different designs.
Hull
Such devices are also called lamp IR heaters. The emitter is a spiral placed in a quartz tube (protected from dust), fixed in a reflector.
Case IR heater
Cabinet IR heaters are mounted at the top - on the wall or under the ceiling. The minimum distance to plants is 1-1.5 m (depending on power).
Film
Between the two layers of polyester there are tracks of carbon paste. In fact, such devices are not infrared: they heat up to a temperature no higher than +400C (with poor heat dissipation - up to +700C), so they emit even less intense IR radiation than a regular heating radiator.
For comparison: the coil of an IR lamp heater heats up to a temperature of 600C (until a red glow).
A film heater gives off heat by contact, so it is laid in the ground like a heating cable. Using such a heater in a greenhouse is dangerous!
A thin insulating film is easily damaged (the insulation of a heating cable is much thicker), as a result of which, when watering, water can get on conductive elements with subsequent electrical injury to the user.
Tape
These heaters are designed similarly to film heaters, but have a small width, equal to a garden bed. This allows you to save money by placing heating devices only under the plants.
Belt heaters are also installed vertically between rows. In this position, they heat the air like low-temperature radiators of a large area.
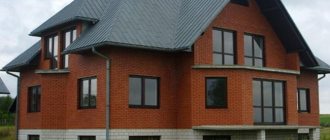
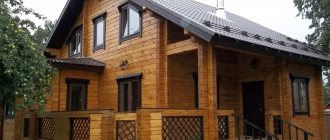
Systems with external heat source
Heating of the greenhouse is possible due to the close location of the house or other heated building. This simplifies the entire procedure, since there is no need to install an autonomous heat source. Using wired or wi-fi relays, you can remotely receive information about the temperature in the greenhouse and regulate its microclimate from home.
An ordinary wi-fi temperature complex consisting of a sensor and a relay costs about 2 thousand rubles. When the temperature goes out of range, it transmits its values to devices running Windows or Android
Creating a separate heating circuit
If the house uses water or steam heating, then it is possible to create a separate circuit leading to the greenhouse. It must be equipped with a separate pump, since the total horizontal length of the new segment will be large.
You also need to install an open expansion tank in the greenhouse to remove air from the system. The area of open water in the tank must be minimized to prevent intense evaporation of hot water into the room.
Radiators are rarely installed in a greenhouse, since the design of its premises plays a secondary role. If there is a lack of heat, it is better to lengthen the pipe contour, as this is cheaper and reduces the risk of leaks and breakdowns.
The outdoor segment of the circuit must be insulated to avoid heat loss and minimize the risk of freezing. The underground option for placing pipes is best suited for these purposes.
Connecting the heating segment of the greenhouse to the general circuit can be done using a three- or four-way valve.
Standard connection diagram for an additional heating circuit. The location of the taps in the house allows you to remotely regulate the air temperature in the greenhouse (+)
It is also possible to create an automatic temperature control system.
This can be done in the following ways:
- Changing the volume of hot water passed through depending on the readings of temperature sensors. In this case, it is necessary to purchase a pump with power control.
- Turning the greenhouse heating circuit on and off. For this purpose, automatic crane control systems are used.
Instead of manually changing the position of a three- or four-way valve, servo-based devices can be used. Its electronic control unit is adjusted to the readings of temperature sensors located in the greenhouse.
If it is necessary to change the heating mode, a control signal is sent to the motor, which turns the rod, setting a different position of the valve.
The servo drive for automatic adjustment is large relative to the crane. Therefore, to install it, it is necessary to remove the heating pipe from the wall
Heating using extract air
Good heating can be obtained by using warm air from the exhaust ventilation of a residential building. By directing an insulated ventilation duct into the greenhouse, you can obtain a constant incoming flow with a temperature of 20-25°C.
The only condition is the absence of excess humidity and impurities in the air, which are typical for kitchens and bathrooms.
Air outflow from the greenhouse can be organized in two ways:
- Local exhaust vent to the street in the form of a tube without a fan. It must be of small cross-section to create a high flow rate. In this case, at negative street temperatures, the condensation formation zone will be located at some distance from the tube, which will prevent the formation of ice.
- Return the flow back using an additional air duct and obligatory connection to the general house hood. Otherwise, odors from the greenhouse will spread throughout all areas of the house.
This method is the most economical in terms of one-time costs for installing the system and recurring costs for fuel use. The only question remains whether the hood volume is sufficient to maintain the required temperature. It is better to check this experimentally.
If sometimes, during extreme cold snaps, the air temperature in the greenhouse drops below the permissible level, then you can build a small air heater into the air duct, or install an additional electrical device at the facility itself.
Greenhouse heating calculation
The power of the heating system corresponds to heat loss during the coldest period of winter. The amount of heat loss depends on the temperature difference inside and outside the greenhouse, as well as on the thermal conductivity of the enclosing structures - walls and roof.
Formula W = 1.25 * Kt * S * (tin – tout), where:
- W —heat loss power, W;
- 1,25 — coefficient taking into account heat loss from ventilation and blowing;
- Kt - heat transfer coefficient of the enclosing structure, W/sq. m*0С (not to be confused with the thermal conductivity coefficient of the material);
- S —area of the enclosing structure, sq. m;
- Tin - temperature inside the greenhouse, taken equal to +180C;
- Tnar - the lowest temperature of the coldest month, 0C.
Kt values for various designs:
- glass with metal sprockets: 6.4;
- double glazing on metal frames: 3.3;
- polyethylene film: 10;
- polyethylene film with condensation (in greenhouses with high relative humidity): 7.5;
- double film coating with an air gap: 5.8;
- the same with condensate: 4.6;
- concrete plinth 40 cm thick: 2.
There are computer programs and online calculators that perform calculations based on user-entered parameters.
Solar batteries
The principle of operation of a solar battery
Collecting and accumulating the heat given off by the sun's rays will help to get an early harvest in the spring. Heating a greenhouse using solar batteries can also be used as an additional option. For the winter period, the heat received only from them will not be enough.
To accumulate solar energy, the greenhouse must be installed in the most open place and located from east to west. It has been proven that arched polycarbonate structures are capable of “collecting” the maximum number of rays. Plus, the air in the cells of this material will serve as a natural heat insulator.
Solar batteries are divided into:
- water : the heat storage in this case is water containers (barrels or pools); Moreover, several small containers have a higher efficiency than one large one, because water always warms up better closer to the surface; they are distributed evenly throughout the room
- stone : this material is capable of retaining heat for a long time, so it makes sense to line the walls of the greenhouse with stone or cover it with a sufficiently large layer around the perimeter of the structure
- air : are among the most efficient battery devices (see photo); for efficient heating, heat exchangers are positioned perpendicular to the direction of the sun's rays; heated air enters the greenhouse through pipes; cold air is taken in through the second duct
When installing an air heating system in a polycarbonate greenhouse, it is advisable to use fans to ensure rapid air exchange. The inlet pipe of the air duct is located as close to the ground as possible. The pipe through which heated air enters the greenhouse is placed in the upper part of the room.
Biological method
The simplest and probably the oldest and most favorite method of heating a greenhouse by gardeners is biological, i.e. heating using the heat released by biological materials during decay. This method attracts land owners not only for its simplicity, but also for its low cost.
In addition, when using this method, another goal is achieved - the soil is fertilized with mineral nutrition. The biologically active substances most often are a variety of combinations of plant waste and manure, which have the ability to generate heat in reaction with air.
Reference: Based on the practice of use, pig manure is able to maintain a temperature of +14-16 ˚C for 70 days; horse manure maintains a temperature of +33-38 ˚С for 70-90 days; Cow manure produces heat for up to 100 days, capable of maintaining a temperature of +12-20 ˚C in a greenhouse. Plant substances also give good results. Thus, sawdust can warm the soil to +20 ˚C for 14 days, rotted tree bark keeps the heat in the range of +20-25 ˚C for up to 120 days.
Heating a greenhouse using technical means is more energy-intensive, but also more practical, since it eliminates the need to constantly change biological mixtures in the structure, and also provides much more stable indicators, so necessary for growing a rich harvest.
Technical heating methods can be divided into a number of subtypes depending on the energy sources used.
Installation of an electric cable floor in a greenhouse
It’s easy to build a cable floor in a greenhouse yourself. The scheme is similar to the installation of water heating, the only difference is in the connection.
The process is as follows:
- A cable, thermostat and insulating material are purchased.
- A 30-40 cm layer of soil is removed with a spatula. It is better to do this in warm weather, then the layer of earth can be easily thrown aside.
- The base is compacted and covered with sand - 5 cm. A polyethylene film is laid on it for waterproofing.
- Hooks are made from wire; they will be used to secure the cable. Installation is possible without them, but there is a risk that the wire will shift during installation. The hooks can be replaced with a mounting grid to which the cable will be attached.
- Strips of heat-insulating material, 6-7 cm wide, are cut out. They are laid on top of the film, in the places where the cable is located.
- The heating element is placed on the insulation like a snake and secured with hooks.
- The wire is connected to the thermostat, which is located at the planned location.
- A temperature sensor is installed. It is passed under the cable and secured with a bracket. All wires leading to the regulator and sensor are placed in a corrugated pipe, this will protect them from damage.
- The cable is covered with film and covered with sand - a layer of 5 cm.
- Fertile soil is poured on top.
The warm floor for heating the greenhouse is ready, you can proceed to the test.
Landing
Preliminary preparation of the plant is necessary: the shoots of the seedling are shortened to 3-5 buds, cutting off weakened growths, the roots are trimmed and left in water with the addition of a biostimulant (for example, “Zircon”) for 24 hours. The soil at the planting site is prepared in advance by digging it up with humus and the necessary fertilizer complex.
When planting a young crop, ensure its correct location: the root collar is buried 10 cm into the soil. Upon completion of planting, the soil is well compacted, and the tree trunk circle is watered abundantly.