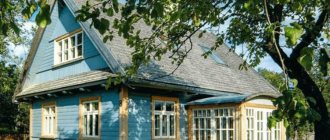
Immediately after building a house, and sometimes even before, the problem of parking arises. It is not always possible to build a permanent garage, but installing a roof on poles - a canopy - is easier and cheaper. The carport can be a free-standing structure. Then it is placed in the yard, usually not far from the entrance gate or garage. The second option is attached to the house, when one or more sides of the roof rest on the wall of the building. From a functional point of view, both options are equivalent; everyone just chooses based on personal requirements and preferences.
One of the carport options
Dimensions
Since the dimensions of cars can vary significantly, in each case the optimal dimensions are determined depending on the car available.
The height is usually around 2.5 meters. This is more than enough even for an SUV with a loaded trunk. And to determine the length and width of the canopy, at least a meter is added to the external dimensions of the machine. Agree, it is quite enough if there is a distance of half a meter to the pillars.
Example of a carport for one car
But to protect against precipitation, it is better to make the roof overhangs longer: they will also protect from slanting rain and snow.
When determining the size of a canopy for two cars, take the distance between the rear-view mirrors to be 50 cm. The same amount is calculated for the pillars. And the length of the canopy is determined by the longest car.
When calculating the width of the canopy for two cars, take the distance between the rear-view mirrors equal to 50 cm. The distance to the pillars is also considered half a meter
Project preparation
The construction of a canopy begins with the preparation of the project. It includes a drawing with basic dimensions and a description of the parameters of the future design. The project takes into account optimal operating conditions, coating composition, characteristics of the base and coating.
- Choosing the best winter option.
All the benefits of a carport are fully realized in winter.
When developing a project, the climatic features of the area must be taken into account.
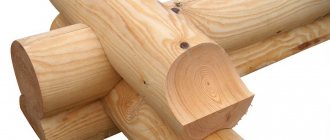
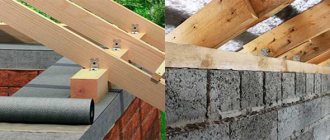
Frame materials
Mostly, wood is used for supports - timber or logs, metal pipes of round or rectangular cross-section. Sometimes the supporting columns are made of brick or stone. They are more massive, attract more attention, and therefore must fit into the style of the building that is located nearby.
There are also options when the bottom of the support column is made of brick, and the top is made of wood or metal. And in this case, everything is determined by the style of the house and the site. You should not make brick supports if there are restrictions on the size of the site: they are quite massive and take up a decent amount of space.
All materials (except brick) are processed before use. Wood is necessarily coated with fire retardants (reducing the flammability of the material). Then it is impregnated with compounds that will protect it from damage by wood-boring insects, as well as from all weather conditions.
Interesting polycarbonate carport project
Its implementation
Particular attention should be paid to the processing of wood that will be buried in the ground. It can be impregnated with special compounds for wood in contact with the ground (for example, Senezh Ultra and its analogues). The impregnation performed well during testing. The ends of the pillars that will be buried are immersed in a container with mining for a couple of days. After drying, they can be used without additional measures. 10 years is enough.
The second option is to pour a concrete pillar into the ground, and install a mounting plate, shoe or pin into it, to which a wooden beam is then attached.
Metal poles are cleaned of rust and coated with primer. After welding, the seams are additionally processed and everything is coated with paint in two layers. The second is applied after the first layer of paint has dried to a touch-touch state.
Why choose wood?
The easiest way to make a simple canopy with your own hands is from wood. The advantages of this solution lie in the relative cheapness of the material; an iron pipe is many times more expensive than timber. Well-dried wood is lightweight; installation can be carried out by one person, without assistants.
The wood fits well into the country landscape, does not look heavy, and if necessary, it can be painted in different colors, adding originality to the garden design.
Most often, beam supports are chosen 150*150 mm, but 100*150 mm is also possible, or, if the machine is small, 100*100 mm. As an option - logs with a diameter of at least 15 cm. Thinner ones (podtovarnik) will quickly become unusable or if there is too much snowfall in winter they will break under the weight. It is not always possible for a summer resident to go to the garden and clean the roofs in winter.
Provided that the wood is treated in a timely manner with special protective compounds, the design will be practical and durable.
The disadvantages include the flammability of wood and its susceptibility to rot. Although, if the owner takes good care of the building, paints it in a timely manner, and applies protection (antiseptic, fire retardant, paint or varnish, fire-retardant impregnation), these shortcomings can be leveled out.
Types of roofing (with drawings and dimensions)
The most economical and simplest is a pitched roof. It is usually used if the carport is attached to the house: this is the easiest way to organize a normal connection to the wall.
Drawing of a shed with a pitched roof attached to the house
They also make a pitched roof for free-standing sheds. In regions with little snow in winters, you can make a roof without a slope; in those where there is a lot of snow, a slope of at least 8-10° is required. In this case, the lower side is made from the south or east: so that there is more shadow. Also in this case, on the south side you can sew up the canopy on the side (or plant tall plants there).
Drawing of a carport with a pitched roof for one car
If a canopy is made from polycarbonate, then the roof is vaulted. It is also optimal from the point of view of precipitation and is easily implemented due to the flexibility of this material.
Drawing of a canopy with a vaulted roof
A more complex gable roof. If made of metal, it has a relatively simple structure.
Drawing of a gable roof for a metal carport
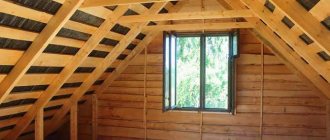
In the case of a wooden canopy under a gable roof, the system is multi-component.
An example of a wooden gable roof
>
The final stage
To make it comfortable at night in the summer, the canopy can be equipped with a lamp with a protective, waterproof housing. To connect a vacuum cleaner (to clean the interior), a socket with a cover is mounted on the pole.
The side boards can be surrounded around the perimeter with mesh or polycarbonate. Or make them with smaller gaps so that precipitation does not get inside the frame.
The final touch is the treatment of wooden structures with a protective compound. You can choose any color, from colorless to dark, walnut.
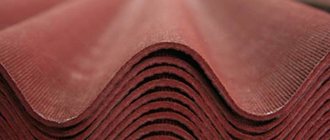
Roofing material
If the carport is attached to the house, it makes sense to make its roof from the same material. For soft types of roofing (flexible tiles, ondulin, etc.) a continuous sheathing is required, for hard ones - sparse, and the pitch is chosen depending on the wind and snow loads in the region, also focusing on the recommendations of roofing material manufacturers.
When attaching a canopy to a house, it makes sense to make the roof look like
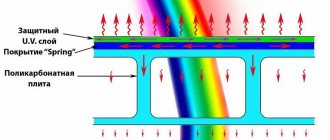
If complete shading is not required, polycarbonate can be used. By the way, it is the most popular material recently. You just need to choose it correctly: take a multi-chamber one that has at least three layers of plastic and two rows of cells. It’s not hot under such a polycarbonate canopy even on a sunny day.
Also, the degree of heating depends on the color. See the technical specifications and choose the one that absorbs sunlight more. Transparent ones are needed for greenhouses to warm the plants. For canopies, on the contrary, you need polycarbonate with low light transmittance.
Optimal height
The minimum height of a canopy column is 2 m. This indicator is influenced by the type of roof, design, installation site, height of the car itself, etc. It is also worth noting that the smaller the roof area and the higher the height of the pillars, the worse your car will be protected from precipitation. However, a very low design will cause discomfort during operation. Therefore, when planning a future canopy, all these factors should be taken into account.
Source of the article: https://atlant-naves.ru/poleznye-stati/219-optimalnyj-razmer-navesa-dlya-avtomobilya
How to lay out the site
The easiest and most inexpensive way to make a platform under a carport is to fill it with gravel. To do this, you will need to remove the turf, dig the curb, pour crushed stone and compact it well using tamping platforms. Then the platform will be rigid and ruts will not form.
Compacted crushed stone is a good surface for car parking
Recently, areas paved with paving slabs or paving stones have become more popular. They have a more attractive appearance, but their construction is more expensive. Preparation begins the same way: first the soil is removed. But the pit is made about 20-25 cm deep. Crushed stone is poured onto the bottom, which is also compacted well. Then it is advisable to spread a layer of geotextile on the crushed stone. This is a non-woven material that will prevent the sand that will be poured on top from spilling out and mixing with gravel. Geotextiles also redistribute the load more evenly, preventing the base from sagging under the wheels of a car (it is used in road construction). A layer of sand is already poured onto it, which is also compacted. Paving slabs, clinker bricks, cobblestones and other similar materials are laid in the sand.
Paving slabs
In the middle in terms of costs is a concrete site. The base is also prepared from compacted crushed stone. Wooden planks are laid on it at a distance of 1 m, which are set level or with a slight slope to drain water. These strips serve as beacons during pouring, and then play the role of damping joints, compensating for the thermal expansion of concrete. With this structure, cracks appear less frequently.
A metal mesh made of galvanized wire is laid between the slats. You can, of course, use stainless steel, but it is expensive. The thickness of the wire is 3-4 mm, the cell is 10*10 cm. The top is filled with concrete not lower than M 250. The thickness of the concrete layer is 7-10 cm.
Concrete platform under a carport
List of useful features
The first and most important advantage of a canopy is the protection of the car from the harmful effects of the environment. The second plus is purely for everyday use - the owner, undoubtedly, finds it much more pleasant to sit down (go out) in the rain under cover than to run quickly and climb into the cabin with wet feet and clothes.
Despite the fact that experts say that “a car rots faster in a garage,” the influence of atmospheric phenomena on the body is no less a worse option.
The canopy protects the car from:
- Rain, snow . Metal parts corrode faster, and if the seal is poor, water gets into the interior.
- Grada . Large hailstones can pierce the body and break windows.
- Dirt . Dust, bird droppings.
- Sun rays . The sun, especially in hot summers, causes the upholstery on the seats inside the cabin to fade and damages the tires.
It is also important that getting in or out of the car in rain or snow under a canopy is much more pleasant than under the open sky. In winter, the driver relieves himself of the responsibility of cleaning the car from snow and clearing snowdrifts around it after a snowfall.
DIY canopy attached to the house (photo report)
It was decided to attach a canopy to the house, under which to hide favorite equipment - a car and a boat. First, using a motor drill, we dug holes 1.5 m deep - below the freezing depth.
It's easier to dig with a motor drill))
We inserted waterproofing sleeves, a frame made of 10 mm rods with welded mortgages, and filled them with concrete.
Base for pillars
The installation step of the pillars is 2 meters.
This is what a poured row of supports for a carport looks like
When the concrete set, the pillars and top trim were installed. They are sanded and treated with protective impregnation. To prevent the frame from moving, we secured it with what we had - aluminum corners. The joint between the posts and the frame was reinforced with metal plates.
The pillars are screwed to the “heels”
A support board was nailed to the wall of the house. Roof beams (50-200 cm board) were attached to it. The slope turned out to be small, about 9°, but it was enough. Small cuts were made in the beams to fit the size of the timber - for support, the edges were cut off to create an even overhang.
Gaps on beams
The beams were fastened to the frame with nails diagonally, 2 pieces on each side.
A board was nailed to the wall, beams were attached to it
The beams on the wall are fixed to U-shaped metal plates.
Plates that attach beams to the wall
The rafter system was assembled - the beams were installed with a small pitch - 40 cm, they were made from 50 * 200 mm boards.
Rafter system of a lean-to canopy from below
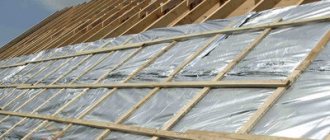
OSB was attached to the rafters on top. Roofing material - soft tiles. It needs a continuous sheathing underneath.
OSB laid on the roof
A board was nailed to the side between the posts: for greater rigidity and so that the rain would wet the site less.
The sidewall was sewn up with a board - so that the rain would get in less
Soft tiles were laid. It worked - at least dance.
You can dance on the canopy
Now there's competition in the parking lot.
Ready carport
Tips for carport care
Polycarbonate does not require special care, but if certain rules are followed, its service life will increase significantly:
- Wipe carports with a soft sponge and a small amount of detergent.
- If cracks appear on the roof of the car shelter, seal them with sealant.
- Remember to rinse off the detergent thoroughly with plenty of water.
- The polycarbonate surface covered with a protective film must not be treated with agents such as solvents.
If you follow these rules, your canopy will last a long time and be durable.
How to make a canopy for polycarbonate (photo report)
Used materials:
- professional pipe for racks 80*80 14.6 m;
- for arches 50*25 - 4 pcs. 6 m each + 50*25 - 10 pcs. 6 m each for spacers;
The canopy was built over the already finished path. The posts were buried in the gap between the curb and the fence. It turned out that the supports of the canopy were placed near the fence posts. It was decided to use them when setting the level: they attached them with anchors so as not to suffer when pouring.
This is how the pillars were attached
We straighten the pillars
The metal pillars of the racks were buried 1.2 m into the ground, covered with crushed stone, and filled with concrete. When the concrete set, the top trim was welded.
We weld the top trim
Afterwards the production of trusses began. First, profiles with the required radius were bent on a pipe bender (rise at the highest point 1.2 m). Afterwards, the assembly of the “constructor” began.
Truss assembly
Clamps were useful; they were used to hold parts together so that they would not move during work. They fixed it to the first truss so that everything was done accurately. There were a lot of clamps)))
Cut, fold, cook
Once all the trusses were complete, they were cleaned, sanded down to white metal, then primed and painted twice. Then the acrobatics began. It is necessary to install heavy trusses on poles, align them vertically, without knocking down the diagonals.
Performing an acrobatic sketch
As soon as we managed to set it correctly, we quickly tacked it by welding, leaving the thorough welding of the seams “for later,” after the final inspection: everything should be on the same level.
We grab the farms right away
A miracle happened, everything turned out to be almost on the same level. We do not take into account a small difference of a few millimeters.
All farms are displayed on the same level
Now we weld the sheathing from a 50*25 mm profile pipe under polycarbonate. We place them along the long side of the canopy. The installation step was chosen to be 0.8 m.
We weld pipes for fastening polycarbonate
All that remains is to attach the polycarbonate. It is attached to self-tapping screws through special thermal washers (sold in the same place where polycarbonate is sold). The two sheets are connected using special profiles. They are detachable and non-detachable. One-piece ones are cheaper, but then you won’t be able to make anything else out of this polycarbonate. So we used detachable ones.
The first sheet is fixed
It is also necessary to cover the edges of all sheets, otherwise dust and midges will get inside, then moisture will appear due to evaporation, and then mold. And the coating will look deplorable. Therefore, we install special plugs on the edges.