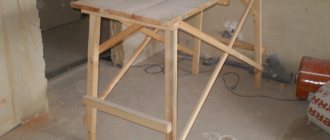
From this master class you will learn how you can independently make the now popular folding pair of trestles for a portable workshop.
The design is quite simple, made from inexpensive materials. All necessary drawings are presented for manufacturing, as well as a cutting blank in the Sketchup program.
At the end of the work the author also talks about that. how to make simple mounts for hanging sawhorses on the wall from
- Materials and tools
- Drawings for manufacturing
- Making goats
- Tests
- Making fasteners for hanging
- Storage
Drawings for manufacturing
Schematic drawing
Dimensions of trestles
- height 811 mm;
- width of the upper base 844 mm;
- minimum width (legs) 711 mm.
Goat drawings in Sketchup
In case you want to change the design and dimensions at your discretion, you can download the file for editing in SketchUp
Download file: scetchup.zip [39.73 Kb] (downloads: 969).zip
Do-it-yourself sketch and calculations of scaffolding
The most important stage. After all, in fact, you will have to trust the manufactured scaffolding with your health, and even your life. This requires utmost care and seriousness.
For large structures, higher than 2-2.5 meters, which will be loaded not only with the weight of the worker, but also with heavy materials, it is better to find drawings of a standard design, with dimensions and fastenings, corresponding to SNiP. Of course, such systems are not often required, however, even an ordinary “goat” for plastering work requires respect.
First, we determine the dimensions of the scaffolding: height, width and length. They depend on your height and type of work. As a rule, a length of one to one and a half meters and a width of up to half a meter are sufficient. Such dimensions will allow you to stand quite comfortably and place the necessary materials and tools.
In order for the supporting frame to have sufficient rigidity, its main element must be a triangle - a figure with maximum rigidity. How this is implemented in the diagrams of various scaffoldings can be seen in Figure 1.
To make scaffolding, scaffolding, “goats”, etc. with your own hands, wood is usually used. We'll talk about this in more detail later.
Making goats
- Cutting parts
- Sidewall assembly
- Side connection
- Making an opening limiter
Cutting parts
We mark out parts for cutting plywood.
Scheme for marking plywood for cutting.
Explanations for color detailing
- Green: tops 844*90 mm - (2 pcs needed);
- Yellow: bottom support cross member 711 x 90 mm (originally intended 711 x 180 mm);
- Orange: top crossbars 844 x 90 mm (originally intended 844 x 180 mm);
- Blue: legs. 844 *90 mm - 8 pieces;
- Pink: parts for making wall mounts;
- White: waste.
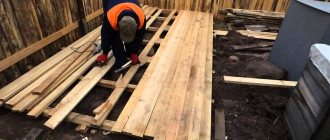
We cut the workpieces on a sawing machine, a circular saw or other devices.
Sidewall assembly
To begin with, a piece of plywood 80 x 200 mm was cut out; it acts as a marking template when making joints of parts.
At this stage the task is to connect the support legs to the upper and lower crossbars.
When installing the top crossbar, it is recommended to attach hinges so that in the future the self-tapping screws for fastening the hinges do not fall on the screws for fastening the plywood blanks.
We drill the fastening points with self-tapping screws with a drill of a smaller diameter, and countersink the holes to hide the caps in the future.
self-tapping screws
To connect the parts, PVA wood glue was also used; a small amount of glue was applied to the joint, the workpiece was applied and tightened with self-tapping screws.
Side connection
After the sidewalls have been made, you can fasten them together using furniture hinges. thereby producing a folding and unfolding mechanism.
Then we screw the upper support platform to the end of one of the sidewalls.
Both are not necessary, otherwise the opening and closing mechanism will not work.
Making an opening limiter
For safety when working on sawhorses, when they are opened more than 20 degrees, an opening limiter was invented.
It is made of polypropylene rope, because... This material is inelastic, durable and inexpensive.
To make a limiter, we drill holes in each leg in the area of the lower support, and thread a polypropylene rope through one leg and then into the second leg. We tighten the knot on the rope and melt it using a regular lighter.
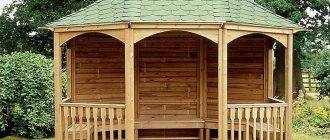
We are drawing up a project for a gazebo made of timber
Any construction should begin with drawing up diagrams, plans, drawings. This will allow you to calculate the required amount of materials and prevent possible errors.
For clarity, it is convenient to create a three-dimensional model of the gazebo frame in any of the specialized programs, for example, KOMPAS-3D. For a square-shaped lean-to building, it will look something like the one below.
Three-dimensional model of a gazebo frame made of timber with a section of 100x100 mm
The following identical elements are separated into groups in the assembly:
- red – longitudinal bars of the lower trim;
- green - 3 transverse beams at the base of the gazebo and 2 for the top trim (the grooves of both are made identically);
- blue – 6 short vertical supports;
- yellow – 4 front pillars;
- purple – 2 upper horizontal bars on the sides.
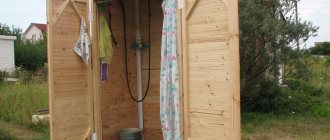
Making fastenings for trestles on the wall
Also, for convenient storage of paired sawhorses, simple wall mounts were invented. for this purpose they were cut out of plywood
- 2 blanks 206 x 50 mm;
- 2 blanks 188 x 50;
- 2 triangles with legs of 188 mm each.
The overall dimensions of the workpieces are also given above on the parts cutting plan.
To tighten the blanks, black wood screws 50 mm long were used.
After manufacturing, the mounts can be hung on the wall.
Necessary tool
For work I found the following useful:
Jigsaw
Screwdriver
Tape measure, pencil
Bolts M10x100. Key for 17
For furniture bolts M10x100 I used an M10 nut with a nylon sealing insert and three washers.
You will also need some tie-down tape to keep the sawhorses from moving apart. I used welded chain.
How to make construction trestles with your own hands: Review of options + Video and Photo
Construction trestles - how to make them yourself? Many works related to repairs and construction must take place on an elevated surface. The first thing you come across is a stepladder, but it greatly limits your options. For this purpose, they came up with trestles and scaffolds, because even two people can stand on them, as well as all the necessary tools that are needed in the public domain. Since goat-building production is not yet so widely developed, you can learn how to assemble construction trestles with your own hands.
Construction trestles are a practical solution that allows you to be on a hill and move freely.
Full scaffolding
The structure of traditional wooden scaffolding has not changed over the years. It is well known to everyone from Soviet films and posters in which charming girls, standing on scaffolding, smiled life-affirmingly at enthusiastically working young men.
To make such scaffolding with your own hands, you will need a lot of lumber; the advantage of the design is that it can withstand heavy loads and allows you to carry out work of any degree of complexity.
Before you start assembling scaffolding, you should stock up in advance on boards 50 mm thick and bars for crossbars up to 1 m long. At the first stage, racks are made from long bars or boards connected by crossbars. The scaffolding will be especially stable if the racks are placed at an angle rather than strictly vertically.
Depending on the future load on the flooring and the thickness of the boards on it, the racks are placed at a distance of 1.5 to 2.5 m from each other and reinforced with jibs. There is no such thing as too many crossbars and jibs; the more of them, the more stable the scaffolding will be.
Note! If the height of the structure exceeds 3 m, then additional jibs resting on the ground support the vertical beams of the racks.
Lastly, a flooring of boards is laid on the bars located along the perimeter of the racks on top, which are carefully inspected the day before. The surface is laid in such a way that no cracks or gaps are formed at the joints, so that the result is a canvas similar to the floor in wooden huts. On such a floor, workers can confidently concentrate on their immediate responsibilities without fear of failure. At high altitudes, it is safer to work if there are railings; they must be made of durable material without cracks or other defects.
Full-fledged construction trestles from lumber can be made with your own hands in a short time if you have the skills and a minimum set of tools, preferably with an electrical power system.
Briefly about the main thing
The main advantage of homemade trestles is their low cost and the ability to assemble a structure of exactly the height that the builder needs. If desired, the trestles can be modified at any time - for example, reducing the height, slightly filing the legs, or even adding a second tier. To reduce the cost, instead of wood, in some cases you can use plastic or remnants from profile pipes. To work, you will need a beam of the required size, a screwdriver and self-tapping screws, a jigsaw or saw. The work takes 2-3 hours.
Construction for an ordinary saw
An ordinary hand saw is most often used for preparing medium-sized firewood, so the goat will fit standard dimensions and is not difficult to build with your own hands, having in stock:
- wooden beam with a cross-section of 10x10 cm and a length of 1 to 1.2 m.
- beam with a cross-section of 5x5 cm and a length of 1.0 m for installing the legs of the device in the amount of 4 pieces.
- the same timber, but 36 cm long for making “horns” in the amount of 2 pieces.
- 1 inch beams in the amount of 2 or 4 pieces for strengthening the legs.
- self-tapping screws in the amount of 30-40 pcs. for fastening parts.
- stain, paint or varnish to protect the sawhorses from rotting timbers.
You can also use any available material suitable for constructing goats.
For assembly you need to prepare the following tool:
- hacksaw - for cutting and leveling the surface of the timber,
- corner - to control the evenness of elements important for the stability of the structure,
- graphite pencil for making the necessary marks,
- screwdriver or screwdriver for tightening the fastener,
- hammer,
- chisel,
- roulette,
- paint brush (4-5 cm).