Where to start planning a house?
We immediately decided on the size of the house, 5 by 6 meters, which should fit on a standard plot of 6 acres.
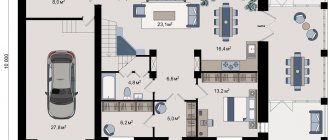
Initial project. First floor. (Click to enlarge image)
The children have already grown up and live separately. Therefore, my wife and I could live in the country from early spring until late autumn. But I wanted it in comfortable conditions, with a separate bedroom and definitely on the first floor, because we are no longer young, and in 10-15 years, we won’t even want to run up steep stairs back and forth to the second floor. And with a warm bathroom and toilet, we somehow got unaccustomed to the amenities on the street.
Initial project. Attic. (Click to enlarge image)
We also need a kitchen and a living room, because the summer season was very long. And of course, our grandchildren will be visiting us all summer, and there are already three of them. And on weekends, children with their husbands and wives will come. And this is already 9 people all together. And then there are brothers, matchmakers and family holidays to which you want to invite all your relatives. And where should they all be placed?
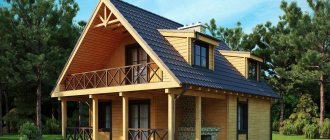
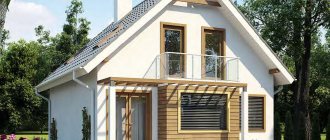
Therefore, an attic is really needed. It doesn't make sense for so much space under the roof to be empty. And since there is a second floor, there must be a balcony. As the wife commented: “And then he got carried away...”
Indeed, it turned out that downstairs we needed 4 rooms and an entrance hall-corridor. There are at least a couple of bedrooms upstairs. And also a closet for seaming and storing the harvest. And allocate a place for a fireplace, a real one, with an open firebox and a clock. And all this needs to be placed on 30 squares of the first floor. An attic with 22 square meters for 2 bedrooms is also not a mansion. And what is a dacha without a terrace? And another dream is billiards, albeit the smallest one, 7 feet, but real.
Layout sketch. (Click to enlarge image)
We decided to add a meter in length and width. All the same, it turned out to be cage-like rooms. There was nowhere else to add. And the plot might not allow it, and the result would not be a country house, but a full-fledged cottage, which would take up a third of the plot and would cost accordingly, but then it would be necessary to build not a country house, but a house. And live in it all year round, and sell the apartment. But a house, not a dacha. Not the same atmosphere, not the same unity with nature. Therefore, 6 by 7 meters was the maximum size. Moreover, another 3 meters behind the house will be occupied by a terrace. And along with the sidewalk, 1 hectare will be occupied. There is also a bathhouse and a garage, and from 5 - 6 acres there are only 3 - 4 left. Therefore, the struggle was for every meter.
I didn’t want to give up anything either. I had to look through a bunch of projects, use all my imagination and make a compromise. I remember studio apartments where there are no partitions and the space is divided into zones. This idea was taken as a basis.
Construction options
Depending on the purpose of the house and the financial capabilities of the client, the house can be built from profile timber of various thicknesses 140x140 or 190x140 mm “shrinkable” (shrinkage) or “turnkey”. An alternative option is an insulated frame structure with varying thicknesses of the heat-insulating layer from 100 to 200 mm. When constructing a structure from timber, the client can choose a material with natural moisture or dried in a special chamber with a small surcharge.
Changes to the internal layout of the house involve the arrangement of the bathroom and the installation of additional partitions.
Planning the first floor
But first we decided what should be in a separate room and not in a common room. Naturally, a toilet and a bath. But they can be combined, and instead of a bathtub, a shower can be installed. Moreover, there will definitely be a bathhouse, even if not right away, but it will be there.
First floor layout project. (Click to enlarge image)
The bedroom for my wife and I should also be separate. We’re already used to a spacious double bed, but you can’t put one like that in the living room. Again, I didn’t want a small room; the bed needed to be in the middle, and I didn’t have to climb over each other. There would also be room for a wardrobe and a chest of drawers for a TV. Linen and clothes also need to be stored somewhere.
Another closet with seams. The best thing is of course the cellar. Why not? There, the temperature regime in winter and summer is approximately the same. And many shelves can be placed. And even a couple of 30-liter barrels for sauerkraut, pickled apples and grapes from your own plot. It was decided to go to the cellar.
But all other rooms can be combined into one. Not very convenient, you say? But there will be a large room. There will be a place for guests to sit at the table, for the grandchildren to play, for the hostess to turn around. And most importantly, we will all have more time together. It’s not like in the city, everyone is in their own room, and we meet only at the table. In general, it turned out something like: living room-dining room-kitchen-hallway with a fireplace and stairs to the second floor. And in the middle of all this, a huge stained glass window with access to the terrace.
I am sure that such a pun caused a smile or even a grin. But when you see the photos, or even better live... I admit, at the beginning none of my loved ones supported me either. But when everyone got together for the housewarming... In general, everyone was delighted. In a small house, in appearance, there is a room of 24 square meters, this is unexpected and pleasant. However, everything is in order.
Planning and expanding the attic
We sorted out the wishes for the first floor, but now it’s the attic’s turn. Despite the fact that it was necessary to plan only 2 rooms, this turned out to be no easier than the first floor. And in some ways it’s even more difficult.
Let me start with the fact that it is undesirable to make the roof slope angle steeper than 45 degrees. The wind load increases greatly and standard design solutions for the construction of rafters are no longer acceptable. I also didn’t want to make a broken roof, as is usually the case with attics. The appearance of a house with such a roof reminds me of a mushroom, with a large cap and a thin stalk. In general, I don't like this roof. In addition, the attic must have a roof window. And it should be visible from below. It looks beautiful. And on a sloping roof, the attic window will not be visible. And on top of everything else, a broken roof is much more expensive and at the same time structurally less durable than a simple gable roof.
Attic layout project. (Click to enlarge image)
Why is all this important? Because you need to determine where the support posts for the rafters will be and they will also determine the width of the attic room. It is clear that the wider the room, the better. But by moving the racks too wide, we get a low side wall, which causes a number of inconveniences: the placement of furniture, the inability to approach it at full height, and the appearance of such a room deteriorates significantly. And besides, you always want the ceiling to be higher. For attics, the minimum ceiling height must be at least 2.3 meters. Otherwise, tall people will touch the lamps and feel uncomfortable. And it should be noted that our son-in-law is 1.9 meters tall. And the bedroom in the attic was just intended for their family with 3 children. Therefore, in addition to the double bed, it was planned to put a full bunk bed in it.
If we take the height of the side walls to be about 1.5 meters, then with a roof steepness of 45 degrees, the same amount is 1.5 meters, it is necessary to retreat from the lower edge of the rafters, on both sides of the building. But in this case, from 6 meters of the width of the house, only 3 meters remain for the attic. This is very little. Even if we take comfort in the fact that this is the standard for a city apartment, the appearance of two cut corners finally finishes it off. As is the ceiling width of 1.4 meters.
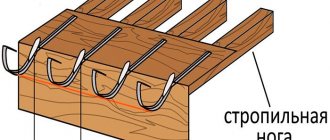
And the search for a compromise began again. But first, a little digression. For some reason, in Kuban it is not customary to extend rafters beyond the load-bearing walls. The largest is 20 centimeters. And we planned to build a house from aerated concrete, which really doesn’t like rain. And to protect the walls from rain, I decided to extend the rafters beyond the walls much further than the local builders did. So that the overhanging roof would protect the walls. And then the length of the beams and the width of the attic increased. It was this factor that I decided to use to expand the attic.
Expanding the attic was important for another reason. To install a billiards, you need a room that allows you to freely use the cue. And its length is from 1.2 to 1.5 meters, and another 25 - 50 centimeters per swing for impact. The 7 foot table measures 2 by 1 meter. Hence the minimum room dimensions are 5.2 by 4.3 meters.
The beams were extended 75 centimeters on each side, which already gave an increase of 1.5 meters, and a total of 4.5 meters. Now the width suited me. And at the same time, the issue with the stairs to the second floor was resolved. It must be placed against the wall. And this, in turn, suggests that at the lifting point it is necessary to provide space above the head. If the beams were not extended, the top of the stairs would have to be moved closer to the center of the house, taking away space from the living room and space from the attic.
We had to decide where to install the partition. They decided to abandon the second bedroom on the 2nd floor in favor of billiards and to get another large, bright room for relaxation and pastime. In addition to the billiards, it was planned to install a computer table, a bookcase, a low TV stand and a corner sofa, which could also be used to accommodate guests for the night. But the problems weren't over.
There was a fireplace planned in the living room. And the pipe from it ran on the second floor. And not at the side wall, but closer to the center of the room. The position of the pipe determined where the partition would be placed. On the one hand, it is necessary to ensure that the length of the billiard room is more than 5 meters. But then the width of the bedroom will be only 2 meters, because the length of the house is 7 meters. On the other hand, the fireplace should be located against the wall of the first floor bedroom, which means that the width there is only 2 meters. This was not acceptable. At least 3 meters was required. This means that the end wall of the recreation room in the attic needs to be pulled out. And it will partially overhang the terrace. It's not difficult to draw, but how to implement it constructively? And yet there was no other solution. But the width of both bedrooms was 3.5 meters, and the dimensions of the billiard room were 4.5 by 5.2 meters. And for the balcony there was 1.25 left, taking into account the width of the wall and partition. It must be said that the thickness of the lower wall of the first floor is 25 cm, which made it possible to add the missing 20 centimeters to the 5 meters.
Finally, everything worked out and all the dimensions of the premises suited us. It remained to determine the height of the ceilings in the attic. At this height, it was necessary to install transverse beams - tie-downs, to connect the rafters and impart rigidity to the roof structure.
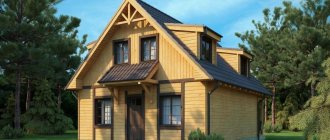
Projects of two-story frame houses
When choosing a two-story frame residential building measuring 6x7 meters, experts recommend taking into account the following features:
- Often in projects of such buildings, an attic space is provided as the second floor;
- A two-story building requires strengthening of the foundation;
- The higher the structure, the less resistant it is to wind loads;
- It is more difficult to erect a two-story building than a one-story building.
Despite the difficulties in constructing such buildings, they have the main advantage of a large living area. Accordingly, in such a house it is already possible to equip several bedrooms, for example, on the first and second floor, as well as a large living room.
What to do with the attic?
And again another problem. If you install a ceiling along the entire length of the attic, then you need to take care of the exit to the attic. It is difficult to do this from the outside. Firstly, high, 6 meters to the ceiling level. Secondly, lifting such a ladder is difficult, as is finding storage space for it. The entrance must be from the inside. And again a departure from standards. What if there is no ceiling in the second room?
And again, none of my loved ones understood me. It turns out that the ties will be visible, the attic itself will be visible, or it will need to be sewn up. And what will it all look like? I was the only one who saw what it would look like. Puffs made of laminated veneer lumber at a height of 2.8 meters. We do not sew up the end, we only make a decorative lattice with a large mesh. Staircase in the form of a Swedish wall. And such an attic will be a great place to store unnecessary things that you would hate to throw away. It will also be a place for the boys’ grandchildren, where they can get away from annoying adults. By the way, they were the first to support me. It was essentially the third floor. It’s just not clear what height it is yet.
The length of the beams overhanging the walls was 8 meters, this is the width of the house 6 meters, overhangs 1.5 and 2 walls 25 centimeters each. With a slope of 45 degrees, the height at the ridge is 4 meters. Subtracting the height of the bedrooms, we get 1.7. This suited me just fine. But... It's a but again. The width of the rafters and ties is 15 centimeters. This means the height of the attic will be 1.4. And taking into account that the rafters at the top are connected at an angle, that means another minus 10 centimeters. And our head is not triangular. In general, again, only 30 centimeters are missing to be able to stand at full height.
If you calculate the length of the rafters, with sides of 4 meters, you get 5.6 meters. But the standard length of the board is 6 meters and even with a margin. True, the ends of the rafters are cut into a triangle for a tight connection. Having made a calculation based on a rafter length of 6 meters, it can be obtained that with a lower base of 4 meters, the height can be 4.47. The increase of 0.47 meters was more than satisfactory. The height of the attic at the ridge was 1.75 meters. But the roof slope was already 48 degrees. But he moved the side walls another 25 centimeters in each direction and now the width was 5 meters.
Now all that remained was to translate all these ideas and sketches into drawings.
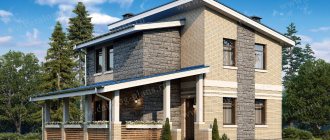
Country house project
Thanks to my sketches, the architect had a clear idea of what the client wanted. But some wishes conflicted with the requirements of building regulations. So, the walls of the cellar should be at least a meter away from the main foundations. Therefore, its dimensions were reduced to 1.6 by 2 meters. But this was quite enough.
Due to the width of the house being 6 meters, wooden floor beams had to be selected with a cross-section of 150 by 100 millimeters and installed in increments of 40 centimeters. But even in this case, the deflection was about 3 centimeters. This means that the ceiling could no longer be plastered. And you can’t play billiards when the floor sags. They also needed beams 8 meters long, which was a special order and doubled the price.
And the roof slope in the project was specified as 45 degrees, which did not suit me at all. The architect was also unable to draw the design of the units of the ceiling above the terrace to move the room out by 1.5 meters. All this had to be decided by the builders. By the way, the project cost me 25 thousand rubles.
But overall the project was completed and construction could now begin. I must admit that I had great pleasure designing the house and the entire site in general. Discussing the project with loved ones gave us many pleasant moments of communication and dreams. And most importantly, all my dreams took on the form of a project. But a lot could be drawn; now we had to build. Choosing a construction contractor
Price
- Summer house - RUB 1,239,900
- Autumn house - RUB 1,479,600
- Winter house - RUB 1,749,300
Foundation
Pile foundation
3500r/per pile
Reinforced concrete piles
6000r/per pile
Tape or plate
4000r/cube
The exact cost of the foundation is determined after our specialist visits the site to determine the composition of the soil!
Summer house equipment
Start of construction: foundation and walls
I’ll start right away with the main thing – contract prices. The maximum price, 2.5 million rubles, was asked by large well-known construction companies. And this is without interior decoration, but with exterior decoration in the form of good plastic siding and the construction of an 8 by 4 meter garage. Private construction crews asked for the minimum price, 1.5 million. I made a compromise decision and entered into an agreement with a small construction company for 1.65 million, of which 40% was an advance payment.
Laying the foundation for a house with a terrace. In the foreground is a pit for a septic tank. In the background is a cellar pit. You can see trees whose branches have been slightly cut off so that they are not damaged during construction.
Work began at the end of June, with the preparation of the foundation. They immediately poured it under the house and garage. It was decided to first build a garage, which could be used to store tools and materials, including rain protection.
The foundation is poured and covered with film so that the sun does not dry out the moisture. Watered daily with water from a well. The brick is prepared for the installation of a septic tank. In the background you can see a water well, or rather a water tap from it.
He supervised all the work personally every day, which was not very to the liking of the builders. The foundation was made of a lightweight strip foundation with bored piles. Concrete was ordered from RBU, poured using two mixers in 2 hours. We used 2 electric vibrators. Covered with film to retain moisture on hot summer days. Watered 2 times a day from a well.
The first dispute arose about the curing time of the poured concrete before the start of work on laying the walls. The brigade wanted to start within a week. They wanted to make money quickly and not waste time waiting. I insisted that in a week the concrete would gain only 50% strength, and masonry could be continued only at 70%, that is, after 2 weeks. Concrete gains full strength in 4 weeks. We agreed on 10 days and started laying cinder blocks on the garage.
After 3 days the garage was ready. Another day was spent on the roof. They began laying the aerated concrete block on the house after 2 weeks, having previously laid the waterproofing. According to the project, it was necessary to install concrete cores in the aerated block with a pitch of 2.5 meters. Builders began to convince that this was unnecessary reinsurance and no one was doing it. But Kuban is classified as a seismic active zone of 7-8 points. I had to resort to the threat of termination of the contract.
We continued construction and 4 days later, after laying 11 rows of the block, we assembled the top formwork for pouring the armored belt. Again they argued about its width and thickness. They filled the entire width of the gas block, 250 millimeters, and the same height. This time they let the concrete sit for a week. A wide board 200x50 mm - maurlat - was laid on top of the armored belt. We secured it with anchors in 1 meter increments. Taking into account the thickness of the floor beams, the ceiling height was about 2.8 meters.
general information
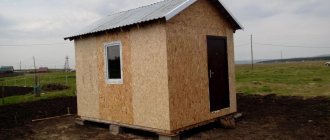
Small 6x7 frame houses can be equipped for permanent residence. Frame technology provides for insulation of such buildings, installation of all necessary communication systems (electricity, gas, water, heat). Therefore, such a house is comfortable not only in summer, but also in winter.
You can build a frame residential building measuring 6x7 meters with your own hands, having previously selected a ready-made standard project using one of the frame technologies.
Finnish technology for constructing frame houses
The design of frame buildings using Finnish technology is considered the easiest for independent installation work.
This technology provides for the construction of a frame structure, laying insulating material and covering the walls of the building with lumber outside and inside the building.
Canadian technology for constructing frame houses
According to Canadian house-building technology, the frame and walls of the structure are assembled at a construction site or factory. The internal space is filled with insulating material. On the outside, the frame walls are completely covered with a waterproofing membrane, on the inside - with a vapor barrier film, sheathed on top with OSB boards or equivalents. After this, the finished parts of the house are assembled on the foundation.
Regardless of the chosen private house-building technology, all lumber, before being assembled into a single structure, is treated with special protective agents against moisture, rot and mold, against fire, rodents and other harmful insects.
Construction of floors capable of withstanding not only billiards
The first floor was not difficult. The cellar walls served as additional intermediate supports for the floor beams. A 30 mm board was laid along the inner projection of the foundation so that the beams lay in the same plane. The beams were laid across the room so that the support points were closer.
All the logs on the 1st floor have been laid, you can move on to covering the second floor.
Construction of the second floor has begun. Note the double channel resting on the wall.
The closure of the second floor was a concern. A 6 meter span is not 3.5 meters. But you can’t put it any other way. After all, the rafters and racks must rest on these beams. To achieve maximum rigidity, they must be solid or... Or their ends must be firmly pinched. What can they be inserted into? After all, there is emptiness there.
The idea came unexpectedly. Place number 16 on the top of the channel. 150x50 mm boards were inserted well into them. The spans were 1.5 meters at the edges and 3 meters in the middle. Now you could get by with a simple board and no need to order 8-meter beams. And the rigidity of the double channels made it possible not to worry about the load on the floor. As the builders joked, an armored personnel carrier can be safely driven here. True, they had to work hard to get up, but that was the only difficulty.
Installation of a gable roof and insulation of the attic
I was very curious how the builders would be able to raise the rafters and secure them at a height of 4.5 meters from the second floor ceiling and 8 meters from the ground. Of course, I scoured the Internet, but this has not happened in my practice yet. And on the Internet the height of the ridge was within 2.5 meters. And you could get by with a ladder and a stepladder. To the credit of the brigade, they coped with this task easily, if that can be said about working at such a height.
First, they erected temporary scaffolding inside the attic. They missed a run from the board from above. And the rafters began to rest on this purlin, and the lower part was attached to the beams. They immediately put in the tightening. And finally, we installed two posts on each side under the rafters. The racks were placed on opposite sides of the wall, so that the load from the roof evenly pressed on the beams on both sides of the wall on which the beams rested. Across the row, side slopes were installed to give the roof additional longitudinal rigidity.
Next, the internal sheathing was hemmed from the inside, onto which a vapor barrier was rolled out and insulation was laid. We also filled the side walls with insulation. After which, the temporary scaffolding was dismantled.
The insulation is laid on the roof to insulate the attic. The roof is covered with a vapor barrier and sheathed with a lath for attaching metal tiles.
Due to the protruding beams and roof of the terrace, the side and rear walls were protected from precipitation. But the front remained unprotected. The high roof protruding forward did not cope with this task. And again the Internet helped. We installed a canopy between the attic and the first floor, protruding 0.5 meters. He helped us out like a scaffold when covering the gable with siding.
Covering the roof with finished metal tiles was not difficult. There was no need to cut anything. They simply laid the profile and secured it.
Finally, the builders plastered the interior walls and that was the end of their work. But mine and my wife began. But I’ll tell you about this another time. How did we get such a dacha?