Hexagon tiles attract attention with their unusual shape. It is most often used as floor tiles, but recently it can increasingly be seen as wall tiles. The original shape is a potential highlight for any interior style. Appearing on the market just a few years ago, honeycomb tiles quickly won the hearts of people, taking a strong position among many types of ceramic tiles.
- Hexagons in the world of tiles
- Peculiarities
- Hexagon Shape Meaning
- Types of hexagonal tiles
- Manufacturing method
- Surface treatment method
- Appearance
- Texture options
- Advantages and disadvantages
- Design
- Laying
- Manufacturers
- Hexagonal tiles in the interior
- For different rooms
- Buying tips
Hexagons in the world of tiles
Hexagon-shaped tiles can be found in many options. Manufacturers of porcelain stoneware provide a wide selection of different designs for this original form: from styling with traditional and natural materials, to exclusive design solutions. Honeycomb tiles can come in a variety of sizes - from large-format floor tiles to small mosaic elements. The hexagonal shape can have a wide variety of textures and surface types - just like any ordinary modern tile.
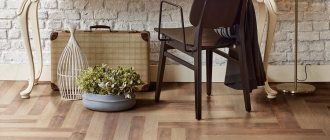
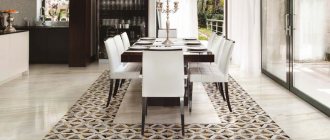
What it looks like
There is no point in understanding the nuances of masonry technology here - all work is carried out in exactly the same way as in the case of rectangular or square slabs, excluding the cutting technology, since these works will be complicated by the special shape of the trimmed parts. It is much more important to understand how the finished surface will look and decide whether such a design suits you. To do this, below are several photographs demonstrating the results of such repairs.
Peculiarities
The hexagon shape gives the tiles not only an unusual appearance, but also expands design possibilities. The combination of honeycombs of different colors and folding them into patterns looks much more impressive than in the case of ordinary wall or floor tiles. She has more possible styling schemes. The disadvantages include its higher cost and complexity of installation.
Wall covering
Hexagons are rarely used to cover the entire surface of a wall. Basically, this material is used for finishing individual areas or to create decorative wall panels.
The technique of creating asymmetry or smooth transitions in decoration using polyhedra is popular.
By combining hexagons of different colors, you can create separate compositions or focus on areas of uniform color. White polygonal tiles look great in combination with dark-colored modules.
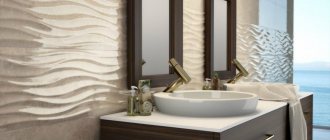
The patchwork model is used for wall cladding no less often than for floor finishing. The entire wall or part of it can be decorated with a mosaic of hexagons that are harmoniously combined in shade. For wall cladding, a special model of hexagonal tiles is produced, which has a voluminous convex surface. With this coating you can create interesting 3D effects.
Hexagon Shape Meaning
Hexagonal ceramic tiles are by no means the first appearance of the hexagon in architecture and interior design. It’s not for nothing that they make hexagon tiles, and not octagons or pentagons. People have always drawn inspiration from nature. Bees with their honeycombs have been an important object in the culture of many peoples. Often this form symbolized protection from dark forces. This natural form can be found not only on Earth - most recently, a giant planetary vortex in the shape of a regular hexagon was noticed by scientists on Saturn. Knowing this, hexagonal tiles can be used not only as an unusual accent, but also give it a deep meaning.
How to seal the transition between floor coverings:
The nuances of joining without a threshold Basic design recommendations How to join seams Grout:
- Sealant
- Liquid plug
- Cork compensator
How to join sections without a seam When a threshold is needed Types of thresholds Video: how to join hexagon tiles
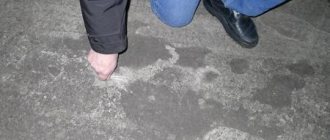
Two coatings are usually used for zoning rooms. For example, to visually separate the hallway from the corridor, or the living room from the kitchen, if they are combined. In this case, the transition line between materials can have a complex shape and a large length. It is advisable to design such a joint between tiles and laminate without a threshold.
It looks more attractive, dirt does not accumulate at the junction and no one will trip over it. But this technology is considered more complex than delimiting a room using a protrusion.
Types of hexagonal tiles
Hexagon tiles come in many different types. The following properties can be distinguished:
- Size. Most often, small sizes are found, such as 20x20 or 40x40 cm. 25x21 is a typical size for patterned European tiles. 28.5x32.5 – the size of a standard terracotta tile. There are larger options, as well as small hexagon mosaics.
- Color. The color palette is limitless. Most often you can see calm natural colors: beige, gray, brown.
- Proportions. In addition to regular hexagons, you can also find elongated options, for example, measuring 10x20 cm.
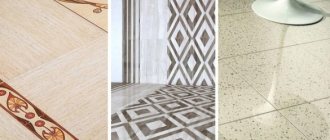
- Surface. Glossy, matte, lapped (semi-matte) or structured.
- Drawing. There are plain models, designer options and tiles imitating materials: marble, stone or wood.
Manufacturing method
The production of hexagonal tiles is no different from the production of a regular slab, if we put aside the other type of shape. Mostly natural components (clay, spar, quartz, minerals and dyes) are mixed together and poured into a special hexagonal shape. This is followed by pressing, firing (in some cases this can occur several times) and final surface treatment. Some factories can produce a custom-made hexagonal version of conventional slabs from their range.
Surface treatment method
Like any tile, hexagonal tiles have several subtypes of surface treatment:
- Glossy or polished – a smooth surface with an active shine. If water gets in, it can become very slippery, so in damp rooms it is best to use it only for wall cladding.
- Lapped – semi-gloss surface with a slight wave-like surface roughness and soft shine. A compromise between gloss and matte surface.
- Matte surface is the natural surface of ceramics and porcelain stoneware. May have slight roughness.
- Embossed. This can be wall tiles with a 3D effect, active relief, or floor tiles with a pronounced surface structure for an anti-slip effect. The second case is suitable for installation outdoors, in pools, and showers.
Appearance
Today, the design options for ceramic and porcelain tiles are endless. Often these materials are cheaper and more practical imitations of marble, stone, wood, concrete, metal, etc. But there are also design positions that express only a flight of human imagination. This also applies to hexagonal shapes.
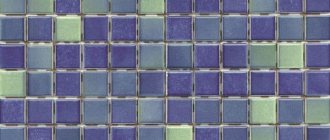
Honeycomb tiles can also be divided into separate, individual slabs and mosaic tiles. Mosaics today are sold glued to grids measuring approximately 30x30 for ease of installation. Such mosaic sheets can consist of chips of various shapes, including hexagonal.
Pros - cons
Unusual finishing solutions are more popular than ever at the moment, and the hexagonal shape of the parts will be one of the advantages in this case - the result is a very beautiful and unusual surface. But the same point entails certain inconveniences: working with hexagons is more difficult than with squares or rectangles. In addition, trimming and adjusting the components of the coating to certain shapes of the surfaces to be finished is also more difficult.
In addition to the main parts, you can currently find on sale a whole series of various additional parts that allow you to create very noteworthy compositions from hexagons. Laying in rows can be a very interesting activity, reminiscent of folding a mosaic - by combining the components of different shapes you can get a unique and very beautiful sketch. With all this, you can combine not only parts of different shapes, but also different sizes of tiles.
Difficulties include the enormous labor intensity of the finishing process. While even a beginner can work with standard plates, it will be more difficult with hexagons. Here you will need to take into account many small aspects and painstakingly maintain equal gaps between adjacent masonry elements. If you make them uneven, it will be very noticeable and ruin the whole look. When laying such tiles on the floor, the work will be a little easier and without experience, but by following the requirements and rules for installing such a covering, this can be done. If you have to work on a wall, it is better to turn to a professional if you have never done such work before.
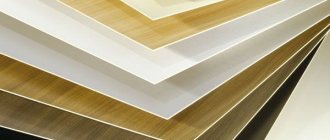
Texture options
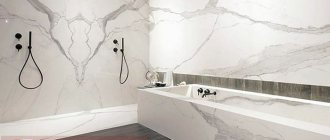
Porcelain tiles, from which honeycomb tiles are often made, have superior characteristics to most finishing materials. It is durable, strong, frost-resistant, and not afraid of moisture and cleaning agents. And with all this, it is cheaper than most natural materials, and, unlike them, does not require special care. Therefore, more and more people prefer porcelain tiles that imitate one of them to natural analogues. Marble, wood, onyx, metal, plaster, other types of stones - porcelain tiles can look exactly the same. Thanks to this, bathroom tiles can look like noble marble or like relief wood. The same applies to hexagonal porcelain tiles.
Advantages and disadvantages
Let's compare the pros and cons of hexagonal tiles. The advantages include:
- Original and unusual design
- Many layout options
- Wide range of designs
If we talk about porcelain stoneware honeycombs, then these advantages will be added:
- High strength
- Possibility of installation outdoors and in rooms with high humidity
- Durability
- Variety of sizes and textures
- Unpretentiousness
- Relatively low price
The disadvantages of this form include:
- Difficulty of installation
- Higher price than regular tiles
Design
Hexagonal tiles in the interior create many possibilities for interesting and unusual design. Due to their shape, hexagonal tiles can be seamlessly integrated into tiles of a different color or even a different shape. Hexagonal floor tiles of different colors can be used to divide spaces and highlight a specific area in a room. When decorating walls, the hexagonal shape immediately catches the eye, so you can use it to place emphasis on one place or another. Or even distract from something, for example, from the small size of the room.
List of tools for tiling work
Laying tiles on the floor starts from the selected edge, or from the center mowing line, lay the tiles on 1/4 of the floor at a time.
Lay all full tiles before laying cut tiles.
When laying, constantly check with a level that the laying is horizontal and the joint angle is 90° to each other.
4.Cut the tiles using a manual tile cutter. or better yet, a tile cutting machine.
When cutting curved tiles, first make a template from cardboard. Sand rough edges with sandpaper or emery cloth.
Marking for laying tiles
For a square or rectangular room:
How to lay hexagonal tiles. hexagon to the floor
1.Stretch a marking cord between the centers of two adjacent walls. Pull and release the cord. The cord paint will apply straight line to the surface. Do the same for the other pair of walls. The resulting mowing lines should intersect in the center of the room at an exact 90° angle. Check the intersection with the carpenter's angle. If necessary, adjust the angle of intersection of the lines to 90°.
Lay the tiles from the marked center to the walls as a guide. If the cuts on the outer tiles are not the same, move the center of the tile laying to the right or left. Make the same measurement in a perpendicular direction. Determine the new stacking center. Make new line markings using string. (Fig. 2a and 2b illustrations). This marking will allow you to lay tiles with identical cut tiles along the edges of the room.
Laying
Laying hexagonal tiles begins with careful leveling and surface preparation. Due to their usually small size and large number of edges, tiles on the floor or wall will accentuate any unevenness. After leveling, apply a primer to the surface.
The larger the slab format, the larger the layer of glue that needs to be applied. This is done with a special comb. Before laying hexagonal tiles, you should first lay them out on a sheet of hardboard to get the pattern you want. Next, apply glue and leave to dry. Afterwards you can proceed to installation.
The seams of tiles of this shape begin to quickly diverge during careless installation. To avoid this, control each row and press the tiles tightly to the base. To control the seams, it is advisable to use special construction crosses. Where the tiles touch the boundaries of the room, trim. For an ideal result, use a construction laser, which has a smooth cut.
Installation nuances
The clear edges of the tiles greatly simplify the installation process. Of course, professional skills are welcome, but if the necessary rules are followed, enthusiasm can win over work of any complexity. Whether for the floor or other surfaces, the principles of laying figured cladding are in many ways similar to diagonal rows. Even at the purchasing stage, it is necessary to decide on the layout principle in order to visually assess the appearance of the finish and acquire an initial idea of what the surface will look like.
During the installation process, the material will have to be adjusted to the specific parameters of the room. To do this, individual elements must be cut. That is why purchases are made with a reserve. Also, when making miscalculations, one should not forget about the main background of the surface and its decor.
In order for the installation to be perfectly smooth, the surface of the base must be the same. If necessary, the area for cladding will have to be leveled and then cleaned. After the area has become perfectly level, it must be covered with a layer of primer. The thickness of the adhesive should not exceed the thickness of a single hexagon. The work begins with preliminary fitting and calculations.
To make laying convenient, each subsequent row must be checked with a special tool and rule. A kind of level is constantly applied along the entire length of the row, which will show with what accuracy the installation was carried out or whether there are flaws in the work. Each mounted element is inspected at the boundaries and a control cross is inserted along the edges of all six faces. This simple installation tool will help you clearly control the evenness and thickness of the seams. Particular attention must be paid when cutting tiles in a doorway. In order for the edge to be smooth along the entire perimeter of the cut elements, it is necessary to lay out the material without glue, make markings along the entire surface and only then make adjustments along a clear, even line.
Manufacturers
Today, hexagon tiles can be found from almost any manufacturer. The Spanish premium factory Apavisa produces large format honeycombs with various unusual patterns and textures. The Italian ]Ce.Si[/anchor] produces single-color hexagons of small sizes. The Spanish factory Peronda Harmony Group has a large assortment of hexagons of different sizes and designs. Atlas Concorde produces mosaics with hexagonal chips with textures of marble, stone, concrete and gold. And this is not the entire list! Please check with our managers for the availability of the articles you are interested in and their samples!
Surface and material preparation
The hexagon has six sides, which means that such tiles will be even more difficult to align with the level of the decorative coating as a whole. For this reason, the base on which the material will be laid must be perfectly level. When we say ideal, we mean an absolutely flat surface without flaws. If, when laying ordinary tiles, small flaws in the base can be smoothed out with an adhesive solution, then in a situation with hexagons, even a small bump or hole can significantly complicate the work.
requirements for a barbecue for a summer residence
After the base is leveled, it should be treated with a deep penetration primer. Impregnation will minimize the extraction of moisture from the adhesive by the base, which means that when setting, the volume of the adhesive layer will practically not change and will not distort the tile.
Due to its small size, prepare a small spatula-comb, it will be useful for applying glue to scrap tiles near the walls. Place a row of tiles near the wall farthest from the door for testing. Before starting work, cut exactly the halves of the tiles; they will lie together with the whole one against the far wall.
Hexagonal tiles in the interior
Hexagon-shaped tiles, like octagonal ones, will find a place in any room of any style. For example, it will look extremely good on the bathroom floor, and thanks to more seams than regular tiles, it will be more difficult to slip in it. Honeycomb tiles on the floor can be continued to be laid on the wall so that later they smoothly flow into another material. By playing with tiles of different colors, you can lay out a variety of shapes and patterns. And a small hexagonal mosaic will visually increase the space if you use it to cover the apron in the kitchen. Honeycomb tiles with marble or stone texture will add a touch of modernity to a classic interior. It’s not for nothing that designers speak of hexagonal tiles as a discovery of the 21st century!
Applications of hexagon tiles
This type of finishing can be called universal, suitable for different rooms. Initially, it was used only in the bathroom and kitchen. Now designers are trying to include hexagons in the interior of living rooms, offices, dining rooms, and hallways.
On the floor
Finishing the floor with hexagons is an interesting and most popular solution. For this purpose, choose matte or cement products that will not be too slippery. To make walking on the floor comfortable, you should not buy relief elements. Hexagon is perfect for decorating any room.
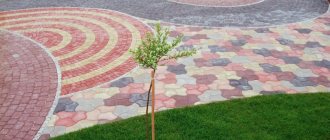
In residential areas, you can put a warm carpet or rug on the floor. In a private house, it makes sense to cover a veranda, terrace, gazebo, or even part of a personal plot.
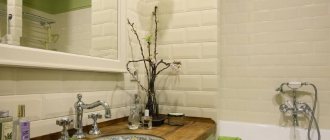
For wall decoration
Wall cladding is a more unusual option for incorporating honeycombs into the interior. In the bathroom, they usually use complete wall decoration with elements of the same or different colors. In the hall and living room, hexagons are often combined with other types of finishing (paint, wallpaper). Hexagons are also suitable for creating an accent wall.
Kitchen apron
Slabs of non-standard shape are no less suitable for a kitchen apron than classic coverings. They fill the space between the countertop and cabinets to protect and decorate the wall. If you decide to choose hexagons with a pattern, a complex ornament, or in the form of a picture, the remaining elements of the interior should be modest and discreet.
For different rooms
There are many options for hex tile colors and sizes. This shape is perfect for any type of room.
In bathrooms, standard-shaped slabs are found so often that they might get boring. Honeycomb tiles will be an excellent alternative to standard materials. To cover the floor of this room, use matte or structured tiles. Porcelain tiles imitating wood or stone will create a warm and cozy image. You can add a heated floor - porcelain stoneware is one of the most successful materials for this engineering solution. Leave glossy tile options in bathrooms for walls.
In the case of kitchens, this tile design is often used in high-tech or loft style. Hexagons in gray and white shades can be combined with any color and material. Concrete or metal slabs will look bold and original.
Hexagons can be used not only in modern interior styles! From small honeycombs you can lay out a variety of ornaments and patterns. This form of coating can become a highlight, an unusual fresh element in a room of any design.
How can you connect the transition?
To neatly design the gap between functional areas, four materials are most often used.
Grout
An easy way to seal winding, shallow seams. Such thresholds are difficult to find, and other fillers will not look so organic. Often in modern interiors there is an interesting way of finishing the floor: polygonal ceramic parts “incline” a little into an area with a different coating. This separates the hallway area from the rest of the house and the kitchen area from the living room. In this case, the transition is also carried out using grout. Do it in the following order:
- Carry out preparatory work.
- Treat the edges of the second material with silicone compound.
- Fill the resulting seam halfway with it.
- Wait for it to dry.
- Dilute the grout, spread it on top and level it with a spatula.
- Wipe the finished dried layer with a damp cloth and cover it with clear varnish to extend its service life.
Photo: Instagram @remont100lvl
- Decoration
Colored grout for tiles: 8 pros
Silicone and acrylic sealant
Joining two sections with elastic sealant is even easier than with grout. The advantage of the method is that there is no need to additionally treat the boards to protect them from moisture. But there is one point - you need to take into account that after drying the filler will turn light brown. The acrylic filler can be painted in a suitable shade after it has dried. Both expansion joints are suitable for renovation work in new buildings, as they are able to adapt to the shrinkage of the building.
Sequence of work:
- Place masking tape on both sides of the seam so you don’t have to waste time scrubbing it off later.
- Make a hole in the silicone paste tube so that it can be squeezed out, or insert it into a special gun.
- Fill the gap so that the sealant extends slightly above the floor surface.
- Use a spatula to remove excess mixture. If you don’t have a spatula, you can wait until the mixture dries and cut off the excess.
Keep in mind that it takes one or two days for the sealant to dry completely. Silicone expansion joints are recommended for use in rooms where the flooring is secured with glue or fasteners.
Photo: Instagram @42m2.ofhappiness
Photo: Instagram @42m2.ofhappiness
Photo: Instagram @42m2.ofhappiness
Photo: Instagram @prinesite_pechenki
Liquid plug
Liquid cork for laminate and tile joints is a moisture-resistant mixture of an adhesive base and cork chips. It has an unusual texture and looks good in seams no larger than 7 mm. On wide crossings it will look alien. This is a simple connection method for areas of any shape.
The hole that is filled with the mass is first cleaned of dust and degreased.
Rules for working with the mixture:
- The coating levels must match. If there is a slight difference, the glue is aligned along the higher edge.
- Do not let the cork get on the floor, as it is difficult to wipe off and, once dry, almost impossible. You can pre-coat the floor with oil or apply masking tape to it.
- The material must be sanded a day after pouring, until it hardens.
The layer turns out to be very durable and it is almost impossible to remove it.
Photo: Instagram @centraparketarf
Photo: Instagram @parquet_design
Cork compensator
One of the most popular ways to design boundaries between two floor coverings. The filler is a soft, pressed lath or whole sheets with the same characteristics. The compensator has several advantages:
- Possibility to choose the appropriate color.
- Ability to withstand building shrinkage and dimensional fluctuations of laminated strips.
- Suitable for wide seams.
- Looks beautiful in the interior.
For this material it is also desirable that both areas are at the same level. Otherwise, the result will not look aesthetically pleasing.
Sequence of working with the filler:
- Adjust the rail to the desired size or cut the part from the sheet.
- Apply adhesive to the entire width of the laminate or tile, and a thin layer of sealant to the bottom.
- Glue the compensator and cover it on top with an antiseptic and clear varnish.
- The rail can be tinted, but you need to take into account that it absorbs paint well and the color turns out saturated.
Photo: Instagram @centrpola.ru
Photo: Instagram @centrpola.ru
Buying tips
Before purchasing tiles, make sure to correctly calculate the required area. To the resulting value, add 10%-15% for pruning and possible combat. Pay attention to such properties of hexagon models as anti-slip class, abrasion resistance, and strength. After purchasing tiles, do not forget to take care of glue and grout mixtures. Their quality is as important as the quality of the tiles themselves! Choose materials that suit your type of room and facing material. Today, tile grout can come in a variety of colors and even with the addition of glitter. To accurately select the grout color for your tiles, take the time to compare samples in person before purchasing.