To solve construction problems it is often necessary to use a special drill. This tool allows you to check where underground water is located, as well as make all sorts of holes in the ground, for example, to install a fence. And if for a single job you can ask a friend or rent equipment, then for more serious operations it is better to make a hole drill yourself.
A hand drill will help you solve various construction problems
general information
A hole drill is a special tool for making holes, boreholes, holes and other round-shaped depressions in the soil. They are used for:
- Installation of enclosing structures.
- Manufacturing of columnar foundations.
- Planting crops.
- And many other household purposes in which you need to equip holes in the ground.
The main task of the device is to quickly and efficiently make cylindrical holes without significant labor costs. Depending on the design, pit drills are:
- Mounted.
- Manual.
The first option is intended for installation on a tractor or a special platform with an electric drive. A striking example of such a model is the MTZ pit drill.
As for manual devices, they can be equipped with a mechanical, electric or gasoline drive. There are also homemade inventions that have a simplified design and can be easily made at home. With their help you can drill holes up to four meters.
In this video we will look at a self-made hole drill:
The scope of application of the device is very diverse. In most cases, they are used to make round holes in the soil for fencing structures, poles and other structures. If it is necessary to equip a pile foundation, then you cannot do without the appropriate recesses. Only their diameter will be more impressive.
To perform such work, a mechanical or motorized hole drill is used. In construction hypermarkets, such equipment is sold in large quantities, but craftsmen prefer homemade inventions, arguing that they are accessible, cheap and reliable. In addition, with a small investment in a short period of time, you can produce a truly powerful tool that will surpass factory devices in performance.
Purpose
When using an electric drill, you can perform many types of work without voltage, due to the fact that the device can be used immediately after it has been turned on, and it is also characterized by high productivity.
During operation, there are low mechanical costs, which is a plus: the efficiency is seventy percent.
It is difficult to work manually with highly dense soil, especially if it contains elements that prevent drilling (stones or other rocks, roots), and the use of the unit greatly facilitates soil development.
An electric drill will come in handy in dachas and gardening . They can be used to loosen the soil and make holes of the required depth for planting various crops, be it ornamental shrubs or young trees. Therefore, the use of the unit in the summer is very common, especially among land owners. An earth drill can be attached to a drill or screwdriver and used for any purpose, cultivating the soil.
An electric hole drill is used when installing fences and you need to make holes in the ground for a fence. Similarly, when laying the foundation of any structure, it becomes necessary to drill the soil for piles. Sometimes it becomes necessary to drill through ice, in which again a power tool comes to the rescue. Convenience is due to the fact that you can use different blades.
But in order to successfully use the tool, you need to decide what characteristics it will require for successful operation for its intended purpose. Thus, the diameter and type of blades and the length of the rod differ. For various types of excavation work, units of suitable power are selected accordingly.
Removable blades of drilling machines can be helical, auger or disk.
In the case when it is necessary to obtain a hole with smooth edges that would not crumble, an attachment is used, which is a pipe with a spiral of blades around it - this is an auger. It can be used to drill tunnels in the ground, it is used for water wells, and is also suitable for making holes for pillars.
During serious work, double-spiral augers are the most useful; with their help, it is easier to lift dense soil than single-spiral augers.
The auger must be selected according to the type of soil you will be dealing with. For example, for ground that is frozen and covered with ice, the store always has a separate type of durable attachment.
Auger blades are very popular because they are the most practical and versatile. A garden drill is capable of making depressions in the ground up to a meter, so you can make holes for the base of light structures: swings, benches. This hand-held electric soil drill is suitable for summer residents and can be used even in rocky soil.
The disk type is represented by an attachment in the form of blades attached to a rod, located at an angle to each other. May be useful for the garden.
The length of the rod is selected based on the user’s height and the required depth of the hole. Working at an angle with an electric drill is not always convenient and, moreover, unsafe, so the length of the rod is an important characteristic. For downhole drilling, it would be optimal to choose a rod of 1.5-2 m.
Units with an electric motor operate from the electrical network. A cordless drill is very convenient because it can drill even without being connected to an outlet. If you plan to work for a long time, it is better to use an extension cord, because the battery may be discharged.
Main varieties
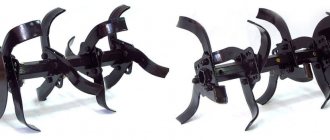
If you want to make a manual hole drill with your own hands, you need to know about the main types of such equipment , the principle of their operation and design. Garden tools equipped with semicircular blades are in particular demand. They are welded at a certain angle and used to make holes in the ground for any plant crops. In addition, with the help of such a tool you can make pits for supports and the construction of gazebos or light buildings and enclosing structures.
There are also auger drills, which have an elongated cutting element and a lot of advantages. They are necessary for digging deep holes for supports. The device is designed in such a way that it does not need to be taken out of the ground often, which significantly speeds up the drilling process.
Before starting to manufacture the device, it is necessary to determine the type of work for which it will be intended. This will allow you to make the right decision and choose the best option.
The simplest options for homemade drills are garden tools. They are characterized by minimal weight and a simplified design, which can be changed depending on working conditions. As for conventional models, they are distinguished by their versatility and low cost. Often they are used only for light soil, because when making depressions in clayey soil or loam they are ineffective.
What it is?
An electric drill is a tool that automatically operates on alternating current, which is used to solve such a problem as creating earthen pits of various types and purposes.
The device consists of a rod, handles and a drive. It is equipped with an electric motor, which is its distinctive feature. Special blades on thrust bearings are attached to the rod (the so-called rod part of the frame), which collects and lifts the earth when the unit is buried in the ground during the development of the hole.
Making a pit drill with your own hands
Drawings and diagrams of a hole drill will significantly simplify the procedure for manufacturing the device, so they need to be given special attention. The main structural element of each device is the cutting part, which consists of two semicircular disks with sharpened edges.
The next unit is a rod made of a profiled pipe with a square cross-section. In some cases, it is replaced with scrap metal of the appropriate length. The optimal height of the structure should be at least 1.5 meters.
The rod needs to be extended with small sections of pipe, and it is important to think in advance about how to connect them. You should also consider what the handle will look like. As a rule, it has a T-shaped design and a length of 40 or 60 centimeters. The product is additionally equipped with a tip in the form of a drill, which is placed under the blades. Its task is to loosen the substrate, as well as center the tool during drilling.
Preparation of materials
Having understood the design of the hole drill, you can begin preparing materials . The classic model is created from pipes with the appropriate diameter. When using profiled products, it is 20-35 mm.
To create cutting blades, a saw blade from an angle grinder or sheet steel is used. The latter has a thickness of 4 mm. According to experienced craftsmen, it is better to create blades from saw blades. In this case, you will not have to make additional cutting edges. At the same time, the side edges are additionally sharpened for more productive loosening of the soil.
Any hard metal is used as a material for making a drill. In addition, you can get by with a regular sharpened rod by taking a piece of rod with a large diameter. You can also take a steel strip and slightly modify it, giving it the appearance of a drill. In some cases, combined options are used.
When creating a handle, it is advisable to give it the shape of a round pipe with a diameter that matches the size of your palms. The main requirement for this element is ease of use. The master should not feel discomfort when working with the device.
Create a hole drill from a saw blade
Cutting elements
At the stage of manufacturing cutting elements (blades), you need to decide what they will be. As a rule, these parts are:
- Removable.
- Non-removable (stationary).
The first option involves the presence of special shelves made of thick steel at one of the ends of the rod. They are placed at an angle, which is required to spread the knives in a plane at an angle of 30 degrees.
If you create a manual model or a hole drill for a tractor with your own hands, drawings and step-by-step instructions can become the most useful assistant. After familiarizing yourself with them, it becomes clear that, having attached the shelves, you will also have to arrange mounting holes. Next you need to make the same holes in the blades.
Holes are cut out in the central part of the disks to ensure a tight fit of the working elements to the rod. However, this option can only be considered when using monolithic structures.
Application of sheet steel
When trying to figure out how to make a hole drill with your own hands, you need to follow the instructions exactly and not deviate from the drawings. If high-quality sheet steel will be used to make the blades, then you first need to make a template from paper. A hole is drilled in the central part of the circle for further installation of the rod. The shape of the hole is determined by the type of rod and can be either square or round. Moreover, its diameter slightly exceeds the size of the rod.
Next you need to select the appropriate type of blades. They can have two halves, or be an open circle design with offset edges. To ensure better drilling efficiency, it is better to spread the edges at an angle of 30 degrees.
To process heavy and dense soil mixtures, the drill blades must be additionally reinforced with thick steel corners. The fact is that under the influence of serious loads they can become deformed and lose their serviceability.
Saw blades and modification of the device
If the hole drill is intended for a tractor, then a saw blade can be used as a cutting element. The main thing is that its diameter corresponds to the required parameters . Most modern disks are made of hardened steel, which is characterized by better strength characteristics and an elastic design. It is problematic to bend such a disk, so it is sawed into two parts and then moved at the required angle.
Such homemade manual hole drills are characterized by a high efficiency rate and a long service life. And even if an old saw blade is used as the cutting element, it will do its job perfectly, providing high drilling speed.
Many craftsmen understand that no matter how ideal the drawing or step-by-step guide may be, almost all homemade products require some modification. If digging holes is carried out in dense soil compositions, then large blades will not work. The fact is that they cannot cope with heavy soils and quickly become dull. To make the device more productive, blades of different sizes need to be welded onto its rod.
In the lower part, near the peak, small blades are strengthened, and after a few centimeters - larger ones. The optimal number of tiers is 3, and the size of the cutting elements should not exceed 50 centimeters. If this is not the case, then further work with the tool will be uncomfortable.
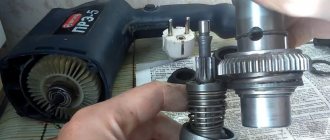
Vibrator from a hammer drill
To put the project into practice, you will need the following materials and tools:
- metal (steel) plate of the required dimensions, thickness from 50 to 70 mm;
- an iron rod or reinforcement (rectangular or round) of such length that it is possible to reach the bottom of the exposed formwork structure when pouring concrete;
- perforator;
- an old drill or a pick, a shovel, a chisel, even a crown;
- grinder with metal discs;
- welding machine with electrodes;
- ruler or tape measure;
- marker.
The minimum power of the hammer drill should be 1.5 kW - only such a tool will provide the required performance without overheating.
One side of the rod with a cross-section of 15-20 mm is processed so that it can be inserted into a punch chuck. A stainless steel plate is welded to the second side. For this you will need special electrodes.
It is better that the rod is also made of stainless steel. Concrete is an aggressive environment. Ordinary metal is highly susceptible to chemical attack and also wears out faster mechanically.
The sequence of manufacturing the tamping nozzle is as follows:
- Using a grinder, cut a rectangle of the required size from a steel sheet, and a piece of the required length from a round or rectangular rod;
- weld the plate to either end of the rod;
- cut off the drill seat with a small margin;
- weld it to the rod.
If you do not use an old drill, you will need to make a special adapter for the hammer drill chuck, or use machine tools to grind out a seat at the free end of the rod . The easiest way is to immediately use a drill of the required length. On the basis of a hammer drill, you can make more complex devices, for example, with a flexible shaft, which will additionally mix the working solution.
A homemade tamper for small-sized concrete (the simplest manufacturing option) is presented in the video.
Electric models
If you want to create an electric drill for making holes in the ground, you need to have certain skills in the field of electrical engineering.
A gear motor can be used as an electric drive, which guarantees high drilling speed. By the way, to manufacture a highly productive device, you can remake an ordinary manual hole drill, created according to the above instructions. This is interesting: how to make a garden drill with your own hands.
You can also try to upgrade the hammer drill by equipping it with a cutting disc to which a round pipe is welded. An adapter is ordered from a turning specialist to connect the power tool to the mechanical part. When processing the soil with such a tool, it is important to avoid roots, otherwise they can damage it.
If the drill is created for a powerful tractor, then it is better to use durable disks made of hardened steel or any other reliable metal. Their number is determined by the number of turns, and the sizes must be the same. Holes for the rod are made in the central part. On one side, the discs are welded and then stretched a little. On the other hand, they are boiled with a weld. On the outer disks it is necessary to strengthen the rings, and place the finished structure on the rod. Ultimately, the bottom edge is welded to the rest of the parts.
Also, craftsmen use an ordinary electric drill as a basis for a future drill. The “Rebir” model has proven itself to be excellent, demonstrating a power of 2 kW, which is supplemented by an auger. Due to the presence of a third cone in the drill, it needs to be finished with a lathe, making recesses on both sides. A drill with a third cone is welded to the adapter, and the drilling section is cut off.
This design option is characterized by large dimensions and impressive weight, so it is not entirely comfortable to use alone. For convenient operation, the equipment is equipped with an electric winch, and a radiator is mounted on the thyristor.
Blueprints
A self-made drill is good because its design is “tailored” to its owner. During the manufacturing process, everyone makes their own changes, then many more refine the product. But it can be difficult to do without basic drawings. This engraving contains several drawings with the sizes of various drills. As you understand, the dimensions are arbitrary; they can and should be changed, adjusting them to the size of the required wells.
Shovel drill
There is no point in making a serious structure for planting plants. In this case, you can make a garden drill from a shovel. Choose a high-quality shovel made of good steel, apply markings as shown in the drawing. According to the markings, you will need to cut out two small fragments and saw the lower part in the middle to a depth of 30 cm (pictured).
Next, the edges are bent one forward, the other back, and the petals formed in the lower part are folded towards them. The resulting seams are boiled outside and inside.
Drill for soft soils
If the ground is soft, the conventional design does not work very well. For such cases, there is a special drill with an extended cutting part. It is a kind of glass with slits on the sides. The cuts are equipped with cutting edges. They are best made from well-hardened steel.
Drill for soft soils
This drawing shows an interesting handle design - it can be rearranged as the length of the rod increases.
Basic drawings of auger and garden auger
Both of these units work well, but the garden one has to be taken out often, and the auger one is harder to rotate. Choose according to your own preferences.
Auger and garden auger for soil of different densities
Detailed projection drawing of an auger drill
Garden auger drawing
Useful tips
When trying to make a high-quality hole drill with your own hands, you need to be patient and follow the instructions exactly. With a responsible approach, in a short period of time you can create a good tool with which you can solve a lot of construction and household problems.
It is important to understand that in some models the cutting elements are made removable, and the holes themselves are made using garden drills. And for their further expansion, a folding knife with a special earth receiver is taken. This guarantees quick completion of the task with a significant reduction in labor costs.
Popular brands
Today, electric drills allow you to perform many jobs. Without these tools, the efficiency of solving many problems would be significantly reduced. Thanks to the fact that suppliers now offer equipment that meets consumer needs, labor productivity has increased significantly and less and less human effort is spent.
Drill manufacturers compete for dominance in the market and try to improve new models of equipment. The brands in greatest demand are:
STIHL is the first domestic company to produce a variety of technical equipment at attractive prices. The models presented by this brand receive a lot of positive reviews. Buyers note the decent quality of the products. As for electric drills, STIHL guarantees a long service life of the unit.
There is a large selection of drill models designed for work of various formats.
Equipment for any, even the most specific taste, is sold by the following brand - EFCO , which specializes primarily in garden equipment. It is not surprising that this Italian brand is so famous on the Russian market: official representative offices sell its products in many countries. The drills from this company are very durable and are used for tasks of various sizes, from making an ice hole for fishing to responsible professional work.
Electric drill for excavation work: advantages of modern devices
Builder 4th category
You have to use a variety of equipment in your garden. To plant trees or build a fence, the owner will need an electric excavation drill. This device is simple in design and has high performance. You just need to choose the right device, and the work will take less physical effort and time.
Hand drill design
A garden auger is a very useful device for any summer resident. It is very compact, convenient and easy to use. As a rule, it is made of solid metal. It effortlessly splits small stones and plant rhizomes into pieces.
With the help of such a device, you can easily dig a hole by rotating it around its axis like a corkscrew.
The main purpose of the drill is to dig holes for posts. Small wells are made by the cutting part of the device, which can be of various shapes:
- Two-blade;
- In the form of half-discs;
- Helical;
- Screw-shaped;
- Multi-tiered;
- Solid or removable.
There are models that start with small blades and gradually increase the top to larger sizes. A factory drill is not functional and effective in all situations, because the tool simply will not be able to penetrate the soil to the required depth, or its attachments will not be of the required diameter.
Although the cost of a factory-made pole drill is relatively affordable, it is quite possible to make a useful tool yourself, and at the same time it will meet all the necessary requirements. The technology for making a drill with your own hands is very simple, and its cost will be much cheaper than a factory one. You just need to decide on the parameters of the product.
Let's look at several different designs that are responsible for the efficiency and functionality of the drill:
Baking powder. This part consists of a pair of planes or a screw. The auger looks like a spiral, the knife is located on a rod. Soil receiver. This part collects soil, and it greatly facilitates the drilling of holes up to 35 cm in size. Forming plow. It is located in the lower zone
This design allows you to strengthen the columnar foundation, which is very important in the construction of massive structures. The auger is attached to the handle with a bolted connection. The length of the ready-to-use and fully assembled product is about a meter, which allows you to easily make holes up to 70 cm deep
If the hole needs to be deeper, then the structure can be expanded using a tube (500 mm). This element is a part with a nut and bolt, which are located at the ends of the pipes.
Rules of application
Typically, an electric earth drill is used to make holes for planting fruit trees or shrubs. But this device can also come in handy during construction work. It is great for creating holes where piles or other supporting elements will later be installed.
Manually creating holes in the ground is a labor-intensive task and is made more difficult by the presence of rocks and tree roots. However, using an electric drill can solve the problem easily and quickly. In a situation where it is necessary to drill holes in a hard-to-reach place, where it is not possible to place large equipment, such a device will significantly facilitate the process.
There are a variety of electric drills available in the market today. They differ in size from each other. They can even be used for work such as drilling a well or constructing a well. If you need a device to perform a wide range of tasks in the garden, then you can easily purchase it at any specialized store.
Budget electric drill.
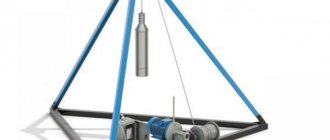
As they say, laziness is the engine of progress. He began experiments on drilling through thick ice back in 2014. And it seems that I found the optimal solution to this, in the form of an attachment - a gearbox for a chainsaw, but something didn’t catch on; of course, it’s convenient for them to drive assholes, but that’s not what we go fishing for. https://www.youtube.com/watch?v=5mIlvYdKwvA And then just last season the original battery on the Dingasik “died” (it’s a winter “goat”, like a snowmobile), I stuck an adult 55 A/h battery in it .
Well, I think, since the stars have aligned, it’s time to switch the drill to electric traction. I bought a Toyota electric power steering at Drome for 2.5 rubles.
, a 22mm aluminum tube in Leroy, a rubberized cable with a cross section of 2.5mm, a 40 Amp car relay, a 30 A fuse, bicycle handles, crocodile clips on the terminals, and other little things.
First of all, I unscrewed all the unnecessary parts from the amplifier that could not be removed in a civilized way - I sawed them off with a grinder, only two wires should be left (thick power ones), the rest “in the furnace”. The button cannot be connected directly, they are usually designed for 2-5 amperes, and the motor “eats” 15-17, in general, sooner or later it will burn out. It is also advisable to install a fuse in the power branch; no one is insured against a short circuit, otherwise at least the battery will remain intact.
The button I have is not quite correct, it is a two-position on-off button, it is better to set it to “single-contact” like on a doorbell, pressed - there is power, released - no power, it’s safer.
Well, of course, it is advisable to solder all contacts. There is a lot of information on the Internet about how to connect a relay; I won’t describe it. I screwed the handle into the standard holes of the amplifier. I put spacers inside the tube on the bolts, without them, when tightening the nut, the handle flattens and it bursts.
The diameter of the output shaft was adjusted to the dimensions of the adapter.
The weight turned out to be 5 kg. Rotation can be provided either left or right, it all depends on how the terminals are connected to the battery. The rotation speed is about 140 rpm, which makes it quite comfortable to make holes in the ice.
I’ll also tell you a case of how NOT to do it. I started assembling the drill at the end of last season, screwed on the handle, installed the auger, threw the wires directly without buttons and relays and ran to the tests. The first hole was good, the second was a total “song”, and on the third the auger got caught on the lower edge of the ice..... In general, while I reached it and threw off the terminals, the handle broke off on the ice. It’s good that the drill itself didn’t drown. So don't repeat other people's mistakes. I wish you all a good bite and big catches in the coming season.
Which drill is better?
Drills for drilling wells come in two types: spiral (disc, auger) and spoon. Each type has its own advantages and disadvantages and is used for a specific type of soil.
Spiral drill - advantages and disadvantages
The versatility of the spiral type allows it to be used not only for constructing wells, but also for other gardening and construction work.
Advantages:
- Wide range of applications. Used in the construction of fences, pile foundations, planting, etc.
- Fast and easy penetration into the ground.
- At shallow depths, soil is automatically removed from the well using a drill auger.
- Easy to make with your own hands.
Flaws:
- To excavate the soil, it is necessary to disassemble the boom.
- Not suitable for loose and rocky materials.
- Small passage depth.
- You have to frequently clear away the worked-out soil.
Spoon drill – is it worth choosing?
The advantages of a spoon drill over other types of hand drills justify its use.
- Used for loose soils.
- Soil excavation is carried out by the lower and side edges of the drill.
- The width of the passage is greater than the diameter of the drill, which makes it easier to remove it from the well.
- You can rotate the drill not only manually, but also with a drill or hammer drill.
- The simplest design and manufacturing method.
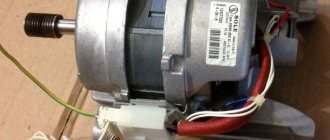
Motor: removable or non-removable
So, there is a drill, a chainsaw engine and a gearbox in a strong and reliable case. Now they need to be connected to each other. And here the question arises: how will the engine be used?
If the engine will be used only for drilling, then the structure can be made monolithic: the engine will not be removed from the structure.
However, this decision seems somewhat strange. After all, you will probably need to use a chainsaw someday, which means you will have to return the engine to its place. Therefore, it is better to leave the ability to remove the engine from a homemade housing as needed.
In order to obtain this opportunity, you need to make holes in the housing to install the engine. The hole must match the dimensions of the chainsaw engine.
In addition, it is very important to consider a reliable fastening system. The engine mount should be strong, but it shouldn't be a horribly time consuming process to insert or remove the engine. Ideally, it should be like this: unscrew two or three nuts, lift the frame, pull out the motor (or insert the motor, lower the frame, screw in the nuts).
When making a design, you need to take into account not only the size of the chainsaw, but also the convenience of refueling and valve control to control the pressure in the engine.
How to make an auger drill
You can make your own spiral drill of 2 types for rotary drilling of wells: with a spiral cutting element, with a hemispherical disk knife. For work you will need:
- A metal rod or strong pipe is the base, a hollow pipe of larger diameter is for the container on the rod of the spoon.
- Couplings for connecting rods, metal handle - a piece of reinforcement, rod, up to 40 - 50 cm long.
- Metal sheet if a spiral knife is planned.
- Steel discs with teeth from an electric saw.
Metal circles of different diameters are suitable for forming a cutting surface
Spiral simple and two-stage drill: drawings
How to make a classic drill with a spiral band knife for a sand well? It is difficult to make such a tool with your own hands without special machines for working with metal. The difficulty lies in the preliminary hardening and bending of the metal strip. It is necessary to select steel with a thickness of 1.5 - 2 mm. Next, the hot strip is bent on a machine, giving the strip a spiral shape.
A spiral drill with a long cutting band cannot be made without equipment
Only after this is the tape welded to the base. During the connection, symmetry is monitored: the turns must be positioned strictly parallel to each other and at a certain angle to the horizontal line. The edge of the tape is sharpened and the surface is painted.
Drawing of a simple drill with two knives at an angle
Starting from the simplest design, you can improve the tool and make a drill that is suitable for drilling shallow wells of different diameters.
For production, take 3 disks of the same thickness with different diameters. Each is cut into 2 halves, one edge (bottom) is sharpened. Holes are drilled in all parts to connect the petals.
Drill parts
A circle of smaller diameter is welded to the base so that the edges of the two halves form an angle of 30 degrees. Larger diameter knives are attached to the upper one using nuts and bolts.
Ready-to-assemble drill with replaceable blade sets
The rod is formed with thread cutting or a coupling with finished thread is welded to the upper edge: in this case, there is no need to install protection against unwinding during operation.
Advantages of a homemade motor drill
You can make a motorized drill yourself for those who have good metalworking skills and are familiar with turning. Costs will be minimal if you already have a chainsaw. It is enough to purchase an adapter for a screw auger and a gear worm gearbox. The gear ratio of the latter must be at least 1/55. There is no need for mechanical transmissions or couplings.
This technique has obvious advantages over professional tools:
Using a motor drill
- saving money;
- the ability to quickly and easily perform site improvement tasks;
- due to the low power of the motor, there is no need to additionally involve a specialist;
- homemade drill - light and mobile.
Some believe that a non-professional gas drill cannot be classified as a full-fledged technique, because the maximum possible diameter of the hole is no more than 150 mm. This value is quite sufficient for solving everyday problems. Of course, such a technique is not suitable for large-scale production.