Greetings, my dear readers.
Sorry I haven't written for so long. A whole bunch of problems have accumulated, both at home and at work, not only did I sit without the Internet for two weeks - death, melancholy.
Today I will tell you the secret of the ancient diggers and teach you how to dig a hole correctly - in case it comes in handy for someone! It doesn’t matter whether you’re digging or digging, it doesn’t matter what you’re digging for - you’re digging a shambo, a drain hole for waste products, a sewer, you’re digging a hole for a garage or a toilet - the main thing is that you must understand that after reading this article you will become a digging Jedi, only damn, instead of a laser pointer you will have a shovel! So, let's get started my tireless hands!
We made the markings, again I will repeat to you that it doesn’t matter why you are digging, even just for the sake of it. What a romance - he took a shovel and went. As my grandfather said, and his grandfather told him - dig deeper, throw further, rest while you fly!
So, my one-assed, two-bunched creatures - let's look at all the options through the prism of a shovel!
Where does dense soil come from?
Surprisingly, by trying to improve the soil, man himself spoils it. Experts are familiar with the phenomenon of plow sole. This is a dense layer of soil that forms between the plowed soil and the subsoil. Depending on the method of processing the area, the depth of this gap ranges from a couple of tens of centimeters to a meter.
It is impossible to avoid the appearance of arable sole
What is the harm of a plow sole? Impenetrable to roots. Moisture and most nutrients accumulate below the sole, and the roots cannot get through to them.
Please note that the thickness of this barrier also varies. In the beds it is only 10-15 centimeters, when cultivating the field with heavy equipment - up to 40 centimeters
It is impossible to avoid the appearance of arable sole. Even working with one shovel is still stressful for the soil. The weight of a person is quite enough to form a seal. In addition, people calmly walk around the site when there are no beds on it yet or no longer. Do you make circles, dragging sacks of potatoes across the field, or do you take shortcuts based on the rule that the shortest distance between two points is a straight line?
There are no plow soles in the forest. The soil is plowed by thousands of worms, and the likelihood that several living creatures will pass through the same area during the day is negligible.
Dimensions of inspection hole
It is necessary to take into account the dimensions of the walls and bottom when calculating the area of the pit. The dimensions of the inspection pit will be 75x185x300 cm. The thickness of the concrete walls and floor is approximately 10 cm.
The calculations will be as follows: 0.85x3 = 2.55 m2 - area.
The following pit size criteria exist:
- Traditionally, the width of the pit is made from 70 to 75 cm. This width is enough for free movement inside. This distance between the walls is necessary for a car to enter.
- The construction is done so that the walls narrow slightly to the floor.
- If possible, make a ladder in the hole. In this case, the length is increased by 100–120 cm.
- The height of the pit is no less than 170–180 cm. These dimensions are arbitrary, since the height of the garage owner is taken into account here.
- The depth should exceed the owner’s height by 25–30 cm, so that the hands do not get tired when working.
Metal limiters are installed near the pit for safety. These are 4 pillars attached to the corners of the niche, 10–15 cm each. From time to time for those. For inspection, not 4 pillars are used, but 2 corners, which are installed opposite each other.
Naturally, it is even easier to make a hole when the garage has not yet been built; here it is necessary to complete this work until the floors are poured.
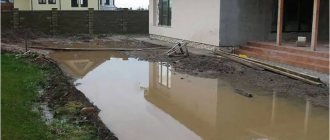
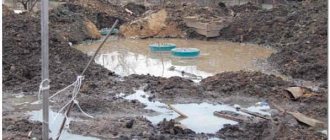
It is imperative to find out how groundwater is located in the ground. The degree of groundwater occurrence in the area where the garage is located plays a major role.
In a garage under construction, it is necessary to make a drainage system that drains excess water into the sewer system. We must remember that dampness and humidity are the main danger for pits and garages; their service life depends on this.
What it looks like: harvesting parsnips and planting winter garlic
The situation is as follows: parsnips have been removed from the garden bed, and we are planning to plant garlic in its place. Neighborhood rules are observed - this is an important point and cannot be missed.
Autumn digging of ridges
Parsnips have long roots. To get the crop out of the ground, you need the help of a shovel. We act carefully. We drive a shovel into the ground near the parsnip and make a slight movement - you should hear the sound of roots tearing. We take out the shovel vertically, without disturbing the layers of soil, and pull out the parsnips. We receive a harvested crop and a conditionally dug garden bed. Please note that the soil is practically not damaged during the process.
Just for fun, you can check the degree of softness of the soil after this method of growing and harvesting. After three years, without digging, a thin twig easily penetrates the ground to a depth of 70 centimeters!
Now it's garlic's turn. Using a flat hoe, we slightly loosen and at the same time level the ground. Touch the top 3–5 centimeters, no more. Use a peg to make holes for the garlic cloves, place them in places and sprinkle. Work is done.
All that remains is to cover the beds with parsnip tops. Under natural conditions, it would remain lying on top of the ground - no need to break the rules. In spring, the soil under the leaves will be soft as feathers.
Foundation trench width
The trench itself will always be wider than the foundation blocks that will fall into it. In turn, the foundation should be slightly wider than the main planned walls.
In practice, the width is calculated based on the dimensions of the structure, including formwork and supports plus 0.4 m (0.2 outside and 0.2 m inside the building).
As a rule, a trench for a private house is manually dug with a width of 0.7-0.8 m. With these dimensions, it is convenient to remove soil and move freely when carrying out work.
When digging a foundation manually, the bottom layer of soil must be removed as horizontally as possible, without disturbing the natural density of the soil.
The crumbled soil should not be trampled down, but must be removed. This is important because even compacted earth is much inferior to the natural density of the soil.
What is a sole and how to get rid of it
The sole is a layer of compacted soil resulting from frequent digging of the garden to the same depth.
Heavy soils (soddy-podzolic, clayey) and swampy soils are susceptible to the formation of soles. It is recommended to carry out a two-tier excavation of the territory every 4-6 years.
Important! Do not overuse two-tier digging. Beneficial substances disappear
The sole prevents the growth of many rooted plants: celery, carrots, beets, onions, parsley, etc., and deforms their roots.
If the sole is heavily compacted, then stagnation of water occurs, which promotes the development of unfavorable bacteria and microorganisms, which subsequently affect the development of vegetables.
A two-tiered digging of the garden will help you get rid of the sole. It is advisable to carry it out in the fall, so that beneficial microflora has time to form during the winter and spring. To do this, you need to dig a furrow the width of the bayonet of your shovel and loosen its bottom with a garden fork. In this case, the soil along the edges of the furrow should also be loosened. Then you can add compost or manure. As a result of such digging, the arable layer increases, and the earth is saturated with oxygen necessary for the development of useful substances, and its physical and water properties improve.
Did you know? During two-tier digging, the top layer of low-fertility soil is not removed.
Insulation of inspection pit
To work in winter, the pit is insulated. In addition, you need to save electricity to heat the garage. Even when calculating the work on the pit, it should be insulated mainly with polystyrene.
He has the following qualities:
- does not rot at all;
- does not support combustion in any way;
- does not let water through in any way, is perfectly attached to concrete planes with the support of glue;
- inexpensive;
- not dangerous to health.
It is traditionally recommended to use polystyrene foam of the PSB-S-25 brand for the walls, and PSB-S-35 for the floor. It is installed in a layer 50 mm wide. For fastening, cement-based glue is used. Many people skimp on insulating their pits and as a result, they often get sick in winter.
Quotes again
A little about recommendations from dacha magazines. One of the readers says that for carrots she digs up the beds twice (in autumn and spring), applies humus and mineral fertilizers. The gorgeous harvest from the photo above was grown contrary to all these rules. And not for the first time, not by chance, but year after year.
It is known that carrots came to us from the Mediterranean. It was originally grown on cultivated former peatlands, so heavy soils are not suitable for it. In beds formed with virtually no outside participation, the root crop feels great. Need proof? – Go back to the photographs.
More about the rules of cultivation in the next video.
https://youtube.com/watch?v=PUAfcAUVnZc
How to properly dig soil with a shovel. How to dig in the garden correctly: advice from experienced people
Having seen how inexperienced summer residents hold a shovel in their hands, we decided to tell everyone how to properly dig in the garden, so as to benefit the soil and not cause harm to themselves.
We are absolutely serious, and this is not a joke, but quite serious material, and even instructions for using a shovel in the country, so to speak. We were prompted to write it literally by the current warm season, when young people were spotted in many suburban areas. Naturally, this is very good, because young people work the land, which means they are busy with useful work. But this is precisely where the positive from what he saw ends, since a shovel in his hands is not yet a reason for applause. First, you need to learn how to dig correctly, and only then you can take up the tool.
How to dig soil in the garden: instructions
Now we will provide you with literally a few points that will tell you in detail how to dig in a vegetable garden or garden.
The most important thing in such a process is the correct choice of tool.
- One hand rests on the edge of the shovel handle, the second - a little further, holding the handle in the palm of your hand, the foot is placed on the top of the shovel tray and pressure is applied downward into the ground, preferably at a slight angle.
- After the blade of the shovel has sunk into the soil, you need to take a more comfortable position for lifting and dumping the soil, which means you need to take a step back, bend a little and put pressure on the handle of the shovel, grabbing one hand even closer to the tray.
- Now, you can bend your knees a little and press as much as possible on the handle, which, with a lever effect, will pull the soil out of the hole.
- Raise the shovel with the soil, turn it over and lower it into the hole, hit the largest lumps of earth with the blade of the shovel several times to break them up.
You see, digging with a shovel is very easy, it’s strange that many people don’t succeed the first time.
We remind you once again that the material on how to properly dig the soil is only for beginners in summer cottages, gardens and vegetable gardens, and in no way concerns experienced summer residents, who themselves are able to give such advice.
How to dig a garden without injuring your legs
It often happens that in a moment of excitement or anger, we forget about safety precautions and want to break a large earthen lump, break the root or stem of a large weed with a shovel blade, and so on. But it often happens that such an action can injure the performer of this work. To prevent this from happening, try to take the process seriously, do not be nervous while working, maintain a safe distance between the shovel and your feet during such actions, and also try to dig in closed shoes, such as boots. Of course, doing this in the summer is not particularly pleasant, but believe me, an injury from a shovel or even drying out the skin of your feet from dust (if you work in slippers) is much more unpleasant.
How to dig a vegetable garden without calluses
To prevent unpleasant marks on your hands while digging the soil, you need to use high-quality rag gloves with rubberized inserts (these are very convenient for such work). Also, try to hold the shovel correctly, do not put too much pressure on the handle with your palm when you can use the strength of your leg for this, and also, do not hold the shovel too tightly with your hands when turning the earth into the hole.
That's all, just a couple of practical tips, and we are back to more serious topics, but we are proud that now many will be able to learn how to dig properly in the garden, without injury and unnecessary fatigue.
How to properly dig a hole with a flat bottom, even on slopes
Whether you are installing a support for a site, digging a trench for a retaining wall, or building a fire pit in your garden, you need to properly dig a hole with a bottom, flat, flat surface. If the terrain is similarly flat, the job requires nothing more than a shovel and a measuring tape. But on slopes, you can also make do with just a peg, level and string to properly dig the hole. Here's how to do it
1. Mark the perimeter of the hole, and then begin digging the hole at the lowest point until you reach your target depth, measured from the bottom of the slope. Continue digging the hole further, doing your best to stay level with the designed depth.
2. When most of the soil has been excavated from the hole, drive a stake into the ground near the highest point, about 6 inches beyond the marked edge of the hole. Tie a string around the peg, hang the level on the string and pull it elastically over the entire hole. Hold the level bubble in the center, and measure from the lace to the bottom of the hole on the underside. This measurement is from the cord down to the ground, your guide to how deep to dig to properly dig a hole.
3. Take repeated level measurements from the string to the bottom of the hole being dug, at each point in the hole, sometimes adding, removing or compacting soil. You will be finished and will be able to say that you have dug the hole correctly when the distance from the string to the bottom of the hole is the same no matter where you hold the string above the hole.
Based on materials from www.thisoldhouse.com
tnn-garden.ru
How to prepare the soil for planting vegetables
After the first processing of virgin soil, you cannot immediately begin cultivation. It is necessary to further prepare the land. If the soil was processed using machinery, then weeds are not selected from it, as with manual digging, but are plowed up along with the soil.
After plowing with a walk-behind tractor or
To improve the structure of the soil and saturate it with useful microelements, green manure plants (mustard, lupine, oats, rye, alfalfa) are planted. When the greenery grows, it is mowed and additional digging is carried out using machinery or manually.
Winter crops are planted in winter. In early spring, after the snow melts, the third plowing is carried out and the plot is planted with garden crops for the first time.
After manual digging
When cultivating the land manually, you can use the previous method, but more often they do it differently. The land freed from turf is treated with herbicides to kill weeds. Then sprinkle with peat, humus or sawdust and dig, mixing everything.
A week later, the soil is fertilized with complex mineral fertilizers: potassium sulfate, ammonium nitrate, nitrophoska, superphosphate and dug up a second time. The land becomes suitable for use as a vegetable garden.
Organic farming and soil cultivation features
Organic farming is based on respect for the land.
Proper, reasonable management of the land will help preserve and increase soil fertility. That is why supporters of organic farming adhere to the following principles:
- The loose layer should be no more than 5 cm. Digging and plowing are prohibited. If you dig up the soil for 2-3 years, you will notice its enrichment with oxygen. The activity of microorganisms is manifested, the root system of plants extracts nutrients more easily. But then a decline occurs, and the soil becomes poorer: the amount of humus decreases and its structure changes
- Carrying out mulching. Beneficial microorganisms and worms are activated under a layer of mulch, moisture is retained, a soil crust does not form, and the earth does not overheat on hot days.
- Revitalizing the earth by feeding living fauna with compost, green manure, and organic compounds that penetrate into the deep layers during watering, nourishing the roots of plants. For irrigation, trenches are dug along the beds.
- During gardening work, the introduction of preparations containing microorganisms. This technology was developed by Japanese scientists and has been successfully used for 15 years. Beneficial microbes and fungi introduced into the soil begin to actively divide, suppressing pathogenic microflora and bringing organic matter into a form accessible to plants. Effective microorganisms significantly increase yield. It's easier than waiting for them to gradually reproduce
- Crop rotation is important so that part of the land is “fallow”, and in other areas there is a change of crops. This is necessary to avoid the accumulation of pests and diseases in the soil that parasitize a specific plant family.
Organic farming
Organic farming involves slight loosening of the soil. This is necessary to enrich it with oxygen, trim weeds and prepare it for planting. The rest of the work is completed by worms and microorganisms: they loosen and process nutrients, converting them into a form accessible to plants.
Flat-cutting as a soil care option
Loosening the soil with a flat cutter
In organic farming, a shovel is not needed; a flat cutter is used, which goes underground and loosens it without digging up. This tool is needed not only in spring. It is perfect for killing weeds throughout the season.
A sharp flat cutter is used:
- with surface tillage to a depth of 5 cm
- when creating beds
- for destroying excess shoots and raspberry cuttings
- while hilling potatoes
- for removing strawberry whiskers
- when cutting furrows for sowing seeds
- for thinning densely sprouted seedlings
The miracle flat cutter will help loosen the soil under cucumbers that have a shallow root system. But it is impossible to dig up an overgrown area that has not been cultivated for a long time and the turf has already formed.
A dull flat cutter is recommended for land plots overgrown with weeds. Weeds caught under the blade of the tool are not only cut, but also uprooted. At the same time, the soil ecosystem remains intact and does not suffer from external interference. Flat-cut weed removal is carried out throughout the summer. It won't do any harm at the dacha in the fall.
How to increase soil fertility? TOP 8 environmentally friendly options +agricultural methods | +Reviews
Basic information
If a cesspool was built without taking into account all sanitary and technical standards (according to SNiP), sewage can seep into the soil, and then into groundwater, which can lead to severe poisoning of the body. If you are making a drainage hole with your own hands, do not forget to take into account all the requirements for the work.
This type of sewage system can most often be found in dachas, as well as in private houses where two or three people live temporarily. Such a number of residents use water evenly, so systematic cleaning of the cesspool is not necessary.
Reason one: digging deprives the soil of living organisms
We are accustomed to considering the earth to be inorganic matter, that is, nonliving, and we treat it accordingly. And soil is a very complex living organism with its own hierarchical structure, its own laws of coexistence, densely populated by microorganisms and lower animal organisms, such as, for example, earthworms.
When digging to the depth of a spade bayonet, turning the layer over, we swap the layers of soil, and each type of microorganism finds itself in an unfavorable environment for itself. Most of them die, and the soil, devoid of microorganisms, loses fertility. And at the same time, it is completely useless to apply any fertilizers until its population is restored.
Losing its inhabitants, the soil loses its structure along with them. Such soil is washed away by rains and carried away by winds. You probably have your own experience on this issue. Remember: you fill up a large pile of earth, for example, removed from the place where you are going to build a house, and then you want to use it for garden beds. And suddenly you discover that the soil has somehow become barren, although you put mostly sod in this pile.
Thanks to the use of agricultural machinery, today we have almost completely destroyed the most fertile lands on the entire planet and an inexorable decline in soil fertility. You and I cannot bring all of humanity to reason, but on our own plots we are quite capable of stopping disastrous agriculture and starting to restore the lost natural fertility of the soil.
How are these microchannels formed in the soil? The fact is that the root system of plants is huge. Not only can it go deep up to 2-5 m (in beets, for example, the central root can penetrate up to 3-4 m deep, and in cucumber - up to 1 m), but also branches in all directions, and each of these roots is covered hundreds of thousands of sucking hairs, the total length of which can reach 5–10 km! As a result, every inch of earth is literally riddled with these hairs.
When the above-ground part of the plant dies, soil microorganisms begin to eat the remains of the roots. As a result, microscopic channels are formed through which moisture penetrates, and after it is absorbed by the soil, air rushes into the soil through the channels. In addition, worms make passages in the soil, which also serve as channels for water and air, only larger ones. Through all these passages, the roots of the next generation of plants easily penetrate deep into the soil.
We are strongly recommended to dig up the soil in the fall in order to destroy pests that have settled for the winter in the surface layer of soil, and also to ensure that moisture penetrates between the clods, freezes and expands the passages for spring water and air, which will rush through these cracks into the soil layer.
Results
Summarizing the above information, you should group the main points that you need to remember when deciding to dig a ditch for the water supply system yourself:
- before you start digging, you need to determine the parameters of the future hole: configuration, width and depth;
- the shape of the section must be chosen based on the characteristics of the soil in order to prevent the possibility of the walls collapsing;
- how wide and deep the ditch will be is determined by the level of freezing of the soil layers and the convenience of excavation work;
- at the stage of marking implementation, it is necessary to keep in mind the location of other communication connections available on the territory;
- The digging method should be chosen in accordance with financial capabilities, as well as taking into account the presence or absence of free access for special equipment.
The need to organize water supply arises both in a residential building and in a summer cottage. When figuring out what is used to dig trenches for water supply, we must not forget about the quality characteristics of drinking liquid. To get truly clean drinking, you should use special filtering devices. Thus, ours is one of the leaders in the production of water treatment equipment. The quality of the company's products is repeatedly confirmed by years of successful work in this area and reviews from grateful consumers.
Useful waste paper
This very original method will be effective if you carefully follow the instructions. To make it a reality, you will need rotted manure (you can use chicken manure, compost or humus). This composition must be evenly distributed over the entire area of the developed area and covered on top with black and white newspaper 5-7 layers thick. If you find this difficult, you can replace the newspaper with thick cardboard. Compost mixed with manure is poured onto the paper layer on top.
The advantage of this method is that you can make holes in newspapers in which you can plant any crops grown through seedlings. This is perfect for those who don’t want to wait a long time, being content with only potatoes and cabbage. At the end of the season, in addition to an excellent harvest of the crops you grow, you will also receive a clean area with soil enriched with vitamins and microelements.
Application of mineral fertilizers in autumn
Gardeners, when they start digging up plots, apply fertilizers. Organic matter must be distributed over the beds where it is planned to grow cabbage, cucumbers and seedlings. The amount of fertilizer should not exceed 1 bucket per square meter. m. Compost and manure are used. Mineral fertilizers are allowed for all crops. The soil for mineral compositions must be dug up to a depth of at least 20 cm. Liming is carried out if the soil is acidic.
Not everyone manages to complete all the work before the first cold weather. After harvesting cabbage, parsnips or celery, the tops do not need to be removed from the garden; you should finely chop them with a shovel and dig them in. This will become organic humus, which will be useful to plants in the spring.
Note!
If the furrows were plowed deeply, you will need to increase the dose of mineral fertilizers used, otherwise the desired effect will not be achieved.
Correct “marking” of the site
An important role in the formation of an “uncultivated” vegetable garden is played by the number of beds and paths between them. To begin with, you should make a level path along the perimeter of the garden so that you can drive up with a wheelbarrow to any point. Then you should outline the direction of the beds and begin to “conquer” the garden space using a flat cutter.
Having formed several beds, you should level their surface with a small rake, leaving low sides. It may seem that the soil in new beds dries out instantly, but this is only true for the surface 3-5 cm layer. At greater depths, moisture remains, which makes it possible to grow carrots, onions and many other crops.
It is easier to create your own microclimate on an area divided into zones
In the first year after harvesting, you need to sow green manure (mustard, phacelia or fenugreek) so that a nutritious “cover” is formed on the soil for the winter. Already next spring the soil will “breathe deeply” and become soft and pliable.
Perhaps such methods will seem unacceptable to some: they are not suitable for all climatic zones. But one thing is obvious - deep plowing of lands over time leads to their impoverishment and degeneration. So you need to manage wisely!
How to dig virgin soil correctly
Virgin land is land that has not been subjected to any cultivation, not plowed by anyone and, on the one hand, wild.
If you have such an area, then this is a great reason to treat it and get moral and physical satisfaction from the results. Once you have gathered the strength, tools and inspiration, you can immediately begin. But keep in mind that this is terrible work and testing.
Important! When choosing a site, you should make sure that there are amenities nearby: water, a store, a gas station, roads.
You can process virgin soil either with the help of equipment or on your own (this depends on your health). The method of processing with machinery is quite simple, but before you think that, except for a tractor, there is nothing you can do to dig up virgin soil, remember about your hands and feet. An excellent tool, and most importantly, free, for conquering virgin lands.
Manual processing is a complex and labor-intensive process. First of all, you need to choose the right season. The autumn digging period is perfect for this type of work. Since to process virgin soil you need to clear your abandoned area of weeds, start by choosing a lawn mower. You can use a regular one, but then the work time will increase.
Important! It is necessary to mow grass and weeds in virgin lands before mechanical processing. You will also need a shovel
It is best to dig up virgin soil in parts, dividing it with a thread. You need to dig to a depth of at least 15 cm. Leave the dug area to dry for a while. Then you need to walk over it with a pitchfork and fluff up the earth
You will also need a shovel. It is best to dig up virgin soil in parts, dividing it with a thread. You need to dig to a depth of at least 15 cm. Leave the dug area to dry for a while. Then you need to walk over it with a pitchfork and fluff up the earth.
When digging virgin soil, it is important to be patient, because such a task often remains abandoned due to its complexity
Sealed structures
Sealed tanks are made from various materials:
- brick;
- concrete;
- tarred wood;
- special reinforced concrete products.
In the end, you can buy a special plastic container and bury it in the ground.
When you dig a hole for a sealed structure, you need to do it with a slight slope towards the neck of the container to make pumping easier. The operating principle of such structures is extremely simple: using a sewer pipe, waste enters the tank, and when it is full, it is pumped out by specialists.
When choosing a location for a pit, consider the possibility of access by a special vehicle.
Additionally, you need to take into account the following nuances:
- distance to the neighboring area - at least 2 m;
- the distance to the main residential building is at least 5 m.
According to SNiP rules, the depth of the storage pit is no more than 3 m. If the container is larger, it will be practically impossible to completely pump out the sewage from it.
To guarantee explosion safety, ventilation is provided using a pipe (10 cm) that extends approximately 60 cm above the ground. When removing it, keep in mind that odors will come out of it corresponding to the contents of the tank.
What is good about autumn digging?
It is especially necessary to dig up the garden in the fall for heavy, uncultivated clay soils. At the same time, work is also carried out on other types of soil. Autumn digging of the garden has the following advantages:
- When deep cultivation of the soil in the garden, all pests rise to the top. Colorado potato beetle, wireworm, rodents, cabbage grass, caterpillars - they will all be eaten by birds or die from the cold, wind, and sun.
- At the time of autumn digging, weeds sprout under the still warm daytime sun. Stronger crops then die at the first frost. An ungerminated weed dies from wind and cold while still at the seed stage.
- During autumn digging, the remains of cultivated plants go into the ground. They simultaneously fertilize the soil and work as a leavening agent.
- In well-loosened soil, nitrogen-fixing microorganisms begin their active activity. They enrich the earth with all the forms of nitrogen it needs.
How to dig with a shovel correctly
- When digging your garden in the fall, you create better moisture retention (precipitation in the form of rain and snow). In the spring, such soil, warmed by the sun, will be more convenient for plants. It will create a kind of greenhouse effect for them.
- The ability to add the necessary fertilizers to the soil, which will completely rot and rot over the winter. Most often it is wood ash, green manure, sawdust moistened with urea.
Interesting: Using wood ash in the garden
Important: when digging up your garden in the fall, it is important to remove all fallen leaves from it. It is a mistake to think that it will become a good fertilizer.
Often the foliage can harbor diseases and pests that will begin their harmful activities in the soil.
As a last resort, you can then cover the dug-up garden with fallen leaves. In the spring it will need to be removed from the beds.
And the most important advantage of digging the garden in the fall is that by doing this work on the eve of winter, we make it easier for ourselves to carry out spring tillage before planting. In the warm months, it will be enough to just loosen the soil a little and form beds.
Lighting
To work in a pit you need lighting. It is necessary to use either a portable lamp or lay wires inside the wall for the lighting device. The voltage is no more than 36 V; at a voltage of 220 W, the wires must be folded into an elastic steel hose. Sockets and switches should be selected in waterproof version UR5 X in accordance with GOST 17677-82E and GOST 14254-80.
Despite all measures to protect against water, it is often difficult to breathe due to dampness in the pit, so ventilation must be done. An elastic air duct is stretched underground and brought out twenty-five centimeters above the surface. Cover the air duct with a lid to prevent contamination. In addition, ventilation allows you to dry both the pit and the garage well on warm days, which is simply necessary for the long-term operation of the structure.
Is it necessary to dig a garden?
It is necessary to dig a vegetable garden if the soil is heavy, clayey or loamy. The fact is that such soils retain moisture for a long time and have low air permeability. When you dig up heavy soils or those soils where the groundwater is high, you create a microporous soil structure. All pores are filled with air. That is, the land acquires almost double its volume. In such loose soils, plants rot more easily if left over the winter.
Light, initially loose soils do not require autumn digging. If you turn them over again, you disrupt the structure of the soil.
Digging a dense clay garden in the fall is extremely necessary. They do this to avoid the following consequences:
- Soil salinization. This is a major problem with land especially in those regions where the climate is very humid. In this case, only the top layer of soil always dries out. At deeper levels, salt always accumulates. As a result, this indicator greatly reduces the yield on the site.
- Accumulation of weeds and pests. If you don't touch the ground, they behave in an extremely arrogant manner. They take root and settle in the deep layers of the earth. Then the yield is greatly reduced.
- Strong soil compaction.
Tip: the answer to the question “do I need to dig my garden in the fall” sounds like a resounding “Yes.” Moreover, it is better to carry out digging in the fall rather than in the spring. Autumn digging must be done deep.
Work is carried out immediately after harvesting, before the onset of severe cold and snowfall.
Interesting: What can you plant next in the garden?
Correct technique
You need to dig correctly if only to make the whole process much easier and faster.
As a child, many people saw how to use a shovel
The basic movements remain the same, but you need to pay attention to one main point - you cannot lift the instrument from the ground using your wrists. You need to try to hook the end of the handle with your elbow, thereby giving an additional impulse, which will reduce the load on the person’s back and joints
By following this simple rule, you can dig up a large vegetable garden without any problems.
The position of the leading hand can be alternately changed while maintaining the necessary balance.
This technique becomes especially useful and necessary during large-scale and lengthy work, for example, when it is necessary to dig up a garden or remove large volumes of snow in the winter season.
When is the best time to dig up a vegetable garden - timing
Experienced gardeners note that digging up soil in the garden in the fall is much more useful than in the spring. With this procedure you can quickly get rid of many problems. This is especially true in regions with dry soil.
This technique is called “fall plowing”. After it, the overturned weeds freeze and die. If you dig up your garden in the spring, the weeds may germinate again. Therefore, it is recommended to dig up the soil in the fall every year. This will allow you to achieve maximum results.
In the fall, you can not only dig up the garden, but also add compost, humus or manure to the soil. In gardens where crops often suffer from Colorado potato beetles, mole crickets, wireworms and other parasites, digging allows you to eliminate their larvae. To do this, the soil needs to be turned over to a depth of 20-25 cm.
In this case, it is necessary to take into account the timing of processing the site in the fall. The timing for this may vary in different regions. Everything depends on weather conditions. The general approach is this: you need to dig up the ground as late as possible in the fall, before the first heavy rains and frosts.
After harvesting, you need to chop the tops, distribute them in an even layer on the surface of the soil and dig up the soil manually or using a special tool (light digger) or equipment (motoblock). It is recommended to schedule the procedure for October-November as long as the temperature outside is above 0°C.
Digging the soil in the garden in the spring will have a beneficial effect on the yield of vegetables, as it becomes loose and saturated with oxygen. The time it takes to dig up the soil in the spring also depends on the weather conditions of a particular region. You need to dig up the soil in the spring no later than a week before planting vegetables in the garden. Unlike in autumn, in spring you can dig up the soil in the garden shallowly (up to 10cm).
Tools for digging a vegetable garden
You can dig up a garden using various tools.
Bayonet shovel
This is the most common tool for digging up a garden, but if the area is large enough, the process can take several days. Digging with a bayonet shovel is very time-consuming and labor-intensive, but it is still the most popular method.
Pitchfork
Using a pitchfork, it is good to dig up an area where the soil is light and loose. Loamy soils are not suitable for digging with this tool.
Miracle shovel
This tool allows you to quickly and conveniently dig up the soil on your site. The process of tillage becomes less labor-intensive and more efficient and of high quality. The miracle shovel combines the work of two tools - a shovel and a fork.
If digging is done with a shovel, then you do not need to collect a lot of soil on the bayonet. To prevent compaction of the dug-up part of the garden, you do not need to walk on it, so the direction of digging should be backwards. Before digging up the garden, you can scatter peat, compost, fertilizer or humus around the area. And then dig up the ground.
Necessary materials
To calculate the volume of concrete, you need to multiply the length, width and height of the wall. The same calculations are carried out for gender.
When using brick, understanding its characteristics, you can simply determine its quantity in pieces. Brick dimensions - 250x120x60 mm.
For the work the following is used:
- shovels and bayonet shovels;
- buckets;
- trowels;
- welder;
- hacksaws.
The following materials are also needed:
- bricks;
- sand, crushed stone, cement;
- concrete M200;
- boards with a section of 400x50 mm;
- reinforcing bars;
- corner 50 mm wide;
- waterproofing material.
Recommendations
The process of leveling a summer cottage is considered complex, taking a lot of physical effort and time. Therefore, many land owners prefer to use the services of professionals who do everything quickly and correctly.
If you do the leveling of the territory yourself, then it is important to take into account the following recommendations:
Before starting all work related to adjusting the territory, you should decide in advance on its purpose and the creation of separate zones (choose a place for placing a swimming pool, arranging a garden and for building)
At this stage, it is necessary to carefully study the site plan and consult with a specialist in the field of land surveying, since it is important to analyze the location of groundwater, soil composition and the possibilities for further exploitation of the territory. In addition, the direction of water flow and the slope of the terrain should be determined. Since the entire complex of earthworks is associated with the movement of earth, it is necessary to assess the complexity of this activity, taking into account the area of the site, the topography and the desired result
Some of the work (leveling small areas) can be done manually using shovels and rakes. For other manipulations, the use of special equipment may be necessary.
The removed top fertile layer of soil can be stored for no more than a month, otherwise all aerobic microorganisms may die and the soil will become unusable (it will not be able to be enriched with oxygen).
You need to start leveling the land before starting to build a house, laying out garden paths and installing all communication systems. It is best to do this in the fall, since the winter-spring period can be rich in precipitation, and the soil will sag. In addition, the plot leveled in the fall for a vegetable garden will be well saturated with moisture and fertilizers over the winter, which will have a positive effect on growing crops.
Areas with large areas must be leveled using special equipment that can penetrate to a depth of up to 30 cm. You need to walk along and across the territory with a tractor, this will allow the soil to be well loosened. If there is a need to move a large volume of earth, then it is best to use a bulldozer.
If you plan to allocate an area for a lawn for flowers, then you need to provide it with a perfectly flat surface. To do this, levels are set and a check is made for the presence of curvature. In some places you can remove the top layer of soil, then fill in all the holes and level out the bumps. If the soil is heavy, it is recommended to mix the top layer with peat and sand. To quickly level areas with a slope, you can use the removed topsoil from other areas that are considered unsuitable for planting. First, the slopes are covered with sand, then with earth. It is allowed to leave a slight slope; it is needed to prevent melt and rain water from stagnating. To simplify the process of leveling areas with a slope, the square method will help, for which you need to drive wooden pegs around the perimeter of the territory and then add soil according to their height. When designing landscape design on a site, one should not forget about such a main attribute as steps. They can be arranged in the place where there are slopes on the site. If the territory is located on a hill, then one part of it can be leveled, and the other can be equipped with stairs and railings. Once the area is leveled, fountains, small ponds and statues can be placed on it.
You can see how to properly level the area in the following video.
Do-it-yourself inspection hole in the garage - dimensions, drawings, what to consider when designing, photos of the work
Today there are a huge number of services that provide car maintenance services, as well as carry out repairs of any degree of complexity. However, some motorists prefer to inspect their car themselves and even fix minor breakdowns. Today we’ll tell you how to make a hole in the garage with your own hands, so as not to repair the car while lying under it.
Tips for a beginning gardener: to dig or not to dig?
With the right approach to the land, it does not deplete, supplying the gardener with a harvest
The earth is a breathing substance, saturated with living organisms. Each “inhabitant” of the soil plays its role, working on its structure. It is with this understanding that you need to approach your plot of land. With such thoughts you need to take up a shovel. Consider whether you need to dig up the soil. Weigh the pros and cons.
And don't forget about the following points:
- If the soil is loose, rich in humus (sandy loam), then autumn digging is not necessary. It is enough to clean the area, removing foliage and weeds in which pest larvae or disease spores can overwinter. You'll have to dig up the overgrown area, otherwise you won't be able to deal with the weeds in the spring.
- Spring digging on loose soils is carried out with a flat cutter to a depth of up to 5 cm. Heavy soils are dug with a shovel bayonet without turning the earthen lump over.
- Organic compounds rich in nutrients are added. Poor soils require mineral nutrition, which is added strictly according to instructions.
- To avoid further damaging the top layers by loosening, use mulch or sow green manure. All this will keep the surface layer moist and loose. Mulch creates an excellent environment for the proliferation of microorganisms
- If the soil structure is disturbed (the soil is dusty, cracked, hard), then live preparations containing microorganisms are added along with compost or humus. They quickly divide and begin to “work”, restoring the soil structure
Both natural and synthetic materials can be used as mulch.
Over time, nature restores lost fertility without human help. Empty lands are abundantly populated with weeds. Gradually they die, the tops and foliage rot, providing food for soil microorganisms. They restore the soil structure and its fertility.
Proponents of organic farming approach the issue of tillage with caution. By maintaining its structure, we multiply the harvest and avoid depletion of the fertile layer
Intensive land cultivation technologies do not take such points into account, so huge areas quickly become unusable. Fertilizers are introduced into them and operation continues. This approach has a basis: feeding a growing humanity is not so easy. But no one has canceled the caring attitude and individual approach.