Designing the perfect kitchen is a big challenge for any homeowner. When you're dealing with a small space, it can seem like mission impossible.
In a small area you will have to use your imagination to harmoniously combine the kitchen and hallway.
An entryway kitchen, also known as a gallery kitchen, helps maximize available space to create an efficient workspace. You'll have to get creative with your design when designing a kitchen like this, but you can create a stylish and efficient kitchen no matter how limited your space is.
In this article we will talk about creating kitchens combined with a hallway.
Features of separating the kitchen from the hallway
In small apartments, people prefer to use partition walls. They want to divide one room into several smaller ones. For example, this often happens between the kitchen and the hallway.
You can separate the kitchen from the hallway without building a wall.
The best thing about these partitions is that they save space. This is their main purpose: to separate two rooms without inserting a wall between them, which will eat up your precious space.
The partition saves space in the apartment.
Pros and cons of kitchens combined with a hallway
How to separate the kitchen from the hallway? One of the main advantages of combined kitchens is the availability of space. You don't have to be a psychologist to know that regular communication with family makes us happier and healthier. The large open space allows you to enjoy a complete holiday with the whole family.
A kitchen combined with a hallway has both pros and cons.
At the same time, such kitchens have a number of disadvantages and disadvantages. Below we list the main advantages and disadvantages of combined kitchens.
Advantages
- Space efficiency and cost reduction. The concept of a combined kitchen contributes to more efficient use of space, since the kitchen is part of the living and hallway areas. In addition, it provides a sense of volume to the living space, especially in small apartments. This also helps in reducing the cost of renovation as fewer building materials are used when finishing off the kitchen.
- Family interaction and multitasking. An open kitchen encourages closer interaction with family and guests, not only while eating, but also while cooking. Wives can watch their favorite TV shows with their husbands while cooking their signature dishes. Moms and dads can also keep an eye on the little ones while they play in the hallway and living room.
- Natural light. The openness of the kitchen ensures that more natural light flows through. This makes the apartment warmer and more comfortable. Gone are the days when the kitchen felt more like a dungeon than a place to prepare food. Instead, lighter images appear.
- Hygiene. The idea is that if your kitchen is adjacent to the hallway or is part of the living area, you will keep it clean and tidy to avoid polluting the living space. According to statistics, separated kitchens are cleaned 40% less often than combined kitchens.
A single space has its advantages.
Flaws
Creating an open plan kitchen involves removing walls and structural work, as well as moving plumbing and electrical wires and sockets. This is a big job that may require builders, electricians and plumbers, which can take up a lot of your time.
Redevelopment of a large space will cost a lot of money and time.
When it comes to renovations and remodels, the kitchen is one of the most expensive rooms in the house. By turning this room into a shared space, you're adding value when it comes to renovations, redesigns, and remodels.
The kitchen is the most expensive room in the house.
If you have a dinner party, everyone will be able to see you cooking and preparing the food. Guests will witness work chaos. With this layout, it is impossible to close the door and hide the mess from your guests.
Be prepared that you will always be visible while cooking.
Open plans are much harder to keep clean, and you can't keep clutter in one room anymore, so consider whether you're happy living with clutter.
One of the disadvantages of a single space is the difficulty in maintaining order.
After reading these advantages and disadvantages, ask yourself a few questions, such as:
- Can I afford to remodel this part of my home?
- Will I be able to afford to renovate a large space?
- Will minor clutter bother me?
Once you've thought it through and decided that a kitchen combo is right for you, start designing and building your own kitchen.
Preparatory stage
- Before you begin any renovations, contact your housing office to find out what the requirements are for building permits and inspections, including any electrical and plumbing permits.
- Then measure the kitchen and draw a simple plan for the hallway layout.
- Determine which walls need to be knocked down to create more space. You should also check what type of walls you are cleaning. If they are load-bearing, removing them will change the structural stability of the entire home.
Ergonomic solutions for arranging kitchen and corridor spaces
To design the most functional interior of the kitchen and hallway, you should consider examples of design solutions with an emphasis on the ergonomics of the combined space:
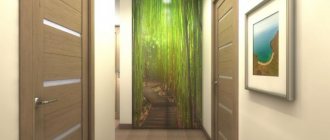
- Due to the entrance door being in the field of view of visitors to the combined room, it is necessary to focus attention on the decoration of the surrounding wall. A good idea would be cladding that reflects the features of the city landscape. To create an urban background, it is worth doing brick, stone, and concrete finishing. To decorate the wall, it is important to apply airbrush drawings with city scenes and hang lamps with the design of street lamps. If you plan to install a wardrobe with mirrored or glass doors, then it is reasonable to decorate them with stained glass windows with a metropolis theme.
Brick trim creates an urban backdrop
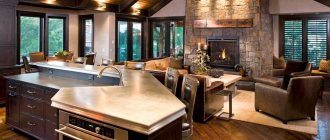
- If you need to organize a place to relax in a voluminous kitchen-corridor, it is reasonable to rely on the principles of minimalism. Nothing should interfere with the relaxation of those around you. Therefore, it is worth furnishing the space with built-in kitchen appliances, a set with doors that mask the internal contents (sink, stove, hood). If the dimensions of the area allow you to install volumetric interior details, then be sure to organize a fireplace area.
Furnish your space with built-in kitchen appliances
By choosing a professionally designed solution for combining the kitchen with the corridor, you can create the most convenient spatial composition. In a rationally equipped studio, every inhabitant of the house will be able to be endlessly inspired by the impressive-looking spacious environment and create real culinary masterpieces. A non-trivially designed kitchen space will definitely delight those around you, impressed by the implementation of a creative design idea.
How to choose colors
In all design salons, combining the kitchen with the hallway is considered as a way to expand the space. This is a particularly important reason for the growing popularity of open-plan kitchens and dining rooms as people look to update traditional homes with more modern, spacious living spaces.
Combining the kitchen and hallway will help make the apartment more modern and expand the space.
Choose natural color relationships
For harmonious color that flows smoothly through the open space of the kitchen, choose natural paint colors. You can use the color wheel to choose your paint. Choose similar colors that are next to each other on the color wheel.
It is advisable to choose natural colors.
Choose muted colors
You're not limited to neutral paint with an open floor plan, but you should stick to muted colors. When your kitchen is combined with a hallway and the dining room is part of an open living space, you may get tired of such bright colors. When browsing through potential colors, choose paint that is a neutral shade. Remember that it always looks brighter and more intense on the wall than in a jar.
To avoid getting tired of bright colors, choose muted tones.
Don't use two colors of paint on a solid wall.
In a combined kitchen, two zones have one solid wall. As much as you want to highlight each area, don't paint a solid wall with more than one color. Use one shade for the entire space.
A solid wall should be painted one color.
Use a second paint color on undivided walls in one area, making the overall wall act as an accent wall for that particular space.
Interior solutions for a kitchen combined with a corridor
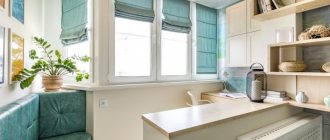
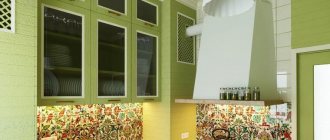
Ultra-modern interior design in light colors will create a unique flavor in the house, regardless of the size of the combined space. The decoration of the kitchen-corridor, made in various gradations of white, always looks fresh and airy:
- To decorate the lower part of the room, you should opt for light self-leveling floors in gray or beige.
- Wall cladding is characterized by the use of snow-white gypsum panels, the texture of which imitates natural materials - the roughness of tree bark, the texture of rocks or natural stone.
- To finish the ceiling, you can choose PVC fabric in pearl, sand, or sky colors.
Finishing in light colors looks fresh and airy
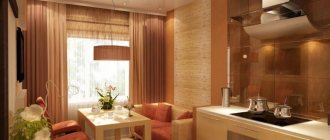
You can add bright accents to the light lining of the kitchen-corridor using landscaping and decorating with richly colored details - colorful organizers, railing rods, light panels, intricately shaped hangers, door mats in rainbow tones. You should not oversaturate the interior of a small combined corridor with a kitchen with an abundance of decorative items. Photos with examples of the introduction of uniform furnishings and accessories will help you competently design rooms that are completely different in purpose.
Bright details will refresh the interior
If window openings are small, you need to consider in detail the ability of mirror surfaces to reflect light. Solutions for installing wardrobes and shoe cabinets with mirrored facades are extremely useful for leveling the effect of darkness in a windowless corridor. They are able to multiply light, which is extremely necessary for the entrance area of the house, which acts as a presentation of its ultra-fashionable studio appearance.
Mirror surfaces fill the room with light
Design style
Combined kitchens should adhere to the general style of your apartment. Failure to comply with this rule will lead to loss of visual harmony of the space.
It is advisable to use the same style in the kitchen as for the entire apartment.
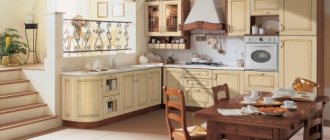
The natural combination of furniture and decoration will help you create a comfortable, lively image of the kitchen. When designing such a kitchen, try to maintain harmony of colors and shapes.
The furniture should be combined with the decoration, then the home will look harmonious.
Required materials
Before choosing the material from which your partition will be made, you should first of all decide on its purpose and interior style. Below we will describe the most common materials used for zoning the territory.
Plasterboard sheet
Drywall is intended for the construction of solid fences and for the construction of false walls. It has gained popularity due to its low cost and ease of installation and looks great in combination with any metal, board or glass blanks. GCR is very plastic, thanks to this you can create columns, arches or any other curved partitions.
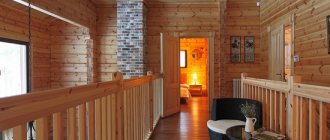
Wood
Natural wood, just like drywall, goes well with any apartment design. The main thing is the correct choice of color shade. Wood can be used to construct bedside tables, shelves, a bar counter with chairs, etc. Wood looks very stylish and is highly reliable. But it also has negative sides. And the main drawback is the price. Not every owner can afford to make a wooden arch.
In addition to this, wooden partitions are vulnerable to moisture, so installing a natural wood partition near the kitchen or bathroom is not advisable.
This option is a better alternative to wood, and with proper surface treatment it will be very difficult to distinguish. Chipboard is much cheaper and does not require careful maintenance. If we compare this sheet with natural wood, it is less strong, and when heated it can emit unpleasant odors. Shelves, cabinets and other furniture can be built from this material.
Furniture selection
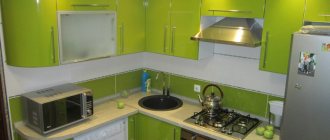
An easy way to make the most of a large space is to create a balanced look with tall pieces of furniture. Use tall and narrow kitchen cabinets that compensate for the lack of available space.
The lack of free space is compensated for by tall and narrow cabinets.
When choosing a refrigerator and stove, stick to a small width, paying attention to furniture of high height.
The refrigerator and stove should also be narrow.
Try to decorate your kitchen with glass furniture that will improve the light in the space.
Glass interior items will add more light to the space.
Fire partitions in public corridors
Partitions are different: interior, inter-apartment, wooden, plasterboard, plastic. But there are other fireproof partitions. Their function is to partition or separate the space, thereby dividing it into compartments, and to protect each compartment separately from the penetration of fire into it from a fire. Such partitions are mainly used in public corridors: in hotels, dormitories, and administrative buildings.
Fire partitions in public corridors are the requirements of SNiP and GOST. No public institution will be put into operation if these requirements of architectural standards are not met during its construction.
Therefore, please pay attention to the following.
During construction, the type of fire barrier is determined based on:
But, like all architectural structures, fire partitions also have differences. We divide them into the following types: 1st type – for rooms with a glazing percentage of up to 25%, and 2nd type – with a glazing percentage of over 25%; which means fire resistance rating. The first type of partition should prevent fire from entering the compartment for 15 minutes, the other for 45 minutes.
Materials used to make fire partitions:
This is very important, because your life may depend on the chosen material.
Lighting Features
A hallway kitchen can often be dark and cramped, so lighting is important to consider when planning your design. Ceiling lights are an ideal option because they do not take up space in the room. Place a row of recessed lights along the hallway to ensure the entire space is well lit.
Ceiling lamps are an ideal option for illuminating a combined space.
Natural light is also a central feature of almost any open plan space, helping the area feel brighter and more spacious.
In a combined kitchen, the soft light from LED lighting should be compensated by a large amount of natural light coming through the windows. It also seamlessly connects the indoors to the adjacent outdoor space, bringing those inside the kitchen closer to the space outside.
Natural light is also important in a combined layout.
How to choose furniture
Open space and the combination of different zones dictate some rules when selecting furniture. It is important to consider that the entire space will be visible immediately after entering the home. Therefore, furniture should be aesthetically attractive and consistent in style.
For the kitchen area, select furniture made from materials that are resistant to moisture and high temperatures.
It should be multifunctional and as closed as possible.
The U-shaped arrangement of furniture is convenient for moving inside the kitchen. The hallway area can be separated by a light bar counter or partition.
In the case of an L-shaped arrangement, part of the furniture plays the role of the upper boundary between the zones. You can place a dining table in a free corner of the kitchen near the window.
If possible, it is better to order furniture according to your own design. In this case, the depth of the countertops can be made 20 cm larger than the standard by installing the stove and sink closer to the inner wall. This prevents water and grease from splashing on the floor. Also, built-in furniture will save some functional space.
Open shelves and railings are not installed in the kitchen-hallway - they create visual chaos and quickly accumulate dust and dirt
The width of the passages between the kitchen set and other furniture should be at least 120 cm. Narrower passages are inconvenient for work and even dangerous. For example, you can get burned on a stove burner.
In cramped apartments, you can save space and expand passages by using hallway furniture. To do this, you can purchase narrow and hanging slim storage systems. In the hallway they make do with only the necessary minimum: a wardrobe, a shoe rack and a chest of drawers. All storage systems must be tightly closed with doors.
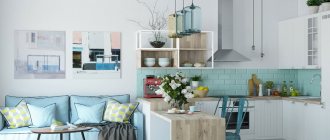
You should not purchase massive furniture made in dark shades.
Light colors, decor with mirrors and stained glass windows will make the space visually voluminous and light.
Zoning
In any design, the ideal zoning of the kitchen and hallway involves placing the refrigerator, sink and work space in a triangle, so you can easily move between zones. In a kitchen with a hallway it can be more difficult to achieve this type of layout, but if possible, try to incorporate the triangle into your design.
The classic kitchen design is a work triangle that can also be placed in the hallway.
Typically, you need to use both hallway walls to create a triangle. You can place the refrigerator and sink—and dishwasher—on the same wall. However, to avoid congestion in your kitchen, the passage between the two sides should be up to 1.5 meters wide.
When your hallway is too narrow to accommodate this type of setting, it's best to ditch the triangle and place the refrigerator, sink, and countertop on the same wall.
Kitchen partitions: originality and practicality
If you think that this solution is boring, then the original partitions between the hallway and the kitchen will change your opinion. After all, there are a large number of different options, starting with the choice of non-standard materials in the form of plexiglass or frosted glass, ending with various types of design tricks - pictures, inscriptions, patterns, coatings, etc. The main thing is not to overdo it with this aspect, so that the appearance of the partition does not contrast with the other elements. And professional designers, employees of companies producing such structures, as well as consultants from online stores will help with this.
Examples of hallway design with kitchen
Because space is limited in a semi-detached kitchen, it can be difficult to find a suitable place to store supplies and equipment. Instead of worrying about the lack of square footage in your kitchen, create a design that takes full advantage of the vertical space in your hallway.
To make the most of the space, you can install cabinets up to the ceiling.
The best examples of kitchen entryway designs use cabinets that reach to the ceiling to maximize storage space. If the top shelves are too high, store items there that you don't use as often, such as china for special occasions.
Use compact appliances. You can't have a kitchen without a refrigerator and utensils, but these appliances can take up a lot of space in your hallway kitchen. Luckily, you can find compact appliances that are smaller than traditional ones. For example, consider a refrigerator that is only up to 50 centimeters wide, which can free up a few valuable centimeters.
You can also find compact stoves and dishwashers that are just 40cm wide, so you can make the most of the space available to you.
For small spaces, use compact appliances.
Preparation for installation
In most situations, for zoning such premises, blind plasterboard structures are used, consisting of plasterboard sheets, a metal frame, and thermal insulation placed in the spaces between the profiles. To assemble plasterboard partitions with your own hands, you need a certain tool and a number of materials.
Assembling the tool
Kitchen partitions are assembled using the following devices:
- A power tool in the form of a grinder, a screwdriver or a complete bit for screwing in self-tapping screws in a drill or hammer drill. If you don’t have any positions in your personal workshop, you can rent a tool. Installation rarely takes more than a couple of days, so use will cost a reasonable amount;
- Tape measure and metal square to control the position of the frame;
- Upholstery cord and a simple pencil for marking;
- Rules 2 meters long, plumb, level;
- Construction thread;
- Scissors for cutting metal;
- Hammer;
- A construction knife and a set of replacement blades for cutting drywall.
The overall design of 2 different rooms is the secret of correct placement.
Plasterboard walls are erected to the entire height of the rooms, so a stepladder is required for fastening near the ceiling .
Deciding on consumables
Installation work is impossible if at least one of the following items is missing:
- Partition profiles in the form of load-bearing and guide elements;
- Self-tapping screws;
- Quick installation (required diameter – 6 mm);
- Special fasteners for the profile.
If a plasterboard partition in the kitchen is planned in an old house, it is worth considering the dilapidation of the walls and immediately, instead of installing 6 mm, take dowels whose diameter is 8 mm for reliable fixation.
Separately, it is worth noting the choice of material for the cladding. Due to the characteristics of the kitchen space, it is desirable that the plasterboard partition be assembled from moisture-resistant sheets, otherwise, over time, the finishing materials will peel off from the surface.
Tips on how to make a kitchen from a hallway with your own hands
How to make a kitchen out of a hallway? A DIY kitchen layout that is achieved through proper placement of countertops, major appliances, and storage spaces. This layout creates a kitchen work triangle—the path you take from the refrigerator to the sink to the food prep range.
When planning a shared kitchen and hallway, you need to take into account the rule of the working triangle.
When designing your new kitchen and choosing the best dining solutions for your home, one of the first considerations is the overall layout of the kitchen.
There are five basic layouts for most kitchens - G, L, U. While certain floor plans create a more spacious, efficient kitchen, every kitchen layout can be enhanced with the right cabinetry and decorative accents.
Decorative accents can help improve your kitchen layout.
Depending on the overall size of your kitchen, many of these layouts can have a kitchen island added to expand storage and create additional counter space.
The width of the aisles between the cabinets and the island is important, and your kitchen designer will help determine if you have enough space to accommodate an island.
Kitchen islands can be created in all shapes and sizes, and you are not limited to the standard square or rectangular shape.
Partition installation
The sequence of work is very simple: first, markings are made, then the frame is mounted, the plane is leveled, and then sheathing of the structure with plasterboard begins.
Screwing drywall to the frame
Let's look at everything in order.
Marking
Let's assume that we are making a standard partition - from wall to wall. So, the order of steps will be like this:
- we determine where the partition will be located, and put a point on the ceiling near the corner with the wall;
- we put the same mark on the ceiling, but near the opposite wall;
- using a plumb line we transfer the points to the floor;
- take the upholstery cord and connect all the points on the walls, ceiling and floor.
We should get one solid line along which we will attach the guides. Let's get to this stage.
Installation of guides
In fact, attaching UW profiles couldn’t be easier. We measure the distance from wall to wall and from ceiling to floor, and then, in accordance with the figures obtained, we cut the profile to the required size. After that, we place them on the plane, take a hammer drill, drill holes and, using quick installation, fasten the entire profile.
Assembling the partition frame
By the way, if there is a depression or, on the contrary, a bump on the plane of the wall or ceiling, then you should not give up. If the depression is small, then the profile can be attached, and the empty space between the metal and the stone plane can be simply blown out with foam.
If the plane is very curved and the profile does not align with it, then there is a very simple solution. You need a guide profile, lightly cut along both side edges and after that it can be easily bent. Moreover, the more cuts you make, the more the rail can bend.
Cut profile edges for plasterboard
Advice: do not overdo it with cuts on the side edges - if cuts are made with great frequency, then it will be difficult to screw in sheets of drywall, since the self-tapping screw will press into the edge of the profile, which will simply bend and thereby “move away” from the screw.
Once the outline of the future partition is ready, you can begin installation and alignment of the pillars.
Assembly and covering of the frame
Remember, the rack profile should be placed so that the middle of each rack is at a distance of 60 centimeters from each other. This is not a random figure - it’s just that a sheet of drywall is 60 cm wide, and if the racks are spaced wider, then the edges and middle of the sheets simply won’t have anything to attach to. If you make the distance smaller, then on the contrary - each sheet will have to be cut lengthwise, and this is already uneconomical and simply outright damage to the material.
So, we cut the CW profiles to the required size and insert them vertically into the grooves of the floor and ceiling guides, and then screw them on.
CW Profile Arrangement
After this, you need to make horizontal jumpers between the pillars for greater rigidity of the frame and so that the horizontal edges of the sheet have something to screw to.
Making lintels in kitchen partitions is very simple - measure the distance between the pillars, add 5 centimeters and cut the profile pieces. The extra centimeters are needed to cut out the so-called “lip” with scissors on each side of the jumper so that its edge can be screwed to the vertical profile.
After the jumpers are screwed, you need to “sew up” the partition with sheets on one side, and then put mineral wool inside the frame. After this, you can “sew up” the second side of the partition. In principle, after this the plasterboard partition in the kitchen is ready.
Mineral wool inside the frame
However, we did not consider one important point...
We are talking about leveling the frame - how to do this?
And it's very simple actually.
Oddly enough, but in principle you don’t have to pull the threads and align each vertical profile. In most cases, it will be enough, after the sheets are screwed, to apply the rule to the plane of the partition, and if the plane is uneven, then you just need to press on it or tap it in the right place. As a rule, these actions and (the rigidity of the sheets themselves) are enough to level the surface.
That's all it really is now.
Conclusion
As you can see, installing a partition between the kitchen and the corridor is really not a difficult task. But if there are still unclear points, we recommend watching the video at the end of the article - perhaps it will be a good addition to our instructions (