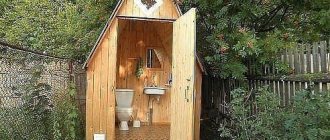
It is no coincidence that there is a joke in dacha areas: “The toilet is the face of the owner.” Indeed, the free-standing structure of the toilet cubicle involuntarily catches the eye of everyone passing by. Rarely does a guest not look into this room. Therefore, the impression of the entire complex of the dacha building largely depends on how monumental the toilet looks and how basic hygienic requirements are met.
Choosing the location of the toilet in the country
When building a country toilet with your own hands, first of all, you need to correctly determine its location. In no case should it be adjacent to existing economic, especially residential, buildings, since even the use of chemical septic tanks and reliable waterproofing cannot 100% protect against the penetration of foreign odors into neighboring premises, the spread of fungus and other harmful factors accompanying the premises with high humidity. In addition, you should take into account the prevailing direction of the wind by placing the toilet on the leeward side. According to hygienic requirements, the cesspool, namely it is usually used in open-type country toilets, should not be located at a distance of less than 10 meters from residential premises, both your own and those of neighbors. Meeting all these requirements at the same time is sometimes difficult in cramped country conditions, so something has to be neglected.
Click on the picture to enlarge
Plastic containers
When constructing a cesspool with your own hands, plastic is considered a better material than metal.
It has many advantages:
Plastic barrel
- long service life. Plastic can be used for arranging a cesspool for a toilet in a country house for 40 years;
- due to their light weight, these containers are very easy to install without the help of outsiders or special equipment;
- plastic is resistant to the harmful effects of biological fluids or special chemical compounds that are used to process waste;
- prevents wastewater from penetrating through the walls of the container into the soil;
- the cost of such a container is quite low;
- The plastic is very durable and will not collapse under pressure from soil or runoff.
The disadvantages of this material include its instability to low temperatures. To fix this, the plastic walls of the container must be insulated with a layer of mineral wool. Also, a plastic barrel can float due to its light weight.
To prevent this, its walls must be securely fixed in the ground.
Excavation of soil, installation of a barrel
Having chosen a place for the toilet, they clear the area for construction and install a container under the cesspool. A rigid polyethylene barrel of large capacity or a galvanized metal one may be suitable for these purposes. You can build the formwork yourself and fill the concrete container, however, experience shows the fragility of such a structure due to the high aggressiveness of the cesspool contents. Further repair of such a structure is practically impossible. Plug-in barrels can be replaced over time without changing the location of the toilet. The container is dug in almost to its entire depth, leaving it unburied at a height of 70–80 mm. This is done to make it easier to dismantle in the future.
After installing the barrel, the space under the toilet is filled with gravel to a level with the edges of the cesspool. It is compacted and sand is sprinkled on top to fix it.
Construction of the base and walls of the toilet
Next, they begin to install the base of the toilet. For these purposes, it is better to choose oak boards with a thickness of at least 40 mm, or other construction lumber that is specially protected from rotting. The size of the subfloor essentially determines the area of the toilet. It should not be made too large or too tight. Usually the dimensions are about 120 x 120 centimeters. The carefully assembled frame is installed on a concrete base using stainless steel screws of at least 80 mm in length, as shown in the photograph:
It is not necessary to use special concrete structures for these purposes; you can pour concrete blocks in the corners or lay out brick columns. The main requirements that must be met are: ensuring good ventilation and horizontal construction.
At the next stage, they move on to installing the walls. First, the frame of the side walls is installed. A 25 x 60 mm board is quite suitable for these purposes. The height of the walls is usually 200 - 220 centimeters.
Then the rear wall frame is secured. All connections are made using 40 x 4.0 mm screws; it is best to use an electric screwdriver for these purposes.
The frame of the front wall is installed taking into account the width of the front door. For convenience, it should be at least 70 centimeters.
After completing the construction of the frame, once again checking the verticality of the walls, they begin to upholster the wall boards. For these purposes, it is better to choose a special tongue-and-groove or half-tongue board that will prevent the wind from penetrating through the cracks in the wall.
Particular attention should be paid to ensuring that the upholstery board is well dried, since otherwise it may dry out after some time, which will lead to the formation of cracks and a change for the worse in the appearance of the building as a whole.
Features of gas connections
When connecting gas stoves, water heaters and other types of equipment, flexible hoses are also used. Unlike water models, they are yellow and are not tested for environmental safety. For fixation, end steel or aluminum reinforcement is used. There are the following types of devices for connecting gas appliances:
- PVC hoses reinforced with polyester thread;
- made of synthetic rubber with stainless steel braid;
- bellows, made in the form of a corrugated stainless steel tube.
The Santekhkomplekt holding offers engineering equipment, fittings, plumbing fixtures and devices for connecting them to communications. The assortment is represented by products and materials from well-known foreign and domestic manufacturers. Discounts apply for bulk purchases, and product quality is confirmed by standard certificates. For information support and assistance, each client is assigned a personal manager. The ability to arrange delivery within Moscow and to other regions of the Russian Federation allows you to quickly receive the purchased goods without unnecessary hassle.
Assembling the roof of a country toilet
Having sheathed the side walls, we build a roof. Since the structure is not yet massive enough and is poorly secured, when working at height from a ladder, additional insurance should be used; it is best to use a reinforced stepladder for these purposes.
Having secured the roof along the ridge line (upper joint), check the compliance of the slope angles on adjacent surfaces. Usually it is about 30 degrees.
After installing the roof frame, sew up the back wall and hem the overhangs, as shown in the photo:
After completing the work described above, the main construction work can be considered completed.
At the final stage, the degree of tightening of all screws, the verticality of wall structures, and the horizontality of the floor in various planes are checked. In case of any violations, adjustment is made by adding gravel under the raised foundation, installing spacers or other design techniques. Carefully secure the base of the toilet, installing additional fasteners at the bottom of the foundation. The posts are concreted on the sides to finally secure the location.
Sawing a hole
At the next stage of construction, interior work begins. First of all, a niche is cut out in the floor according to the size of the cesspool along the perimeter of the buried barrel. This work is easier to do with a jigsaw, although you can also use a manual circular saw. The upper part of the niche is hemmed with a board at least 25 mm thick, as shown in the photograph.
The niche should be located strictly in the center of the front side at a distance of about 200 mm from the rear wall of the toilet and have dimensions of at least 450 x 450 mm.
Baikal-EM1 and Tamir are an excellent means for processing feces into fertilizer.
Microorganisms contained in Baikal EM1 effectively process the contents of the cesspool of a country toilet and eliminate unpleasant odors. The bacteria that Baikal contains digest feces well and the residue settles and compacts to a minimum. What remains is cloudy water with some sediment. Microbiological preparation "Tamir" for cleaning a cesspool at a summer cottage.
Baikal and Tamir has many positive reviews. This is a good all-rounder.
Toilet roof lining
Having once again checked the horizontality of the upper ridge and the slope of the rafters, the roof is covered with boards at least 20 mm thick.
This work can also be done with the help of nails, since there will not be any special load-bearing load on a small-sized roof. In any case, it is necessary to carefully check the work to ensure that there are no through holes on the back side, as this can lead to serious injury.
It should be remembered that a toilet, with insufficient support area and a height of more than two meters, is a shaky structure, and when carrying out high-altitude work, you can fall by leaning on it.
The final stage of roof construction is the installation of the roof covering. It can be made from the remnants of the coating of the main structure, for example ondulin, as shown in the photograph. You can use roofing felt and metal tiles for these purposes. The use of slate is undesirable, as it will significantly increase the wind load on this structure.
To give an aesthetically finished look, the perimeter of the front side of the toilet can be sheathed with decorative trim.
Applying protective impregnation to structural elements
Having completed the main work with lumber, it is necessary to apply a special wood impregnation to all surfaces. The choice of impregnation preparations is quite wide. First, and this is especially important, saturate wooden structures with an antiseptic that protects against mold, fungi and other organic formations. The toilet is an unheated room located in the zone of extreme risk of damage from organic tumors, therefore special attention should be paid to antiseptic protection. Secondly, it is necessary to thoroughly protect the entire structure from rotting. In conditions of high humidity, both outside and inside the toilet, the rotting process can lead to the destruction of the structure in just a couple of years.
There are special impregnations that protect wood from fire. An accidentally thrown unextinguished cigarette in a toilet can lead to a fire, which can then spread to neighboring buildings, so special attention should be paid to fire protection. Finally, impregnations can also perform decorative functions, giving wooden structures an elegant look.
Door installation
The door, even if it is used from a “recycled” stock, should also be carefully processed and installed on hinges previously lubricated with grease or other solid lubricant, which will slow down the process of rust on metal structures.
The inner surface of the door can be covered with mesh or other decorative material.
Organization of lighting in the toilet
Before completing the finishing work of your building, it is necessary to provide lighting. Electrical installation work must be performed in compliance with all building codes and regulations for electrical supply to buildings with high humidity. Basic requirements to be met:
- The distance from the power line support to the building should not exceed 5 meters.
- The power cable is entered through a mast at least 2.5 meters high, securely fixed to the rear wall of the toilet.
- If the building is located in an open space, it is necessary to install grounding.
- The cable layout inside the building is carried out using the open method; its cross-section should not be less than 0.75 sq. mm.
- The lamp power should not be more than 40 W; it is better to use energy-saving lamps for these purposes. The design of the lamp must provide for its operation in conditions of high humidity.
- You cannot install a light switch inside a toilet; it is installed on a special panel at the beginning of the power supply line (inside a permanent building, on the distribution panel).
- In order to 100% protect yourself and guests from electric shock, the voltage supplied to the building should not exceed 40 Volts.
Such lighting can be achieved using LED lamps designed for a voltage of 12 or 36 Volts. In this case, a voltage converter is installed at the beginning of the toilet power supply line. Thus, a reduced voltage that is safe for humans will be transmitted through the electrical cable. The light switch for LED lamps can be located inside the toilet, often it is built into the design of the lamp. The lighting fixture can be located at a low level. This lighting option is most suitable, especially if there are small children in the house.
Installation of a toilet seat
For the convenience of using the resulting structure directly for its intended purpose, you should make a small but durable structure inside it - a podium. To do this, you should stock up on a sufficient number of bars with a cross-section of 30x60 and self-tapping screws to connect them. As a base material, the remains of the slats from which the frame of the main walls of the building is made can be used.
To connect the parts of the podium, self-tapping screws of a sufficiently long length (at least 70 millimeters) are better suited. To screw them in, a cordless screwdriver or electric drill is indispensable. When working, try to leave a clear niche opposite the cesspool. This will help with periodic cleaning of the contents of the barrel and will significantly extend the life of the entire toilet.
The resulting structure must be sheathed with some durable sheet wood material. It can be plywood, chipboard or OSB boards. For the front wall, cut out a rectangle of the required size with a hacksaw or jigsaw and secure it with self-tapping screws.
Covering the top of the podium will require precision and accuracy. It will be necessary to carefully mark and cut out a small strip of sheet material that goes around the vertical posts of the wall frame. To do this, it is necessary to accurately measure and saw off the rectangular part, and then, taking one edge as the base, mark the grooves, the location and size of which correspond to the racks.
Similar parts must be installed on the sides of the podium. This is necessary to facilitate the manufacture of a floor-lid that will fold down as needed.
To create conditions as close as possible to a home bathroom, install a toilet seat on top that closes with a lid. This will not only prevent the spread of unpleasant odors, but will also give the interior an aesthetic appearance.
The simplest device, which is a plastic box without a lid or bottom, will help to close the interior space of the podium from the eyes of household members and guests.
The first stage is the arrangement of a cesspool from a container
When constructing an outdoor toilet from a plastic barrel with your own hands, you must first dig a pit of suitable dimensions. In this case, the use of a galvanized metal container is also allowed. But you need to take into account that it has a much shorter service life.
The pit for a toilet that you build yourself should have a depth that is 25-30 cm greater than the height of the container. This is necessary to create a filtration field, which will help clean the waste, and clean liquid without harmful impurities will be absorbed into the soil. Also, this pit should be 10-20 cm wider than the tank. This gap is needed to fix the tank inside the pit.
Cesspool for a round container
When the hole is dug, fill its bottom with a layer of fine crushed stone 20 cm thick. Lay sand on top by another 10-15 cm. In this case, each layer must be carefully compacted so that no voids form. After this, you need to install a barrel without a bottom so that its upper edge rises 7-8 cm above the ground surface. In the future, this will greatly facilitate dismantling the container.
You need to fill the sides of the walls with crushed stone. It should reach 2/3 of the height of the container. Place a layer of clay on top to the ground level. When the hole is completely filled, cover the surface of the soil with fine gravel. Also, add an additional layer of sand on top, reaching the level of the top edge of the container.
Surface painting
Having completed the installation of the podium, we move on to the final stage of the project - interior finishing work. If high-quality wood materials were used to decorate the walls, then their surface can not be painted, but can be limited to various types of stains that preserve the unique pattern of wood fibers. It is better to paint the floor and podium with weatherproof dyes. This will create a feeling of cleanliness and the possibility of better cleaning of the toilet.
Select the desired shade of dye, prepare the necessary painting tools - a tray, brushes and a roller. Protect the perimeter of the walls in places of contact with the floor and podium with masking tape, carefully gluing it on.
Pre-treatment of wooden surfaces will help improve application and reduce paint consumption. To do this, you can use drying oil heated for better absorption, or a dye previously diluted with a solvent in a ratio of 1:3. After drying, it is necessary to carefully sand it by hand or with a sander and paint it. In this case, the quality of the work performed will be incomparably higher.
After the paint has completely dried, carefully remove the masking tape. It is also better to additionally protect the door of the building and the outer surface of the walls by painting. It will not only save wood, but will also allow the new toilet to be included in the existing ensemble of buildings.
Before painting, the door must be thoroughly cleaned of old paint mechanically or chemically and its surfaces must be sanded.
Having previously primed using the above method, paint the product on both sides.
Use the same technology to finish the exterior walls of the toilet.
After all the work is completed, a new irreplaceable structure will appear on your site.
To ensure hygiene when using the future toilet, we recommend purchasing and placing a package of toilet paper in the building in advance. Your guests will appreciate the care and will be sincerely grateful to you.
We recommend other articles on the topic
Self-production of borders for the garden and dacha
Fighting moles on the site, do-it-yourself mole trap
How to make a fireplace with your own hands - choosing a design
Porch made of polycarbonate and metal in a private house: photos, examples
Dry toilet
An alternative to the capital construction of a toilet is a dry toilet, which is a toilet that does not require a separate permanent room and drainage pit.
The dry closet consists of two chambers, where the upper one is a toilet, and the lower one is used for biological treatment of waste products. It contains active substances that decompose waste, turning it into a homogeneous, odorless mass. Typically, the action of the bioactive liquid lasts for 10 days, after which the chamber must be cleaned by removing the contents into the sewer or soil, depending on what kind of biologically active substances are used.
Active substances
there are three types:
– composting – chemical – microorganic.
The choice of the type of active substances depends on the type of dry closet.
– for composting, peat is used as an active substance. It has a very high absorption capacity (1 kg of peat can absorb 10 liters of liquid). The resulting compost is odorless and can be used as fertilizer for garden beds. Such a dry closet can be equipped with pipes to remove unpleasant odors.
– in a toilet that uses active chemicals, an indicator is installed indicating the need to clean the container. This waste is discharged into the sewer. This type can be equipped with substances that have anti-freezing properties.
– in a biological toilet, microorganisms are used as active substances, which, as a result of their vital activity, turn waste into compost. The resulting compost is odorless, environmentally friendly and absolutely harmless to the soil and animals.
Bioactive substances for toilets
Biologically active substances for drainage pits are similar to those used in dry closets. They include peat, chemical or bacterial concentrates, which gradually process waste products and rid the toilet of unpleasant odors. Available in the form of tablets, powders or liquids.
Before use, you should read the instructions for use, which indicate the dosage and method of application. The following active substances are produced, one package of which is enough for a whole year of use for a cesspool volume of up to 4 tons.
Comments
- Stupefied:
07/05/2014 at 23:59Concrete supports for the toilet are impressive! It took about a quarter of the country house's worth of timber and plywood. You could immediately wipe yourself with money.
- admin:
07/14/2014 at 06:54
You know what German quality is... It’s the same here - if you want a good construction - think through every little detail and don’t skimp on materials. Maybe a builder has such a hobby, he has a lot of money, but he loves to build something with his own hands.
- Eugene:
05/23/2015 at 21:40
What is the correct name for foundation columns? I want the same ones) I can’t find them
- admin:
05/24/2015 at 22:33
Don’t bother too much - take a foam block of a suitable size, if you really want to, you can cut holes in it for the beams. Only with high hygroscopicity the issue needs to be resolved.
- Anton:
06/14/2015 at 22:18
What if you put 4 tires?