Basic recommendations
When installing an electrical network in under-roof areas, you should use: * for installing lighting fixtures - copper wires with a cross-section of at least 1.5 sq. mm; * for installation of sockets - copper wires with a cross-section of at least 2.5 sq. mm; * to protect wiring - fuses with a rated current of 10A; * to protect sockets - fuses with a rated current of at least 16A.
Besides:
* network installation should be carried out avoiding the use of distribution boxes, i.e. each cable must be routed from one power source to one “point”; * the electrical network must be provided with a separate circuit breaker with a trigger setting of 30 mA. For electrical wiring installed in the attic, it is recommended to use a three-wire cable, or, in extreme cases, three single-wire cables laid in a special protective casing or tube. If necessary, wiring can also be installed using double-insulated wires or multi-core cables.
Note:
Electrical wiring laid on a wooden base should under no circumstances be secured with metal clamps. Such fasteners not only do not provide the recommended distance between the wire and the base, but can also damage the insulation.
When is a roof renovation required?
Let us highlight the key points when you need to invite specialists to dismantle and install a new roof.
See also: Replacing the roof in an old wooden house
- The structure is very worn out, defects are visible to the naked eye.
- The rafter system is actively rotting, mold and mildew are visible.
- The design features of the roof do not suit you.
- The old roofing material has become unusable.
- You are planning to convert the roof into an attic.
When remodeling the roof, special attention should be paid to thermal insulation materials. Otherwise, all efforts will be in vain. Try to choose basalt or mineral wool to ensure high-quality insulation. As for finishing materials, we recommend using metal tiles and corrugated sheets. Slate is not practical and is more suitable for outbuildings, so we also recommend replacing the building material.
Creating a plan
Before you begin installing electrical wiring, you must carefully consider the future needs of your users. You should create a plan diagram indicating the installation locations of lighting fixtures, sockets, etc. If some “points” are intended to power devices that are too powerful (electric stoves, convector heaters, fan heaters), separate wires must be allocated for them. If you plan to install a water heating boiler in the under-roof room, power to such a unit must be supplied separately. The number of “points” for lighting fixtures depends on the purpose of each individual room. But the number of sockets can be easily calculated in advance - each electrical appliance requires a separate socket, plus two spare ones. After counting the required number of “points,” we can begin to determine the amount of cable we need. On average, there is one cable for every 15-20 square meters of living space. Well, there can be much more wires in the under-roof room. Many sources clearly indicate the maximum number of “points” for one electrical network. Typically this includes 20 lighting fixtures and 10 sockets. But in the attic, lighting fixtures are located at a higher height than in other living spaces. Consequently, for high-quality attic lighting, it is necessary to use more powerful lamps. In this case, to reduce the load on electrical wiring, the following limitation for electrical networks should be accepted: 10 points for lighting fixtures and 6 for sockets. Cables intended to power particularly powerful devices must terminate in only one connector. This primarily applies to refrigerators, freezers, etc.
Requirements for installing a lighting network in the attic
When designing wiring for a private house, some nuances of the attic space must be taken into account. After all, according to clause 15.1 of VSN 59 - 88, attics are classified as high-risk premises. In connection with this, increased demands are placed on them.
Note! According to paragraph 2.43 of VSN 59 - 88, for private houses with a height of less than three floors, as well as for country houses, the attic lighting network is not mandatory. If you still decide to mount it, then it must meet all other standards.
- First of all, the attic lighting network, according to Table 1 VSN 59 - 88, must provide illumination of at least 10 lux. For comparison, the kitchen illumination should be at least 50 lux.
- In this case, for attics it is enough to illuminate the main passages. Installation of full lighting is not necessary.
- According to clause 2.27 of VSN 59 - 88, for attics, modern wiring in the house should be done exclusively with incandescent lamps. Fluorescent lamps are not recommended. But at the time the standard was written, diode lamps probably did not yet exist. But this point is advisory in nature and I don’t recommend focusing too much on it.
- There are also restrictions on the maximum number of lamps per lighting group. For attic spaces it is increased to 60 lamps. At the same time, according to clause 7.1.27 of the PUE, the power of these lamps should not exceed 65W.
Laying wiring
The next preparatory stage is to determine the routes along which the wiring will “go.” There are no special requirements for both routes and locations for installing “points”. Horizontal electrical wiring routes are carried out at a height of 10 - 30 cm from the floor, or at the same distance from the ceiling. Typically, the attic is not easy to route in the upper area, so the wiring is placed in the lower area. Vertical sections are laid at the joints of walls or along openings (for example, doors or windows). For lighting fixtures mounted on inclined surfaces, the wires should be laid along the fixed elements of the roof structure.
Lighting points
It is not difficult to determine the places where the lamps will be located. You just need to imagine the future layout of the room. A pre-drawn plan for arranging the room can make the task even easier, since the location of the furniture often determines the type and intensity of lighting. It is important to remember that artificial light should not cause discomfort, and lighting devices must be protected from possible damage. For stable, uniform illumination of the attic room, lamps are placed as high as possible. As for other lighting fixtures, a good solution would be to place “night lights” near the attic windows. Thus, artificial light can complement and replace natural light. Wires leading to pendant lamps or sconces must be “hidden” using special recessed plastering boxes. If the lamps are planned to be integrated into the ceiling or walls, then special boxes that remove heat from the lamp and wiring should be installed in advance. This is especially necessary when using halogen lamps, since they can get quite hot.
Stages of reconstruction and insulation of an old house, which made it possible to increase its usable area.
Along with topics describing the details of the construction of large country cottages, reports are very popular on FORUMHOUSE, where portal users share their experience of remodeling small houses. In this article we will tell you how, having about 600 thousand rubles and a great desire to provide your family with normal housing, you can convert an old house with a “cold” attic into a comfortable cottage with a residential attic. Namely:
- How to expand your living space with an attic floor.
- How to properly reconstruct and insulate an old house.
- Why is there a double ventilated gap on an insulated roof covered with metal tiles?
- What are the features of installing a ventilated facade?
Sockets
Sockets, first of all, must be easily accessible to users. They are usually mounted at a height of about 20 cm above the floor. One socket should be placed immediately at the entrance to the room, under the switch. Other sockets, depending on their purpose, should be located in places where electrical appliances are used. In addition, a certain number of sockets must be installed in places that may be useful in the future (for example, when changing the purpose of the roof space). Many manufacturers offer special blocks that can accommodate several connectors for devices of various types - for example, a block that includes 3 sockets, 1 computer output and 1 television cable.
Stages of reconstruction of an old house
I decided to make external attic walls 1.2 m high. The height in the center, from the floor to the ridge, is 3.5 m. On the second floor there will be two children's rooms of 16 square meters. m. Roofing - metal tiles. I plan to use stone wool for insulation. Walls from the inside are 15 cm, roofs are 20 cm + counter-insulation of the walls from the outside is 5 cm.
Having spent the entire winter working on calculations (the house began to be remodeled in 2013), at the beginning of spring the user began remodeling and reconstructing the house, for which he hired a team of workers.
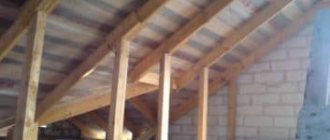
Having dismantled the roof, but left the old ceiling, which was supported with supports, because... they live in the house, and after removing the roofing felt, the builders saw a sad picture.
The floor beams sagged.
Expanded clay is used as insulation.
You can evaluate the “quality” of the masonry from the following photograph.
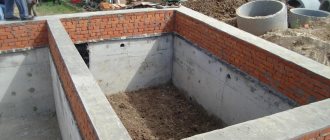
Having removed all the rubbish from the “second” floor, they decided to level the upper part of the walls using brickwork and pouring an armored belt.
I will subsequently disassemble the old ceiling (in parts) and raise it from the original height of 2.3 m to the height of the second floor floor beams of 2.6 m. Having assembled the formwork for the armored belt from cut OSB sheets, the builders laid the “sixteenth” reinforcement in it, after which they inserted studs and poured concrete.
Moreover, the concrete armored belt covers only the front gable and two side walls. On the back wall (on the neighbor's side) a beam was laid together from 3 boards 20x5 cm, which was tied with an armored belt.
The next stage is the installation of columns from a metal pipe with a diameter of 15 cm concreted at the bottom, to which a 22nd channel laid on the “edge” was welded.
Logs (flooring) made from 20x5 cm boards were inserted into the channel.
The logs are laid at a distance of 0.5 m from each other.
Subfloor boards were laid on the resulting “platform”, which, like all wooden frame elements, were treated with an antiseptic and fire retardant.
Having covered the floor from precipitation with banners, the builders began building the walls of the second floor.
The frame will subsequently be covered with OSB boards, 9 mm thick, thereby ensuring its rigidity and resistance to wind loads.
We also left an opening for the rough staircase measuring 1800x1800 mm.
Switches
The placement of switches depends on the layout of the attic. Switches are located at a height of 1.1-1.3 m from the floor, as a rule, at the entrance to the room, as well as in other easily accessible places. Recently, they are increasingly being installed at the height of the lowered arm. In order to minimize risks, the connecting cables of the switch should be brought to the switch and already there connected to the wires leading to the lamps. There is another connection method, which consists of connecting the cable to the connectors of the switch itself, because modern switch models are equipped with double clamps.
Arrangement of a ventilated air layer
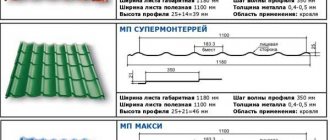
The width of the air gap between the roof and the insulation depends on the profile of the coating material. If metal tiles, tiles and other corrugated sheets are used for the roof, then the thickness of the ventilated air layer must be at least 25 mm. When the roofing is made from flat sheets (roll materials, soft bitumen tiles, galvanized steel), the air gap must have a thickness of at least 50 mm. Ventilation of the air gap is done through holes in the ridge and cornice.
The width of the air gap between the roof and the insulation depends on the profile of the coating material.
Protection against blowing of insulation
The thermal insulation material on the side of the ventilated air layer should be protected with a vapor-tight membrane. Under no circumstances should you use polyethylene film or roofing felt as such a material. It is also worth mentioning that membranes, which perfectly allow water vapor to pass through, do not allow liquid water to pass through, which naturally prevents the insulation from getting wet from moisture that condenses inside the roof.
When a new house is built, windproof material is laid on top of the rafters and secured with wooden blocks. And when the attic is installed in an existing attic, the vapor-tight windproof material is secured to the rafters with slats.
Cable route
Electrical wiring should be laid along the simplest and shortest routes. Depending on the architectural layout of the attic, the route may run directly behind the plasterboard ceilings or in an unused space, for example, between the suspended ceiling and the roof structure. Wires are always attached to stable structural elements. If the electrical wiring route will run in unused space, it must be laid in special channels so that the wires do not hang down. After completing the installation of the plaster wall fasteners, you should first install the cable channel, and only then lay the wire itself into it. Each wire must be securely insulated on both sides. Power wires for pendant lighting fixtures must be routed above the suspended ceiling. If a suspended ceiling is not provided in the attic, all that remains is to conduct the electrical wiring in the lower zone - at a height of 10-30 cm above the floor. In order to simplify your work in the future, you can immediately install three channels (one above the other), intended for different purposes - for sockets, lighting, and communications. In this case, the sockets will be located at the level of the wires intended for them, and the power supply to the lighting devices will pass in vertical directions along the stationary elements of the roof structure through special tubes or using fasteners. No matter how rationally we design the route for electrical wiring, in some places it will be necessary to run cables not along, but across the elements of the roof structure. If it is not possible to install wiring behind these elements, then special holes will need to be made in the roof structure. It is not recommended to drill wooden elements and pull wires through the resulting holes, as this can damage them. It is much better to make a die cut into which the cable will then be inserted. In any case, regardless of the location and method of creating the hole, the wiring must be protected by a special tube with a smooth inner surface and a diameter that allows free movement of the cable. They can also be protected with additional insulation, for example, heat-shrink tubing, and secured in the created cut using polyurethane foam. Remember that electrical wiring should never come into contact with sharp edges of wood, and especially metal elements, in particular plasterboard wall sheathing profiles.
Roofing and waterproofing
We have already mentioned roofing materials above. Let us describe just one example for now - covering with metal tiles. This material is galvanized, press-processed metal, 0.5 mm thick, powder-painted or otherwise painted. Everything here is extremely simple. Sheets of metal tiles are overlapped on the external lining and secured with roofing screws with a rubberized skirt, which prevents leakage at the fastening points. It is best to trim the protruding parts of excess material in place with a grinder. This is the easiest way to avoid markup-related errors. The side and ridge parts are covered with corner overlays made of the same material.
Installing a roof using metal tiles as an external covering is an aesthetic and practical option that has many advantages
Metal tiles are a fairly lightweight and quickly installed material, easy to process, but very large and easily deformed, and this is perhaps its only drawback. After laying the metal tile sheets, you can proceed to waterproofing. Using a construction stapler, we attach the protective membrane to the rafter legs and fastening cross members. The fabric is attached with an overlap. And if we laid the metal tiles from the outside from the bottom up, then here we have to go from top to bottom using the same “ledges”. Correct installation of metal tiles and attic insulation https://www.youtube.com/watch?v=HKkszb91l8Y&t=405s
Pediments
Having protected ourselves from what might drip from above, we proceed to the gables, so that subsequent work can be carried out in more comfortable indoor conditions. As a rule, the gables are “covered” with foam concrete or aerated concrete, whichever you prefer, a material that is relatively light in all respects. This also applies to weight and its mechanical processing. Its thermal insulation characteristics also speak in its favor. Some prefer to see not plaster on the pediment, but wooden paneling, which is also not bad in our opinion. An important part of any pediment is translucent window and door structures. Here you have your choice - you can order windows and doors for existing openings or organize them for ready-made, pre-ordered translucent structures.
Idea! Sometimes you can see completed projects with full glazing of the gable of the house, but this depends on the fullness of each individual’s wallet. When the gable parts of the building are completely filled with translucent structures, the house looks simply enchanting.
Attic balcony with glass railing
Thermal insulation and vapor barrier
Installing thermal insulation for the future attic of a house is generally not a tricky matter. Whether rolled or sheet, it fits tightly into the spaces between the rafters along the entire internal area of the roof and must be at least 100 mm thick. We also do not forget about the thermal insulation of the ceiling between the first and second floors of our almost two-story house. Vapor barrier of a room is as important as waterproofing. It is mounted directly after laying the insulation using the same construction stapler. All that remains is to sew up the interior with DSP or OSB sheets and the conversion of an ordinary roof into a residential attic is almost complete.
Attic insulation scheme
All that remains are mere trifles - finishing work. You can learn about this, as well as about electrical installation work when converting from an old attic into an attic room, from the articles on our website. Proper attic insulation https://www.youtube.com/watch?v=czIlH8kHIpY
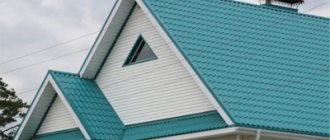
Attic roof shape
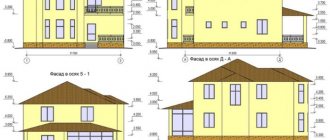
Choosing the right shape and design is the main factor in achieving certain properties.
The roof configurations of cottages can be symmetrical or asymmetrical, triangular or broken. The roof of the house is built along the width of the entire building or in one of the sides; a special role in the design is given to the configuration and area of the future attic room. If you choose a broken type of roof, the area increases significantly; if the roof is straight in configuration, then the space becomes significantly smaller.
When constructing an attic, it is necessary to take into account the degree of illumination of the room. Only a hipped roof configuration will provide good illumination. At the design stage, you need to place it in the alignment or take it outside the load-bearing walls, taking into account the location of the point for support. During construction work, it is necessary to pay special attention to the configuration, building materials and dimensions of the roof itself. Must perform the functions of waterproofing, thermal insulation and sealing of the resulting building.
What roof options are there (including so-called mansard roofs)
The most common is a gable roof with a frame made of triangular trusses. The base of each truss is a ceiling beam resting on the walls. There is usually no talk of using such attics as living quarters, but there is a possibility of rebuilding them. To do this, it is necessary to change the structural and strength diagram of the load-bearing structures.
EVERYTHING YOU NEED FOR THIS ARTICLE IS HERE >>>
Let's look at several options for remodeling the most common attic floors. In the first of them (Fig. 1), we strengthen rafters 2 and floor beams 3 with overlays 8 and 9, respectively, tying the latter with uprights 10. Then we attach tie-rods 7 to the struts 4 and the reinforced rafters. Having strengthened the trusses, we cut out the struts 4 and 5, which were previously were load-bearing.
If the trusses in the attic are located quite often (in increments of about 600 mm), then the load is distributed from the roof to the floor beams. After changing the structural-power scheme of the attic floors, the load on the floor beams will be redistributed and increase, since the weight of the furniture and inhabitants of the second floor will be added. Therefore, it is better to install additional I-beams with wooden shelves and a metal corrugated wall, on top of which you can safely lay the floor.
It should be noted that it is necessary to redo the floor trusses sequentially, in order to avoid excessive deflection of the roof and its damage. This design will free up space around trusses with a width of 3 to 4 m.
Having finished altering the attic trusses, you should take care of the windows that will be cut out in the roof and the insulation of the future living space.
In another option (Fig. 2) with a peaked roof, central posts 2 and two struts 3 are used in the frame trusses. When they are located in increments of 500 to 1000 mm, rafter 1 and ceiling beam 6 should be strengthened, doubling their cross-section.
Wood finishing
Another option is wood finishing. By and large, here you can do without lining with sheets of DSP, OSB and GK. It is enough just to secure the transverse beam between the elements of the rafter frame. A size of 50x50 mm is quite enough. It can be secured using metal corners with holes for self-tapping screws. Having prepared such a frame, you can safely begin sheathing. Usually clapboard finishing is practiced, but you can find other, more interesting options, for example, imitation of a log house. Wood is selected completely differently than for load-bearing structures. Here, the more knots, the better.
Important!
When preparing wood yourself, the required stages are sanding and antiseptic treatment.
If you want to organize a design in an eco-style, then finishing the attic with wood will suit you
Coating with stains and varnishes, as they say, is a matter of taste. Natural wood has been and remains one of the most popular materials for finishing work, especially in country houses. Its natural structure will not leave anyone indifferent, the main thing is to present it correctly.
Has your attic already acquired a residential look? Well, almost residential. Now is the time to do the lighting. We install sockets, switches and lamps in the holes prepared in advance. When the lighting is turned on, the interior decoration of the attic walls will take on a residential and finished look. And, in general, trust your imagination and do everything according to technology. The results will pleasantly surprise you.
Ksenia Skvortsova. Chief Editor. Author. Planning and distribution of responsibilities in the content production team, working with texts. Education: Kharkov State Academy of Culture, specialty “Culturologist.” Teacher of history and cultural theory." Experience in copywriting: From 2010 to present. Editor: from 2021.
Electrical wiring in the attic
I read the forum, a little PUE and SP 31-110-2003, but did not clarify several questions for myself. We have a house under construction with a residential semi-attic, i.e. the walls under the slopes rise to approximately 1.5 meters, then the slope (on wooden rafters), at a height of 2.75 meters is the ceiling, which will be attached to wooden crossbars. Walls and partitions made of brick and gas silicate. I plan to plaster the walls, and drywall the ceiling and inclined areas. Naturally, the slopes and ceiling are insulated with stone wool. 1) As far as I understand, a semi-attic is equivalent to attics, because... There are wooden structures, albeit under drywall. But the walls are made of fireproof material, so it’s possible to conduct wiring through plaster? Or not? 2) How to properly make lighting with hidden wiring? Is it really possible to lay metal pipes in an unheated attic? Or is it still possible to somehow make a ceiling to do without metal pipes? (It is possible to lay the cable so that it does not come close to the tree anywhere. The ceiling is not yet done and you can redo something in the plans). Or is there only open wiring left as an option? What do you think?
Construction technology
The technology for constructing an attic roof for a private house depends primarily on what type you choose. If you are just starting to build a house from SIP panels, then there are no problems when choosing an attic. You simply include it in the construction project and implement it without difficulty. But if you already have a house, then you should choose the roof option that will minimally affect the foundation, that is, will not exceed the permitted load. In the first case, the weight of the attic will already be taken into account when choosing the foundation.
In the second option, it is worth considering not only the weight of additional beams and furniture, but also wind and snow, and also think about how you will insulate the additional room.
Project preparation
Before starting work, you need to decide on your own wishes. Also, a true professional will tell you that not every attic is suitable for converting the roof into an attic. It will be uncomfortable for a person to be in a cramped closet with a low ceiling. It is optimal if its height is 2.5 meters on at least half the area of the second floor.
Before starting work, you should request a project. This way you will be sure that the construction company initially correctly interpreted and took into account your every wish. In addition, this will make it easier to prepare a preliminary shift.