A breakdown of an electrical outlet is perhaps one of the most significant troubles for owners.
You calmly turn on the household appliance, when suddenly a crackling sound comes from the depths of the outlet and a light smoke appears above it. It’s good if the fuses of the device or some important microcircuit do not burn out along with the socket! In response to a short circuit, the automatic protection of the electrical panel should work, but you should not wait for this moment. It is necessary to remove the load - immediately disconnect the device from the network.
Fortunately, you can do the repair of an outlet in an apartment yourself. Even a woman can do this if she first spends a few minutes understanding the intricacies of fixing an electrical outlet.
Temporary measures
If, for example, a situation arises that the voltage in one of the rooms goes out in the evening and two phases appear in the sockets, then you can temporarily use an extension cord and power, for example, a TV from the corridor.
But this method is not convenient because you can only turn on one or two devices in this way, because they are not located in the same place. Yes, and the extension cord must be 6 or more meters long.
In order to solve this problem in our case, we had to disassemble the old 3-meter extension cord and connect another plug to it instead of sockets. The result is an unusual design; there are two plugs on both sides of the extension cord.
Preparing the old
If it is decided not to replace the old outlet, it is inspected for defects:
- deposits on the terminals. It has high electrical resistance, so it is important to clean it with P200 sandpaper (fine-grained) or a personal file;
- traces of an electric arc on the contacts for the plug: carbon deposits, tubercles of molten metal. They interfere with the tight fit of the plug and thus do not allow high-quality surface contact of electrically conductive materials. The contacts are cleaned, but it is better to replace the socket;
- loosening of plug contacts. It happens when the plug is frequently plugged in/out or when the contacts overheat as a result of metal tempering. The element no longer presses tightly onto the plug and the quality of contact deteriorates (overheating, sparks). The contacts can be tightened for a while, but it is better to replace the socket.
An electric arc occurs when a switched-on appliance is connected to an outlet. To avoid its occurrence, connect the plug to the socket and remove it only after turning off the device with the button.
- We are looking for a breakdown
There is also a situation when the sockets in one room do not work. This means that the fault must be looked for in this outlet group.
We identify the machine that powers the group and check the wires; perhaps there is a broken section of the wiring. Failure to operate a machine of one socket group may also be a consequence of the load on the machine exceeding the limit. In this case, you will have to purchase another device that will cope with the applied load.
In addition, it is necessary to inspect all sockets in the room. In their working part, a breakdown may occur in the contact area. We also check the accessible parts of the wiring for breaks, damage to insulation and short circuits caused, for example, by flooding the wiring with water.
This problem occurs more often than others. And if only one socket malfunctions, the number of answers to the question “why the socket doesn’t work” increases. The most likely cause is improper installation of the outlet. Breakage can occur almost immediately after installation.
Also, the first socket in the block connected in parallel will destroy all the others. Therefore, you need to remove the external plastic panel, having previously de-energized the apartment, and check all the wires. If the wire falls out of the clamp, you need to tighten it more tightly, and clean and insulate the exposed parts with electrical tape.
Make sure that there is a general power supply: at least one electrical appliance must be working or the overhead light in one of the rooms must be on. The flow of current at the input circuit breaker is also checked. A negative result means the lights are switched off on an industrial scale.
Make sure the switches in the distribution box are working properly by measuring the voltage at the input and output terminals. The presence of sufficient readings on the first and a zero result on the second indicates a broken system. In this case, it is important to reboot the device and then check all outgoing switches.
Find the switch on the machine on which the power supply to the outlet group depends. The supply of voltage to the line indicates that the current does not reach the final point due to a wire break.
If only one socket stops working, it is recommended to check the contacts, as the wire often comes loose. To do this, turn off the general light, unscrew the plastic protection and check the attachment of all phases.
– We fix the problem
For most people, the answer to the question “what to do if the outlet does not work” will be one solution: contact the appropriate service, call a qualified electrician, or go to a familiar mechanic for help.
However, in reality, such actions are only necessary in cases of a problematic situation with the shield, a wiring break, after a short circuit from a burnt-out device, a fire or a flood. It is also advisable to contact a specialist if the need to replace the shield or non-working machines has been discovered.
More often, minor repairs can be done independently, armed with a small set of tools and a school physics course. Thus, the required set of tools includes screwdrivers, pliers, a knife, wires, and sandpaper.
Below are the most common causes of breakdowns and step-by-step instructions on how to fix the outlet in each case. To troubleshoot a junction box:
- De-energize the apartment by turning off all circuit breakers;
- Make sure there is no voltage;
- Open the box;
- Carefully inspect the twists, identify burnt or broken wires;
- Clean the burnt conductor with sandpaper, a knife, a file, twist it and wrap it with electrical tape;
- Twist the broken wire and insulate it;
- Reassemble the box, turn on the power, check the voltage at the outputs.
To replace or repair a single outlet:
- De-energize the house;
- Remove the plastic cover;
- Screw the wire that fell out of the clamp, if necessary, cleaning and insulating the exposed areas;
- If necessary, replace the old decorative panel with another one, disconnecting all the clips and terminals from the previous one and repeating similar steps with the new cover;
- Check the contacts, tighten the bolts;
- Check the voltage with an indicator.
Required materials and tools
Here's what you need to prepare:
- phase indicator;
- flat screwdriver;
- pliers;
- wire cutters;
- knife;
- fine-grained sandpaper, such as P200 or a personal file.
Materials you may need:
- electrical tape or heat shrink tubing;
- wire of the same cross-section as that connected to the outlet;
- spring terminals or sleeves for crimping - for extending the wire.
Restoring a socket that fell out of the wall
A malfunction of this kind is not the most pleasant reward for careless use of household appliances.
To get out of this situation, you can use the two most common options: short-term or long-term:
- The first method involves twisting the petals much more than usual. This will allow the product to remain in its place for some time and serve faithfully.
- A long-lasting method requires significantly more time, as well as the availability of tools and new devices.
The main reason for a socket falling out of the wall is precisely non-working petals. The solution in this case will be to modernize the seat.
Additional tools for socket repair
To return the socket to its place you will need:
- mounting box 68x45 mm;
- gypsum;
- construction knife;
- polymer primer;
- putty knife;
- tools that have already been written about.
Before starting work, you need to turn off the power to the room and warn other people who, with a high degree of probability, can turn on the power supply to the machine again. If this is not possible, be sure to post a sign: “Repairs are underway.”
Let's start restoration work
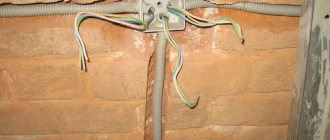
When dismantling the socket and the old wiring box, be sure to mark each wire with a marker. Remove all plugs and screws. This will ensure free access of wires into the box.
The bottom should also be removed from it, since the dimensions of the box often do not coincide with the parameters of the holes in the wall. A box without a bottom can be easily trimmed, but it cannot be deformed by compression.
The socket must be installed so that it sits firmly and motionlessly in the wall. To do this, the hole is primed. After that, gypsum is diluted in water and the hole is treated with this mixture, and the cracks are sealed with a spatula.
The mounting box is inserted there. After 15 minutes, when the plaster firmly grips it, you can begin the process of installing the inside of the new outlet and begin connecting the wiring. The final step will be installing the front panel.
Installation of a socket box
The installation box is mounted in several ways.
If you have an old metal socket box
In such products, the socket is secured only by means of spacer tabs, which is why it often becomes loose. A modern plastic mounting box with a standard outer diameter of 68 mm easily fits into an old metal socket box, and this should be taken advantage of.
Use one of the mounting methods:
- screw the new plastic socket box to the old metal one using three self-tapping screws;
- if it is not possible to use the first method, glue the new socket box to the old one with Liquid Nails glue. The composition hardens within 24 hours.
The front end of the new socket box should be in the plane of the wall surface. If it does not fit completely into the metal socket, cut off the bottom.
If the socket itself is loose, but the socket is held firmly in it
If the socket itself is loose, proceed as follows:
- carefully remove the socket box;
- sweep dust and crumbs of solution out of the hole;
- prepare an alabaster solution: it sets quickly, so you should not hesitate;
- prime the walls of the hole or at least spray them with water: this measure ensures good adhesion to the solution;
- coat the socket box with alabaster mixture;
- return the glass to the hole.
The solution will set in 1-1.5 hours, and the socket box will be firmly fixed.
If the socket box is missing or needs to be replaced
The part is removed, the hole is widened if necessary and a new socket is installed on the solution, as described above. In addition to alabaster mortar, gypsum and plaster are used. Before using the solution, wrap the exposed ends of the wires with electrical tape to prevent them from getting dirty.
Reasons why the socket stopped working
If the outlet stops working, the reasons can be very different. Moreover, this manifests itself more often in old private houses than in apartments.
Usually, when buying new electrical equipment, few people think about the possibilities of home electrical wiring. People remember her only when she makes herself known in all sorts of unpleasant situations. Let's say that in spring or autumn it is especially noticeable that the sockets are behaving unreliably. In this case, it is worth checking the wiring insulation.
Consider the main reasons why the outlet does not work:
- 1) All sockets in the apartment do not work
- 2) Half of the outlets in the apartment do not work
- 3) One socket does not work
- 4) Damage in the junction box
- 5) The lights are on, but the sockets do not work
- 6) There is a phase, but the socket does not work
- 7) Two phases in the socket
In another case, in the evenings, most often in winter, electrical appliances clearly do not have enough power. Then we can say with confidence that the voltage in the network is reduced. Let's look at several options when the outlet doesn't work and how you can fix the problem.
Possible consequences
For those who are delaying the repair of a sparking socket, we recommend that you read this section carefully and then begin immediate repairs.
Without eliminating the cause of the sparking, the home master puts himself and everyone who lives with him at risk. A problem plug can cause a fire in your home. Sometimes a weak spark is enough for a fire to engulf a home.
The plastic of high-quality products is not subject to combustion, but this does not mean that it will not melt and if you try to pull out the plug, you may be exposed to the harmful effects of electric current.
You should not blindly rely on the operation of circuit breakers, especially if they were installed 5-10 years ago and were not checked after that. Connecting a high-power device or extension cord with equipment connected to it may cause the wiring to catch fire due to overload, and the AV may become faulty. In practice, such cases are not uncommon; it is especially surprising when a plug is inserted into a sparking connector, since it is located very conveniently.
To repair an outlet or replace it, it will take no more than 10-20 minutes, a maximum of twice as long if you lack the skills. But with a reliable electrical contact, the danger will no longer threaten your home.
Breakdown of the junction box
Often the problem lies in the junction boxes, because it is there that a short circuit can begin and the connecting wires can break.
When the outlet stops working because of the box, do this:
- De-energize the apartment by turning off the machines;
- Open the device;
- Check the presence of current in the network with an indicator screwdriver;
- Inspect the reliability of the connection of the contacts (disconnect the twists and twist them again, if necessary, strip and insulate the wires).
Clean charred and oxidized wires with files and insulate them. Connect the device in reverse order.
Possible problem options
If it is determined that one outlet is not working, then you will need to check all those in the room. If they are connected in series, and not from separate lines, and only one does not work, then this is the simplest reason - the contact has loosened, the wire has broken off. If the wire is of poor quality, then when loaded in a weak spot it will burn out due to sparking under the insulation. This reason is detected with a multimeter.
When, when connecting a powerful electrical appliance, the circuit breaker in the panel knocks out, it is possible that it does not have enough amperes. Each machine indicates the maximum current strength at which its shutdown mechanism is triggered. If a powerful electrical appliance (microwave oven, boiler, stove) is supposed to be used for this outlet, then a circuit breaker of the appropriate power should be installed on this line. The reserve is also not recommended, since during intensive operation of the electrical appliance the machine will not turn off, but the wiring will heat up. As a result, the insulation melts and the contacts burn. In the best case, the entire riser in the house will be de-energized; in the worst case, there will be a fire.
Sockets don't work, but there is light
A common reason why there is light, but the sockets in the apartment stop working is an unacceptable load on the point. A powerful electrical appliance will work until it is turned off, but the next time it is plugged into this outlet, it will not turn on. This means that the contacts inside the socket have oxidized. This happens for the following reason: when heated, all materials expand, and when cooled, they contract, as a result of which the bolt fastening weakens. When the wires are heated, there is contact and the device works. When there is a break in operation, the wires cool down and the contact disappears. The next time you turn on the device does not work - the problem is in the socket. Now that the lights are on and the sockets are not working, then what should you do?
You can remove the socket cover, tighten the contact, and the problem will be solved. But not for long if the same device is used in the future. In this case you need:
- replace the socket with suitable current parameters;
- replace wires with a large core cross-section;
- install a circuit breaker on the line equal in current strength to the connected electrical appliance.
The outlet may not be receiving power from the distribution box. They usually twist wires with soldering or welding. There are models of distribution boxes with contact groups, and in them the same problem occurs as in a socket - loosening of bolted connections.
Another reason is the poor quality of the product. Cheap sockets work for a year, at best two, if they include lamps, an iron or a weak consumer. Poor quality means brittle plastic housing, poorly designed wire clamps, and soft metal plug contacts. In such sockets, after five to eight turns on, the plug will dangle and the contacts will spark. After a few sparks, the outlet stops working.
The sockets do not work, but there is a phase
After checking the retro socket in the new apartment with a multimeter, it was discovered that there was a phase, but the connected electrical appliance did not work. This indicates the absence of “zero”. You need to remove the housing cover and check the connection. It is possible that you only need to tighten the bolts, and if the wire is burnt out, then the cause should be identified. You can strip the end and reconnect it, but this method only solves the problem temporarily if the cause was a power surge.
If the contacts in the socket are normal: tightly tightened, not burnt, the insulation is not melted, check the junction box from which the line to the socket extends. We eliminate the obvious cause, but when everything is in order in the box, but there is no voltage in the socket, then we check the circuit breaker in the panel. If it is turned on, then we test the line with a multimeter.
When a multimeter detects two phases on both contacts of the socket, the electrical appliance plugged into it will also not work. In this case, no short circuit occurs, just one phase “walks” in the circuit. The reason here is banal - the socket was connected by an amateur. In this case, you need to find the neutral wire and connect it correctly. It is possible that in a three-core cable different wires were connected to the “zero”. The phase is connected correctly, but the other two wires are connected incorrectly.
Only one socket is not working
If a group of sockets operates from one line, then if the wiring at the input is faulty, all sockets will not work. But if in this case only one does not work, then the reason lies only in this outlet. It needs to be disassembled, the contacts connected or repaired.
When each outlet in a room is connected to a separate line, and one of them does not work, then the reason must be looked for either in the outlet or on the line. If everything is fine with the outlet, check the junction box. When the distribution box is also in order, we check the circuit breaker in the panel.
When identifying a problem in the wiring using a multimeter, you should determine whether the brand of wire corresponds to the current consumed at a given point. The issue is resolved either by the fact that powerful electrical appliances will not be connected to this outlet, or by replacing the wiring.
All sockets in the room do not work
If all sockets are connected in parallel, then if the line breaks, they will all not work. The matter is more complicated when it is not clear why the lights are on, but the sockets in the apartment do not work, and each has its own separate line. Here you need to check first of all the central distribution box, from which the individual lines depart. They can go to other boxes, from which branches extend to a group of sockets. If not one group, but all sockets do not work, then it is logical that the problem is in the central distribution box. This is provided that everything is in order in the input panel. A new, more reliable junction box may be needed.
Low quality
As I wrote earlier in my article “What You Shouldn’t Save on When Repairing,” electricians do not tolerate purchasing low-quality products. If you are not yet familiar with this material, you can read it at this link.
You can try to save your money on laminate, paint or drywall, but never on electrical fittings or wiring. Such savings will not only lead to possible breakdowns of other household appliances, but will also create a fire hazard in the home. A high-quality product will easily withstand the load indicated on it. Cheap options from unknown manufacturers can even be burned by a vacuum cleaner. It is best to purchase goods from trusted suppliers. I would recommend checking out the range and prices on Yandex Market.